
A key component of traditional pitched roofs, the rafter system is responsible for evenly distributing the weight of the roof structure and supporting it. In essence, it creates the structure that supports the roof covering, be it metal sheets, shingles, or tiles.
The ridge, the highest point of the roof, and the eaves, the edges that overhang the walls, are the two main components of the rafter system, which are sloped beams. Pitched roofs are characterized by the triangular shape formed by the arrangement of these rafters, which are usually placed in pairs.
Transferring the weight of the roof to the building’s walls is one of the rafter system’s primary purposes. This weight distribution aids in maintaining the stability and integrity of the structure, particularly in inclement weather like persistent rain or snow.
The adaptability of the rafter system’s design is another crucial feature. Roof pitches can vary greatly depending on the architectural style and climate of the area. Shallower pitches might be preferred in milder climates, but steeper pitches are common in areas with heavy snowfall because they facilitate snow shedding.
Construction of the rafter system
Therefore, it is important to consider the roof in addition to the foundation if you want the structure to be sturdy, dependable, and serve for a long time. Since the roof is exposed to the adverse effects of changing weather patterns and other circumstances, the construction system of such an element is crucial.
A pitched roof’s rafter system needs to meet specific specifications, such as:
- Rigidity
- Little weight
- High quality material
To ensure that the structure lasts for a long time, such requirements must be taken into consideration.
A pitched roof’s rafters are 20 to 30 centimeters wide. An online calculator can be used to determine the rafters.
Because different parts are connected with the aid of rigid elements, the element’s rigid characteristics are crucial. Under no circumstances should such elements be subjected to discord or deformation processes.
This design is based on a triangle that is constructed with a unique, sturdy frame. This frame’s elements are all fixed to one another in parallel, ensuring the stability of the entire structure with the aid of strong fixation.

Diagram of a pitched roof’s raft system
However, if these frames are movable and poorly attached, this will only have bad effects. Such a roof is susceptible to collapsing both spontaneously and due to strong winds.
When it comes to weight, this roof shouldn’t be too heavy. That’s why wood is used to construct this system most of the time. If the weight is sufficiently great, a metal supporting base must be made.
Use coniferous trees in situations where their humidity content is at least 18%. The following are requirements that must be met when using trees:
- Antiseptic treatment
- Use of flame retardants
The nodes in the region where the entire system is precisely fastened will only stand out for their high strength and dependability in this scenario.
One of the key guidelines is to use materials of the highest caliber. The tree needs to have the following qualities:
- 1-3 different varieties are used. It is important to pay attention that there are fewer cracks and knots. Per meter of material, 3 knots with a height of no more than 3 centimeters are allowed. Cracks are also allowed in a minimum quantity, but not throughout the entire depth.
- It is advisable to make supporting elements from parts whose thickness is at least 5 cm., and area from 40 m2.
- Boards made from coniferous trees can only be used with a length of no more than 6.5 meters, and from deciduous trees – up to 4.5 m.
- It is advisable to make pillows, purlins, and also the Mauerlat from trees that belong to hard deciduous species. Such material should be pre-treated with one or another high-quality antiseptic.
Shed roof design
Therefore, it is crucial to understand the system’s primary components before beginning to manufacture it:
- Mauerlat, what can be called the foundation of the system. Using this part the load is distributed evenly and correctly.
- Run represents an element that confidently fastens all the legs of the rafters. The ridge version is at the top, but the side elements are located on the sides.
- The rafter leg is installed to determine the angle of inclination of the slope, and also for the reliability of the entire roof, its appearance. It is this product that fixes individual parts of the system.
- Tightening helps keep feet in place, don"t move apart. This part connects them at the bottom.
- Racks, and also the struts give additional foot stability.
- Lathing represents boards, as well as trimmed beams. It is stuffed perpendicularly, transfers the load to the rafter legs.
- The overhang of the entire roof protects against precipitation.
- Horse is the place where two roof slopes meet. It is along this element that the lathing is packed, due to which it occurs strengthening one or another part of the roof.
- fillies are used when the length of the legs is short, as a result of which they create an overhang.
The single slope, which has an angle between 14 and 26 degrees, is what defines a pitched roof. It is advised to create a layered system when the roof is intended for a small house because the span will not be greater than 5 cm.
This kind of roof is supported by both internal and external walls within the structure. When it comes to truss trusses, rafter systems are employed.
Roofing pie, or more accurately, the design of it, is dependent upon the choice of final coating. However, this component maximizes the roof’s durability and "life" regardless of the material.
Since this stage of construction has the biggest impact on the climate that the structure will be exposed to, the lean-to type requires extra care.

Design of Rafter Systems
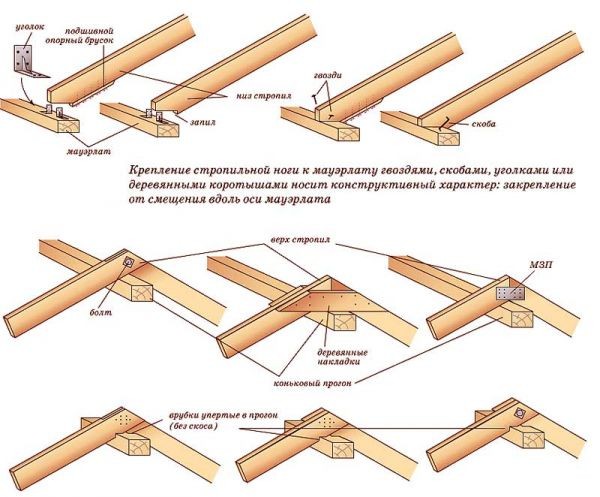
Fastening the rafters of a pitched roof
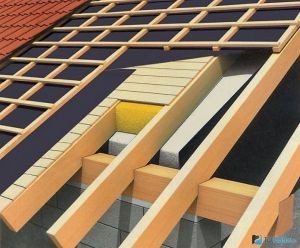
The fastening system, which consists of parallel boards resting on two walls, is fairly straightforward. Use specific wood transition pieces to install the legs.
These can be used as transition pieces, depending on the material used:
- Mauerlat. In the above single pitch roof system, there are two wooden beams that lie separately and complete the walls.
- Upper foot, which is made of beams.
- Upper harness the entire frame.
Despite the straightforward design of this roof, there are a few subtleties to the way the rafters are fastened that should be understood.
It is a fact that the nodes that are employed have to consider every drawback of a material like wood.
The following duties need to be considered when designing:
- The ability to easily move wooden parts from one another
- Adaptation to the consequences that may occur after the subsidence of each wall in order to take a stable position
- Elimination of all possible causes of failure of one or another connection
The triangles are secured using the subsequent plan: the horizontal side is fixedly installed on the Mauerlat. Its large enough surface area for docking with other elements is crucial.
Installing the rafter legs at a specific angle to the supporting components is crucial. It’s important to realize that two points are insufficient for a secure fastening, so other techniques are employed to prevent unfavorable outcomes.
First and foremost, it’s critical to expand the rafters’ overall interaction area and the supporting portion by utilizing:
- Select cuts
- File the top and bottom edges of the legs. With the help of such actions you can easily create a support platform and increase stability.
Rafter pitch
The calculation of the spacing between rafters in a pitched roof is contingent upon the material selection and section. Building codes and regulations should be followed when performing these computations during the design phase.
The above roof option has a very straightforward calculation. Only the rafters of a pitched roof are considered because there are no racks or braces present.
Typically, coniferous wood with a moisture factor of 20–22 percent is utilized for roofing of this kind. These kinds of boards ought to be even and devoid of blueness.
Since every roofing material has unique qualities, there are differences in the rafter pitch as well:
- When usingcorrugated boardthe distance depends on the size of the sheet. Usually, the pitch of the beams is not less than 60 cm and up to 90 cm. With a greater distance, additional boards with a larger section are used – 150 mm. It is important to take into account the use of lathing, the cross-section of which should be 30*100 mm, and installation is carried out taking into account a span of at least 50 cm.
- Ceramic tilesoften used, but its weight is taken into account. Beams for such a system are pre-dried. When determining the step size, the length of the boards should be taken into account. With a maximum length, it is worth making a minimum distance between the rafters. The same rule is used with a minimum length of beams – a large step distance. Typically, 80 cm is considered a safe step.
- Undermetal tiles, which are used much more often than the two above materials, beams with a small cross-section are used. The step in this case is equal to a number from 60 to 90 centimeters. Timber should be used with a cross section of about 50*150 mm.
- Usingondulinait is worth understanding that thissoft roofingin the form of sheets. Beams should be placed with a distance that will not be less than 60 centimeters, but not more than 90 centimeters. The section of the timber is 50*200, and 50*150 mm can also be used. When using a smaller section, negative aspects can be expected, since such a section will not be able to provide high strength to the legs.
- Under slate, which is used very rarely, rafter legs with a cross section of 50*100.50*150 are used. Step – no less than 60 centimeters, and no more than 80. In this case, the pitch differs depending on the roof structure.
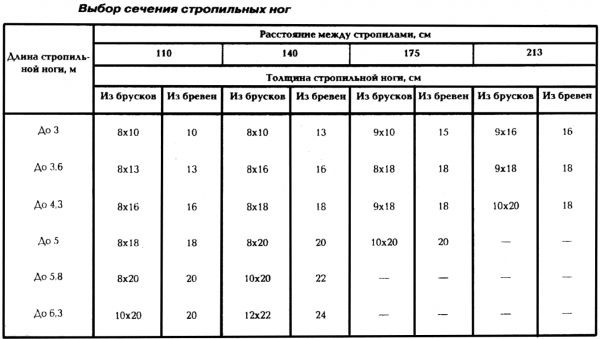
Pitch table for rafters
We’ll look at the basic framework supporting pitched roofs in an article titled "How the rafter system of a pitched roof works." The rafter system, which consists of slanted beams that run from the ridge (top) to the eaves (edges), creates the framework of the roof. These rafters support the weight of the roof and distribute it to the building’s load-bearing walls. They maintain stability and evenly distribute weight in concert with other components such as collar ties and ridge boards. Anyone building or renovating a roof must understand this system because it guarantees the roof’s long-term stability and safety.
Installation of the rafter system

If you choose to install the rafters on a pitched roof yourself, you should take extra care and preparation for each component.
The boards need to be positioned in the grooves and laid out on both sides of a specific roof.
It is advised to carefully assess the tilt space and stretch multiple strings between the beams.
It’s crucial to attach multiple extreme rafters only after this.
Kindly remember that it’s crucial to drive one or two nails into every joint. The legs are nailed in the same manner after being installed with consideration for the stretched strings beforehand. The roof is then installed and the sheathing is put in place.
Following design and calculation, there are a few installation stages:
- Installation of the supporting beam. A large beam is laid along the wall of the object. It should be pre-planed, impregnated with an antiseptic. It is important to lay roofing felt along the end of the wall, mount the beam on it at the level using anchor bolts.
- Processing of the beam, rafter elements. It is planned to extend the board over the roof overhang – the level is about 40 cm on each side, depending on the angle of inclination. It is important to take into account that the steeper the angle, the smaller the extension should be. When using metal tiles, as well as corrugated board, the step is 120 centimeters. In the case when the width of the roofing material is more than 6 meters, it is recommended to reduce the step to 1 meter. The board is cut into the wall plate for strength.
As you can see, it’s not a difficult process at all, and you can install this object on your own by following all the guidelines.

Pitch roof installation

An alternate installation technique
A pitched roof’s rafter system is essential to both its construction and operation. It is made up of a system of beams known as rafters that slope from the top of the roof’s ridge to the eaves at its edges. These rafters serve as the support structure for the roof covering, such as shingles or tiles.
In order to evenly distribute the weight of the roof covering to the building’s walls, each rafter is essential. This distribution ensures stability and longevity by preventing undue strain on any one component of the structure. The pitch, or angle at which the rafters are oriented, influences the roof’s capacity to efficiently shed snow and water in addition to its visual appeal.
The rafter system also consists of other parts, such as ridge boards and collar ties. Horizontal beams known as collar ties join opposing rafters, adding extra support and preventing the rafters from separating under the weight of the roof. Ridge boards connect the upper ends of the rafters and give them a strong point of attachment as they run the length of the roof’s peak.
Anyone working on building or remodeling projects needs to understand how the rafter system operates. It guarantees that roofs are constructed with structural integrity over time, allowing them to endure the elements. Builders can design and install roofs that reliably protect against weather conditions while also improving the building’s aesthetic appeal by adhering to best practices in both design and installation.


