
Although installing a window sill on plastic windows may seem difficult, it can be a simple and enjoyable do-it-yourself project if you have the right instructions and supplies. Whether you’re looking to install a new sill from scratch or replace an old, damaged one, doing it yourself can save you money and provide you with the satisfaction of finishing a home improvement project.
It’s crucial to gather all required tools and materials before you start. A spirit level, saw, silicone sealant, tape measure, screws, and of course your new window sill are all you’ll need. To ensure that the new sill fits your window precisely, take precise measurements.
We’ll take you step-by-step through the entire process in this guide, from clearing the space and measuring the window sill to installing it and securing it in place. You can improve the look and functionality of your windows by achieving a professional-looking outcome with perseverance and attention to detail.
| Step | Description |
| 1. Measure the space | Measure the length and depth of the window opening to get the right size for your window sill. |
| 2. Cut the window sill | Use a saw to cut the window sill to the correct dimensions. |
| 3. Dry fit the sill | Place the sill in the window opening to ensure it fits properly. |
| 4. Apply adhesive | Apply a suitable adhesive on the surface where the sill will be placed. |
| 5. Position the sill | Carefully place the sill into the window opening, pressing it down firmly. |
| 6. Secure the sill | Use clamps or heavy objects to hold the sill in place while the adhesive dries. |
| 7. Seal the edges | Apply sealant around the edges to prevent any drafts or moisture from getting in. |
| 8. Clean up | Remove any excess adhesive or sealant and clean the window sill. |
- Consumables and tools
- Instructions: how to install yourself?
- How to install without errors?
- Pros and cons of installation
- Useful video
- Video on the topic
- Installing PVC window sill with your own hands on mounting foam.
- Installation of the windowsill! Repair in details!
- Installation of a window sill instead of casting.
- How to install a windowsill with your own hands (master class)
Consumables and tools
For contemporary PVC windows, installing a window sill is a reasonably easy task that can be completed by any home craftsman. The product itself, which is composed of plastic, wood, chipboard, or another material, and a few basic tools are required for it to function.
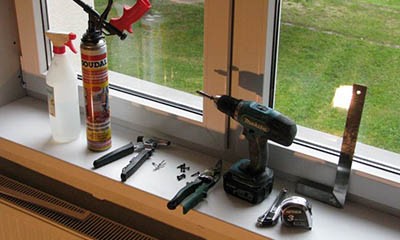
- Marking and taking measurements before cutting:
- tape measure with a metal sheet of 2 m or more in length;
- a ruler used to mark small distances for selecting angles;
- construction corner for maintaining orthogonality of cutting;
- pencil with soft lead for marking.
- Cutting window sill boards before installation:
- plastic window sills can be easily cut with a hacksaw;
- for wooden, chipboard or MDF products you will need a jigsaw or circular saw. If the volume is large, you should purchase or rent a cross-cutting machine with a rotating bed and a built-in protractor;
- stone products are cut using a circular saw with a special diamond blade. Cutting will be more efficient when using a machine with water supply to reduce friction and eliminate heating of the material;
- A special glass cutter is used to cut glass products;
- file or sanding discs for an electric drill to bring ragged edges after cutting to a smooth surface.
- Installation of window sill boards:
- pressure mounting gun for applying sealant or foam;
- building level with glass bubble flask;
- rubber spatulas for arranging and smoothing the sealant;
- hammer with an elastic striker made of polymer materials;
- clamps for fixing the product in the designed position until the adhesive composition polymerizes;
- a screwdriver or a set of screwdrivers for mechanical fastening of wooden boards.
In addition to the instrument, the technician needs to have the following materials on hand:
- Polyurethane foam in a cylinder.
- Silicone transparent, white or colored sealant, depending on the shade of the product.
- When fastening wooden workpieces, self-tapping screws are occasionally used.
- Stone window sills can be installed on a bed of cement-sand mortar, for which dry building mixture or tile adhesive is purchased.
Vital. The window sill fastening tool needs to be in good operating order, properly sharpened, free of external flaws, and free of any kind of residual dirt.
Instructions: how to install yourself?
Installing window sills successfully requires meticulous adherence to the technological map and completion of the four primary stages of work listed below:
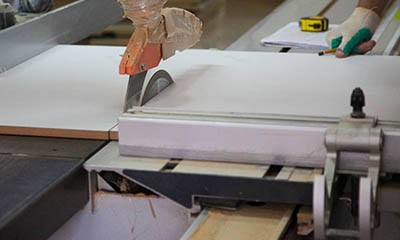
- Marking the window sill board before installation:
- the master takes measurements from the bottom of the window opening – the width, as well as the residual thickness of the wall section;
- the dimensions are transferred to the product, pencil marks are placed at characteristic points;
- using a ruler, markings are applied in the form of smooth, solid lines;
- if it is necessary to select corners, the places for future cutting are marked using a square.
- Cutting the window sill board:
- immediately after marking is applied, the element is installed in a fixed position so that the cutting area is freely accessible;
- depending on the material, the board is cut using different tools, strictly along the marking line;
- after cutting, the edges are carefully finished and trimmed using files and other abrasives;
- the workpiece is tried on the seat and, if necessary, modified until a normal connection with the elements of the window opening is achieved.
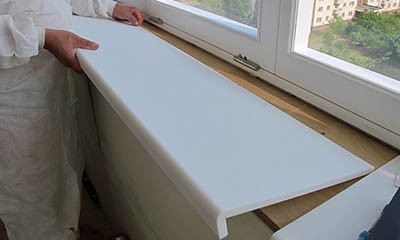
- Installation window sill:
- the finished element is cleaned of dust and degreased;
- the landing plane is prepared in the same way;
- depending on the type of material, different adhesive materials are applied to the mounting surface in an even layer;
- the window sill board is installed in the design position and fixed using the clamping method;
- compliance with the horizontal plane, as well as constant overhang, is checked with a building level and square;
- if any corner or edge is skewed, it is necessary to tap the plane with a rubber hammer.
- Refinement of the element after installation:
- immediately after fixing, the window sill must be spread using wooden blocks installed at the height of the window, or clamps. Otherwise, the polyurethane foam will squeeze out the element or deform it;
- after hardening and polymerization of the adhesive compositions, the clamp is removed;
- the master checks the horizontal plane again with a building level;
- the remains of the polyurethane foam are cut off with a retractable construction knife;
- at the final stage, all installation gaps and joints are sealed to avoid air blowing from the street and to achieve an aesthetic appearance.
Note: The window sill can be used for years without causing issues for the property owner if the technological map is carefully followed.
It’s easy to improve the appearance and usability of your plastic windows by installing a window sill on your own. This tutorial will lead you through every step of the procedure, from selecting the appropriate materials to installing and fastening the sill. You can save money and give your home improvement project a personalized touch by using a few basic DIY skills and a few tools to achieve a professional-looking result.
How to install without errors?
A do-it-yourself window sill board installation could result in a number of mistakes that could cause interference and issues with the product’s operation:
- The main error is inaccurate marking. Before cutting, we must check the correctness of each line several times. If the windowsill is cut and, in the end, its dimensions are much smaller than the landing plane, it is not possible to fix this situation.
- The saw should be carried out only by sharpened tool. Old cutting canvases often leave torn edges and chips, which are difficult to refine.
- When installing PVC products, you do not need to apply too thick a layer of foam. Self -expanding material fills all cavities and irregularities within a few minutes after squeezing. Exceeding the number of foam will lead to deformation of the window sill.
- Before fixing the window sill after gluing, you need to make sure of the correct position of the product. Before the composition is polymerized, the geometry of the board can be fixed with simple movements. After hardening it is no longer possible to do this.
- Before applying glue, you need to take care of cleaning and degreasing the joined planes. If the adhesion composition is squeezed out onto a dusty plane, the clutch deteriorates many times.
Vital. In addition, you should wear respirators, gloves, and goggles while working to ensure safety.
It is required to fix the element so that, under any pressure, it remains stationary during the cutting process.
Pros and cons of installation
There are several benefits to DIY window sill installation, but here are a few in particular:
- Saving money in the work of work.
- Acquisition of a new skill for a home master.
- Lack of doubts about the incompetence of the invited brigade.
- Implementation of all individual ideas and ideas.
- Double reinsurance without the need to check before accepting work.
But there are certain drawbacks to this kind of installation as well:
- The need for independent search and purchase of materials, tools.
- The possibility of making errors, which will lead to uncomfortable operation of the product.
- Lack of warranty on work performed.
Therefore, you should only begin using your hands when the home master has a certain level of expertise in building and installing things, along with a specific set of tools, and he is assured of the high quality of his work.
Useful video
How to do a manual windowsill installation:
It may seem impossible to install a window sill on plastic windows by yourself, but it is absolutely possible if you have the right equipment and a little perseverance. You now know how to measure accurately, cut the sill to size, and install it firmly. In this project, accuracy in measurements and a steady hand are your best allies.
Don’t hurry things along. By taking your time, you can make sure that everything fits and looks fantastic. Do not hesitate to double-check your work or seek assistance from additional resources if you encounter any problems. Reevaluating and taking a step back can sometimes make a huge difference.
In addition to saving money, doing it yourself gives you a sense of accomplishment and valuable skills. You also receive the satisfaction of knowing that you made a tiny improvement to your house. Have fun constructing!


