
Pouring a slab onto a strip foundation is an essential step in constructing a strong structure. This procedure helps to ensure the longevity of your building and gives your floors a strong foundation. Proper pouring and setting of your slab can have a significant impact on the result, whether you’re building a new house or renovating an existing one.
The strip foundation, which serves as the slab’s supporting structure, must first be ready. Making sure the foundation is level and well-compacted is part of this. You will mix and pour the slab concrete once your foundation is ready. It’s critical to adhere to the correct protocols in order to prevent frequent errors that could weaken the slab.
There are various ways you can arrange the flooring once the slab has been poured. Various materials, such as hardwood floors, carpets, or tiles, can be chosen based on your preferences and the intended use of the space. Every option has advantages and installation requirements of its own, so it’s important to think about how each will affect the overall layout and use of your room.
To assist you in making decisions, we’ll go over how to pour your slab and go over the different flooring options in this guide. These pointers will help you achieve a well-finished, long-lasting floor that matches your building or remodeling project.
| Step | Description |
| 1. Prepare the site | Clear the area of debris and level the ground. Ensure the strip foundation is clean and dry. |
| 2. Install formwork | Set up wooden or metal forms around the perimeter of the foundation to hold the concrete in place. |
| 3. Lay a vapor barrier | Place a plastic sheet or other vapor barrier material over the ground inside the formwork to prevent moisture from rising. |
| 4. Add reinforcement | Lay steel rebar or mesh within the formwork to strengthen the concrete slab. |
| 5. Mix and pour concrete | Mix concrete according to the manufacturer’s instructions and pour it into the formwork, spreading it evenly. |
| 6. Level the concrete | Use a screed to level the concrete surface, ensuring it is smooth and even. |
| 7. Cure the concrete | Allow the concrete to cure for at least a week, keeping it moist to prevent cracking. |
| Floor arrangement options | Description |
| Concrete floor | Simple and durable, often used in basements and garages. |
| Wooden floor | Offers a warmer feel, can be installed over a concrete slab with a moisture barrier. |
| Tile floor | Ideal for wet areas like bathrooms and kitchens, can be laid directly on the concrete slab. |
| Laminate floor | Easy to install and maintain, requires an underlayment for moisture protection and sound insulation. |
- Advantages and disadvantages
- Monolithic slab
- General construction scheme
- With ground floor
- Without base
- Backfill under the slab
- Formwork
- Reinforcement
- Do I need to insulate the floor??
- Pouring a slab onto a strip foundation
- Flooring options
- Useful video
- Video on the topic
- Pouring a zero-cycle floor slab resting on the foundation walls.
- Floor slab / floors on the ground on a pile-grillage foundation TISE
Advantages and disadvantages
A class of foundations known for their high performance qualities and simplicity of construction are collectively referred to as strip foundations.
Advantages of tape
- Strong support for load-bearing walls.
- Cost-effective, no unnecessary consumption of materials.
- Many design options allowing you to choose the optimal type for the existing conditions.
- There is no need to involve specialists for construction; the work can be done independently.
- A reliable foundation does not interfere with arranging a basement.
- Possibility to build on different soils, including weak-bearing ones.
Strip bases also have the benefit of being simple and utilizing intuitive construction technology, which improves and expedites work.
Monolithic slab
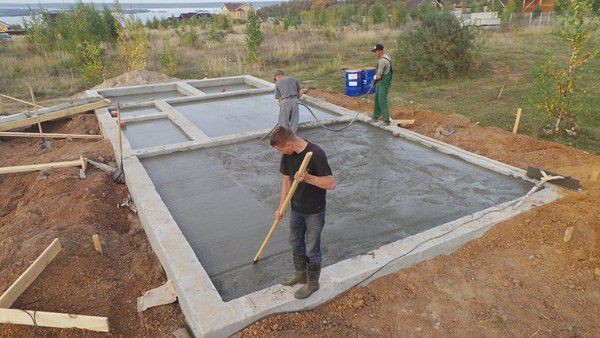
Slab and strip foundations are combined in this foundation design option. Simplified visually, it can be thought of as the lid of a flat box turned upside down.
A monolithic slab is poured on top of a tape that has first been constructed so that the edges of the slab rest on the tape. As it happens, the house is supported by a strip foundation in addition to a slab foundation.
By combining the benefits of two different foundation types, you can reduce the load on the belt due to the building’s weight being redistributed and potentially strengthen the areas where it is most likely to be loaded.
The large support area of the slab results in low specific pressure on the ground, which is an advantage. When soil movements occur, the base moves with the house without collapsing or endangering the structure.
The likelihood of the platform moving off the sand bed due to lateral movement is decreased by the installation of tape beneath the slab. The load on the slab is also lessened by additional reinforcement that surrounds the perimeter of the load-bearing walls.
Combining these two results in a reduction of the slab’s thickness and the tape’s cross-sectional area, which reinforce one another and provide a noticeable building material savings.
The requirements for a detailed investigation of the site’s hydrogeological conditions, a fairly involved engineering computation of the project, and a substantial labor investment—particularly for earthworks—are among the drawbacks.

General construction scheme
When it comes to applying a slab base on a tape, there are two choices:
With ground floor
In this instance, the strip base bears the majority of the load. It is put in all the way around, and the slab actually acts as the first floor’s (zero level) ceiling.
Building plan:
- A pit is dug to a certain depth on the prepared site .
- A backfill layer is created from ASG.
- The formwork is installed according to the shape of the tape, an armored belt is made.
- The tape is being poured.
- Film aging according to all technology standards – 28 days.
- Installation of a solid deck resting on the edges of the tape. For reliability and immobility, it is supported from below with bars. In fact, this is the bottom layer of formwork under the slab, so it is necessary to build taking into account the weight of the material. Wells are made in the deck in places of future passages for people or communications.
- Installation of reinforcement cage.
- Pouring concrete, holding until completely hardened.
Due to its complexity, this option calls for the involvement of knowledgeable experts. Sometimes installing prefabricated floor slabs speeds up and simplifies the process.
The length of a freely hanging slab without additional supports should not exceed 6 meters due to technological requirements.
Without base
This option entails pouring the slab directly onto a layer of sand that fills the entire interior space of the belt. Since building a deck is not necessary, less work is involved.
Following building, shallow tapes are made:
- Sand backfilling of the interior, compaction.
- Laying a double layer of waterproofing.
- Installation of reinforcement cage. Since the slab will be supported over the entire area, a structural type of reinforcement is used.
- Pouring a slab, compacting concrete with an electric vibrator. For a private house with a small area, you can get by with a manual tamper, which can expel air bubbles from the concrete.
- Aging until completely hardened (28 days).
Both design options have benefits and drawbacks, but the first and second types are distinguished by their complexity and abundance of subtleties.
One of the most important steps in laying a solid foundation for your building is pouring a slab onto a strip foundation. This procedure creates a level and sturdy surface for floors by pouring a concrete slab over a strip foundation. To improve the longevity and comfort of your space, you can also think about other floor plan options, like insulating or putting in a vapor barrier. Comprehending these components contributes to the achievement of a durable and prosperous construction endeavor.
Backfill under the slab
Homogeneous material is used for backfilling; river sand works best. It is imperative to avoid the inclusion of clay particles that hold water in it. Various sources provide different options for backfilling: either backfilling is done layer-by-layer with small crushed stone and sand, or backfilling is done entirely with sand.
Because the small stones’ sharp edges compact the sand layer more effectively, the presence of crushed stone enables the bottom layer to be compacted more densely. Again, a five-centimeter layer of leveling sand is applied to the crushed stone.
There’s no agreement on this issue. In both homogeneous and multilayer backfill options, pillow subsidence has been observed in practice. This phenomenon is explained by a higher load on the internal load-bearing walls than on the external ones.
Formwork
Slab formwork is a wooden panel box that is positioned 10–15 cm above the concrete. There should be no gaps larger than 3 mm in the formwork assembly, which is done as tightly and firmly as possible. Support bars and angled stops are fixed on the exterior to keep the panels from squeezing out under the weight of the liquid concrete mass.
Build a deck before constructing the formwork for a slab with a plinth. This is accomplished by installing a system of crossbars, support beams, and other components that together provide a sturdy supporting framework that keeps the deck stationary. The plane is then put together, being as gap-free and dense as feasible.
To keep concrete from leaking out of the structure and to seal the deck, a layer of film is applied.

Reinforcement
Many different materials are used to reinforce the slab. Working rods with a thickness of 12–14 mm are positioned no more than 20 cm apart. It is necessary to have two layers (grids) of working rods, spaced no more than 10–15 cm apart, and 5 cm from the bottom plane.
The bottom layer of rods is positioned on stands that are the proper height in order to regulate the gap.
Together, they form a common reinforcement frame, with the edges of the working stubble rigidly attached to the ends of the armpos sticking out of the tape.

Do I need to insulate the floor??
Eliminating condensation and concrete wetting is made possible by the very helpful process of floor insulation. However, insulating the slab is a costly procedure because it calls for a layer of waterproof insulation, such as extruded polystyrene foam, to be applied to the entire area beneath it.
Swedish builders recommend a thickness of 20 cm for insulation. According to some sources, a layer as thin as 10 or 15 cm is adequate, but this relies on the local climate. It is preferable to lay it in 5 cm layers with offset joints and mastic applied.
Ordinary polystyrene foam is not allowed to be used because it is not strong enough to support loads and settles quickly, losing its ability to function and weakening the slab.

Pouring a slab onto a strip foundation
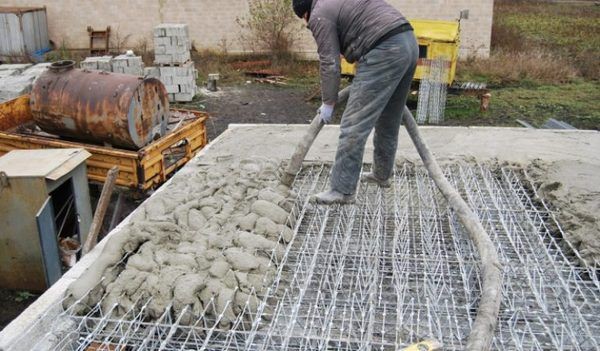
The slab is covered in an even layer of concrete. In order to accomplish this, you must install a moveable concrete supply tray that can be fastened to a concrete mixer and distribute the material evenly throughout the area.
It is imperative to guarantee that equipment can approach from multiple directions in order to facilitate a more convenient supply of concrete and distribute it in the most uniform layer possible. You should pour according to the level of the uppermost layer of reinforcing bars.
Five cm more should be the concrete level. Installing a system of drains 120–30 cm above the concrete level is advised for ease of pouring and auxiliary tasks (leveling the surface, eliminating air bubbles).
You are able to work, walk, and carry out other activities on them without damaging the fill layer.
Once the pouring process is finished, a polyethylene sheet is placed over the entire slab to provide sun protection. The concrete is periodically irrigated during the first few days to counteract the stresses caused by variations in humidity that may cause cracks in the material.
It takes 28 days for the material to fully solidify; attempting to accelerate this process is not advised.
Flooring options
When it comes to laying a floor on a monolithic slab, there are numerous options. The primary responsibility is to insulate the slab and maintain a superior microclimate within the house.
According to the majority of experts, the floor pie’s ideal composition should include the following layers:
- Sand layer.
- “Skinny” screed 5 cm.
- Insulation layer (penoplex 5 cm).
- Concrete screed giving strength (5-7 cm).
- Leveling screed (2-3 cm, ready-made compounds).
- Final (finish) coating.
Simultaneously, less complicated techniques can be applied if the slab has enough insulation from below. Consider a "floating" floor made of sheet materials (such as MDF, plywood, or chipboard) put on top of a layer of sand backfill (you can also use fine expanded clay, which offers extra insulation). P.).
After the backfill layer has been meticulously leveled to a horizontal surface, a subfloor composed of sheet materials is deposited on top, and finally the finishing coating is applied.
Other floor layout options exist, but they all entail varying the ways in which backfill, insulation, and leveling screed are laid out. They are about equal in terms of performance qualities, with no discernible fundamental differences or advantages.

Useful video
You will discover the correct way to pour a slab onto a strip foundation in this video:
In order to guarantee a strong and long-lasting base for your building project, pouring a slab onto a strip foundation is an essential step. A solid foundation that efficiently supports the remainder of your building can be created by adhering to the proper protocols and utilizing high-quality materials. To achieve the best results, allow enough time for curing after pouring and pay close attention to details to avoid common pitfalls.
Depending on your requirements and financial constraints, you can arrange your floor in a number of ways. Every option, including adding insulation for energy efficiency, going for a more complex setup with underfloor heating, or sticking with a traditional concrete floor, has advantages. While choosing the ideal solution for your project, take into account elements like comfort, durability, and thermal performance.
In conclusion, appropriate slab pouring and appropriate floor planning will greatly enhance the stability and usability of your structure. You can create a solid foundation and a cozy, functional living area with careful planning and execution. Recall that investing the time to do things correctly the first time will ultimately save you money and time.


