
Although replacing a window sill may seem like a difficult undertaking, many homeowners can do it themselves if they have the necessary equipment and a little perseverance. A new window sill can significantly improve the appearance of your windows, regardless of whether it is broken, antiquated, or you just want to update their appearance. We’ll walk you through the process of replacing your window sill in an efficient and effective manner in this guide.
It’s crucial to gather all required tools and materials before you start. A new window sill, of course, as well as a pry bar, saw, hammer, nails, wood glue, sandpaper, paint, or finish are required. Having everything ready ahead of time will facilitate the process and help you avoid unneeded disruptions.
Eliminating the old window sill is the first step in replacing it. Pry it carefully away from the window frame, taking care to avoid scratching the surrounding area. After removing the old sill, give the area a thorough cleaning to get rid of any leftover debris and adhesive. This preparation guarantees a perfect fit and long-term stability for your new sill.
Next, take a measurement of the area that will accommodate your new sill. Here, precision is essential because an improperly fitted sill can lead to issues later on. Make sure to adjust the new sill to the exact size by taking into consideration any variations in the window frame. Before attaching the new sill with wood glue and nails, make sure it fits tightly by dry fitting it.
Spend some time finishing the sill with your preferred finish and sanding any jagged edges after installation. Whether you stain it to look like natural wood or paint it to match your interior decor, the finishing touches are essential for a polished, businesslike appearance. Your window will look better and perform better with the new sill installed, improving the comfort and aesthetics of your entire house.
- Reasons for conducting
- Rules and safety precautions
- Set of tools
- Step-by-step instruction
- Dismantling
- Installation without window replacement
- Possible difficulties and errors
- Average prices
- Useful video
- Video on the topic
- DIY plastic windowsill repair. No replacement. It"s simple!
- plastic windows, replacing window sills and slopes with your own hands.
- replacing a plastic window sill without damaging the repair
Reasons for conducting
A crucial component of the window’s structure is the sill. It serves a number of crucial purposes.
Note: In order to get system performance back, a product’s failure needs to be replaced.
Window boards should be disassembled and replaced for a number of reasons:

- Presence of damage. This may be a violation of the integrity of the coating – cracks, chips, scratches. This is especially true for wooden window sills. Damage can be deeper – deformations, large cracks, breakage of the board. In any case, it is necessary to eliminate the defect and the best option is to replace the element.
- Change in the shape or structure of the material. Such types of violations are possible with prolonged exposure of the window sill to moisture, solar radiation, sudden changes or increases in temperature. The slab may warp or bend, and the color or texture of the coating may also change.
- Destruction, changes in the adjacent wall. Such processes occur during foundation shrinkage, wear of the material, structural features of the wall. In this case, the fixation of the window sill becomes poor quality, it may shift and even fall out. The window structure becomes depressurized, drafts appear, and the cost of heating the room increases.
- Replacement of window frames. When installing a new window, it is inappropriate to leave the old window sill so as not to disturb the overall appearance of the structure.
- Change in the style of the room or part of the interior. In this case, you will need to select a new model that will be in harmony with other items.
- Increasing the window sill area to accommodate a working area. May need to be reduced in size. For example, if the board covers a heating device or interferes with the installation of furniture.
The existence of older reinforced concrete structures should be mentioned as another justification for replacing the product. Even in good shape, concrete is a cold bridge and doesn’t always work well with contemporary window designs.
Rules and safety precautions
Progress requires adherence to a few guidelines:
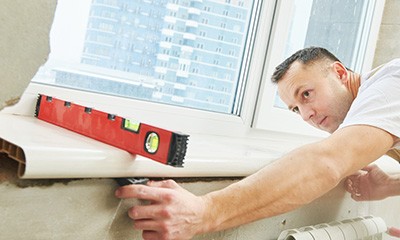
- Building codes. The window sill must be manufactured in accordance with the requirements of GOST. Material – have the appropriate characteristics, dimensions – maintained, finished product – accompanied by documentation and certificates.
- Safety precautions. Work should be carried out in overalls or highlighted a separate kit, you must have gloves, especially if you need to replace the double -glazed window. When using a power tool, you must check its functionality and integrity.
- Health protection. Only environmentally friendly materials can be used.
The following prerequisites must also be fulfilled:
- when dismantling and installing large structures, work only with a partner;
- be sure to clear and clear the work area of unnecessary items and furniture;
- Do not allow young children and strangers into the premises.
Crucial! Make sure to verify each tool’s functionality and integrity.
Set of tools
Make sure you have a comprehensive inventory of all the necessary tools and supplies before you begin. This is required to ensure that the replacement of the window sill proceeds without any disruptions or needless pauses.
Must prepare food:
- hammer;
- chisel;
- building level;
- a hammer drill or good power drill;
- saw for wood or plastic;
- putty knife;
- screwdriver;
- grinder;
- scrap;
- pencil or marker;
- measuring tape or tape measure;
- construction gloves;
- polyurethane foam;
- silicone sealant;
- cargo;
- cement.
Note: The new window sill is the most crucial component and needs to be chosen and bought first.
Step-by-step instruction
The standard scheme is followed when replacing window sill technology. The qualities of the material used to make the board could account for some of the variations in the process. Installing a new product comes in two stages: the first is taking apart the old one.
Dismantling

There are two ways to proceed: with and without the board saved. This subtlety holds true for models composed of stone, concrete, or wood.
You should be aware that a larger amount of wall destruction will happen if the element needs to be preserved.
You must first carefully remove the mixture layer surrounding the ends of the window sill before attempting to remove the board.
Practically speaking, wooden and stone products are still disassembled. In this instance, they can be broken with a sledgehammer (stone) or sawed (wood). To cut reinforcement in concrete, a grinder is required. Product made of plastic is the most common choice.
The methodical disassembly procedure looks like this:
- The first step is to free the window sill from the overall structure. First, you will need to remove the layer of putty or putty from the ends, which serves to seal the seam. Remove the slopes if they are finished with plastic or panels.
- The second step is to trim the mounting foam and silicone. When cutting the foam, it is important not to touch the canvas. Then, tapping with a hammer from below, try to knock the window sill off the opening. If it cannot be moved, you can put a metal rod or crowbar under it and loosen it. In old designs, glass wool was used. When removing the layer, you need to put on a respirator.
- A wooden window sill should carefully knock off the fastening corners with a hammer and chisel. Then pull the product on yourself and pull out. If this technique does not work, you will have to use a crowbar and loosen the structure. The last resort is to cut the board into pieces with a hacksaw.
- Concrete window sill is removed with a hammer and chisel. If you use a hammer drill, this will speed up the work, but you will need a respirator to protect yourself from dust.
Crucial! Take caution not to compromise the structural integrity of the wall when using a hammer drill.
A stone or wooden window sill may not always be able to be taken apart from the window. This needs to be considered before work begins, as it will necessitate a total rebuild of the structure.
Cleaning and leveling the opening is the last step in the disassembly process. The surface needs to be cleaned and degreased, and any leftover debris and old material should be removed. After applying a coat of primer, even out any ridges. The smooth installation of the new product will be hampered if this is not done.
Reapply soil after the surface has been leveled. Using an antiseptic to treat the opening is also advised. This will stop mold and fungus from growing.
Installation without window replacement
Spacers, wooden pegs, beacons, and polyurethane foam are used to install the product. Brackets and mounting angles are also utilized. Detailed explanation of the procedure:
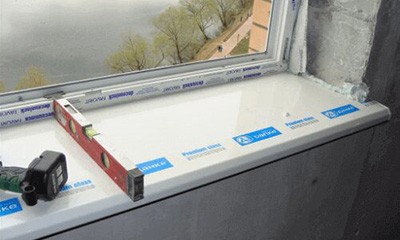
- Prepare the canvas. If the window sill is adjusted to size, then this step can be omitted. Otherwise, you will need to cut the canvas to fit the opening. In a standard situation, the part protrudes into the room by 50-70 mm and 60 mm on each side beyond the slopes. Try on the blank.
- Cut niches in the walls to enter the edges of the boards. You will need a grinder.
- Place the canvas under the frame and install spacers. Check the levelness using a building level horizontally and a plumb line vertically. If the product is not made of moisture-resistant material, then the ends must be coated with sealant. Vertically, it is necessary to ensure the slope of the windowsill 3 °.
- Seal the seam with foam. If you need to avoid expansion of the material, it is better to use a two-component sealant. When using regular foam, place a weight on the canvas for 12 -14 hours.
- After drying, cut off the foam and fill all joints.
- Place plugs on the ends of the window sill.
Vital. For a proper installation, the product must be aligned with respect to the opening and there must be no gaps between the wall and the window sill.
Possible difficulties and errors
The most frequent errors made in progress are:
- Performing partial dismantling. In this case, the product is broken off or torn off without first being freed from foam and layers of plaster. Pieces of the window sill remain in the window area and become difficult to access. To get the debris out, you will have to dismantle the window.
- Inaccurate dismantling leads to changes in window geometry. The consequences will be poor movement and wiping of wings or windows, as well as the appearance of cracks and drafts.
- Poor preparation of the opening. In this case, it is impossible to align the position of the window sill.
- Errors in taking measurements. If the structure does not correspond to the dimensions, this leads to the appearance of cracks and worsens the appearance of the structure. In some cases, such a window sill cannot be installed.
- Poor sealing of seams. Cold bridges and drafts appear.
Work must be done strictly in accordance with the technology in order to prevent common mistakes. Seeking professional consultation is the second choice.
Although replacing a window sill may seem like a difficult undertaking, with the correct equipment and a little know-how, it’s a doable do-it-yourself project that can greatly improve the look and functionality of your house. From taking out the old sill to putting in a new one, this guide will take you step-by-step through the entire process, guaranteeing a tight fit and a polished appearance. We will offer you clear instructions and helpful tips to help you achieve professional-looking results without hiring a contractor, whether you’re dealing with rot, damage, or just updating your style.
Average prices
The cost is determined by the size of the building, the type of finishing, the material used for the window sills, and a number of extra tasks. Additionally, the category of construction is considered. The cost of the service is higher in older homes. The average cost per unit is between 2,500 and 5,000 rubles.
Useful video
Replacing a window sill without physically replacing a window:
| Step | Description |
| 1. Remove the old sill | Carefully pry off the old window sill using a crowbar. Make sure to remove any nails or screws. |
| 2. Measure the new sill | Measure the length and width of the window opening. Cut the new window sill to fit these dimensions. |
| 3. Install the new sill | Place the new sill into the window opening. Use a level to ensure it is straight. Secure it with screws or nails. |
| 4. Seal the edges | Apply a bead of caulk around the edges of the new window sill to seal any gaps and prevent drafts. |
| 5. Paint or finish | If desired, paint or finish the new window sill to match your interior decor. |
A window sill replacement can be an easy yet satisfying do-it-yourself project. You can improve the look and feel of your windows by doing the proper procedures and using the right materials. This project helps to preserve the window area’s structural integrity in addition to enhancing the aesthetic appeal of your house.
Getting precise measurements and selecting a replacement material that blends in with the interior design of your house are two important things to keep in mind. Make sure the material is long-lasting and simple to maintain, whether you choose stone, wood, or a synthetic option. In order to shield the sill from moisture and wear over time, proper sealing and finishing are essential.
During the replacement procedure, safety must come first. Always wear safety equipment and the proper tools. Do not hesitate to seek professional assistance if you come across any complex issues or if you are unsure about any step. A properly installed window sill can improve the comfort and aesthetics of a living area and last for many years.
Ultimately, it can be satisfying to replace a worn-out window sill yourself if you take the time to do so. It lets you personalize your home improvement projects in addition to saving money. You can get a polished finish that raises the overall appeal and value of your house with perseverance and attention to detail.


