
Because of its affordability and ease of use, columnar foundations, sometimes referred to as pier foundations, are a common option for a variety of building types. This kind of foundation works particularly well for buildings on uneven ground or in high-risk areas for flooding. Compared to a full basement or slab foundation, it requires less excavation and concrete because the weight of the building is supported by a number of columns or piers.
Correctly tying the columns is one of the most important steps in building a dependable columnar foundation. When the piers are tied properly, they become stable, oriented, and able to support the weight of the building. If this important step is skipped, the foundation may settle unevenly or shift, which could eventually cause structural problems. Any building project seeking longevity and safety must comprehend the nuances of tying a columnar foundation.
We will look at the key methods and advice for properly tying a columnar foundation in this article. We will go over every step in detail, from choosing the appropriate materials to making sure everything is aligned precisely and tying the ties. Whether you’re an experienced builder or a do-it-yourselfer, this guide will arm you with the skills necessary to lay a solid foundation for your project.
- What is it and why is it needed??
- Installation requirements
- Material requirements
- What material to choose and what to pay attention to?
- timber
- Channel
- Reinforced concrete tape
- I-beam
- Fastening methods
- Threaded connection
- Welded joint
- Using clamps
- Classic timber piping and its installation technology
- Critical installation errors
- Video on the topic
- BINDING a columnar FOUNDATION or piles WITH YOUR OWN HANDS wooden grillage made of boards 50×200 Terrace
- Column foundation tying. Beam 150×100 mm .[Life in the village]
- Tying a columnar foundation with a board. Laying the subfloor along the frame.
- Do-it-yourself wooden strapping of a pile foundation. Sill. Grillage. Anchoring to piles
- Pile tying! All the details you need to know…
- Tying a columnar foundation with timber
What is it and why is it needed??
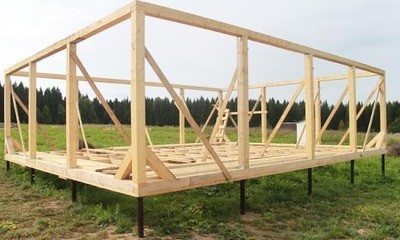
In general, the frame serves as the future home’s subfloor’s foundation.

It is required for:
- combining disparate pillars (or piles) into one monolithic structure;
- use as a base for installing walls and floors;
- uniform distribution of load on the foundation.
In addition, this construction technology is unquestionably less expensive than a simple strip foundation in the event that there are height variations at the construction site.
Installation requirements
Several guidelines need to be followed during installation in order for the harness to perform as intended 100% of the time:
- the strapping material and posts must be securely fastened with bolts, staples or plugs;
- laying must be carried out strictly according to the level (if you need to add, the height is reached with plates, if you remove it, it is cut down);
- between the piles and the strapping material (if it is a solid or composite beam) there must be a layer of waterproofing;
- Each corner must be reinforced with corners, staples, nails, etc.P.
Crucial! Regardless of the material, the base needs to be treated against corrosion and pests in order to be long-lasting. These are specific antiseptics for wood, and paint and varnish are for metal.
Material requirements
The following considerations must be made when choosing materials, which includes deciding between reinforced concrete, metal, and wood:
- the width of the strapping material should be twice the diameter of the piles;
- it must be durable and not subject to deformation;
- the cross-section must be the same around the entire perimeter;
- ideal evenness must be maintained along the entire length;
- it should be easy to process.
Citation! If you plan to do the installation yourself, you should select a material that doesn’t require specialized knowledge or equipment.
For many different kinds of buildings, a columnar foundation is an affordable and useful solution, but it requires an understanding of a few crucial nuances to be done correctly. Tying the columns together correctly guarantees stability and longevity, avoiding problems like settling or shifting. This entails arranging the columns with precision, selecting the appropriate ties, and securing them according to industry best practices. You can build a solid, dependable foundation that will support your structure for many years to come by becoming adept at these subtleties.
What material to choose and what to pay attention to?
Since material selection is the most crucial aspect of the process, we will discuss it next. It is worthwhile to think about the most popular choices.
timber
Most often utilized choice. He’s been picked because he
- cheap;
- easy to install with a minimum set of tools;
- can be treated with antiseptics and impregnations to increase durability.
Furthermore, there are numerous methods for creating a wooden harness. However, there is a drawback as well: if the wood is not properly dried, the strapping might warp after installation.
Laminated wood is a better option because it is guaranteed not to deform during operation, has a larger margin of safety, is pre-treated with impregnations, and goes through a drying process in a special chamber. But the cost will increase as well.
Channel
If wood doesn’t give you confidence, you might want to think about using channel instead.

The benefits of choosing this option are:
- the bearing capacity of the foundation increases;
- does not react to moisture;
- paired with metal piles, the rigidity of the structure increases;
- durable (if painted);
- will not crack over time.
During installation, welding is not required. Anchors or bolts can be used to fasten the channel. One drawback is that the cost is much higher than that of timber.
Take note! Building a brick, block, or concrete house on a columnar foundation is best done on a budget with a channel.
Reinforced concrete tape
Such content also occurs. Moreover, it will be roughly 40% less expensive than channel tying. However, this will be one of the most labor-intensive options to install.
Apart from constructing the formwork and kneading the mortar, reinforced concrete tape needs to be stored for a full 28 days to fully solidify before installation work can start.
When using screw piles with reinforced concrete tape, the latter must also be filled with mortar and have reinforcement inserted into them. This reinforcement will be connected to the strapping’s reinforcement.
I-beam
An I-beam measuring 30 mm is used for piping beneath load-bearing walls; for other applications, 20 mm suffices. With one exception, the advantages are the same as those of utilizing a channel. Because of the form factor, welding is the only method of installation here.
Fastening methods
It is important to think about fastening options and a step-by-step strapping procedure using the materials mentioned above in order to determine which material is best to use.
Threaded connection
The threaded method involves multiple stages and is primarily utilized for tying timber.
- Screwing the screws into the beam through the head of the pile (self-tapping screws of the “Glukhar” type are used, 100-150 mm long, 8-10 mm in diameter).
- Trimming the edges of timber for overlapping joints.
- Tightening self-tapping screws in overlap areas.
- Additional reinforcement of corners with metal corners (you can use ordinary wood screws with cross-heads).

Staples can also be used to reinforce the connection points.
Welded joint
Welding is the best connection method for I-beams and channels. Anchors can be used for the latter, but this option calls for specialized metalworking knowledge.
Because the materials used in this installation method are similar, waterproofing is not provided. After being placed atop the pile heads, the I-beam flange is welded. The beams are brought close to one another or cut at an angle at the corners, and then a seam is applied.
Citation! The inner portion of the channel is positioned within metal heads as well. After that, stitches are put in. It is additionally trimmed and welded together at the corners.
Using clamps
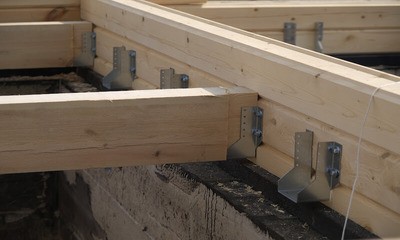
The only application for this kind of connection is in timber strapping. In this instance, bolts or anchors are still used to secure the material to the pile heads. Standard metal corners without a stiffener in the middle serve as a representation of the clamps.
When two beams overlap, their corners do too, causing the two sides of the overlapped beam to simultaneously be next to two other beams. The supplied holes are then screwed with self-tapping screws.
Classic timber piping and its installation technology
It is worthwhile to give this method more thought because, in spite of all its drawbacks, it is already regarded as a classic.
Here is the technology:
- After installing the piles and delivering the timber to the construction site, the latter is additionally dried (even if the seller assures that it is dry).
- Then the timber is sawn and laid out on piles. The dimensions and height are checked once again by level.
- Next, the timber is joined at the corner joints. For this purpose, the overlap technology is used. When the grooves are adjusted millimeter to millimeter, there is no need to connect them with self-tapping screws. Before this, the timber is attached to the heads.
- For fastening to the pile heads, anchors or self-tapping screws of the “Capercaillie” type are used. The threaded connection is made from underneath. Before this, a piece of roofing material is placed between the head and the beam (as waterproofing).
- Next, the corners are connected and reinforced with staples.
For a dependable connection, grooves are also cut out at the joining points in order to install lags. Metal corners are used for fixation (on each side) to avoid the beam breaking from the use of an anchor.
Extra details regarding the strapping in the video:
Critical installation errors
Novices in this field may commit multiple deadly errors, making the house uninhabitable in the end.
As an illustration:

- Connecting timber to each other in places where there is no support. The strapping should always be connected at the pile head.
- Corner joints of timber should always be overlapped. Conventional joining does not provide the necessary rigidity and there is a possibility of cracks forming.
- You can"t overlap vertically. The timber should only be joined horizontally.
- The main part of each beam should go to the head, and not just their “cut part”.
- Avoid using nails. The possibility of a crack appearing increases the next time you hammer in a nail.
Crucial! Understanding which locations will lose their strength characteristics during a specific action and making every effort to avoid such decisions is the fundamental installation principle.
| Step | Description |
| 1. Planning | Determine the location and depth of the columns based on soil type and load requirements. |
| 2. Marking | Mark the foundation layout on the ground, ensuring accurate spacing between columns. |
| 3. Digging | Excavate holes for the columns to the required depth, typically below the frost line. |
| 4. Reinforcement | Place rebar in the holes for added strength, ensuring it is properly positioned. |
| 5. Pouring Concrete | Fill the holes with concrete, making sure to remove air pockets and level the surface. |
| 6. Curing | Allow the concrete to cure for the recommended time to achieve full strength. |
| 7. Connecting Beams | Attach beams to the top of the columns to provide a stable base for the structure. |
Although constructing a columnar foundation may appear simple, stability and longevity must be ensured through meticulous planning and execution. You can steer clear of common pitfalls and create a solid, dependable foundation for your structure by comprehending the subtleties of this kind of construction.
Considering the soil conditions and selecting the appropriate materials are crucial when tying a columnar foundation. For each column to effectively support the weight of the building, it must be positioned and aligned correctly. Digging, leveling, and even adding concrete or steel reinforcement for increased strength are possible steps in the process.
Recall that the foundation’s overall stability is greatly influenced by the columns’ placement and alignment. Make sure that every measurement is precise and reliable. Verifying these details twice can help you avoid costly errors later on and save time.
Eventually, timely repairs and routine inspections are necessary to preserve the columnar foundation’s integrity. To keep your foundation in excellent shape, keep an eye out for wear or damage and take quick action to fix any problems you find. A well-built columnar foundation can offer a stable and dependable base for many years to come with the right maintenance.


