
The process of installing glass in wooden windows blends functionality and artistry. Knowing the steps involved in window restoration or installation can help you produce a safe and appealing end product. This tutorial will lead you through the process while providing hints and techniques to make the work go more smoothly.
While wooden windows are always charming, broken or missing glass can take away from their beauty. These windows look better again, but replacing the glass also increases security and energy efficiency. You can complete this project yourself, saving money and guaranteeing a perfect fit, if you have the necessary equipment and a little perseverance.
Everything will be taken care of, including taking out the old glass and installing the new pane. You will gain knowledge about the tools and methods that will enable you to achieve the greatest outcomes along the way. Regardless of your level of experience doing do-it-yourself work, this tutorial will provide you the skills and assurance you need to properly install glass in wooden windows.
| Step | Description |
| 1. Preparation | Remove old glass and clean the frame thoroughly. Make sure there are no remnants of putty or debris. |
| 2. Measure | Measure the dimensions of the window opening accurately to cut the new glass to size. |
| 3. Cut Glass | Using a glass cutter, cut the glass to fit the measured dimensions, ensuring a snug fit. |
| 4. Apply Putty | Place a layer of putty around the edge of the frame where the glass will sit. |
| 5. Insert Glass | Carefully position the glass into the frame, pressing it gently into the putty to secure it. |
| 6. Secure with Glazing Points | Use glazing points to hold the glass firmly in place within the frame. |
| 7. Apply Final Putty | Spread another layer of putty over the edges of the glass to seal it in and create a smooth finish. |
| 8. Smooth and Clean | Use a putty knife to smooth the putty, then clean any excess putty from the glass and frame. |
| 9. Drying | Allow the putty to dry and set properly before painting or finishing the window. |
- When necessary?
- What types are suitable?
- Tips for choosing
- Measurement rules
- Tools, materials and devices
- Cutting rules and technology
- Step-by-step instructions for glazing frames
- Possible difficulties and errors
- How much does it cost to insert?
- Video on the topic
- The windows are fogging up? Tired of wiping glass? There is a solution!
- Production of wooden windows with double glazing | Petersburg
- Restoration of a wooden window. Installing glass on silicone 1.
- How to properly glaze an old window. The best material for window restoration. Kitt. Window putty
When necessary?
Since proper installation of wooden windows complies with technological advancements, all manipulations are executed in a sequential manner. It is possible to attain excellent sound tightness and insulation if all the guidelines are followed. Wooden frame glazing can be done in the factory or during installation.
There are some circumstances in which glazing is necessary exactly when it is installed:

- the frame was damaged, the glass was removed from it and installed back after installation of the structure;
- wooden window frames are being repaired with the need to remove glass;
- glass was broken – the frame is carefully cleaned of fragments and a new product is inserted.
In other cases, glass products are installed right at the manufacturing facility. It’s quick, easy, and requires little time.
What types are suitable?
Standard-compliant glass and the selection of dependable materials for the window frame are two of a high-quality wooden window’s key features. For instance, some producers incorporate smart glasses into their goods.
Since they can reflect up to 58% of solar radiation, light will enter the window but won’t heat it. It is advised to apply a special coating to the glass of windows facing south in order to protect it from the sun. The room’s air temperature will be kept at the appropriate level at the same time.
Main specifications for glass in wooden windows:
- outer glass 4 mm thick;
- the distance between two glazings is at least 16 mm;
- internal glass 4 mm with hard coating;
- the glass should not have chips or other defects;
- there should be no damage to the edges of the glass that would prevent its sealed installation.
There are various GOSTs that specify specifications for particular product categories, depending on the kind of glass that will be used when installing a wooden frame.
The average cost of 4 mm thick glass that fits in a wooden frame varies depending on the size and area of sales. For instance, the approximate cost per square meter will start at 500 rubles.
Tips for choosing
When choosing glass for a wooden frame, keep the following factors and advice in mind:
- protection from cold;
- Sun protection;
- protection against furniture fading;
- installation location;
- price category.
This also applies to the product’s thickness, as 4 mm isn’t always the ideal thickness. This is a good choice if you need to seal the frame and keep drafts out of the house. For instance, if you live in the summertime only, 4 mm is a good choice for the frame when installing double glazing in a summer house.
Look more closely at thicker structures if you plan to live in the house during the winter. Strong winds and frosts are common during winter in various parts of the world, and while the heating system can help, window structures play a major role in determining how successful the project is.
When producing their goods, contemporary glass manufacturers make extensive use of the newest technological advancements. The majority of sheet glass already has a feature that blocks sunlight and saves heat.
The process of inserting glass into wooden windows is simple yet accurate, improving a home’s appearance and functionality. In order to ensure durability and insulation, this procedure involves carefully measuring and cutting the glass to fit the window frame, securing it in place with glazing points, and sealing it with putty. Even for individuals who are unfamiliar with do-it-yourself projects, knowing the procedures and supplies needed can help make any project, like installing new windows or replacing outdated glass, manageable. This manual will lead you through each step and provide helpful advice to help you produce results that are up to par.
Measurement rules
A length and width measurement alone might not provide enough information because not all window glass for a wooden frame will be rectangular. In many cases, experts take measurements of the frame from both sides; if there is a discrepancy between the indicators, the middle measurement is made.
Use a special meter or tape measure to measure glass as a standard ruler may not have enough length and will provide inaccurate measurements.

What ought to be measured?
- frame length;
- its width;
- diagonal.
The results obtained from outside and inside differ by a negligible amount—typically, 1% or 1 cm.
Such indicators are not important to pay attention to; instead, you can cut out the required piece in a rectangular or square shape and use it as intended. Should the discrepancy exceed one centimeter, you must consider all relevant factors and precisely cut the sheet in accordance with the template.
The ideal way to cut glass is to leave a tiny space between the glass and the frame’s dimensions. This will enable you to put it in the frame swiftly, safely, and without making drafts later on.
Tools, materials and devices
To insert glass into a wooden frame, gather all required supplies and equipment:
- glass cutter;
- glass cutting table or surface;
- chisel;
- hacksaw;
- roulette;
- nails;
- sealant;
- insulating tape;
- pliers;
- marker for marking.
The diamond cutter is thought to be the best because it makes even lines that make it simple to cut a sheet of glass into the necessary sizes.
It’s crucial to make sure the table or surface you’re using to cut glass is bigger than the material. It is also possible to place a blanket or other soft object underneath it. To prevent chips when cutting, the surface needs to be flat.
The glass itself is also ready; it can be ordered to be cut independently or in a workshop. If the task involves working with old, long-lost material, proceed with caution as these items are more brittle.
Use of nails up to 3 cm in length with a copper coating is advised. These consumables have a longer lifespan.
Cutting rules and technology
Cutting new glass is one of the most crucial steps in replacing it in a wooden frame. Here, a few things need to be noted:
- The glass cutter must be very sharp;
- You can also choose a diamond tool, but it is more suitable for professionals, so a roller glass cutter would be the best option;
- the marking line is drawn once, so it is important to initially mark it evenly;
- the place of the glass where the line is drawn is placed on the edge of the table;
- It is recommended to tap using a glass cutter if the sheet is small in width;
- for a chip to form along the intended line, a force of 3-4 kg is sufficient;
- It is not recommended to use metal structures as auxiliary elements;
- The glass cutter should lie perpendicular to the material;
- the tool must pass along the line in one direction only.
Wearing gloves, goggles, and a mask as personal protection equipment is advised to shield your hands and eyes from potential cuts. The material is treated with a whetstone after it has been cut in order to eliminate any sharp edges.
Step-by-step instructions for glazing frames
Take precautions to ensure your safety when glazing a wooden frame yourself. A stiff-bristled brush works well for the initial step of cleaning the frame’s surface of dirt.
If the contamination is severe, pliers, a file, and a chisel can be used. The area that the material is going to be attached to needs to be tidy.
Continue to adhere to instructions:
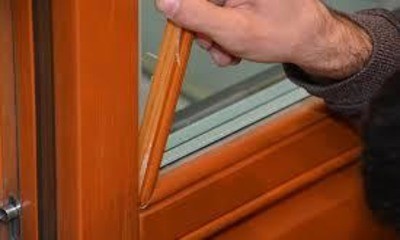
- The cut glass is measured, once again checking compliance. Also select the required number of glazing beads for the frame.
- Using a hacksaw equipped with medium-sized teeth, cut out glazing beads of the required size. Nails are driven into them so that each one is perpendicular.
- All folds are lubricated with silicone sealant.
- A wooden stick is placed on the bottom of the frame to leave a gap for installation.
- Mount the glass, pressing it carefully, remove the wooden stick.
- The glazing bead is carefully hammered into the frame – it must be pre-painted. They also paint over any gaps that occurred when inserting the material.
It is crucial to pay attention to the sealant itself; it should be sensitive to temperature variations and can be either transparent or white. The frame will be subjected to varying temperatures because the glass will be situated both inside and outside the home.
Possible difficulties and errors
Making the wrong glazing material size selection is one of the most frequent errors. For a sealed insert, it is advised to leave tiny gaps on the sides.
Experts also suggest thoroughly inspecting glass discrepancies because uneven sheets could break in the future.
Inaccurate markup is another error. Mark a straight line with a marker first, and then run a glass cutter along it once. An uneven break is highly likely if a glass cutter is moved along a line multiple times.
How much does it cost to insert?
In Russia, the average price for glazing a wooden frame starts at 600 rubles per square. In this instance, the cost of the work will be directly correlated with its complexity. Should the restoration of the frame be necessary in addition to the material installation, there will be an extra cost. The thickness and difficulty of cutting the glass have an impact on the price as well.
A satisfying project that can bring back the aesthetic appeal and practicality of your wooden windows is glass inserting. Securing the glass with precision can guarantee a tight fit that improves both appearance and insulation. Even for do-it-yourself enthusiasts, the process can be manageable with the right tools and a little perseverance, despite its initial intimidating appearance.
Throughout this process, safety is of utmost importance. To avoid getting cut by jagged glass edges or splinters, wear safety gloves and goggles. For a professional finish that lasts for years, take your time aligning the glass correctly and use the appropriate sealants.
Wooden windows are classic, and you can give them a fresh look by replacing their glass. Whether you’re remodeling existing windows or building new ones, having this skill gives your home improvement projects a unique touch. The joy of seeing your windows operate well and appear immaculate is well worth the effort put into this task.
In the end, becoming an expert at glass inserting into wooden windows will save you money on professional services and provide you with a sense of pride. Every stage—from measuring to the last sealing—contributes to a long-lasting and appealing outcome. You can attain a finish that improves your home’s appearance and value with practice and attention to detail.


