
Changing your living area can be a creative and fulfilling project, particularly if you take on do-it-yourself tasks. A project that can significantly improve the appearance of your house is making and embellishing wood tiles. These tiles not only give a touch of natural beauty to any space, but they also present a special chance to personalize your decor to suit your own tastes.
Making your own wood tiles may seem difficult at first, but with the correct equipment and a little perseverance, it can be a simple and fun process. First, you’ll want to decide which kind of wood best fits your intended design. A wide range of grains and colors are available in different woods, giving artists plenty of options. After that, you’ll chop the wood into tiles, sand them smooth, and get them ready for paint.
When your wood tiles are prepared, the good times really start. You can be as creative as you want when decorating them. For a striking effect, you could paint them with vibrant colors and patterns or stain them for a rich, traditional appearance. Wood burning and stenciling are two more excellent methods for adding complex designs. Regardless of how you go about it, every tile turns into a tiny blank canvas on which you can paint.
Including handmade wood tiles into your interior design gives you a sense of accomplishment in addition to a distinctive touch. Every item showcases your creativity and hard work, adding a more unique and welcoming feel to your room. DIY wood tiles are a chic and adaptable accent to any house, whether you use them as a feature wall in the living room, a backsplash in the kitchen, or even as coasters and trivets.
| Step | Description |
| Select Wood | Choose hardwood like oak or maple for durability. |
| Cut Tiles | Cut wood into uniform square pieces. |
| Sand Tiles | Sand the tiles to smooth edges and surfaces. |
| Stain or Paint | Apply stain or paint to enhance the wood"s appearance. |
| Seal Tiles | Use a sealant to protect the wood from moisture. |
| Arrange Tiles | Lay out the tiles in your desired pattern. |
| Install Tiles | Attach the tiles to the surface using wood glue or nails. |
| Finishing Touches | Fill any gaps and touch up with additional paint or stain if needed. |
Wood tiles: tools
What is the main advantage of hand-made wooden tiles is that they are made according to a super individual project – in the sense that you have the opportunity not only to create a unique “pattern” on the wall, but also to think through it down to the smallest detail. Unlike mass production of such decor, you can independently create and combine tiles of different sizes and thicknesses – now add the ability to individually paint each fragment and you will get a full-fledged hand mosaic. Yes, it is long, but in return you will get a practically real work of art – this is, of course, if you try very hard and have enough patience. The fact is that this is a very painstaking work, and this nuance cannot be compensated for by a simple technology for making wood tiles for walls.
How does one go about making such a finishing material? Remarkably, the toolkit isn’t that extensive—it can be summed up as the typical set of tools used by do-it-yourselfers.
1. Jigsaw puzzle with electricity. If one is available, a circular saw is preferable. Better yet, you can use a jigsaw to create tiles with a curved configuration and circular saws to make even cuts.
2. A manual edge router. Cutting the shapes of tiles—chamfering or making panels along the material’s edges—necessitates it.

3. A vibrating model of a grinding machine would be the best choice. The one used for stripping putty: the vibratory sander gently processes wood, allowing the novice craftsman to avoid removing excess wood, in contrast to other grinding tools like drill or angle grinder attachments.
Not to mention that the tiles are painted or varnished after they are manufactured, which requires your own tools (at the very least a brush and roller). Although using a spray gun is preferable, painting by hand can still yield excellent results.
Adding a personalized touch to your space, DIY wood tiles are an affordable and gratifying way to transform your home. The fundamentals of creating and embellishing wood tiles are covered in this guide, from choosing the ideal wood to applying easy yet fashionable decoration techniques. Regardless of your level of experience doing do-it-yourself work, you’ll find useful advice and inspiring ideas to make lovely, personalized tiles that bring personality and warmth to any space. Explore and see how simple it can be to give your walls or floors a distinctive, handmade appearance.
The principle of making wooden mosaic tiles
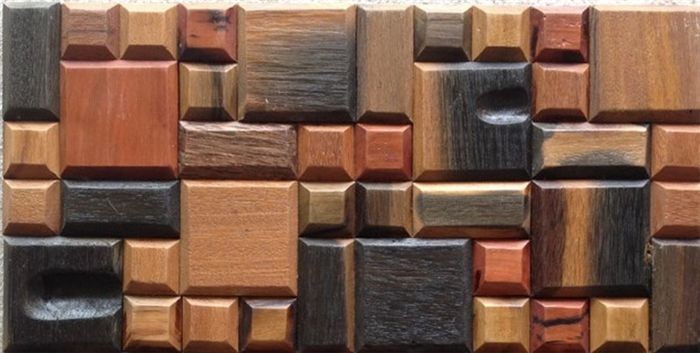
Not always from new boards, but from old ones is the simplest method for creating wooden wall tiles. The condition of the wood is the only thing to consider when working with old wood, as it is currently in style and requires less work to age artificially. The tree shouldn’t have any fungal or shady damage; its surface shouldn’t be blackened or have any tiny holes made by wood-boring beetles. This kind of wood won’t survive very long.
However, generally speaking, the process of creating your own wooden tiles can be thought of as the following series of steps.
1. Calculate size. The process of creating tiles will be facilitated by a little standardization; in this case, a repeating pattern made up of multiple separate fragments must be formed. based on the idea of creating a mosaic on a grid. In other words, the size of the entire fragment is determined first, and the resulting size is then split into smaller fragments that will require production. Following this procedure, you should have five or six, possibly more, repeating pieces. These can be drawn directly onto the wood or, if you’re using a circular saw, the saw itself can be adjusted to accommodate them.
2. Slicing pieces. It will be easy for you to cut workpieces to the necessary size if you know how to operate a circular saw. Not much to discuss here, other than maybe reminding you to take safety precautions, which are common knowledge for most masters.

3. After the workpiece is cut, the formation of the edge, which is accomplished with a manual router, is the penultimate step in the tile-making process. Any kind of edge will do; it all depends on personal preference. These days, they make a wide variety of cutters, so you’re sure to find something you like.
Once the tiles are prepared, they need to be treated with an antiseptic. This will mainly shield them from the effects of different kinds of pests, both big and small, and will prolong the product’s lifespan. Following processing, the wood is completely dried before being ground into a front surface that is flawlessly smooth. A vibrating sanding machine is used to grind using sandpaper with different grain sizes; a coarser abrasive is used first, followed by a finer one. Generally speaking, the procedure is typical and doesn’t differ significantly from the finishing of any wooden product.
Making and embellishing your own wood tiles is a fun and fulfilling project. It enables you to give your living area a distinctively personal touch by incorporating your own style. Although the process might initially seem difficult, it can be a manageable and rewarding do-it-yourself project with proper planning, the appropriate equipment, and a little perseverance.
You’ll pick up useful skills like measuring, cutting, sanding, and staining wood throughout this project. Every stage influences how your tiles will appear in the end, and paying attention to detail will pay off when you see the exquisite result. Take your time and make sure every tile is crafted to your satisfaction rather than rushing.
There are countless creative options when it comes to decorating your wood tiles. There’s no right or wrong way to design your tiles, depending on your preference for a more polished, painted finish or a more natural, rustic appearance. Try out a variety of methods, like stenciling, engraving, or applying different paints and stains, to see which one best suits your aesthetic.
You can create pieces that hold the pride and satisfaction of your own handiwork in addition to adding a personal touch to your home by making and decorating your own wood tiles. Your space will feel even more special because every time you look at those tiles, you’ll be reminded of the time and effort you put into making them.
So get your supplies together, arrange your workspace, and get started on your homemade wood tile project. Along with a stunning outcome, this journey promises a ton of fun and educational opportunities. Savor the procedure and allow your originality to come through in each tile you make.


