
For homeowners who want to learn more about construction, building a hip roof truss system themselves can be a rewarding project. All sides of a hip roof slope gently, coming together to form a ridge at the top. To guarantee structural integrity and weather resistance, the truss system construction process entails meticulous planning, preparation, and precise installation.
Before beginning the construction of a hip roof truss system, preparation is essential. Start by assembling all required tools and materials, such as safety gear like goggles and gloves, plywood for gussets, nails or screws, a saw, and lumber for the trusses. Make sure you have enough room to work with the long pieces of lumber needed for the trusses by clearing the workspace.
Next, draft a comprehensive blueprint or plan for your hip roof truss system. Every truss should have its specifications, angles, and measurements listed in this plan. In addition to reducing construction errors, careful planning guarantees that the trusses will fit together precisely to form a sturdy roof structure. Before cutting any materials, double-check all of your measurements and calculations.
After you have your plan in place, start building the hip roof trusses. First, use your blueprint to cut the lumber to the appropriate lengths. Use a saw with accurate cutting capabilities to make sure every component fits together tightly. The angles at each piece’s ends are important to note because they will determine your roof’s pitch.
Put together every truss on a level, level surface. Arrange the components in accordance with your design, and reinforce the joints where the lumber pieces meet by using plywood gussets. To guarantee that the truss keeps its strength and form, gussets should be firmly fastened with screws or nails. Continue in this manner for every truss that your roof requires.
It’s time to install the trusses on your building once they are all built. Make sure every truss is properly aligned with the layout indicated on the walls of your building as you carefully lift it into position. As you firmly anchor the trusses in place, temporary braces can assist in maintaining their position. At the ridge, firmly fasten the trusses to the walls and to one another using the proper fasteners.
When the trusses are installed, add more sheathing and structural support as necessary to comply with local building codes and weather conditions. At last, you’re prepared to finish the hip roof’s external finish and install roofing materials. Your home will gain value and functionality when you successfully construct your own hip roof truss system by paying close attention to these installation and preparation steps.
- Preparation for construction
- DIY rafter system
- Preparation of frame elements
- Fastening the Mauerlat and the base plates
- Overlap device
- Installation of support posts
- Installation of a ridge beam
- How to attach rafters and frames?
- Installing stiffening links
- How to file properly?
- Frequent mistakes and recommendations for construction
- Video on the topic of the article
- Video on the topic
- installation of a hip roof from a to z – part 1
- Installation of rafters and mortar using a non-thrust system. Hip roof.
Preparation for construction
After carefully reading the instructions and making the necessary material selections, you can tackle the task of building a hip roof truss system on your own. It is preferable to ask one or two helpers to facilitate the process; this will make the work go more quickly.
Before you begin, get the necessary tools ready:

- building level;
- hacksaw, saw, jigsaw;
- hammer, screwdriver;
- tape measure;
- marking cord;
- construction stapler;
- electric drill;
- riveter – when working with metal elements;
- punching shears.
Fasteners, such as screws, anchor bolts, nails, and other metal fasteners, must be prepared using the materials. Metal holders in the shape of beam and timber supports, different plates, mounting angles, connectors, mounting profiles, and height-adjustable anchors are frequently utilized during the installation of a rafter system.
From the supplies you’ll need, additionally:
- Timber with a cross-section of 100 or 150 mm – it will be useful for arranging the Mauerlat, sleepers.
- For rafter legs, boards and beams with a certain cross-section will be needed, which will be calculated according to load calculations.
- For purlins, sunbeds and a ridge you will need a beam with a cross section of 100, 150 or 200 mm.
- For puffs and crossbars you need boards.
- The timber is also useful for arranging parts of the truss support.
- Boards measuring 50×100 mm, 25×100 mm are necessary for creating struts, wind and end beams, sheathing.
Expert builders advise switching out the measuring tape for a different tool. They advise making use of a measuring stick. Take a 50 mm wide strip and apply a size scale to it to accomplish this.
We’ll take you step-by-step through the critical processes of DIY hip roof truss system construction in this guide, from setting up the supplies and equipment to the finer points of installation. This article aims to empower homeowners and do-it-yourselfers to confidently take on this important aspect of construction by dissecting the process into clear, manageable steps and providing helpful tips. Learning how to use the hip roof truss system can greatly improve your construction and renovation abilities, regardless of whether you’re starting a new building project or improving the structural integrity of your existing home.
DIY rafter system
There are two approaches to building a roof truss frame: semi-trusses or element-by-element.
Citation! A semi-truss is made up of two rafters, a tie, two braces, and a suspension. Four to five persons assemble them on the ground and rotate them into position.
They frequently use the first method, in which each component is prepared and fastened separately, to install a hip roof.
Stages of installation:
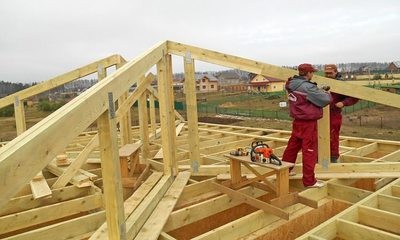
- preparation of the main frame elements;
- fastening the mauerlat and the beds;
- arrangement of floors;
- installation of support posts and ridge girder;
- fastening rafter legs and installing stiffeners.
Preparation of frame elements
First things first, the rafters need to be measured and ready. Because the length of the short rafters must be determined and the proper angle of inclination of the rafter legs must be ensured, this phase is thought to be the most challenging and time-consuming of all.
How is the preparation carried out?
- first you need to design the angle of the roof;
- then you need to select the rafters – there should be no defects or defects on them;
- the system can be layered or hanging;
- according to the design scheme, rafters are selected and laid out according to their purpose: shortened, diagonal and intermediate.
Standard main rafters must be shorter than diagonal rafters. It is advised to apply the technique of combining elements to prevent having to buy materials with varying lengths.
Liners are used to reinforce the structure when multiple rafters need to be spliced together to achieve the desired length. The checkerboard pattern in which the nails are fastened has an impact on the structure’s rigidity and dependability.
Crucial! Rafters are made of high-quality materials because the element might not be able to support the weight even with a clean, accurate cut. There shouldn’t be any flaws in the wood where the Mauerlat is fastened.
Fastening the Mauerlat and the base plates
Mauerlat refers to a variety of sections of wooden beams, typically measuring 100 x 100 mm or 100 x 150 mm. Only first-grade wood is used to mount the wood around the walls’ perimeter:
- waterproofing is installed on the walls;
- the beam is attached to the wall along its entire length with an overlap;
- It is not recommended to attach timber using the butt-to-butt method;
- additional nodes are reinforced with metal brackets;
- after installing the Mauerlat, markings are made on it.

Moisture must be kept out of the Mauerlat. This is accomplished by placing a waterproofing barrier—typically roofing felt—between the wall and the beam.
A reinforced concrete belt is poured beneath the wall plate if the home is constructed of brick, foam concrete, or aerated concrete.
Prior to mounting, studs for the beam are installed in it. Prior to doing this, all diagonals are drawn out and the rafters’ point of support is identified.
The internal load-bearing walls are where the sleeper is installed. It will be possible to maintain the same hip and main slope inclination angles if the ends of the sleeper are spaced equally from the gable and side wall plates.
Overlap device
The wall plate and sleepers are where the upper floor beams are fastened. It’s crucial to follow the cornice’s necessary overhang. Usually between 0.4 and 0.8 meters, but depending on the project, it may be greater.
Installation of support posts
Citation! The ridge is supported by support posts. They are 50 x 200 mm wooden or board pieces that ought to be arranged vertically. The bench is used for installing the support posts; the same wood that is used for the bench and the Mauerlat can also be used for this purpose.
Two outer racks are positioned along the exposed central axis and fastened to the floor beams using temporary struts. After that, racks in between are positioned every one to two meters.
Support posts may be installed on beams if beams are used to cover the structure. If the building is covered in panels, the lower ends of the outer racks are already fastened to the central beam, which is positioned on top of the panels.
Installation of a ridge beam
Prior to installing the ridge beam, a "bench" needs to be constructed. This component is made up of three vertical posts supporting a ridge beam. Remember that the middle beam is situated in the center at the same time. Additionally, everyone else needs to be 100 cm away from her.
Following the rafters’ sawing, a ridge beam is installed, with its section matching that of the vertical posts.
Several types of wood joints, including butt, overlap, and half-timber cutting, are used in the ridge beam to ensure its strength, as this section of the frame is subjected to a significant load.
How to attach rafters and frames?

At this point, two persons fasten the rafter legs to the girder at the top and the mauerlat at the bottom.
You will need to increase the boards if six meters is not enough. The upper third, where the loads are lowest, is a better location for the joint.
The arrangement of the rafter legs can vary in order. You have two options: either install the intermediate rafters first, followed by the diagonal ones, or the other way around. The first option is thought to be simpler, and it has been demonstrated that choosing this option is preferable for a beginner when assembling a rafter system.
The hips and main roof flanges are then fastened. Support beams are installed and notches are made where the frame meets the diagonal rafters. To reinforce the structure, metal components are fastened to the installation site.
Citation! On a wooden ridge beam, a knot can be formed with bolts, wooden plates, and other specialized fasteners. The diagonal rafters can be strengthened by adding a truss, rack, or strut.
Installing stiffening links
Spacers, hangers, ties, and supports are installed to provide stability to the frame. Depending on the perceived load, the board’s auxiliary element section measures 50×50, 50×150, or 50×200 mm.
How to file properly?
Using a Svenson square, the junction angles of the rafter legs are marked and filed. Roofers follow certain guidelines when cutting and fastening hip roof rafters. These consist of the following subtleties:
- it is important to maintain a single line of rafter position; for this you can use a template;
- as a template, you can use a piece of board or plywood, where a line will be drawn from the bottom edge to a third of the width of the rafter;
- a similar line is drawn on all beams that are planned to be sawed.
The markings are then moved to the rafters to verify that the final product is accurate. They inspect the degree of connection along the whole length of the Mauerlat by walking the entire length of the roof. Variations of two to three millimeters are acceptable; corrections are made as needed.
Frequent mistakes and recommendations for construction
Since a hip roof is regarded as a complex structure, operational mistakes frequently occur. You can steer clear of errors if you heed the advice of seasoned builders:
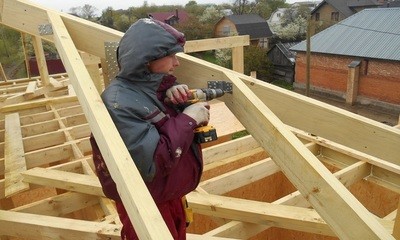
- use boards and timber of the same section for rafters;
- perform preliminary calculations before starting work;
- all components of the rafter system must be reflected in the design documentation;
- the cross-section of the rafters is selected in accordance with the roofing material and its area;
- It is better to carry out the work with an assistant, since long elements cannot be installed alone.
Without a project, it is not advised to begin building a hip roof rafter system.
Video on the topic of the article
The building of the hip roof rafter system is the focus of this video:
When building a hip roof truss system on your own, meticulous planning and methodical installation steps are required. You can provide your building with a strong and useful roof structure by following these steps.
To begin with, careful planning is essential. Start by figuring out how big your roof is and how many trusses you’ll need. Make sure all measurements are exact to prevent mistakes in building. Next, collect all required tools and materials, such as safety gear like goggles and gloves, plywood for the roof decking, nails, and lumber for the trusses.
Once the materials are prepared, begin building the trusses. Mark the locations of the cuts and joints in the lumber as you arrange it in accordance with your truss design blueprint. Cut the lumber to the appropriate lengths using a saw, paying close attention to your layout. Put the trusses together on a level surface, making sure that all of the joints are firmly secured with screws or nails. Make sure the truss dimensions and angles are double checked to ensure structural integrity.
It’s time to install the trusses on the roof structure after they are constructed. Starting from one end of the structure, lift each truss into position with the assistance of assistants if necessary. Using the proper fasteners, fasten each truss to the load-bearing walls, making sure the spacing matches your blueprint. To guarantee a consistent roof surface, use a level to check each truss’ alignment and make any necessary adjustments.
Install the roof decking next, after the trusses are in place. Make sure the plywood sheets are firmly fastened with screws or nails as you lay them over the trusses. To ensure that the decking fits neatly against the walls of the building, trim the edges. Lastly, to guarantee a sturdy and weatherproof roof, check the entire roof structure for any cracks or loose fittings and make any necessary adjustments.
These instructions will help you successfully finish a do-it-yourself project that improves the longevity and functionality of your building when installing a hip roof truss system. Your newly built roof will offer dependable protection and long-lasting beauty with meticulous planning, exact execution, and attention to detail.


