
A satisfying project that can completely change the appearance and feel of your living area is installing wooden floors in your house. You can achieve a professional finish that gives warmth and character to any space with a few basic tools and knowledge. Wooden floors are a classic option that provide durability and elegance, whether you’re building a new home or remodeling an existing one.
It’s crucial to carefully plan your project before you begin. The process will go more smoothly if you choose the appropriate kind of wood and make sure you have the required equipment and supplies. A successful installation depends on the subfloor being properly prepared, which guarantees that the wooden planks will lay evenly and remain secure over time.
The planks must be measured and cut, then laid out in a staggered pattern and fastened in place during the installation process, which entails multiple steps. A gorgeous and durable floor requires time and careful attention to detail. You can experience the beauty of a wooden floor that you installed yourself, along with the satisfaction of a job well done, with a little effort and know-how.
- Step 1. Determining the dimensions of the materials used and the main distances
- Step 2. Do-it-yourself beam installation
- Step 3. Device of the roll
- Step 4. Insulation
- Video on the topic
- Wooden floors – THERE ARE 3 problems and 4 solutions. We build a frame house for ourselves with our own hands.
- Do-it-yourself durable wooden interfloor ceiling in a garage house made of aerated concrete
- Wooden floors of the 1st floor Building a house with your own hands. Installation of beams.
Step 1. Determining the dimensions of the materials used and the main distances
The beams’ cross-section is established by their length and the weight that will be applied to them. The ratio will be roughly as follows: The width is roughly half the height, and the height is 1/24 of the length.
Regarding the spacing between the beams (or, as it is known, the size of the laying step), information on the material’s cross-section and the span length are used to calculate the distance. To make things easier, the related table can be used to calculate this distance.

Step 2. Do-it-yourself beam installation

It’s time to install the beams once all the sizes and distances have been determined. Load-bearing partitions should be installed in order to use shorter, thinner beams. Additionally, this is required to reduce the overall thickness of the wood floor.
The ends of the beams are cut off obliquely, then it is necessary to carry out their antiseptic treatment, use special compounds that will protect the tree for a long time from a wide variety of damage. Then the beams must be wrapped in waterproofing material – in two layers and, finally, embedded in the partitions and external walls of the residential building. What should be the depth of the beams? According to the standard, not less than 180 centimeters. At the same time, the length of the supporting part will be about 150 centimeters, and the width of the gap between the wall and the end of the beam is about 3 centimeters. When creating a beam support on internal walls, it is necessary to put roofing felt or other waterproofing materials under them in two layers. The ends of the beams, when arranging a wooden floor, must be left open, they cannot be covered with bitumen or roofing felt, since they must “breathe”.
The beams have "skull" bars nailed to them from the sides; these bars have a 4×4 or 5×5 cm cross-section.
Step 3. Device of the roll

The roll of wooden floors is arranged either from an ordinary board, or from two boards (shields) knocked together perpendicularly next to each other. When starting the reeling device, you should pay attention to the fact that the bottom of the reeling is located in the same plane with the bottom surface of the beams. The only exception may be the case when you decide to make an antique style, and the beams in your house turn out to be somewhat protruding. Do not forget that any wooden elements that you use in the construction of your home must be carefully treated with antiseptic compounds. Next, the roll should be covered with waterproofing material, for example, roofing felt. It is installed in such a way that the waterproofing covers the beam to half its height. Then insulation is carried out: a layer of thermal insulation – expanded clay, polystyrene foam, stone wool and other materials – is laid on the waterproofing.
Step 4. Insulation
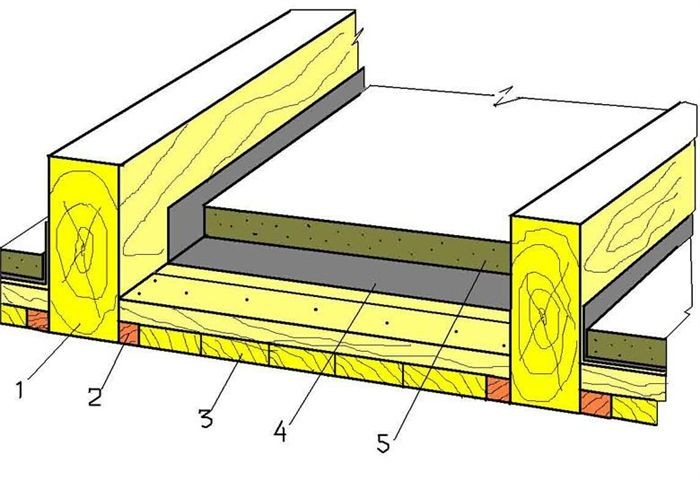
The amount of heat loss in the building, the lifespan of the rafter system, and the longevity of the roof covering are all impacted by the quality of insulation. In the case of a residential building, adequate ventilation of the attic space must be paired with good thermal insulation.
Mineral wool slabs are typically used in homes to insulate the wooden interfloors. Usually, the material is placed on the ceiling or in between beams. Insulation material is placed on top of vapor barrier materials (like Polycraft material) or polyethylene film. The side with the foil should be at the bottom of materials that have one. Next, thermal insulation is inserted into the void created by the beams. Installing an extra layer of heat-insulating material on top of the beams is necessary when insulating with your hands in order to stop heat loss through the so-called "cold bridges."
| Step | Description |
| 1. Gather materials | Get all necessary tools and materials such as wood planks, nails, hammer, saw, tape measure, and level. |
| 2. Prepare the subfloor | Ensure the subfloor is clean, dry, and level. Remove any old flooring if needed. |
| 3. Lay the underlayment | Install a moisture barrier or underlayment to protect the wood from moisture. |
| 4. Plan the layout | Measure and mark the layout to ensure the wood planks fit properly. |
| 5. Start installation | Begin laying the first row of wood planks along the longest wall. Use spacers to maintain expansion gaps. |
| 6. Nail or glue planks | Secure each plank to the subfloor using nails or adhesive, depending on the installation method. |
| 7. Continue laying planks | Stagger the joints of each row for a more stable floor. Cut planks as needed to fit. |
| 8. Finish the edges | Install baseboards or molding to cover the expansion gaps along the walls. |
| 9. Sand and finish | If needed, sand the floor to smooth out any imperfections and apply a finish to protect the wood. |
Doing the installation of hardwood floors yourself can be a satisfying project that enhances the beauty and value of your living area. You can obtain professional-looking results without incurring the high costs associated with hiring a contractor by following the instructions provided in this guide. Recall that accuracy and patience are essential for a successful installation.
Begin by thoroughly cleaning your subfloor and assembling all required equipment and supplies. A strong foundation for your wooden floors can be created by taking the time to make sure your subfloor is dry, clean, and level. To ensure there are no surprises during installation, make sure you measure your space precisely.
Take great care to ensure that the alignment and spacing of each plank are perfect. Maintaining regular gaps for expansion is essential for the lifespan of your wooden floors, and using spacers will help you achieve this. Take your time, as doing so will help to ensure a flawless finish and avoid mistakes.
Baseboards and transitions are examples of finishing touches that can significantly alter the way your floor looks overall. Take great care in these last stages to get a polished and businesslike appearance. Maintaining your wooden floors with routine upkeep, like sweeping and periodic refinishing, will keep them looking gorgeous for many years.
In addition to saving money, doing this project yourself will give you the satisfaction of knowing you improved your house on your own. Installing wooden floors can be a doable and rewarding do-it-yourself project with the correct planning and attention to detail.
A satisfying project that raises the value and coziness of your house is installing hardwood floors yourself. Professional-looking results are achievable even by a novice with the right tools and a little perseverance. From choosing the appropriate wood and prepping your subfloor to installing the planks and adding the finishing touches, this guide will take you step-by-step through the entire process. By doing this project yourself, you’ll improve your living area with your own hands and feel proud of yourself in addition to saving money.


