
Any construction project must have a strong foundation in order to be stable and long-lasting. The pile-screw foundation is an inventive technique that is becoming more and more well-liked due to its effectiveness and simplicity of installation. Pile-screw foundations are suitable for a variety of soil types and can be installed quickly, in contrast to traditional concrete foundations, which require extensive excavation and curing time.
Site preparation is the first step in the process. Make sure the ground is level and clear of any debris before installing the foundation. To achieve a stable base and precise pile placement, this step is crucial.
The piles are then put in place. Steel piles with helical blades that are screwed into the ground by means of specialized machinery make up pile-screw foundations. This technique reduces soil disturbance and does not require large machinery, which makes it perfect for do-it-yourselfers and small-scale projects.
The next step is to use a grillage to tie the piles together once they are firmly in place. A grillage is a structure made of beams or joists that rests atop the piles and serves to equally distribute the weight across the foundation. It guarantees the stability of the entire structure and offers structural support.
Beams or joists must be positioned across the tops of the piles and fastened in place before installing the grillage. The particular requirements of the project, such as load-bearing capacity and environmental conditions, determine the choice of materials for the grillage.
Lastly, it is crucial to verify and make any necessary alignment and leveling adjustments after the grillage is installed. By doing this, the foundation is guaranteed to be level and prepared to support the structure above. For the building to last a long time and to avoid structural problems, proper alignment is essential.
In summary, the pile-screw foundation combines simplicity of installation with dependable performance, providing a useful and effective substitute for conventional techniques. DIY enthusiasts can successfully install a pile-screw foundation with a grillage and lay a strong foundation for their construction projects by following these detailed instructions.
- Types of pile foundations
- Types of piles
- Which ones are best suited for private construction?
- What soils are they suitable for??
- General scheme for installing a pile-screw foundation
- How to calculate the amount of material?
- How to correctly mark installation locations?
- How to determine diving depth?
- Immersion of piles into the soil
- How to align horizontally
- Pouring concrete
- Grillage strapping
- Wood
- Metal
- Reinforced concrete
- How to make a false base
- Useful video
- Video on the topic
- Tying screw piles with a package of boards. Build Yourself a Home.
- Pile-screw foundation. Construction of a pile-screw foundation. DIY foundation.
Types of pile foundations
Numerous positions are included in the pile foundation classification.
The following qualities set them apart:
- Method of action (hanging and pile-racks).
- Barrel type (monolithic and shell)
- Material (wooden, metal, reinforced concrete)
- Immersion method (drive-in, bored-in or screw-in).
The most popular options in private housing construction are pile-screw and bored systems, which enable work in densely populated areas without endangering nearby structures.
Types of piles
There are two primary types of screw piles:
The tip design distinguishes them from one another. This is a crucial component that bears the majority of the weight during a dive.
How the pile behaves in the presence of a natural or man-made obstruction other than a thick layer of soil depends on the quality of the tip. In this sense, welded tips are less resilient; they frequently become deformed and break when they come into contact with rock fragments.
Because of its increased strength, the cast tip can pass obstacles and destroy them while maintaining the pile’s functionality.
There are variations in the quantity of blades as well.
Screw piles exist:
- Single blade.
- Multi-blade.
When a single-blade pile rotates around a vertical axis, its single spiral-shaped blade produces translational motion. They are intended to be installed in soil that is mostly homogeneous, soft, and devoid of rocky or dense inclusions.
These types of piles have a lower bearing capacity than multi-blade samples, which have a much stronger connection to the ground and are much more stable. It is possible to decrease the barrel’s diameter with multiple support units present, which makes installation easier and guarantees structural integrity.
They are best suited for working in permafrost zones, on dense soils, or with a lot of artificial inclusions when they come complete with a cast tip.
Pile classification is based on the type of protective coating used: non-galvanized and galvanized. Because the paint layer that is applied to give the products more solidity peels off when screwed, the latter are essentially unprotected from the effects of ground moisture.
Moreover, it is nearly impossible to predict or identify in advance whether a screw pile will be vulnerable to electrochemical corrosion or the effects of stray currents.

Which ones are best suited for private construction?
First and foremost, the kind and properties of the soil are taken into consideration when selecting a particular brand and size of trunks.
Choose the trunk diameter after deciding on the best variety (single or multiple blades, length, and type of tip). Based on the support’s bearing capacity, the computation is performed.
Trunks with comparatively small diameters are typically utilized for private residences.
Large diameters are practically never used in the construction of private housing because they require a lot of work to submerge.

What soils are they suitable for??
The depth at which screw piles are driven removes the possibility of frost heaving caused by vertical loads. There are only lateral influences left, and because of their small contact area, they are unable to significantly affect the supports.
Therefore, it is customary to take solely mechanical qualities into account when determining the suitability of soil.
The following soil types are the most appropriate (listed in decreasing order of suitability)::
- Sandy.
- Sandy loam.
- Loams.
- Clayey.
Rock and rocky-clastic soils are completely inappropriate. Furthermore, biogenic types—loose subsidence soils or peat bogs—should not be used.
In areas that flood frequently and experience significant seasonal variations in groundwater levels, caution should be used.
It is essential to conduct test drilling and raise the immersion depth to the maximum when building in these areas.

General scheme for installing a pile-screw foundation
The following are step-by-step instructions for installing piles using your hands:
- Preparatory work. Marking the site, checking the parallelism of the lines and compliance with right angles.
- Immersion of corner shafts.
- Installation of intermediate supports.
- Trimming trunks. The surface of the supports should form a flat horizontal plane.
- Concreting the internal cavities of piles to enhance strength.
- Installation of heads. They are installed on the upper end, welded and serve as attachment points for the grillage. All areas located near welding or areas with damaged protective coating are immediately touched up.
It is recommended to start marking at the axes of the walls rather than the house’s perimeter boundaries. Instead of hanging from the heads, walls ought to stand on them.
How to calculate the amount of material?
Two methods are used to calculate the number of supports:
- Along the lines of the greatest load.
- According to the load-bearing capacity of the pile.
Counting the piles along each line of the external and internal load-bearing walls constitutes the first stage. The heavier the house, the closer the supports should be placed to each other; the distance between them shouldn’t be more than two or three meters.
Verifying the obtained number of supports is the second step. the combined weight of the entire house and the estimated extra loads (weight of snow, floors, people, furniture, and appliances, etc.). d.) needs to be split by the maximum load each pile.
The calculation is accurate if the final figure is lower than what was discovered in the initial step. The number of piles along the load lines must be increased if the second stage displays a higher value.
Using an online calculator, which will complete the calculation on its own, will make it simpler. To receive an answer, simply enter your parameters in the required fields.

How to correctly mark installation locations?
You will need a blueprint of the house’s first floor in order to carry out this procedure. First, the intersection of the internal and external load-bearing walls is marked, along with the corner points. Next, all of the remaining piles are spaced equally along each line.
Provide intermediate supports to support the floor beams if there are significant gaps.
How to determine diving depth?
It is only possible to ascertain the supports’ immersion depth by analyzing the composition of the soil. The depth at which the soil freezes is another crucial consideration; piles should not be buried above this point, particularly for vital (residential) structures.
The minimum immersion depth is assumed to be 1.5 m for auxiliary buildings and structures (gazebos, fences, sheds, etc.) that are erected on suitable soils.
The recommended immersion depth for residential buildings should match the house’s height. In actuality, it is frequently lower, which is mostly because of illiteracy or a desire to cut down on the time needed by builders.
It is important to understand the maximum value of soil resistance when diving and to stay within the manufacturer’s permitted limits. If not, there is a chance that the technological hole will collapse before it reaches the necessary depth, in which case the pile will become dysfunctional and require replacement.

Immersion of piles into the soil
To drive piles, there are two methods:
- Manual Dive.
- Mechanical method.
Only relatively thin piles and non-critical auxiliary structures being built may be installed manually. Construction equipment is required for residential buildings. First and foremost, this is because a pile with a diameter of 108 mm cannot be correctly screwed in by hand.
Piles fail too frequently, and the opposite is intolerable since the connection strength is lost. Furthermore, the barrel’s allowable vertical skew is only 2°, which cannot be accomplished by hand.
By using the mechanical approach, you can guarantee excellent immersion while preserving the vertical and a specific force. Only the mechanical approach is allowed for residential buildings, despite widespread advertising suggesting that using muscle power can be used to act in any circumstance.
This gives inexperienced builders the chance to violate various regulations when they start acting independently and end up with a shifting and unstable foundation. A mini-excavator is typically operated with an installed hinged pitch in practical application.
He can submerge trunks up to 159 mm in diameter to a depth of 12 m, which is typically sufficient for individual construction.

How to align horizontally
Subbed screw piles need to be horizontally leveled. To accomplish this, a laser construction level is positioned at the appropriate height above the soil’s surface (a model capable of outlining a horizontal plane is required).
Every trunk is clipped at the mark that is available. In case any of them are excessively brief, initial extensions are made.
In order to increase the missing length, another pipe is welded to the section of the barrel that has been cut (a technological hole is removed), and then the trim is made at the general level.
Immediately after trimming, any exposed metal, including welds, needs to be painted with protective polymer paint. It is essential to use bitumen mastic or pick varieties that are impermeable to moisture.

Pouring concrete
Concrete is poured into the piles’ interior spaces. This lowers the possibility of corrosion inside the barrel and greatly increases the mechanical rigidity of the pipe.
Concreting results in a threefold increase in the shaft’s load-bearing capacity, giving you the foundation’s required margin of strength to withstand unforeseen circumstances. Dense concrete grades (M200 and above) are used for pouring. Filling is done to a level that is marginally below the cutting height.
After filling, a dry sand-cement mixture is poured to the top of the shaft because the concrete in the well will sag by several centimeters during the first few hours. Before the head is installed, it will absorb the water particles that were forced out during subsidence and create a plug that seals the barrel.
Grillage strapping
A grillage is a belt of straps that joins separate supports to form a single structure. It is required to support the weight of the walls and other house structural components, distributing the load evenly over the whole pile field.
Various techniques exist for installing a grillage, contingent upon the manufacturing material:
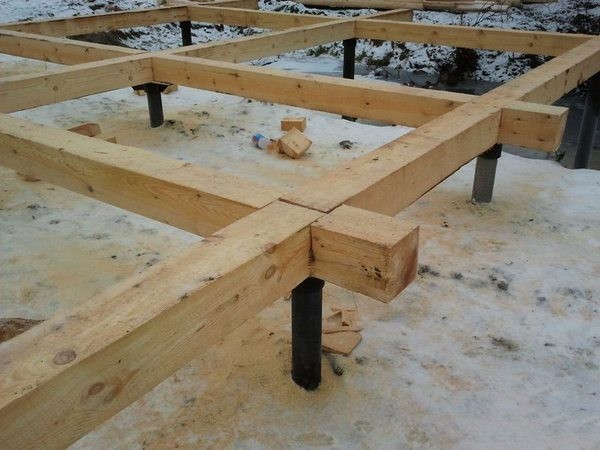
Wood
A minimum of 150:150 mm thick wooden beam is utilized. One alternative is to use packs of boards that are 200 mm wide and 50 mm thick, joined to form a single 150 x 200 mm package. Grade 1 or 2 dry lumber of the highest caliber is used.
An antiseptic and fire-retardant composition is applied to the wood’s surface (at the moment, an impregnation serves both purposes). Only above the pile head are the beams connected, and only halfway across the tree.
Joints situated within the span are prohibited. In every instance, there is a double layer of waterproofing roofing material positioned between the metal and the wood. The pile is precisely positioned along the longitudinal axis of the beam during installation.
Metal
Numerous varieties of rolled metal are employed:
- Channel.
- I-beam.
- Rectangular pipe.
Caps are optional when using a channel, but they are required when using a pipe or an I-beam. When pouring concrete into a channel, specific embedded components are inserted into the pipe.
Waterproofing between the caps and the strapping can be done without, but it is still used between the metal and the wall. Parts are joined together by welding, and bolts are required for reinforcement.
As the metal grillage becomes stronger, a substantial metal component of the building emerges that needs to be maintained by painting it with protective compounds on a regular basis.

Reinforced concrete
While it requires more work and time to create, this grillage option is the most dependable and long-lasting because it won’t corrode or decay. Formwork must be erected atop the heads in order to create it.
After putting in a reinforcement cage, concrete is poured inside.
To stop moisture leaks, a layer of roofing felt or polyethylene is applied to the inside of the formwork. Occasionally, the reinforcement cage is welded directly to the trunks by pouring the grillage below the level of the heads. Usually, this is carried out at ground level at a suitable height.
In these situations, horizontal trimming is carried out following the 28-day hardening of the concrete, and the trunks are then filled.

How to make a false base
A false base is intended to keep animals and birds out of the pile field space beneath the house, as well as wind, moisture, and snow cover during the winter. Such a base is made from a variety of materials.
The most cost-effective and aesthetically pleasing choice is a strip around the outside edge of the corrugated board. It is fastened at the top to a unique wooden board that has been placed all the way around the grillage.
To prevent contact with the ground, the lower portion is fastened to a wooden beam that is positioned atop brick, cinder block, etc. stands.
To drain rainwater, ebbs made of concrete should be placed along the lower edge and ebbs made of plastic should be placed along the upper edge.

Useful video
This video demonstrates the technology used in pile-screw foundation installation:
When building on soft or unstable soil, installing a pile-screw foundation may be a workable solution. Using this technique, piles are driven into the ground to provide a sturdy base for the structure above. To start, you’ll need to evaluate the state of the soil and figure out how many piles to build and where to put them.
After the locations are marked, the screw piles are actually installed by using specialized equipment to drive them into the ground. Compared to conventional foundation techniques, this process is comparatively rapid and causes the least amount of disruption. Every pile is screwed down to a depth sufficient to hold the building’s expected loads.
The next important step is to tie the piles together with a grillage after they are in place. Depending on the design, this may entail using a series of beams or a reinforced concrete beam to connect the pile heads. To ensure stability and avoid uneven settling, the grillage evenly distributes the load across each pile.
You can achieve a sturdy and stable base for your construction project by utilizing a pile-screw foundation with a well-designed grillage. This technique is especially helpful in places where traditional foundations might not be appropriate due to soil movement. It provides a long-lasting, reasonably priced, and effective substitute that is resistant to changing environmental conditions.
With the help of our user-friendly guide, install a pile-screw foundation step-by-step. Learn how to drive piles into the ground and how to secure them with simple tools and methods. We’ll also go over how to connect these piles with a grillage, which is crucial to laying a strong foundation for your building project. Whether you’re new to do-it-yourself projects or want to brush up on your building knowledge, these helpful guidelines will provide you the confidence to take on this important part of home construction and renovation.


