
Enhancing the resilience and visual appeal of roofs can be a satisfying project for homeowners who install metal tiles. Metal tiles have a sleek, contemporary appearance and offer superior weather resistance. Whether you’re starting a new building project or replacing an old roof, a seamless installation process is guaranteed when you follow a step-by-step guide.
Having all the required tools and materials together is essential before beginning the installation. Usually, this consists of flashing, metal tiles, underlayment, fasteners, and safety gear like goggles and gloves. A safer work environment and the avoidance of interruptions are ensured when you make sure you have everything you need before beginning.
Installing metal tiles requires first preparing the roof surface. In order to do this, the roof must be cleared of debris and structurally sound. Prior to moving further, any roof deck repairs ought to be taken care of. To increase energy efficiency and add an extra layer of protection against moisture, a suitable underlayment must be installed.
After the roof has been prepared, the metal tiles are laid out. As directed by the manufacturer, align the first row of tiles beginning at the bottom corner of the roof. To keep water out of the row below it, each row after that should overlap. Use the proper fasteners to secure the tiles, making sure they penetrate the roof deck just enough to prevent chipping.
Continue placing rows of metal tiles, being mindful of alignment and overlap, as you move higher. To create a watertight seal around roof features like vents and chimneys, use flashing. For the roof to stay intact over time and to avoid leaks, flashing must be installed correctly.
After every tile has been put in place, check the roof to see if there are any loose tiles or any places that might need more fastening. Make sure all the tools are stored correctly and clear up any debris left over from the installation process. Your metal tile roof will last longer with routine maintenance, such as looking for damage and debris accumulation.
| Step 1: Prepare the Roof | Clean and inspect the roof surface, ensuring it"s free of debris and damage. | |
| Step 2: Install Underlayment | Lay down a waterproof underlayment to protect against moisture and en Inspect and Clean Up | Check the entire installation for any loose tiles or imperfections, and clean up the work area. |
- Installation of sheathing
- Calculation of metal tiles
- Metal roofing: waterproofing and vapor barrier
- Required tools and equipment
- Fastening and laying metal tiles – step by step
- Installation of metal tiles – step-by-step instructions
- Additional elements
- The device of the roof is
- Practical recommendations from experienced professionals
- Video on the topic
- Metal tiles. Detailed instructions for installing metal tiles and roofing elements
- Installation of metal tiles in detail
- Bypassing a pipe on a roof made of metal tiles. Step-by-step installation instructions. Installation of metal tiles
- Master class on how to install metal tiles step by step . DIY installation of metal tiles
- Nuances of installing metal tiles!
- Installation of a roof made of metal tiles // FORUMHOUSE
Installation of sheathing
Since the tiles will be attached to the sheathing, this stage of the work needs to be given extra care. Additionally, the internal roof space is naturally ventilated thanks to this design.
- Metal tile sheathing is made from wooden beam. The relative position of the boards can be continuous or thinned.
- Most often used sparse designs, in this case, the distance between the boards (sheathing pitch) is strictly tied to the distance between the lower depressions of the tile waves, since in these places the material has the greatest strength.
- Distance between the first two beams on the slope side there should be approximately 70 centimeters less than the established pitch.
- The minimum thickness and width of the board for sheathing is 25 and 100 mm respectively.
- The width of the board for the counter-lattice can be half as large. The first board from the edge of the roof should be 15-20 mm thicker than all the others.
To prevent distortions and uneven tile arrangements in the future, pre-boards are calibrated one size at a time.

After the waterproofing layer is installed to its fullest, the structure is installed. Self-tapping screws are used to secure the counter lath, which is where the main lathing is fastened to the rafter frame. Beneath the metal tiles on the roof ridge are additional support boards.
Calculation of metal tiles
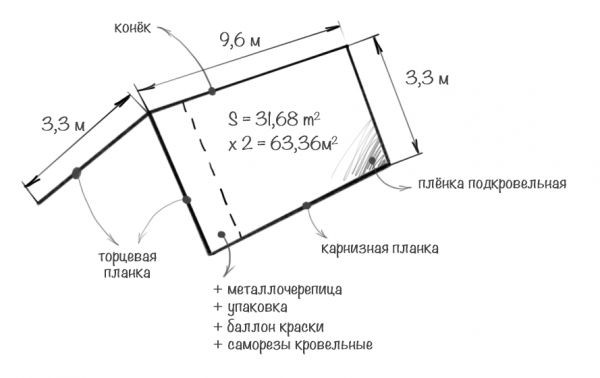
To calculate the quantity of material needed for roof construction, follow these steps (or use an online calculator):

- Calculated square each stingray.
- The effective size of the tile sheet is calculated, for this the area used in the overlap is subtracted from its total area.
- Calculate the number of rows of tiles on the slope. For this the working length of the slope must be divided by the width of the sheet.
- The number of sheets in a row is counted.
- The numbers of rows and sheets in a row are multiplied.
Keep in mind that there may be a value overlap of up to 15-20 centimeters when counting the sheets in a row.
It is preferable to round all values up to make sure there is never a shortage of material.
We offer detailed, step-by-step instructions for installing metal tiles on your roof in this guide. We cover everything you need to know to guarantee a long-lasting and aesthetically pleasing roof, from preparing the roof surface to installing the underlayment and fastening each tile. Whether you’re an experienced do-it-yourselfer or this is your first time, our approachable style will help you accomplish expert results and improve the resilience and appearance of your home’s roof. Does this sum up what you’re looking for in its entirety?
Metal roofing: waterproofing and vapor barrier
Isolation roofing pie should be taken care of before you start manually installing metal tiles. Layers of waterproofing and vapor barrier provide liquid protection for interior spaces.
The waterproofing keeps outside moisture from penetrating the inside of the roofing pie and is situated between the rafters and the counter-lattice. The most widely used waterproof materials are reinforced films and polyethylene. They have a slight sagging and are stretched across the whole slope. Making sure that the waterproofing and thermal insulation do not overlap is crucial.
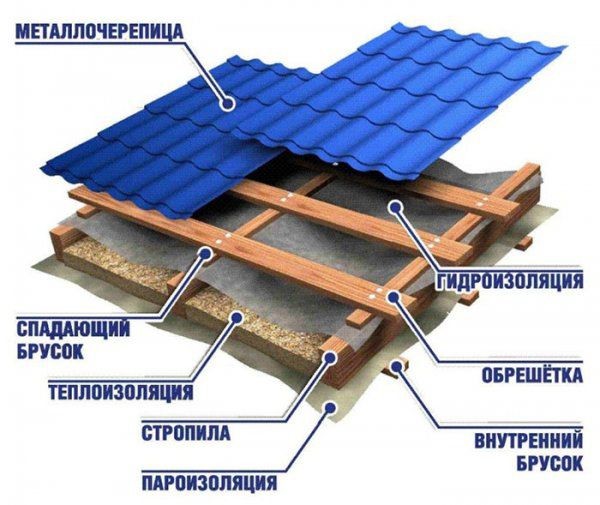
A protective layer called a vapor barrier keeps moisture produced indoors from penetrating the roof’s interior. This is the lowest layer of the roofing pie; it is affixed to the rafters and situated beneath them, providing protection from condensation through thermal insulation.
A high-quality vapor barrier is required for metal tile attic roofs; however, vapor barriers do not need to be installed on cold roofs without insulation.
Required tools and equipment
Setting up the required equipment is the first step in covering a roof with metal tiles. What you’ll need to install a metal tile roof is:
- Screwdriver.
- Rail.
- Tin snips or other metal cutting devices such as nibblers, circular saw, etc. d.
- Construction stapler.
- Tape measure and marker.
- Components of the roof and roofing pie: tile sheets, self-tapping screws, hydro-, steam- and heat-insulating materials, timber for sheathing and rafters.
You cannot use a grinder or other abrasive cutting tools when working with tiles because they will damage the sheet’s structure.
Fastening and laying metal tiles – step by step

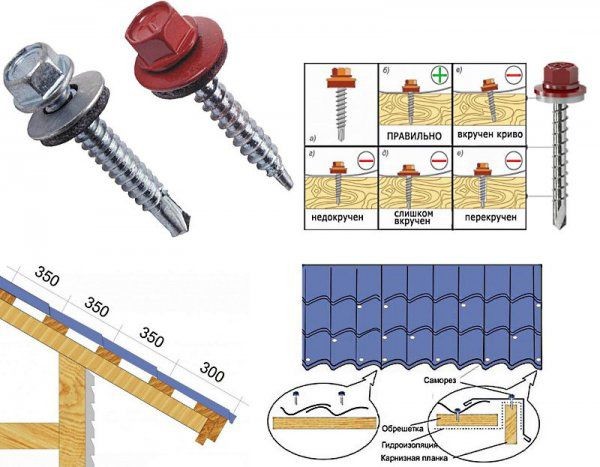
How can you use your hands to manually apply metal tiles to a roof? Self-tapping screws are used to secure the metal tiles to the sheathing, and an ethylene-propylene rubber gasket is used to provide waterproofing around the fastening points.
Galvanized self-tapping screws with a press washer are used if tiles with hidden fastening are installed.
Self-tapping screws need to be tightened as much as possible.
If the force used to secure the cap is not strong enough, moisture will seep under it and lead to corrosion. Overtightening the screws will cause the gasket to distort and lose its tightness.
- Before covering the roof with metal tiles, you should make sure that the sheathing is symmetrical and reliable.
- Self-tapping screws screwed into the lower deflection of the tiles, they must enter strictly perpendicular to the plane of the sheathing boards.
- When connecting two overlaps fastening is carried out in wave rises using shortened screws.
- Installation of tiles begins from the lower left corner of the slope, subsequent sheets are laid on top previous.
- Self-tapping screws screwed into each wave of tiles along the perimeter of the slope and in a checkerboard pattern in internal areas. If a screwdriver is used for this, then you need to minimize its rotational effect on the material.
DIY installation guide for metal tiles
You now understand the proper way to install metal tiles, and we encourage you to become acquainted with the most crucial information: installation guidelines.
Installation of metal tiles – step-by-step instructions
How can you correctly use your hands to apply metal tiles to a roof? Setting up the rafter system is the first step.

All other roofing components will be fixed on this. The beams used in the system are made of wood, and they are larger than the sheathing bars.
The following are the rafters’ most crucial components:
- Mauerlat. This is the fulcrum of the structure.
- Rafter legs. They hold the crate on themselves and rest on the mauerlat.
- Racks. Strengthen the support of the rafter legs.
The so-called tavern is used to secure the rafters to the wall. These metal strips join two structures together using screws or nails.
The three primary insulating layers—vapor, waterproofing, and insulation—are then put in place. The rafter system is coated with a waterproofing film or membrane and stapled to it. With the aid of cords drawn crosswise in the lower plane of the rafters, thermal insulation is positioned in cells made up of the intersections of the rafter beams and fixed.

Once the protective structures are installed, you can start installing the sheathing, which will be the base for the roofing that we will install later. She covered the rafters and waterproofed the layer, fastening it with self-tapping screws.
It is necessary to apply antiseptic preparations to all wooden roofing materials and allow them to dry before installing the sheathing. Don’t forget to select the roof’s angle.
How to install metal tiles by hand:
- A cornice strip is attached to the frontal board, providing protection of the roof from the effects of wind.
- When performing work, the need to ensure good natural ventilation of the space is always taken into account. To do this, you need to leave gaps between all layers of the roofing cake. The basis of natural ventilation is the possibility of free air circulation under the ridge of the roof.
- The last stage is installing metal tiles. It must be taken into account that the sheets should protrude beyond the edges of the sheathing by 5 centimeters and be aligned horizontally along the eaves line.
- The ridge strip is attached to additional two boards, which are installed at the joints of two slopes during the installation of the sheathing. Such measures are necessary to ensure additional resistance of an important structural element to negative influences.
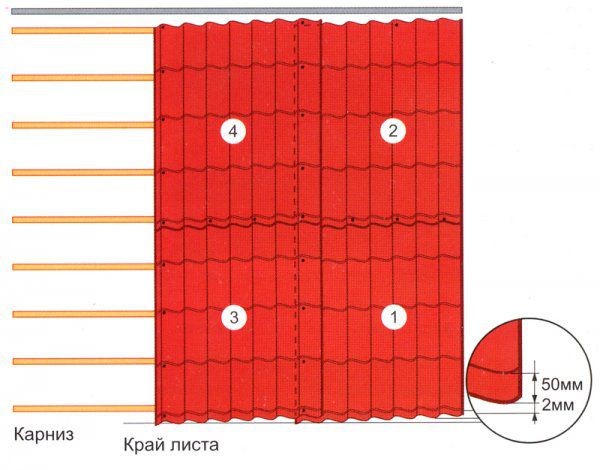
Diagram for laying metal tiles
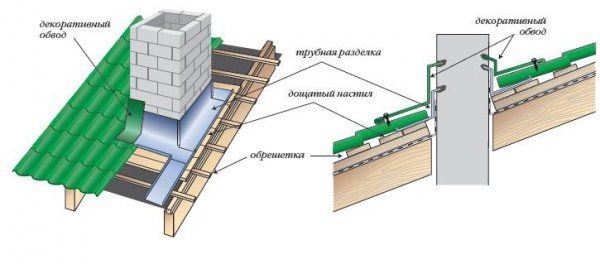
It takes special attention to lay metal tiles around a chimney. First things first, plaster is required. Secondly, sheathing-attached boards must be installed around it. Third, all tile edges facing the chimney are trimmed to a height of 15 centimeters.
Additional elements
Along with the eaves and ridge strips mentioned above, the following items (full list available here) may be required when installing a metal roof:
- Snow guards. They loosen the snow masses falling from the roof, making their fall relatively safe for building structures and for humans.
- Junction strips. These products frame the joints of tiles with all important structures, such as chimneys and ventilation pipes.
- Corners and valleys. They protect all corner roof structures.
- Low tides. Used to redirect flows of rain and melt water.
- Ovka.

The device of the roof is
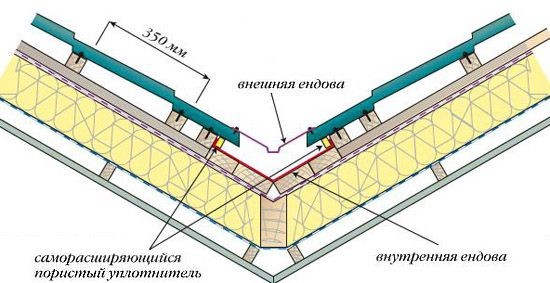
An additional bar is attached for every yendova. The installation begins from below, resulting in a 25–30 centimeter overlap. The lower bars are pruned below the level of the cornice, and then selection is made. The seal is placed under each thunder and horse.
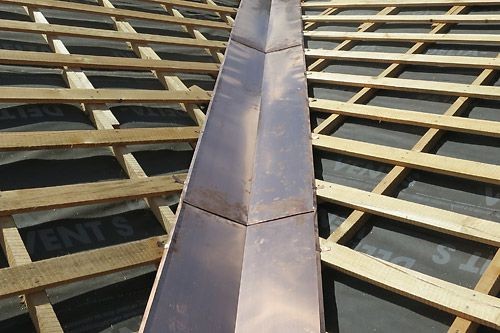
There is still space (at least 8–10 cm) between the axis and the sheets. Screws were screwed 1.5 cm from the stamping line in cut sheets. The fasteners are positioned 25 centimeters away from the axis when they are fixed. When the work is finished and executed correctly, the sheet will border the board where Endov is situated.
Since water should float in this additional element, the lower yendova installation is done before the roofing material is laid.
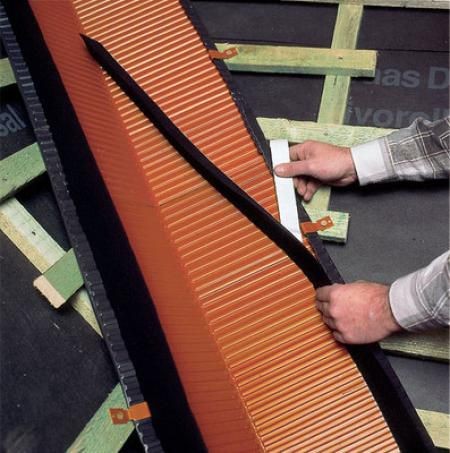
Errors will cause the fastening to end up somewhere else, which will cause gaps to form that could let in roof leaks.
Cut sheets are covered in decorative overlays. When installing them, bear the following points in mind:
- installation starts from the bottom and goes up;
- Do not use a sealant between the tiles and the lining;
- products are laid with an overlap (at least 10 cm);
- self-tapping screws used to fasten the linings should not damage the valley.

The valley often starts and ends at the slope of the roof. For instance, the valley of a dormer window is constructed using a different board. A hole is cut in the sheet for the window itself, and sealing material is positioned along the walls. In this instance, a unique strip covers the eaves overhang.
The valley strips are then fixed after being pre-cut around the edges. The part that protrudes needs to be placed carefully next to the tile sheet.
Practical recommendations from experienced professionals
- Distance between rafter frame beams it is recommended to maintain within 60-90 centimeters, to avoid possible deflection of the roof structure.
- When performing work, it is recommended to use shoes with soft soles and carefully move on the tiles, emphasizing steps in its lower deflections. This will prevent deformation of the material.
- The absence of interaction between the protective layers is necessary not only to ensure normal ventilation, but also to prevent possible mechanical damage during friction.
- For additional ventilation, it is recommended to install dormer windows in the attic.
- For accurate installation of all elongated additional elements, it is advisable to use the method of passing a thread and its fastening between already installed structures.

This is the technology used to install metal roofing tiles. This material is expected to last for 50 years or more, but how long that is without needing repairs depends on how well it is installed.
It is crucial to accurately compute the material consumption; to do this, you must be aware of the coating’s dimensions in addition to all other dimensions and ratios. The service life can be drastically reduced by even small departures from the necessary indicators.
Metal tile installation can greatly improve your roof’s strength and appearance. You can guarantee a strong, aesthetically pleasing roof that is weatherproof by taking a methodical approach.
Thoroughly preparing the roof surface is the first step in the installation process. This include clearing away any debris, making sure the roof structure is aligned correctly, and installing an underlayment to add more moisture protection.
To guarantee that the metal tiles are placed precisely, measure and mark the roof carefully next. Since proper alignment keeps the roof’s structural integrity intact and averts possible water leaks, it is essential for both functional performance and aesthetic appeal.
After the marking and preparation are finished, install the metal tiles, working your way up from the bottom edge of the roof. To ensure maximum protection and prevent water infiltration, securely fasten each tile in accordance with the manufacturer’s instructions, making sure they overlap correctly.
During the installation process, be mindful of small details like how to fasten tiles and making sure there is enough ventilation underneath them. By taking these precautions, you can prolong the life of your roof and improve the comfort and energy efficiency of your house.
To sum up, adding metal tiles to your roof is a wise investment that blends attractiveness and longevity. These detailed instructions will help you install a roof that will protect your home from the elements for a long time while also improving the overall appearance of your house.


