
To prevent water damage to your home’s foundation, you must build a strong and effective blind area around it. This tutorial will help you lay a blind area with your hands, so even if you have no prior construction experience, you can handle this project.
In addition to keeping water away from the foundation, a well-built blind area improves the appearance of your whole house. Your house can be kept both aesthetically pleasing and structurally sound with the right supplies and equipment.
We will go over every step in detail in this article, from setting the foundation to adding the finishing touches. You’ll be able to finish the project quickly and effectively and save money on expert labor costs by following these instructions.
So grab your tools, roll up your sleeves, and let’s get to work building a beautiful and useful blind area that will protect your house for many years to come.
| Step | Description |
| 1. Preparation | Clear the area around the house and remove any debris. Mark the boundaries of the blind area using pegs and string. |
| 2. Digging | Dig a trench along the marked boundary, about 6-8 inches deep. |
| 3. Base Layer | Fill the trench with gravel or crushed stone, compacting it to create a stable base. |
| 4. Formwork | Set up wooden formwork around the trench to shape the edges of the blind area. |
| 5. Sand Layer | Spread a layer of sand over the gravel, leveling it out evenly. |
| 6. Waterproof Membrane | Lay a waterproof membrane over the sand to prevent water from seeping through. |
| 7. Concrete Pouring | Pour concrete into the formwork, smoothing it out with a trowel to create a flat surface. |
| 8. Curing | Allow the concrete to cure for at least 24 hours. Keep it moist to prevent cracking. |
| 9. Finishing | Remove the formwork and clean up the edges. The blind area is now ready. |
Street blind area
It is currently the most widely used method of foundation protection, but it has a lot of drawbacks. If there is a chance to choose a more costly and dependable option, that is preferable. This kind of blind area is typically associated with large-scale urban development.
Among the drawbacks are:
- the need to knead the concrete mixture or its purchase at the factory (there is a need for the use of concrete mixers);
- Concrete is gaining strength within 4 weeks, half and this time he needs care (moisturizing every 2-3 hours), which increases labor intensity and increases the construction time;
- the probability of cracks on the surface;
- The complexity of access to the system of storm sewers and drainage. Since in order to inspect or repair them, you will need to remove the coating and then lay a new one.
A concrete element is manufactured in the following sequence:
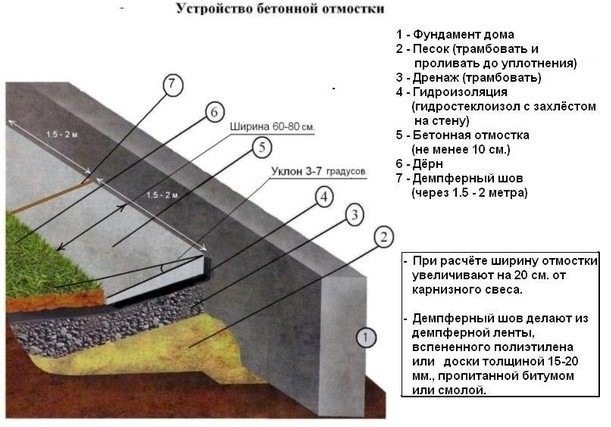
- Calculation of the thickness of the entire structure, in which all layers must be taken into account. This value is needed in order to determine the depth of the trench along the perimeter of the foundation.
- Determination of geometric dimensions. On average, the width should be within 90-100 cm. The slope for concrete is 3-5% (for piece materials – 5%, therefore, in order not to get confused in the values, it is recommended to remember the general – 5%).
- Marking the area. To do this, the limits of the future structure along the perimeter of the foundation are marked with pegs with a cord stretched along them.
- Next they open a trench. The dimensions in the plan are already limited by the markings; all that remains is to dig up the soil to the depth calculated in the first point.
- The base soil is thoroughly compacted. If possible, make a clay castle, which will provide additional protection from moisture.
- The next layer is a sand cushion. Sand performs three functions: replacing heaving soil, which is widespread throughout the country, with conditionally non-heaving soil, leveling the base, installing a drainage layer. The sand cushion is made only from coarse or medium sand. If the blind area is built with your own hands using fine fractions, then large shrinkages, cracks and damage to the waterproofing are possible. The thickness of the layer is selected depending on the characteristics of the soil. It is important to consider strength and water saturation. If the soils on the site are strong, it will be enough to lay about 200 mm of sand. For unstable foundations, 500mm of sand bedding may be required.
- Crushed stone bedding performs approximately the same functions as sand. Here you can use not only crushed stone, but also gravel or a sand-gravel mixture. The installation of a blind area on such a foundation increases the strength of the soil and increases the reliability of the entire structure.at this stage the preparatory work ends. Up to this point, there are no fundamental differences in how to properly make a blind area for a foundation from different materials.
- The next stage is placing the formwork. Formwork is needed so that the liquid concrete mixture does not flow beyond the markings. For manufacturing, you can purchase boards with a thickness of 22-25mm. You can use old materials to save money. Walls are made from boards and installed around the perimeter of the foundation. In this case, it is important to install the board directly to the wall of the building; the thickness of the formwork element will provide the necessary expansion joint, the thickness of which is in the range of 20-40 mm. The seam is needed to prevent cracking and deformation of the structure due to different shrinkage of the foundation and blind area.
- After the formwork is installed, reinforcement mesh is laid. They will increase the bending strength of concrete. The diameter of the reinforcement in meshes is recommended to be approximately 10 mm. This technology for constructing a blind area will ensure its strength and reliability.
- Next, the installation of the blind area requires the installation of transverse boards along the entire perimeter of the foundation. The boards will provide expansion joints that cut the strip into separate sections. The pitch of the boards is 2 meters.
- The next stage is pouring concrete. For this, a concrete mixture of classes B20 – B22.5 (grade M300) is made. It is this solution that can ensure the durability of the structure and the necessary strength. You can use concrete of smaller classes, B15 and B17.5 are suitable, but it is worth remembering that the service life will be reduced. When using B22.5 mixture, the standard service life will be approximately 25 years. The filling of expansion joints in each compartment between the boards is carried out in one step. Afterwards, compaction is required. There are several methods, but the most common is vibratory hammers.in the absence of the necessary equipment, you can use bayonet.
- After the solution is poured, the surface is ironed, this is done to increase the strength characteristics.
- The penultimate stage of manufacturing a concrete foundation blind area is strengthening the structure and maintaining it. At a temperature of +20 degrees Celsius and normal humidity, it takes 4 weeks to harden. If the temperature is lower, the process slows down significantly. It is necessary to wait until at least 70% of the brand strength of concrete. For a week or two after pouring, moisten the surface every 2-3 hours (and at night 2-3 times per night). This is necessary to prevent cracks from appearing.
- When the concrete has gained 70% strength, the formwork can be removed. After this, the blind area is completed.
Foundation blind area made of paving slabs
In this instance, the cost of DIY blind areas around the house is the only disadvantage. Yet, it is better than the earlier type in terms of appearance, upkeep, and usability.
For the purpose of creating a concrete foundation blind area, the preparatory stage of work is completed in accordance with points 1 through 7.

The technology also varies:
- An additional layer of sand 70-100 mm is laid on the crushed stone, while ensuring the required slope.
- The next stage is installation of tiles.
- Seal the joints of piece elements with cement-sand mortar.
The article "Blind area made of paving slabs" has more details about this kind of construction. A structure composed of ceramic bricks or cobblestones is installed using the same technology.
With the correct assistance, installing a blind area around your house is an easy task that you can complete on your own. This post will walk you through the process of building a long-lasting, functional blind area that shields your foundation from water damage. We’ll guide you through every step of the process, from material acquisition to final touches, to make sure you fully grasp the instruments and methods required for a job well done. Regardless of your level of experience with do-it-yourself projects, following these easy instructions will enable you to improve the durability and aesthetics of your house.
Clay blind area
This kind of arrangement to safeguard the foundation necessitates carrying out the following tasks in the correct order:
- Preparation according to points 1-7 for a concrete blind area.
- Laying a layer of clay 100-150 mm thick and compacting it. For manufacturing, you can use the clay that remains after excavating the foundation pit, but only if it is of good quality and high strength.
- The arrangement ends with the creation of a decorative layer. To do this, stones are sunk into the clay layer or pebbles are laid on top. This will create a convenient walking path and strengthen the structure.
A low-cost, low-labor alternative for establishing drainage around the foundation’s edge is a clay blind area.
Installing blinds around your house is a useful and satisfying project that can improve the look and feel of your house. You can guarantee that the work is done correctly, preventing water damage to your foundation and enhancing drainage, by following a step-by-step guide.
Mark the location of the blind area and begin the preparation of the site by clearing away any plants and debris. To create a solid foundation, excavate the soil to the necessary depth and then lay a base of compacted gravel. In order to avoid future settling and cracking, this step is essential.
Next, build the formwork by erecting wooden boards around the blind area’s perimeter. Spread a layer of sand evenly over the gravel. To stop water from seeping in, install a waterproof membrane. When the base is prepared, mix and pour the concrete, making sure to use a trowel to smooth it out and spread it evenly. Think about putting rods or reinforcing mesh inside the concrete to increase durability.
Let the concrete cure for the recommended amount of time after it has been poured and leveled. By doing this, the blind area is guaranteed to properly harden and acquire the required strength. To protect the surface from moisture and increase its lifespan, remove the formwork and seal the surface. Your new blind area will give you good service for many years if you give it the right upkeep and care.
Taking on this project alone will save you money and give you a sense of achievement. By paying close attention to these instructions, you can attain expert-level outcomes and greatly enhance your home’s defense against water damage. Savor the advantages of a well-designed blind area that improves the longevity and curb appeal of your home.


