
Your outdoor space can be made more attractive and useful by laying paving stones around your home. Many homeowners can complete this project on their own with a little preparation and the appropriate equipment. Whether you’re building a driveway, patio, or walkway, knowing the fundamentals will help you produce results that look professional.
Any paving stone project should begin with careful planning. This entails making the appropriate material selections and precise area measurements. It’s important to select paving stones that complement both your design and the function of the area. Careful measurement after choosing your stone will guarantee that you buy enough and save unnecessary trips to the store.
The ground needs to be ready next. This entails clearing the area where the stones will be laid of any grass, roots, or other debris. Additionally, you’ll need to excavate the ground to a depth that can hold both the stones and the base material. Don’t rush this step of the process because a solid foundation is essential to the longevity of your pavers.
When the ground is prepared, the base material—typically a blend of sand and gravel—should be laid. Your paving stones will have a sturdy base thanks to this base, which will help keep them from settling and shifting over time. You can start arranging the stones after spreading and leveling the base material, being careful to fit them tightly together.
The last steps are to compact the whole surface and add sand to the spaces between the stones. This contributes to the smooth, even surface and helps hold the stones in place. For many years to come, regular upkeep like sweeping and sporadic re-sanding will keep your paving stones looking fantastic.
- What kind of material is this?
- In what cases can it be used??
- Varieties with photos
- Requirements for building materials
- What should be the bedding??
- What you need?
- How to lay it out beautifully?
- How to calculate the required quantity?
- Step-by-step instructions for laying
- On a flexible path
- On the finished concrete base
- For a new concrete surface
- How to do everything right and avoid mistakes?
- Pros and cons of using tiles
- Price of raw materials per 1 m2
- Video on the topic of the article
- Video on the topic
- Laying paving stones. How to lay paving stones with your own hands.
- Do you want a blind area made of paving stones?? Watch and do it yourself.
- Technology for laying paving stones on a concrete base, from Vladimir Voloshin
- The complete process of preparing and laying paving slabs in 1.5 minutes
What kind of material is this?
Hard blocks or stones meant for paving roads are referred to as paving stones. Their form is flat and can take the shape of a square, rectangle, or other figure with varying side lengths and shapes.
Paving slabs and stones differ in that the latter’s thickness is determined by the element’s width and, occasionally, length. Paving slabs are substantially lower in height.
Taking this into consideration, streets and sidewalks in major cities of developed nations were paved with paving stones up until the 1920s. It has persisted in its original form to this day because it was so strong that it could support the continuous weight of vehicles.
Because asphalt and concrete pavement are less expensive than paving stones, they gradually replaced paving stones. However, paving stone installations are becoming more and more popular as design solutions.
In what cases can it be used??

The material is suitable for paving even in places where trucks and heavy machinery will be operating.
If you use this coating to pave the house path, it will also be dependable. The material will last for decades if used and cared for properly.
Paving stones are especially simple and don’t need a specific kind of foundation. It can be installed over a soft cushion made of gravel, crushed stone, or sand, or it can be placed on top of a concrete or asphalt surface.
Any temperature fluctuations and frost won’t harm the paving stones. Correct installation of the slope will prevent snow and rainwater from running beneath the tiles, protecting them from deterioration. It is also a safe material for the environment, emitting no harmful substances and posing no threat to humans or the natural world.
Varieties with photos
Materials for paving stones can be artificial or natural.
The home’s owner has an option if he wants only natural and organic materials:
- granite,
- basalt,
- marble,
- clinker tiles.
It is appropriate to regard tiles made from the first three materials—or from other rocks—as an eternal coating. Natural stone can be split or sawed to obtain it.
The strongest paver stones are made of granite. Precipitation, deformation, mechanical stress, and temperature fluctuations won’t concern her. Natural stone tiles—granite in particular—will produce an antique-looking coating. This is how it appears in real life:
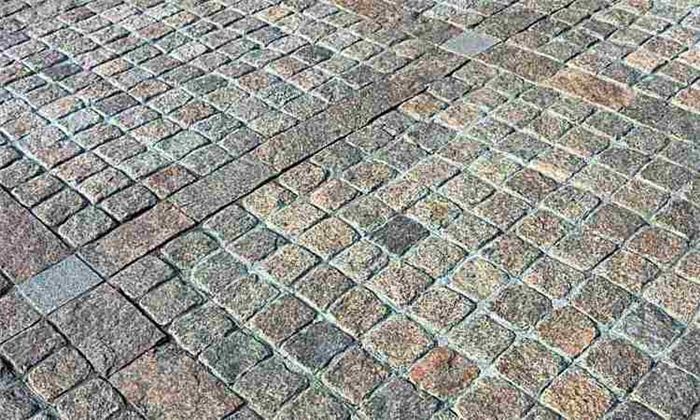
Clay (special grade) is fired at high temperatures to produce clinker tiles. The minerals in the clay are solidified through baking. These tiles are therefore no worse than granite.
It resists the passage of moisture, is unaffected by chemicals, and does not fade in the sun. Clinker tiles also have a unique, rich appearance.

The only options available to those who prefer artificial materials are rubber paving stones or vibro-pressed concrete.
The only ingredients added to vibration-pressed concrete are dyes and plasticizers; otherwise, the composition is identical to that of regular concrete. Additionally, the primary ingredients (sand and cement) are diluted in different ratios. Such a coating won’t be very expensive, but the quality shouldn’t be compromised.
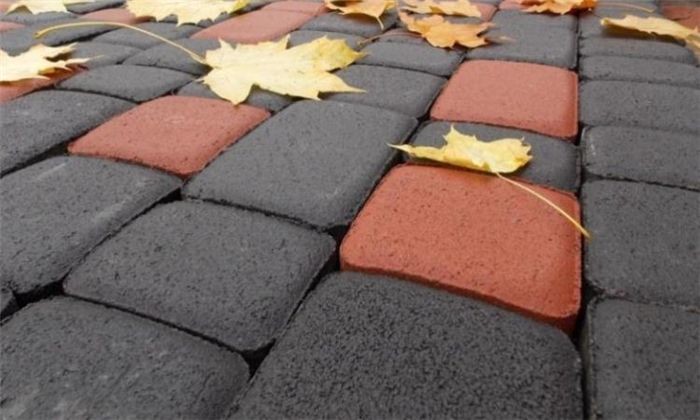
Since rubber paving stones are made from recycled automobile tires, they are not only a lovely and cozy covering but also functional. Walking on such paving is very convenient and comfortable. It is not at all harmful.

Requirements for building materials
Paving stones need to adhere to GOST regulations just like any other material does. When selling, the seller typically only offers information regarding the material’s resistance to frost. However, you don’t have to be afraid to ask him for any supporting documentation that demonstrates additional traits.
There should be no less than these indications on good, high-quality paving stones:
- Frost resistance – F200 (this means that the tiles can withstand at least 200 freezing and thawing cycles in winter). The higher this number, the better and longer the coating will last.
- Moisture resistance – maximum 6%. If the indicator is higher, the tile will begin to absorb too much moisture and collapse because of this.
- Strength – M300, M400. The tiles must pass tensile, compression and bending tests. If the strength data is within these two indicators, then the tile can withstand heavy loads.
- Abrasion – maximum 0.7 g/cm2.
Additionally, M500 cement and sand with a fraction of 2.7 should be used to make paving stones.
What should be the bedding??
Paving stones can be laid on both hard and soft bases, so it’s important to know what layers of backfill to use underneath to prevent the finished coating from slipping down.
The proper arrangement of the "pie" (all backfill layers) determines the caliber of the element installation itself.
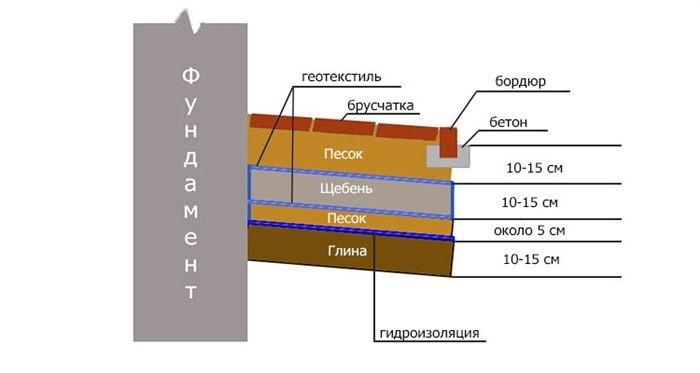
In a soft blind area—that is, when the ground is made of grass, gravel, or crushed stone—the "pie" looks like this:
- Remove the top layer of soil so that after the “multi-layer cake” and paving stones, the height of the blind area is not too high.
- Compact the soil using a manual tamper or vibratory rammer (the same action must be performed after each backfill layer).
- Fill a layer of clay (10-15 cm).
- Lay a waterproofing layer (geotextile). This is necessary so that underground water and moisture do not erode the base, and grass does not grow under the tiles.
- 5 cm of sand is poured onto the waterproofing.
- A layer of crushed stone (from 10 to 15 cm) is placed on top of the sand, which will act as drainage. Crushed stone should have a fraction of 3 to 5 cm.
- Then the last layer of sand or gritsovka up to 7 cm high is poured again. This finishing coat is very important as it will hold the tile in place. You can prepare the gritsovka yourself by simply mixing cement and sand at a ratio of 1:4, or purchase a ready-made mixture at a hardware store.
There are two methods you can use if you need to install tiles on top of concrete:
- For the prancing – cement and sand (1:5) 5 cm thick.
- For glue (you buy a ready-made mixture in the store and dilute it with water). You need to apply this glue to the concrete surface in a thin layer (no more than 1 cm), otherwise it will quickly harden and you will not be able to lay elements on it. Apply glue and level it with a notched trowel over an area of no more than 1 m2.

Paving stone laying is a gratifying do-it-yourself project that improves the usability and curb appeal of your house. You can build a long-lasting, eye-catching patio or pathway by using the appropriate equipment and methods. This procedure calls for meticulous base preparation, exact measurement taking, meticulous planning, and methodical stone placement. By following these guidelines, you can be sure that the finished product will look professional, last a long time, and increase the value and appeal of your house.
What you need?
Getting Started: The following equipment must be carried by you:
- shovels (bayonet – for digging soil, shovel – for removing soil);
- tamping plate or hand tamper;
- Master OK;
- buckets – for storing solution or bulk materials;
- roulette;
- level;
- mallet;
- fishing line, cord;
- grinder and diamond-coated disc – for trimming tiles and borders;
- brush – for sweeping the grout along the seams of the tiles.
Items you will require:
- Paving stones.
- Border.
- Waterproofing (geotextile).
- Clay.
- Sand (sifted).
- Crushed stone (fraction 20 mm).
- Cement.
Sand will be needed in greater quantities when the percentage of crushed stone is higher because it will permeate the crushed stone and create a larger layer.
How to lay it out beautifully?

Innovative design solutions can be created by blending various element colors and shapes. The most chosen looks are:
- Christmas tree. The method is interesting, but not economical. It takes a lot of pruning;
- Brick. Practical and economical, because not many tiles need to be cut;
- Square. The most common option.
You are free to experiment and try various tile-laying techniques.
How to calculate the required quantity?
You must determine the area of the entire house path in order to determine how much material was used to arrange the blind area. To accomplish this, multiply the width by the length for each section after identifying the boundaries of the end of the blind area for each of the house’s sides (and turns) using a tape measure.
You can typically find an online calculator to determine the necessary quantity of tiles on the website of the business where the tiles will be purchased.
A house, for instance, has four straight sides and no turns. Two of them have blind areas that are two meters wide and ten meters long; the other sides are five meters long. As it turns out, the total area of the blind area is equal to (2×10) + (2×10) + (2×5) + (2×5) = 60 m2.
The area of a single tile must now be determined. If a tile is made in the shape of a square, its width and length will be equal to 0.2 meters each. Therefore, one element has an area of 0.2 × 0.2 = 0.04 m2. It will require 25 tiles (1:0.04) for a 1 m2 area. Now that we know how many elements are required to cover one square meter, we only need to multiply 25 tiles by 60 m2 to get 1500 pieces.
Adding a minimum of 5% to the final amount is necessary to account for improperly cut tiles or components that were damaged or proved to be flawed. Example: 100 x 5 = 75 pieces out of 1500. At least 1575 tiles must be purchased.
Step-by-step instructions for laying
Three methods of laying paving slabs will be discussed in this section: laying on a soft blind area, laying on a finished concrete base, and laying after pouring concrete.
On a flexible path

Using a shovel, you must first dig a trench along the lines that have already been drawn to indicate the future blind area. The digging depth is typically 40 cm.
The "pie" is next (the recipe was written a little earlier). Giving the surface the appropriate slope right away during this arrangement stage is crucial to preventing layer-to-layer changes in the slope.
The drainage system needs to be taken care of before the components are laid. In order to do this, drains—such as concrete, metal, or plastic gutters—are installed around the perimeter of the walls to divert water from areas that are visible to the eye into the sewer or away from the foundation.
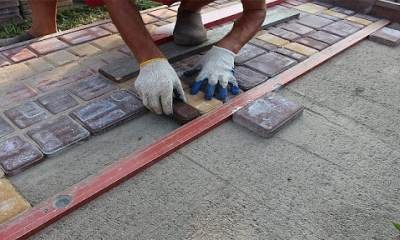
Paving stone installation proceeds gradually in the direction of the walls, beginning at the curb’s edge (the corner). Cut tiles need to be positioned beneath the base or beneath the wall. A level is used to ensure that the installation is level, and a kiyanka is used to knock out a single element or several in a row if needed.
You can use a board or rule to align multiple rows at once by bringing it up to a laid tile and using the tool to align each row or individual element. To help cement grab more quickly, a gang is used to fill the joints between paver stones before water is poured over them.
On the finished concrete base
First, the surface of the concrete is inspected for imperfections, cracks, and potholes. If so, a cement solution is used to first record these deficiencies. The borders must then be installed. If the curbs are already in place, you will need to choose whether to lay the tile in cement-sand mortar or glue.
In the first instance, the curb’s height might be sufficient to prevent the paving stones from slipping once installation is complete. The second option will cause the material to slide off because the backfill layer can be much higher than the curb.
It is therefore preferable to rearrange the tiles (or install new ones next to the old ones) if the height of the border prevents them from staying in their original positions.
The concrete is then leveled using the following rule after a layer of glue (1 cm thick) or a bead (5 cm thick) is applied. After mounting each component on the mortar, the same mortar is used to seal the seams.
For a new concrete surface
Before pouring concrete on a blind area, the existing soil must be dug up.
After carefully compacting the trench’s bottom, waterproofing, crushed stone (10–12 cm), and sand (10 cm) are added. Sand is thoroughly compacted after being wetted with water using a hose or watering can.
Creating the border is the next step. After the curbs are firmly in place the following day, the trench is filled with concrete and a reinforcing mesh is placed at its base.
Sand, cement, and crushed stone are combined in a 3:1:3 ratio to create concrete; water is added last. It ought to be twice as much as cement. In other words, you need two buckets of water for every bucket of cement.
Only after the concrete has completely dried can tiles be put in place. Typically, it takes 28 days. Special plasticizers can hasten the solution’s hardening process when added to concrete.
The same as in other cases, the seams are sealed with glue or covered with grout.
How to do everything right and avoid mistakes?
Even though there is a wealth of information regarding paving stone installation on the Internet, some people continue to make common mistakes:
- They don"t put up curbs. As a result of this, the tile begins to deform and move out, since it does not have a stop.
- They take low-quality material. Good paving stones cannot be suspiciously cheap. If it has a glossy or very bright color, it means that the proportions were violated during its manufacture. Such tiles can be considered disposable.
- Purchase tiles from different batches. This usually happens when there is not enough material and you have to buy more. The quality of the elements may be the same, but the colors may differ. As a result, the coating will look like a spotted giraffe (all in different color spots). Conclusion: buy tiles from one batch.
- The backfill layer is poorly compacted. The result is that depressions form on the surface in which water accumulates. You have to undermine the elements, re-make the bedding and install the tiles again.
- Remove white deposits with detergents. Whitish streaks may appear due to the fact that the material contains mineral particles protruding outward, but over time, they will disappear on their own. Chemicals, on the contrary, will destroy the surface and worsen the appearance of the tiles.
Pros and cons of using tiles

Stone pavers are unique:
- environmental friendliness;
- long service life;
- moisture resistance;
- aesthetic appearance;
- ease of repair and maintenance;
- ease of walking on it.
However, there are a few drawbacks. First, natural stone, particularly granite, is expensive for paving stones. Additionally, you will need to regularly fix it or clear the tile seams of grass and weeds if you do not adhere to the installation technology.
Price of raw materials per 1 m2
Paving stone costs in the Russian Federation typically begin at 1000 rubles per square meter.
The cost of expert paving stone installation depends on:
- terrain complexity,
- soil,
- pattern and form of paving,
- volume of work carried out,
- material they will have to work with.
The following are the typical costs in the Russian Federation for paving stone installation:
- Moscow – 450-1450 rubles. for 1 m2.
- St. Petersburg – minimum 600 rubles. for 1 m2.
- Novosibirsk – from 590 rub. for 1 m2.
- Omsk – 400 rub. for 1 m2.
- Penza – 790 rub. for 1 m2.
This section contains important and helpful information regarding materials for the construction and finishing of blind areas surrounding the house.
Video on the topic of the article
In the video, paving stones are used to create a blind area.
| Step | Description |
| 1. Planning | Decide on the area and design for your paving stones. Draw a layout on paper to visualize the project. |
| 2. Preparation | Clear the area of any grass, roots, or debris. Dig down to a depth of about 6-8 inches to create a stable base. |
| 3. Base Layer | Spread a layer of crushed stone or gravel about 4-6 inches deep. Compact it using a tamper to create a solid foundation. |
| 4. Sand Layer | Place a 1-inch layer of coarse sand over the compacted gravel. Level it with a screed board to ensure an even surface. |
| 5. Laying Stones | Begin placing the paving stones in your desired pattern. Start from a corner and work your way out, ensuring they are snugly fit together. |
| 6. Cutting Stones | Cut stones as needed to fit around edges or obstacles. Use a masonry saw or chisel and hammer for precise cuts. |
| 7. Filling Gaps | Sweep fine sand into the gaps between the stones. This helps lock them in place and prevents shifting. |
| 8. Compacting | Use a plate compactor to press the stones firmly into the sand base. This ensures a stable and level surface. |
| 9. Finishing | Water the area to help settle the sand and stones. Check for any uneven spots and adjust as necessary. |
Paving stones can be laid all around your home to improve both its appearance and use. Taking on the task on your own is a fulfilling endeavor that can result in cost savings and a feeling of achievement. Results that look professional can be achieved by anyone with the correct planning and equipment.
Measure the space and plan your design first. This guarantees that you buy the appropriate quantity of materials. Make sure the ground is level and free of any debris. It’s important to have a strong foundation, so take your time and thoroughly compact each layer of gravel and sand as you lay them down.
When you lay down the paving stones, start at one edge and proceed across. To keep the distances between the stones constant, use spacers. The stones can be gently pressed into position with the use of a rubber mallet. Check your work frequently to make sure everything remains level.
After all the stones have been placed, compact the surface once more and fill in any gaps with sand. By doing this, the stones are fixed firmly and won’t move over time. After one last sweep to get rid of extra sand, your newly paved area is prepared for use.
You can create a stunning and long-lasting paved surface around your house by following these steps. Long-term planning and preparation will pay off, providing you with a tidy and appealing outdoor area. Relish your newly constructed paved space, knowing that you constructed it yourself.


