
For a wooden house to remain comfortable and structurally sound, the floor must be waterproofed. Particularly susceptible to moisture-related issues, such as rot, mold, and warping, are wooden floors. You can safeguard your house and increase the lifespan of your wooden floors by making sure waterproofing is done properly.
For the purpose of waterproofing wooden floors, there are numerous materials and methods available. Every choice has benefits and is appropriate in certain circumstances. Selecting the best strategy for your needs is essential whether you’re building a new house or remodeling an old one.
To help you create a long-lasting, moisture-resistant floor, we’ll go over the significance of waterproofing, the best materials to use, and step-by-step instructions in this article. You can prevent water damage to your wooden house and have a warm, dry living area for many years to come by using the right techniques.
| Aspect | Details |
| Why Waterproof | Prevents moisture damage, mold, and rot |
| Materials Needed | Waterproof membrane, sealant, primer, tools |
| Preparation | Clean and dry the floor, apply primer |
| Application | Lay membrane, seal edges, allow to dry |
| Final Steps | Inspect for gaps, cover with flooring |
- Why do you need waterproofing of a wooden floor?
- Nuances of waterproofing wooden floor
- What is the best way to waterproof a wooden floor
- Painting waterproofing
- Kinds
- Compound
- Advantages and disadvantages
- Application
- Coating waterproofing
- Compound
- Advantages and disadvantages
- Application
- Plaster waterproofing
- Advantages and disadvantages
- Application method
- Roll waterproofing
- Varieties by method of application
- Advantages and disadvantages
- Mastic waterproofing
- Kinds
- Advantages and disadvantages
- Application
- Impregnation waterproofing
- Kinds
- Advantages and disadvantages
- Application
- Cast waterproofing
- Kinds
- Compound
- Advantages and disadvantages
- Application
- Backfill waterproofing
- Advantages and disadvantages
- Sprayed waterproofing
- Penetrating waterproofing
- Advantages and disadvantages
- Application
- Is there any dependence on the finishing coating?
- Required materials and tools
- Instructions for waterproofing the floor
- Waterproofing a wooden floor on the ground
- Waterproofing the subfloor
- Preparatory work
- Waterproofing with roll materials
- Waterproofing with paints
- Waterproofing with coating materials
- Waterproofing with mastics
- Waterproofing with impregnations
- Video on the topic
- Waterproofing earthen floor
- Waterproofing OSB. Flachendicht from knauf.
- Floor waterproofing. Master class // FORUMHOUSE
Why do you need waterproofing of a wooden floor?
Moisture has two effects on the multi-layer structure of a wooden floor, which consists of floorboards, subflooring, and joists:
- coming from below, from the basement or ground (private house) or breaking through the concrete floor from lower neighbors (remember that concrete perfectly allows steam molecules to pass through);
- from waterlogged indoor air – appears there as a result of human activity (from indoor plants, washing, breathing of humans and animals, cooking, bathing, etc.e).
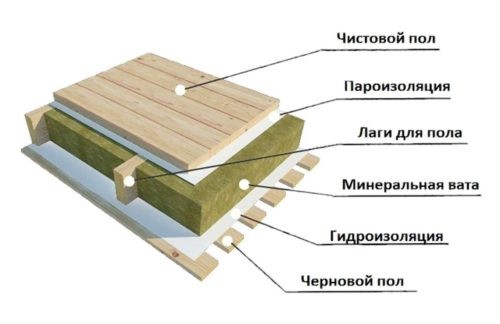
Wood does not react significantly to a brief and insignificant change in moisture; it will dry out and return to its original state. Additionally, if there is a lot of moisture or if the wet state persists for several days or weeks. In this instance, property owners deal with a number of issues that are arising concurrently:
- The boards, swelling and drying out, are deformed – they are spinning;
- increased moisture content of wood leads to the formation of condensate on the lags that begin to rot;
- Wet wood is an excellent base for the propagation of microorganisms: fungus and mold.
There is only one way to prevent over-moistening of wood: waterproofing both the top and bottom of wooden floor components.
Nuances of waterproofing wooden floor
Planning for the waterproofing of a wooden floor requires keeping in mind that features need to be considered in addition to the many benefits of lumber.
1. The ability to retain moisture. Wood takes up moisture from the air quite actively—one could even say aggressively. And all of this is due to the fact that its relative humidity is not constrained. As a result, the relative humidity indicators of the house’s wooden structures alter in tandem with changes in the amount of moisture in the atmosphere.
Occasionally they reach a critical value, which triggers the onset of destructive processes both inside and on the wood: rot sets in, and colonies of microorganisms that take the form of mold and fungus emerge.
Since even one exposed side of the wood can become critically saturated with moisture, waterproofing wooden structures from all sides is the only defense against such processes.
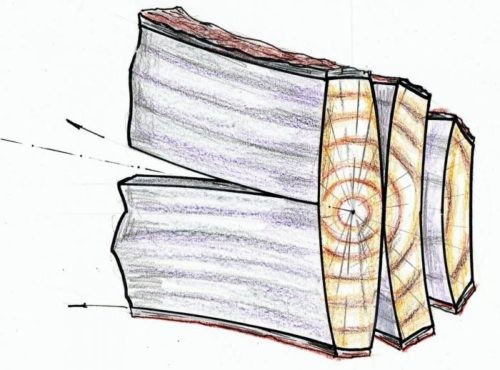
2. Variation in linear dimensions when humidity is present. Wood therefore swells upon absorbing moisture, expanding by 0.1-0.3% along the fibers (along the length), by 3-7% across the radial direction, and by 6 to 10% tangentially. The opposite processes take place when the material dries.
Because of this, wooden structures are constantly moving. This causes problems for the following reasons: (1) it becomes more difficult to fix them; (2) it becomes more difficult to choose waterproofing materials (some of which work perfectly on concrete but will be torn by wood); and (3) because of the multidirectional stresses inside the wood caused by uneven drying, the lumber’s surface cracks, creating large cracks. It is also necessary to consider this stage of the waterproofing procedure.
What is the best way to waterproof a wooden floor
Exactly a few years ago, experts and practitioners mentioned the following when discussing waterproofing materials:
- roll insulation;
- mastics;
- penetrating primers;
- plaster mixtures.
It was simple to navigate this list, even for non-expert customers who had no prior experience with waterproofing projects.
Everything is different now. With the wide variety of waterproofing materials available from manufacturers, even skilled builders may find it difficult to make the right decision. DIY enthusiasts at home can utilize:
- painting waterproofing;
- coating;
- plastering;
- roll;
- mastic;
- impregnating;
- cast;
- backfill;
- sprayed;
- penetrating.
Painting waterproofing
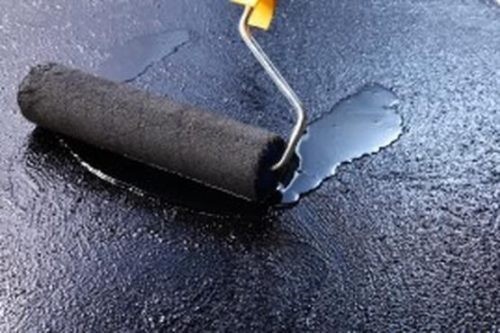
Liquid waterproof compositions made of bitumen, rubber, and polymer resins serve as a representation of painting waterproofing. Apply in multiple layers to create a 2–6 mm thick layer of waterproof protection.
Kinds
Both inside (for interior work) and outside (for exterior work) painted insulation can be used as a moisture barrier. In addition to shielding the wall material from moisture, facade treatment also helps prevent the early stages of degradation, such as erosion, cracking, and crumbling—all common problems with decorative plaster.
Compound
The compositions of paintings are created using:
- bitumen pitch. Depending on the purpose, various additives can be added to the composition. This insulation works in a temperature range from -30 o C to +60 o C;
- bitumen and polymers. The addition of polymers to bitumen makes it elastic and can withstand significant loads when the protected surface is deformed, for example, a wooden floor. They withstand low temperatures, and therefore are actively used for external waterproofing;
- polymers. Created using synthetic rubber and polymer resins. They perform well in aggressive environments;
- polymers and cements. Used to protect concrete structures from moisture.

Advantages and disadvantages
Paint insulation offers advantages as well as disadvantages. Among the benefits are:
- easy application. Almost always done with your own hands;
- accessibility – can be found on sale at any retail outlet selling building materials;
- budget price for many types of insulation;
- quick application with rollers or spray gun.
There are two drawbacks. One of them—a brief service life of only roughly six years—is important. The second is that mechanical damage to the surface layer is easily sustained.
Application
After a surface has been cleared of debris (dust, paint, and grease stains), paint waterproofing is applied. To be absolutely certain that there are no grease stains remaining beneath the insulation layer, it is primed and then treated with white spirit or gasoline. Fiberglass mesh is used to reinforce vertical and inclined surfaces in order to stop the insulation layer from slipping.
Coating waterproofing
Coating first emerged as a separate kind of waterproofing in antiquity, when people started using liquid clay as a water-resistant barrier. Bitumen-based compounds started to emerge over time.
Coating waterproofing is frequently categorized as mastic in practice, which is often appropriate. After all, some waterproofing materials completely meet the requirements for both categories of insulators. However, there are still some differences, albeit slight ones, between them that allow coating insulation to be distinguished as a separate type.
Compound
The following are employed in the coating waterproofing production process:
- bitumen, with the addition of cement, ash, chalk, dolomite and other minerals;
- bitumen with the addition of rubber crumbs;
- bitumen with polymers with the addition of minerals from the first item on the list;
- bitumen with primer.
Advantages and disadvantages
Coating insulation has several benefits, including:
- the applied layer is absolutely tight;
- good noise and heat protection properties;
- easy application;
- high elasticity, as a result of which any damage to the surface is quickly healed.
Among the drawbacks are:
- the need to apply several layers (minimum 2);
- a time-consuming insulation process: each subsequent layer is applied on top of the completely dry previous one;
- high toxicity of hot applied coating;
- ban on the use of heated materials in rooms with wooden structures – high risk of fire.
Application
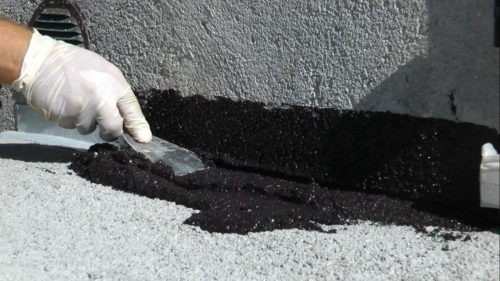
Using a narrow spatula, roller, or hard brush, coating waterproofing is applied to a surface that has been cleared of debris, dust, and grease. It is coated with a bitumen primer to improve adherence to the surface. White spirit is used to dilute an extremely thick coating. Layer paint until a deep shade of black is achieved.
Plaster waterproofing
A complex mixture of cement and additives, plaster insulation creates an elastic, water-resistant film when applied. offered in dry mix form.
Advantages and disadvantages
Waterproofing materials based on cement offer numerous benefits. This:
- durability – service life is about 30 years;
- high resistance to mechanical stress;
- easy application — a home craftsman with no work experience can dilute the solution and apply it to the insulated surface;
- no need to repair and level the insulated surface: the insulator will not only cover the curvature, cracks and chips, but will also serve as a repair solution;
- excellent water resistance;
- the possibility of using as an adhesive for insulation.
Moreover, applying practically any kind of finish directly to the insulation is a huge benefit.
The following are some of the material’s shortcomings:
- fear of vibration and shrinkage of the building – cracks;
- with sudden changes in temperature begins to collapse.
Application method
In order to use plaster mortar to waterproof the surface, the following technological operations must be carried out in order:
- the treated surface is cleaned of dirt and dust, small cracks expand;
- primer is applied. You can use diluted PVA glue;
- after the primer has dried, the solution is mixed to form a thick paste;
- The solution is applied with a spatula to the insulated surface;
- after the first layer has dried, apply the second one, using movements perpendicular to the first layer.
Roll waterproofing
With the occasional exception (foil), rolled waterproofing is made of two layers of material. One layer is the foundation for a second waterproof layer of tar, butyl rubber, or bitumen. The foundation could be:
- fiberglass;
- fiberglass;
- polyester materials;
- cardboard (represented by roofing felt);
- asbestos paper (tar paper).
Varieties by method of application
Roll insulation may be (and occasionally is) included in the list of independent types.
- adhesive – attached to the insulated surface and to each other during multi-layer application using bitumen;
- built-up – during manufacturing, one side is impregnated with a binder, which is heated with a gas burner during installation;
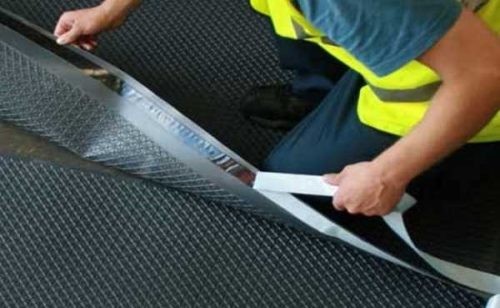
- polymer – the edges of the roll are treated with polymer compounds, which, when heated with a construction hairdryer, are hermetically glued to the already laid canvas.
The project "Waterproofing the floor before screeding" illustrates installation techniques.
Advantages and disadvantages
Insulation that is rolled has few benefits. Among the benefits are:
- simple installation process, despite the need for some types to use heating devices;
- low price.
And that’s practically it. Among the drawbacks are:
- the presence of connecting seams, which requires laying a 2nd layer;
- significant weight, creating additional load on supporting structures;
- impossibility of isolating surfaces with complex geometries;
- loss of tightness under vibration conditions, and therefore is not recommended for use near construction sites and highways.
Mastic waterproofing
A highly viscous plastic mass known as waterproofing mastic is created by combining adhesive additives, finely ground fillers, and organic materials with astringent qualities.
Kinds
One way to waterproof mastics is to:
- bitumen – made from several types of bitumen without additives. You can cook it yourself;
- bitumen-polymer (most types of such waterproofing can also be classified as coatings);
- cement-polymer;
- polymer.
Advantages and disadvantages
Among mastics’ advantages are:
- maintaining elasticity at low temperatures;
- sufficient linear expansion, without loss of protective properties, with constant deformations of the treated base;
- good adhesion to main types of building materials;
- ability to spread in a thin layer;
- versatility – can be used as an adhesive (for rolled materials) and a primer for paint waterproofing;
- availability of ready-to-use materials.
- quite high cost of most types;
- the difficulty of choosing due to the huge assortment and different specializations, which is really a problem for a non-professional builder;
- contains a significant amount of toxic and flammable components, which requires the use of protective equipment and careful handling of fire;
- low mechanical strength – requires reinforcement with fiberglass or fiberglass mesh;
- the vast majority of mastics are not compatible with tile adhesive, which requires installation on top of the waterproofing cement screed.
Application
The technology used to apply paint insulation is exactly the same as that used to protect different surfaces from moisture with mastic.
Impregnation waterproofing
The primary ingredients of impregnated insulation are cement, sand, and a variety of small-particle chemicals. The cement and the treated surface are joined by these particles. When the substances seep into the building material’s pores in a liquid state, they react chemically with cement to form a long-lasting film that is impervious to moisture vapor.
Kinds
In actual practice, a few entirely different materials are used in addition to cement impregnation. We can draw attention to:
- oligomeric – one of the cheapest types of waterproofing. It is something between machine oil and diesel fuel;
- acrylic – consists entirely of acrylates;
- silicone, which, along with cement, may contain silanes, siliconates, siloxanes and other polymers of this group.
Advantages and disadvantages
- easy to apply;
- no additional protection required after application;
- the surface to be treated does not need to be primed;
- increases the mechanical strength of concrete and frost resistance;
- exhibits high inertness to aggressive chemicals.
The one and only disadvantage is restricted specialization. Impregnations are meant for concrete that has just been laid.
Application
You can apply impregnating composition with a brush or a swing paint brush, depending on its type. It does not matter if the surface to be treated is wet or dry—it just needs to be clean.
Cast waterproofing
Cast waterproofing is the best method of moisture protection. It is completed by applying a waterproof solution to the entire surface.
Kinds
Cast waterproofing is classified as hot or cold depending on the state of the surface after pouring.
Compound
With the addition of different kinds of polymers, asphalt and asphalt-concrete compositions are the foundation for the preparation of hot cast insulation. Most people are familiar with cold cast insulation, which is also referred to as "liquid" rubber and glass.
Advantages and disadvantages
The most concise way to sum up all the benefits of cast waterproofing is to say that it is currently the best method for protecting different types of structures from moisture. One minus: expensive. One more drawback existed up until recently: vertical walls could not be used with it. The problem was resolved by adding unique additives to the mixture.
Application
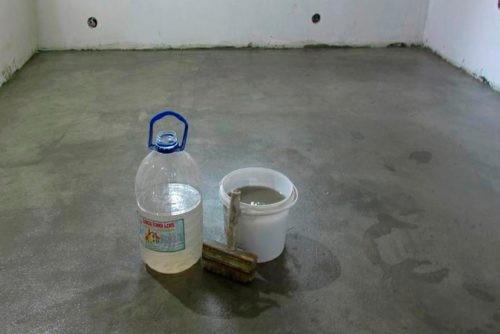
It is possible to seal all the gaps and fissures on the surface by pouring or spraying "liquid" glass. Moreover, hot insulation is poured onto the surface that has to be treated, forming an even and continuous layer of water-repellent material. They turn to leveling if the fluidity is insufficient.
Backfill waterproofing
Backfill waterproofing refers to a series of procedures that keep the building’s structural components dry rather than a particular kind of insulator. Materials that are granular, fibrous, powdery, or granular are utilized as backfill insulators:
- perlite sand;
- bentonite;
- basalt wool;
- slag;
- foam granules.
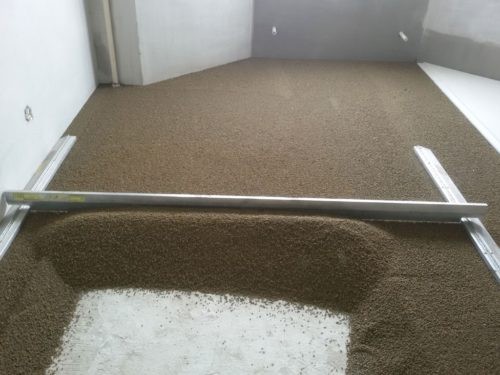
The materials are either filled with water or have cement mortar applied on top to create a waterproof layer.
Advantages and disadvantages
- low cost;
- simple installation;
- durability.
The large thickness of the waterproofing layer and shrinkage when exposed to vibration are drawbacks that homeowners near highways and construction sites need to be aware of.
Sprayed waterproofing
Due to its extremely quick transition to a solid state upon contact with air, sprayed waterproofing produces an incredibly effective seamless coating on any surface, whether it be horizontal, vertical, or inclined.
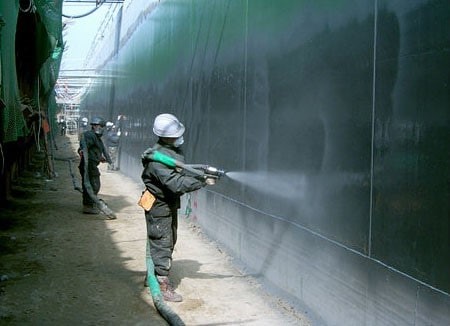
Modified mixtures of "liquid" rubber, "liquid" glass, and other liquid waterproofing agents based on bitumen, acrylic, and polyurethane are used for spraying. It is not utilized in households because of the complicated equipment.
Penetrating waterproofing
The fundamental aspect of penetrating waterproofing is the modification of concrete’s molecular structure caused by impregnation agents. Water-insoluble crystals are produced by the impregnating substance’s liquid composition reacting chemically with cement as it gradually penetrates deeper. Scientists have recently made it possible to create insulators that can penetrate concrete up to 50 centimeters deep. Simultaneously, the quantity of these impregnations’ functions has sharply increased. Concrete gets stronger and more resistant to harsh chemicals in addition to being moisture-proof.
Impregnations are available for purchase as liquids (called "Penetron" or "Pronitrate") or as dry mixtures (called "Kema").
Advantages and disadvantages
Unquestionably, the benefits include:
- unlimited service life;
- ability to withstand any mechanical loads;
- ability to restore the surface of concrete – tightens all microcracks.
- mastic is intended only for concrete;
- very high price;
- long technological cycle.
Application
Using a brush or roller, impregnation is applied in multiple passes to a concrete surface that has already been wet. After the first layer has dried, each subsequent layer is applied. Every pass needs to be made with the surface wetted.
In conclusion, a concrete base and subfloor are possible for a wooden floor. Any kind of waterproofing material covered above can be used to waterproof a concrete floor.
In a private home, there are several methods for waterproofing wood floors, including painting, coating, rolling, mastic, and impregnating insulation.
Is there any dependence on the finishing coating?
Waterproofing materials and a wooden floor’s finishing coat are not antagonistic. An exception would be if bitumen mastics were to be used to waterproof a wooden floor beneath tiles in a bathroom. They cannot be used with tile adhesive, which calls for the installation of an OSB sheet, plywood, or gypsum fiber board layer in between.
Only adhesive waterproofing (open fire) and different types of insulation applied hot (typically heated to +300 o C), which is critical for wood (ignition occurs at +200 o C), are restricted due to safety concerns.
It is essential to waterproof a wooden house’s floor to stop moisture damage, mold growth, and structural deterioration. Water-related problems can be avoided and wooden floor lifespans can be increased by homeowners by using waterproofing solutions such as membranes, sealants, and adequate ventilation. By keeping moisture at bay, this procedure not only protects the wood but also guarantees a healthier living environment.
Required materials and tools
In order to waterproof and create a vapor barrier on a wooden floor, the following supplies and equipment are needed:
- waterproofing mastic, impregnation, etc.d.;
- vapor barrier film (membrane);
- mastics for sealing cracks and crevices;
- bio- and fire-retardant impregnation;
- primer for wood (the most effective option is a water-soluble emulsion primer based on bitumen);
- waterproofing self-adhesive tape;
- raw rubber (rubber liners);
- paint brush;
- construction knife;
- roulette;
- vacuum cleaner or broom.
Instructions for waterproofing the floor
Several technologies can be used to waterproof a wooden floor:
- on the ground (in private houses);
- rough wooden floor (in houses and apartments).
In turn, depending on the waterproofing materials chosen, there are various ways to protect the subfloor from moisture.
Waterproofing a wooden floor on the ground
Ground-level wooden floor waterproofing is a common practice in private construction. The following is the step-by-step algorithm used to implement this technology:
- a pit about 40-50 cm deep is dug in the ground under the house;
- the bottom of the pit is carefully leveled and then compacted manually or with a vibrating plate;
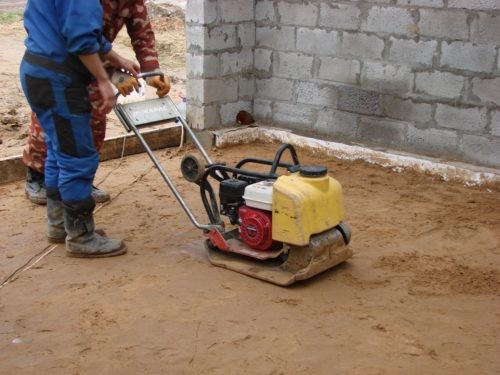
- a 10 cm thick layer of sand is poured (at high ground waters, sand backfill is made up to 20 cm), leveled, and then compacted;
- a backfill of coarse or medium-sized quarry gravel or expanded clay (if you want to simultaneously insulate the bottom of the building) up to 20 cm thick is made on the sand;
- gravel (expanded clay) is leveled with a rake;
- a 10 cm thick layer of sand is poured on top, leveled, compacted with a vibrating plate or manually;
- the sand is poured with water and compacted again (when using expanded clay, only the top layer of sand is moistened with water);
- the sand is dried naturally. In wet weather, it is covered with plastic film if expanded clay is used;
Note that three layers are poured regardless of the waterproofing technique.

Significantly, "Penoplex," which is placed on a sand cushion, has recently replaced the top layer of sand (see photo). This raises the cost of work but enhances the floor’s ability to insulate against heat. If not, the same order is used for all operations.
- roll waterproofing materials are laid on dried sand with an overlap, overlapping the walls (by 20-25 cm). Joints are glued with bitumen mastic;
- polyethylene film is laid on top of the waterproofing. Also with an overlap and overlapping the walls. Film joints are glued either with tape or a hot iron through paper;
- reinforcing mesh is laid;
- screed is poured.
For comparison, this technology is the simplest and least expensive. There are alternative methods for sealing the soil. However, they are more costly in terms of labor intensity as well as money.
Waterproofing the subfloor
Waterproofing and preparatory work are the two main ways to keep a wooden floor’s wood dry.
Preparatory work
The first step in the preparation process is to clean the subfloor’s surface of dust and debris. Subsequently, the tasks are executed in the subsequent order:
- an audit of the joists, cranial bars and boards is carried out, during which damage, mold and mildew are identified;
- wood damaged by fungus and mold is removed. Attempts to remove damaged areas with a plane followed by treatment with antiseptics do not help in most cases. In practice, mold and mildew inexplicably reappear after a few years in the same places;
- rotten floor elements are replaced;
- the loose boards are additionally fastened with self-tapping screws to the skull block;
- fallen knots and cracks are sealed with wood mastic or a mixture of PVA glue and sawdust;
- the resulting construction waste is removed;
- the wood is impregnated with antiseptics and fire retardants (there are compositions containing both components);
- the base of the plank floor and walls 20-25 cm high are treated with a special primer for wood (the process of absorption of liquid waterproofing components, such as bitumen mastic, by the wood is prevented). It is advisable to buy a ready-to-use primer.

Use a paintbrush or roller to apply primer. Because of this, the joints between the walls and the floor are handled very carefully. To. The majority of the time during flooding, this is where water breaks down. Primer is also applied to the bottom of the walls up to a height of 10–15 cm. In bathrooms with wooden floors that need to be waterproofed, wet areas of the walls must also be primed (see rice).
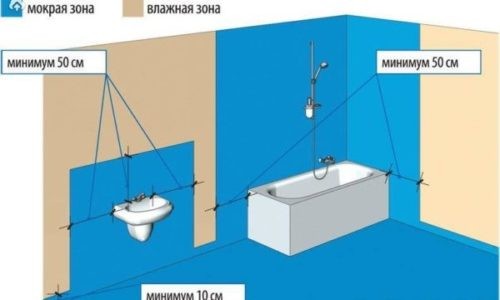
Experts advise re-treating areas where the primer has quickly been absorbed into the wood.
- after the primer has dried, which can last up to 10 hours (you can check it with a cotton pad – it should remain clean after contact with the floor), self-adhesive tape with waterproofing properties is used to glue the joints of the floor to the wall, the seams between the boards, and the cracks treated with mastic;
- places where utility lines pass are sealed with liquid rubber or rubber liners and also sealed with tape.
Note: Self-adhesive film is not used to seal joints, seams, or cracks in roll waterproofing.
Preparatory work in a private home, apartment, cottage, or garage is done in the same order.
Waterproofing with roll materials
The steps involved in using rolled materials to waterproof a wooden floor are as follows:
- the rolled material is cut into strips of length equal to the size of the room in which waterproofing work will be carried out, plus an approach to the walls of 10-15 cm on each side. When calculating the number of strips, it is necessary to take into account overlapping laying;
- the cut sheets are rolled out (they can be laid on top of each other in the hallway) and left overnight in this state (the stress on the surface of the material that arose while it was in the roll is removed);
- waterproofing mastic is applied to the floor and the bottom of the walls with a roller or mat – it serves as an adhesive for roll insulation if an adhesive composition is not applied to it at the factory;
- after 5-6 hours, a second layer of mastic is applied, perpendicular to the strokes of the first layer;
- using a tape measure, find the middle of the rolled strip, where you place a mark with a marker;
- the canvases are twisted at both ends, so that both rolls meet exactly in the middle;
- find the middle of the room (the mark on the roll should be exactly in the middle of the room);
- first, one part of the strip is rolled out (one roll);
- To ensure that the waterproofing material fits tightly to the boards, it is rolled with a wallpaper roller or forcefully ironed with your hands. If this procedure is not done in a timely manner, air pockets may form, which will have to be punctured (experts, however, do not see problems in punctures, believing that they heal over time);
- roll out the second part of the roll;
- similarly lay the second sheet, but only overlap the first by 10-15 cm. The seams are glued with mastic;
- after laying the waterproofing material throughout the room, glue the side joints of the floor with the wall. For this, cut out a strip of waterproofing material 30-40 cm wide and glue it to the floor (about 10 cm) and the wall (the rest) using mastic (experienced specialists immediately start the roll on the side wall, which is more reliable, but very difficult and inconvenient to perform).
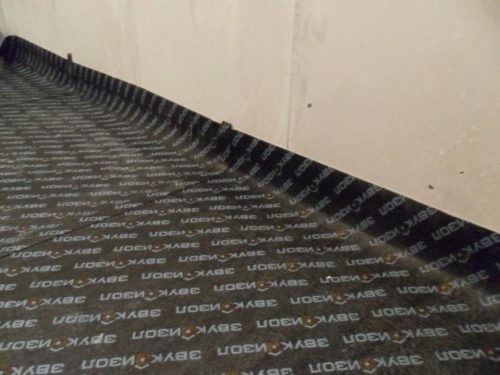
Be aware that roll waterproofing works best in kitchens, bathrooms, balconies, and showers.
Waterproofing with paints
Paints that are waterproof and made of polymers and bitumen are the least expensive kind of waterproofing. But they only serve for a maximum of seven years. applied in two to three layers using regular paintbrushes on sanded and dried boards. Every new layer is put on top of the fully dried layer before it. Ideal applications include kitchen flooring finishing touches or beneath linoleum.
Waterproofing with coating materials
Make a coating solution before you begin. To achieve this, make medium-fat sour cream by diluting the dry mixture in a container 1:1 with water and stirring well. The floor and the bottom of the walls are treated with the resultant composition (10–15 cm above floor level). For flat surfaces, use a roller; for confined spaces, use a paintbrush. It applies insulation in two layers. After four to six hours, the second layer is applied perpendicular to the first. The floor is then left to dry for a full day.

Waterproofing with mastics
The instructions for using mastics to waterproof a wooden floor are straightforward:
- with a brush, mastic is applied to the joints of the floor and walls, as well as in places where utility lines pass;
- a special waterproofing tape is glued to the applied insulation (at the joints of the walls with the floor). During installation, it is necessary to eliminate kinks, folds and air pockets;
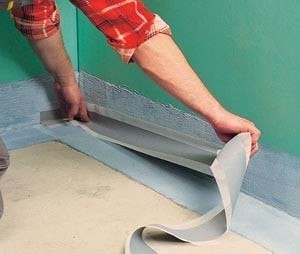
- another layer of insulation is applied to the pasted tape;

- the same actions are performed in places where communications pass;

- The mastic is applied with a roller to a flat surface.
It is advised by experts to treat the floor in two layers.
Waterproofing with impregnations
The best methods for waterproofing wooden floors in bathrooms, laundry rooms, steam rooms, showers, and steam saunas are impregnations. Here, moisture rather than leaks of water protects the wood itself. As a result, the waterproofing method is distinct: wood (boards, joists, and bars) that is prepared for floor installation is immersed in a unique bath containing an impregnating composition for a full day. Under any other impregnation method, the floor’s underside is left exposed and decays rapidly.
If you want to keep your wooden house intact and long-lasting, you must waterproof your floors. You can avoid structural problems, mold growth, and water damage to your floors by taking the time to properly seal and protect them. This helps maintain the safety and comfort of your living area while also boosting the value of your home.
It’s critical to select the appropriate tools and methods for your particular requirements. The creation of an effective waterproof barrier requires the use of sealants, membranes, and appropriate installation techniques, among other things. Make sure you always follow the manufacturer’s instructions, and if you have any questions about any step of the process, think about speaking with a professional.
The initial waterproofing is not nearly as important as routine maintenance and inspections. If you notice any wear or damage, keep an eye out for it and take quick action to stop small issues from growing into larger ones. For years to come, you can take pleasure in a dry, strong floor in your wooden home with a little work and attention to detail.


