
The floor is an essential component of any construction project or kitchen makeover, contributing to both aesthetics and functionality. The floor screed, a foundational layer that guarantees a level surface for tiles or other flooring materials, is one crucial component that is frequently disregarded. The longevity and functionality of your kitchen floor can be greatly impacted by your understanding of the features and significance of floor screed.
Whether it is vinyl, laminate, or tiles for the final flooring layer, floor screed acts as a leveled substrate to support it. In kitchens, where there is frequent foot traffic and heavy appliances, a well-laid screed offers durability and stability. It ensures that the floor stays sturdy over time by preventing cracks and helping to distribute weight evenly.
The composition of kitchen floor screed is an important factor to take into account. Usually, a mixture of cement, sand, and water is used to make screeds. To create a level and smooth surface, this mixture is poured onto the subfloor. Depending on the particular needs of the kitchen, including the kind of flooring to be installed and the overall layout of the area, the thickness of the screed can change.
The capacity of floor screed to support underfloor heating systems is another essential feature. Underfloor heating is becoming more and more common in contemporary kitchen designs because of its effectiveness and ability to save space. An appropriately installed screed serves as a thermal mass, dispersing heat across the kitchen floor to maximize the effectiveness of underfloor heating.
- Is it necessary in this room??
- Requirements
- Construction and pie
- Types of bases
- Wet
- Semi-dry
- Dry
- How to make the right choice?
- Step-by-step instructions for creating
- Semi-dry
- Dry
- If there is a heated floor
- Protection and processing
- Finish options
- Installation price
- Useful video
- Video on the topic
- Device of lightweight cement floor screed (instructions)
- Repair in a Khrushchev-era building. Device of unbound floor screed on beacons on top of penoplex
- Acceptance of screed. How to check the quality of a floor screed?
Is it necessary in this room??
I refer to the clean version of floor screed when I talk about it in the kitchen. The rough foundation or floor slab is covered with a coating that is intended to level out any variations between 3 and 100 mm.
This layer, referred to as the finishing screed, ranges in thickness from 30 to 70 mm.
It can be applied to concrete slabs and wooden floors in the kitchen to level them.
You must first determine how the future screed will impact the foundation. Will the workload increase as a result of this? Such a screed can be installed in the kitchen if the intended coating’s strength is compliant with building codes.
Requirements

Flooring made of concrete is quite common. The thickness of the concrete screed installed on a ceiling with a height of 120-160 mm should not exceed 40-70 mm, per the specifications of SP 29.13330.2011 (Floors).
The final coating’s strength needs to be able to tolerate 20 MPa. Concrete with a minimum thickness of 30 mm and class B15 is required for wet and semi-dry screeds. The grade of cement should rise in proportion to the floor height (M300 and M400).
The high humidity in the kitchen makes it possible to pour both wet and semi-dry screed onto a wooden or cement base. Waterproofing must be laid in order to guarantee its tightness and moisture resistance.
Among the prerequisites:
- resistance to mechanical shocks (falling of heavy pots and pans),
- changes in temperature and humidity;
- presence of shrinkage and expansion joints.
It is also advised to install thermal insulation while installing floors. Here, extruded polystyrene foam is frequently laid. Because it can absorb moisture when it leaks while the floor is in use, this option works well in wet rooms.
Construction and pie
Generally speaking, a wet room’s pie floor should look like this:
- Base (floor slab in the apartment).
- Waterproofing membrane or film made of laminated polyethylene.
- Insulation.
- Finish screed made of cement-sand mixture.
If the apartment is on the ground floor and there is cold and moisture coming from the basement, this floor plan arrangement makes the most sense.
Heated floors can be installed on top of the insulation in addition to it. To accomplish this, cover a layer of polystyrene foam with a unique double-sided foil. It will disperse heat into the kitchen by reflecting it. Following foiling, installing electrical or
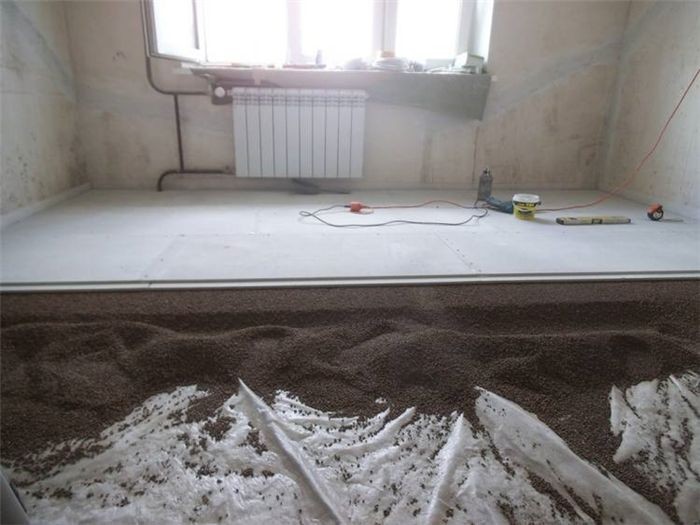
Expanded clay can be used to create a concrete layer when the weight of the floor or the height of the space prevents the screed from being added to the necessary thickness.
The floor pie in this instance will resemble this:
- Base.
- Waterproofing.
- Backfilling with expanded clay.
- Concrete screed.

The room will be insulated and covered in a layer of expanded clay.
Types of bases
The kitchen’s high humidity and temperature are a result of cooking activities. Thus, just like in any other wet room, this one too requires floor arrangement.
These specifications make the following kinds appropriate here with a heavy:
Only in situations where the owner of the property finds it impossible or undesirable to lay other types of screed is dry screed laid here.
In this situation, you could create a screed in the kitchen on a wooden foundation before installing tiles or laminate plank flooring. Here, drywall—even GVL—cannot be utilized.
Only a floating kind of screed with a waterproofing film is used in the kitchen because it is a wet area.
In an apartment, if you pour cement screed without first covering the neighbors with plastic film to protect them from moisture, the neighbors below may flood.
Wet
This kind of flooring embodies the conventional method of applying a cement-sand composite (CPS). The large amount of water in this area causes the cement to set for a considerable amount of time (28–30 days).
Benefits and drawbacks:
- Disadvantage: heavy weight, putting pressure on the floors. With a thickness of 70 mm per 1 sq. m. may account for 60 kg weight.
- Advantage – suitable for all types of floor coverings.

This is a comprehensive article about wet screed.
Semi-dry
Excellent choice for the apartment’s floor plan. It can tolerate high pressure because of the fibers and plasticizers.
- Disadvantage: it usually costs more than traditional technology due to the fact that only high-quality M400 cement is used here.
- Advantage – it dries in 14 days, machine styling allows you to do it in a couple of hours.
This page has all the information about this kind of gadget.
Dry
Only on wood material, such as OSB boards or plywood with a water-insulating gasket, due to the high humidity in the room. The flooring is put down: laminate or linoleum.
- Disadvantage – it is not able to equalize large differences in heights, so it is used on smooth concrete floors or wooden joists.
- Advantages: quick installation, the premises can be occupied on the same day.

Additional details are available via the link.
How to make the right choice?
For master bedrooms in apartments, semi-dry screeding is generally advised. It works with any kind of flooring, including self-leveling floors, porcelain stoneware, and tiles.
It is only when laying a screed on a wooden floor that the issue with finishing material selection can occur. The semi-dry and wet form of the concrete coating is inappropriate because of its weight. There’s a chance the wooden structure will crumble.
As a result, they choose between laminate and linoleum in this instance. The first coating is too cheap, and the second one is moisture-averse. Before laying the laminate, you must first install OSB or plywood, to which laminated dies must be attached.
Alternatively, you could prepare the ground with a concrete screed. Naturally, in this situation, the entire wooden floor system on the joists will need to be opened. Craftsmen expedite the installation process by doing the following:
- Cover the leveled area with expanded clay, having previously laid waterproofing material along the entire perimeter of the room.
- Fill the required thickness of the screed to the level of other rooms.
Filling a thick monolithic screed is more difficult, so this saves DSP, time, and labor effort.
Apartments with self-leveling polymer floors offer a contemporary coating option in situations where the floor’s unevenness is limited to three to five millimeters. They swap out the screed in its entirety.
Step-by-step instructions for creating
You must get your tools ready before you start work.

If the majority of the work is completed by hand, you’ll need:
- container for mixing concrete;
- tamping;
- laser type level or hydraulic level;
- rule;
- spatula and grater.
Technology of creation The following steps must be followed in order to use concrete screed in the kitchen:
- The old coating is first dismantled. This stage is required if the concrete floor in the kitchen has become unusable, has cracks and unevenness, and it is dangerous to continue using such a floor. Dismantling is carried out to the old reinforced concrete floor slab.
- Cleaning the concrete base from debris. The coating must be thoroughly freed from dust and washed. This is done with an industrial vacuum cleaner and a mop.
- In the future you will need to make markings by level. Mark the highest point. Count all sizes and heights from this level.
- The surface is prepared for laying insulation by priming it with a primer. This can be an epoxy or polyurethane primer.
- The waterproofing layer is made with an overlap on the walls with a height of at least 30 mm. Polyethylene film, bitumen or rubber mastic can be used as insulation. Attach the film with tape to each other and to the base, film density – 100 microns in a double layer.
Penetrating insulation, a polyurethane-based sealant, must be applied to all riser and communications (pipes, etc.) locations.
Foamed polystyrene or polystyrene with a density of at least 35 kg/cube is used as a material if insulation is required. Arrange it in an offset manner to create a thermal insulation board checkerboard pattern. Polystyrene is affixed to the polymer-cement glue, which serves the additional purpose of leveling the surface, if the screed is not perfectly level.
Beacons are then installed after that. They may be composed of a cement mixture or metal. Starting from the far corner and working toward the near one, the concrete mixture is poured along the beacons.
After installation, use the rule to level it and give it some time to dry. After the floor has partially dried, take the beacons out of the screed and use the same mixture to fill in all of the voids and cracks.
You’ll need to apply film to the floor in the future to guarantee that it dries evenly. You must evenly wet the entire width of the concrete to prevent it from drying out too quickly and developing cracks.
Water the screed at least once a day, or even twice if it’s really hot outside.
It is not permitted to open the windows during the drying process in order to prevent the floor from weathering and cracking. The drying process for conventional screed can take three to four weeks.
Semi-dry
The mixture must reach a consistency of 60% moisture content while stirring in order for the lump to maintain its shape and crumble when touched.
Since pouring such a composition by hand is nearly impossible, all work related to it is done mechanically. A grinding machine and a pneumatic pump are used for laying.
You can use special "shoes" to walk on such a floor in about four to five hours.
Dry
There will be some preparation needed before installing the dry option:

- If the base is being prepared for a wooden floor on logs, you will need to pre-check the coating. If it is durable, there is no fungus or mold, the surface does not sag under weight, you can lay OSB on it. Otherwise, you can screw the chipboard material directly to the logs.
- If there are individual cracks, the boards can be replaced with a similar material.
- Surface preparation will require sanding the wooden floor at protruding points. Special linings need to be laid on the available depressions. In this case, the maximum unevenness cannot be more than 10 mm per 2 meters of length.
- Before work, all nails must be well punched and their heads must be recessed into the wooden base. For greater durability of the coating, the boards need to be screwed to the joists with self-tapping screws.
- For wet rooms such as the kitchen, modern moisture-resistant chipboard and OSB boards have been developed; tiles can be directly mounted on them.
- The last procedure before laying OSB is antiseptic treatment.
Additional procedures:
- Laying waterproofing with an overlap and gluing with tape.
- Laying slabs at a distance of 10-15 mm from the walls, 5 mm from each other.
- All existing expansion joints must be treated with polyurethane foam.
Tiles or porcelain tiles can be put directly on top of the chipboards after they are installed.
If there is a heated floor
There are unique characteristics when making a floor pie in the screed when heated systems are present.
Mark the positions of the distribution control panel and temperature sensor before placing them down. Create grooves in the rough screed if needed:
- Warm floors need to be laid only where furniture and household appliances will not be placed, with a distance of 10-15 cm from the walls.
- The reflective element for underfloor heating is installed with the shiny side up. Foil insulation is used during installation. It simultaneously insulates the surface from moisture and reflects rays from the floor.
- The electric floor is already laid directly on the foil. Thermal mats spread starting from the far corner. The sensor is mounted at a distance of 50 mm from the wall closest to the control panel.
- Before pouring the concrete mixture, check the functionality of all electrical systems.
- Next, the semi-dry screed is laid using the existing cables. The surface is carefully leveled.
Protection and processing
The screed will require primer protection after it has been laid and allowed to dry.
The primer choice is determined by the kind of coating that will be applied to the floor afterwards. If it’s tile, you’ll need a primer that matches the brand of the adhesive being used.
Cleaning the surface of dust is the first step before priming. Every task is completed using a roller, and where there are wall joints, a brush is used.
It is preferable to use a primer with fungicidal and antiseptic qualities to prevent fungus from growing on the screed.
Finish options

Before the final coat is applied:
- Porcelain tiles or tiles.
- Laminate.
- Linoleum.
- The tiles are laid, focusing on 2 axes, laid in the center of the room perpendicular to each other.
- Apply glue and apply tiles on top in accordance with the drawing. After 36-40 hours, the seams are treated with grout.
- The laminate is fixed in a checkerboard or other pattern using a click-locking mechanism. As soon as there is little space left before the end of the row, the die is cut off. The rest of the same board is used to start the next row of laminate.
- Linoleum is laid overlapping if the width of the roll is not enough to lay across the entire width of the room.
Installation price
The average cost of repairs for concrete screeds in kitchens in the Russian Federation is:
- Without the cost of materials – 400-500 rubles/sq.m.m.
- With materials – 800-1000 rubles/sq.m. m.
The installation of the concrete mixture on the base is the only service included in the list. The cost of installing thermal insulation (80 rubles/sq. m.) and waterproofing (60 rubles/sq. m.) must be added to the total cost of the work.
Other positions:
- Installation of OSB boards will cost approximately 400 rubles/sq. m.
- Laying porcelain stoneware and tiles – 1200-1500 rubles/sq.m. m.
- Laminate – 250-300 rub/sq. m.
- Warm floor – 500 rub/sq.m. m.
The price of the 500 ruble one-time installation of a temperature sensor is an additional expense that must be covered.
It is essential to comprehend the subtleties of floor screed installation when renovating a kitchen. This crucial base layer is crucial to the longevity and usability of the kitchen area, as well as providing a level surface for flooring or tiles. Mastering the art of floor screed in kitchens requires careful planning and execution, from selecting the appropriate materials that meet the unique requirements of a kitchen environment to the methodical application process that ensures durability and stability. This article explores the practical side of screeding, providing information on material selection, application methods, and advice on how to get a smooth, durable kitchen floor that can tolerate normal wear and tear.
Useful video
The video’s creators discuss their experience putting in screeds in the kitchen:
| Feature | Description |
| Leveling | The floor screed in kitchens ensures a flat surface, essential for laying tiles or other flooring materials. |
| Durability | It provides a sturdy base that can withstand the weight of kitchen appliances and foot traffic over time. |
For your kitchen to last a long time and be functional, you must build a level and sturdy floor screed. To produce a level and smooth surface that can accommodate different kinds of flooring materials, the procedure requires meticulous planning and execution.
It is imperative that you evaluate the current subfloor conditions and perform any necessary repairs before starting the floor screed process. Whether you go with contemporary self-leveling compounds or the more conventional sand-cement screed, this guarantees a solid foundation for the screeding material.
Paying close attention to details is essential when applying the screed. A uniform thickness is ensured and any potential voids or uneven areas are eliminated with careful material mixing and spreading. This careful process results in a floor that is dependable and long-lasting, improving the overall quality of your kitchen.
Give yourself enough time to cure after screeding, as advised by the manufacturer. For the screed to reach its maximum strength and stability, this stage is essential. After curing, the floor won’t lose integrity even under heavy foot traffic and can sustain the weight of kitchen appliances.
In conclusion, it takes careful planning, exact execution, and patience during curing to become an expert at the floor screed device process in your kitchen. You can lay a strong foundation for your kitchen that will sustain its usefulness and visual appeal for many years to come by following these steps.


