
Do you want to add some modern, fresh style to your windows? Creating laminate slopes for your windows is a fantastic way to add durability and improve their appearance. You’re in the right place if you’re game for a do-it-yourself project. You can create and install laminate slopes on your own with the help of this guide.
In addition to giving your windows a sleek appearance, laminate slopes aid in insulation and security. With just a few simple tools and supplies, you can complete this project, whether you’re replacing old windows or installing new ones. It’s also an affordable way to improve the aesthetics of your house.
Everything from cutting and measuring the laminate to firmly installing it will be covered in this article. You don’t have to be an expert to produce fantastic results; all you need is a little perseverance and the appropriate technique to look polished and professional. Now let’s begin the process of updating your windows!
| Step | Description |
| 1. Measure | Carefully measure the dimensions of the window slopes to ensure accurate cuts of the laminate pieces. |
| 2. Cut Laminate | Use a saw to cut the laminate panels to fit the measured dimensions of the window slopes. |
| 3. Prepare Surface | Clean the surface of the window slopes to remove dust and debris, ensuring good adhesion. |
| 4. Install Laminate | Apply adhesive to the back of the laminate panels and press them firmly onto the window slopes. |
| 5. Finish Edges | Use trim or molding to cover the edges of the laminate for a clean, finished look. |
| 6. Seal Joints | Apply sealant to any joints or gaps to ensure a smooth and professional finish. |
- Where can I use it??
- Requirements
- Types of material
- Finishing tools
- Installation features
- On a metal frame
- Wooden sheathing
- Glue
- Difficulties and errors
- Pros and cons of use
- Average prices
- Video on the topic
- Laminate slopes on windows.
- Laminate slopes for windows
- Do-it-yourself laminate slopes for windows
- HOW to make a LAMINATE Slope in 1 hour.5 t.p on Door or Window
- Slopes from laminate to window (Do it yourself)
Where can I use it??

Because laminate is made of multiple layers, it is a strong, waterproof, and eco-friendly material.
The retail chain carries a variety of laminate types. Premium goods are selected for internal window slopes.
Which is resistant to temperature changes and high moisture content because a poorly installed window could cause the wall opening to freeze and cause condensation to form on the slopes.
It will be necessary to use specific waterproof materials for exterior finishing, like HPL panel structures. This material has a strong laminate covering both sides that is meant to be used for building cladding. It offers better resistance to heat loss, mechanical shocks, and moisture and frost.
The types of windows or wall materials do not restrict the areas where laminate can be installed internally. On the other hand, designers think that in a space with laminate flooring, this material looks best with wooden windows.
Requirements
Because final puttying and painting are not necessary, the installation method for such window slopes is the same as that of drywall, but simpler. This construction material already acts as a final coat of ornamentation. Gypsum fiber board may be used as a load-bearing rough base in this window slope finishing option, onto which laminate will be adhered.
It is possible to install laminate and gypsum fiber board together on windowslopes as long as there is enough space between the side window hinges and the hinged portion of the sash to prevent obstructions to the hinges’ operation.

In the event that this requirement is not satisfied, the panel is puttied onto a level layer. The type of wall material must be taken into consideration when choosing a leveling layer.
Fast-drying gypsum plaster with robust application and excellent adhesion is ideal for brick.
Additionally, gypsum does not advise using regular putty mixture on concrete walls.
Conditions About window laminated slopes:
- Simple installation, accessibility even for beginners in construction skill.
- High wear resistance, protection against mechanical damage.
- Moisture protection.
- Heat and noise resistance.
- Environmental Safety.
- Resistance from UV rays.
- Thermal resistance.
- Light resistance EN 20105 – otherwise, Blue Wool Standard.
- Destability to delay.
- Contacting contact with chemicals.
- Antistatic characteristics.
- The level of environmental safety for the allocation of formaldehydes, "E1".
- Laminate class: from 32 to 33 for interior, 34- for external finishes.
- Moisture resistant, material with a greenish tint, impregnated with an anti-fungal agent that reduces water absorption.
- Water resistance – thanks to the pressing of products under very high pressure and impregnation with wax, the best brands of waterproof modifications are Witex and Alloc.
- The surface structure is smooth so that it does not become clogged with dust.
- High service life for class 34 of at least 20 years.
- High warranty obligations.
A useful and satisfying do-it-yourself project that improves the appearance and insulation of your windows is making laminate window slopes. Just a few simple steps will do the trick: measure and cut the laminate to size, attach it firmly, and finish the edges for a polished look that improves both the appearance and energy efficiency of your house. You don’t need to hire an expert to update your windows with laminate slopes; this guide will walk you through the process step-by-step.
Types of material
When selecting a laminate to finish window slopes either inside or outside the home, you should consider the product’s class. This is a broad evaluation based on the product’s suitability for use under specific circumstances and its maximum load capacity. After passing factory testing for 20 crucial indicators—such as fading, moisture resistance, water resistance, heat resistance, and abrasion resistance—the class is created.
Be aware that moisture resistance and water resistance are not synonymous with laminate. Water resistance describes the design time spent under spilled water, whereas moisture resistance describes its capacity to tolerate relative moisture in the room for an extended period of time.
The purpose of the room where a specific type of laminate can be installed is indicated by the class’s first digit:
- 2- residential, the weakest materials in terms of abrasion and water resistance;
- 3- commercial, high strength;
- 4 – industrial, the class is established only for vinyl products, but they are the most waterproof and can be used for outdoor work.
The allowable load level is indicated by the class’s second digit:
- 1- low;
- 2-medium;
- 3-high;
- 4-extra high.
For internal window slopes, experts advise using class 31–32 waterproof laminate, and for external use, class 33–34 material with high waterproof performance.
It is crucial to consider thickness when selecting a product class for a slope; the greater the thickness, the greater the strength, resistance to loads, and sound and heat insulation qualities; 8 mm is sufficient for interior work and 10 mm for exterior work. Price and product thickness are directly correlated; the thicker the product, the more expensive it is.
Note: The density, water resistance, and antistatic qualities of the HDF board have a major impact on the material’s quality.
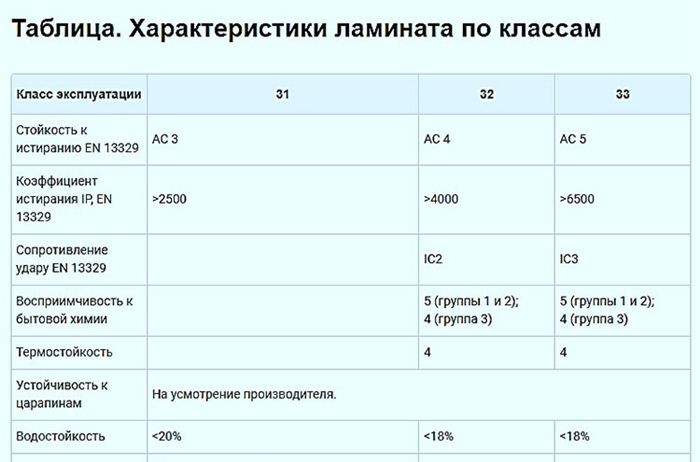
Laminated specifications:
- 31st grade. Advantages: budget option, thickness 8 mm, “click” locking connection, no relief, glossy surface, serviceable for 12 years. Disadvantages: echoing coating requires a cork backing, narrow scope – for dry rooms, on internal slopes for insulated windows.
- 32nd grade. Advantages: average price range, thickness 12 mm, “click” locking connection, surface with wood texture, operation up to 15 years, increased protective characteristics for heat and noise. Disadvantages – low water resistance, narrow scope of use – only for interior work, for well-insulated windows, without the formation of a dew point.
- 33rd grade. Advantages: waterproof impregnation and reinforced construction thickness over 12 mm, “click” locking connection, anti-slip surface, with wood texture, permissible operation for 20 years indoors and 15 years outdoors, highest protective characteristics for heat and noise, versatility for indoor and outdoor use works. Disadvantage: high price.
- 34th grade. Advantages: obtained by pressing under pressure; density 950 kg/m3; impregnation with special compounds; kraft paper with moisture-resistant treatment; noise-absorbing substrate; melamine resin to increase mechanical strength; versatility for indoor and outdoor use; high outdoor service life of 15 years; indoors from 30 years. Disadvantage: high cost.
- HPL laminate. Advantage: external use; low expansion coefficient; high protective characteristics for water, heat, noise and UV rays; thickness 16 mm; high mechanical strength Disadvantage – high price.
Finishing tools
Complex and rare tools and consumables won’t be needed to install such slopes on windows; after the contractor covers the floors with this material, the laminate and consumables usually stay with the contractor.
Standard supplies and equipment needed to install window opening slopes include:
- laminate according to class depending on the installation location;
- profiles or wooden beams for fixation;
- polyurethane foam or special glue;
- insulation;
- vapor barrier and other membranes, depending on the accepted “wall cake”;
- fasteners – self-tapping screws and dowel – nails;
- rule;
- decorative corners;
- hand scissors for metal;
- measuring instruments;
- electric jigsaw;
- hand hacksaw for metal;
- hammer drill for concrete walls;
- screwdriver;
- Bulgarian;
- drill.
Installation features

There are several methods for installing laminate window slopes: adhesive polymer glue, polyurethane foam, and frame.
The latter is the most dependable and labor-intensive because it is installed on metal profiles or wooden slats while insulation and moisture protection are also installed at the same time.
Generally speaking, strip laying is done vertically; however, if horizontal laying is preferred, it is done from the bottom up.
Make sure the workspace is ready before you begin working:
- Remove protruding sections of the walls.
- Remove peeling plaster.
- Wipe the walls from dust with a damp cloth.
- After drying, treat the surfaces with a primer mixture 2-3 times.
In order to level uneven wall openings at the edges, use plasterboard, properly seal all of the openings with foam, and insulate the slopes.
Cut the laminate to fit the slopes after preparing the surface. In order to ensure that the completed slope does not obstruct the sash opening, measure the openings using a tape measure while accounting for the slope’s angle of deviation from the window structure. They start by using a pencil to transfer all of the dimensions to the laminate before sawing it.
It is preferable to use a jigsaw for this task; first, cut the protective film along the desired line with a knife. Next, place the laminate with the outer side down. Set the jigsaw to high speed and carefully, slowly, cut the slab without letting the tool move sideways.
Note: If the material is to be manually cut with a fine-toothed hacksaw, the cut line will not develop chips if masking tape is adhered to.
Window laminate slopes:
On a metal frame
Laminated window slope installation technology on a metal profile frame:
- Remove protruding fragments of construction foam remaining from sealing cracks around the perimeter of the window.
- Drill holes and fix the vertical profile with dowel nails on the inside and outside of the wall opening.
- The plank is fixed on one side to the wall.
- Install horizontal slats at the top/bottom of the side slopes.
- Similarly, 2 side and 1 upper slope are formed.
- If the slope length is significant, then several additional transverse elements are installed between the metal profile guides.
- Install a heat-protective layer.
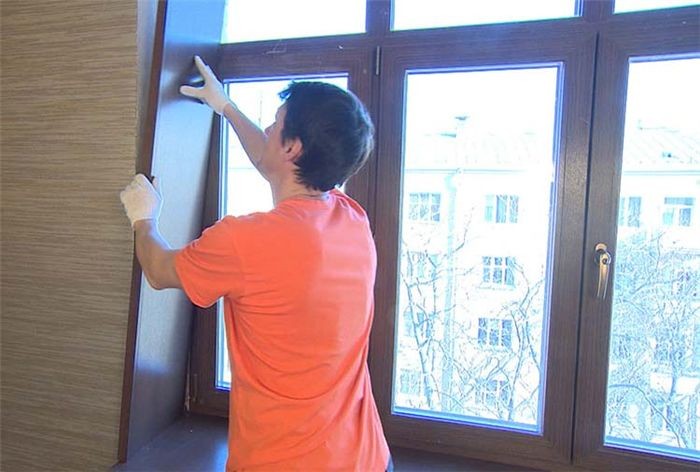
- The laminate is screwed to the frame with self-tapping screws, first the slope or window sill is installed, then the sides and finished with the upper part of the slope.
Advantages of metal profile laminate slopes:
- high strength and durability;
- suitable for any walls;
- easy assembly and disassembly;
- light weight;
- the design is not subject to corrosion;
- high frost resistance;
- has no temperature deformations;
- high fire resistance and not susceptible to biological damage.
Laminate faults that slope on a metal profile:
- high price;
- additional noise and heat protection with thermal insulation materials is required.

Wooden sheathing
Laminated window slope installed on wooden sheathing using installation technology:
- Drill holes of the required diameter in the walls and secure the slats along the inner/outer perimeter of the opening.
- Make sure that the frame elements do not extend beyond the cut of the wall.
- To create a rigid sheathing, several transverse slats are installed in the vertical posts of the structure.
- If the surface of the lathing corresponds to the placement of the laminate and has a sufficient area for contact, the prepared parts of the material can be glued with “liquid nails” to the frame, otherwise the installation is carried out using self-tapping screws, and their heads are closed with plugs, according to the color of the product.
Benefits of laminate slopes put over wooden sheathing:
- affordable price;
- easy installation, you don’t have to install brackets, fixing the bars directly to the walls;
- the fibrous wood structure ensures rigid fixation of the finishing material;
- light weight;
- highest heat and noise protection indicators;
- environmental safety;
- reliability and durability;
- long service life;
- can be used with any finishing material.
The following are drawbacks of laminate slopes set over wooden sheathing:
- material susceptible to moisture;
- large deformation of sheathing elements;
- additional treatment with antiseptics and fire retardants is required;
- easily flammable and fire hazardous material.

Glue
Even though it seems straightforward, installing laminate on glue is far more challenging than installing it on sheathing. This is because this method is used when it is necessary to maintain the wall opening’s dimensions as precisely as possible. It involves meticulous base preparation and careful observation of the angles of inclination, both of which take experience and skill.
Kindly take note! The laminate is adhered to the opening’s base surface using a unique type of adhesive. It is made thick and according to the manufacturer’s instructions, and it is used within 30 minutes of making it.
Window slope installation technology employing the adhesive method for laminate:
- Level the wall base.
- Mix the required amount of plaster for the job.
- Scoop the solution onto a spatula and apply it to the surface of the wall, starting from the bottom and moving up.
- As a rule, they pass over the resulting fresh layer from bottom to top, thereby leveling the layer of plaster.
- If unevenness is found on the surface, add solution to these places. Using a spatula with a wide blade, perform the leveling procedure.
- During work, check the evenness of the resulting surface with a level.
- After the solution has dried, process the slopes in a circular motion with a construction float and paying attention to the corners.
- Primer surface in 2-3 layers.
- Start laying the laminate after all surfaces of the slope have dried thoroughly.
- Mix the glue according to the manufacturer"s recipe.
- Apply glue to the back side of the plank and press it against the plastered slope, holding it for 30-60 seconds.
Until the glue has completely dried, spacers are used to fix the side bars and tape is used to fix the top bar to prevent the laminate from mixing.
Benefits of adhesively fixed laminate slopes:
- speed of execution;
- minimum amount of consumables;
- no need to perform complex work on the arrangement of the metal frame;
- low cost of work.
The following are drawbacks of adhesively fixed laminate slopes:
- additional noise, moisture and heat protection of the slope is required before installing the laminate;
- the need to perform plastering work so that the surface is as smooth as possible before gluing.
Counseling! Silicone sealant is used to fix all of the slopes’ ornamental elements, such as corners and trims. It’s important to control how tightly they fit together during installation and to get rid of any extra sealant.
Difficulties and errors
Errors in this type of installation may result in the slopes looking unsightly and developing mold and condensation on them.
Primary reasons why mistakes were made when creating laminate slopes for windows:
- Poor preparation of the wall base before installing the finishing material.
- Incorrect measurements.
- Insufficient amount of glue when performing work.
- The presence of voids in the area where the slabs adjoin the window.
- Incorrect laminate class selected for installation on window slopes.
- The wall surface was not primed before laying the finishing material.
- Incorrect adhesive composition.
- After installation on glue, the parts were not spaced.
- Poor frame fastening.
- Violation of the horizontal/vertical position of the installed frame.
- The long frame was not reinforced.
- Poor sealing of assembly seams.
Pros and cons of use
The best option for finishing slopes from the inside and outside of contemporary window systems is laminate, which enables the owner to finish the work quickly and independently. When the windows, sills, and slopes are all the same color and texture as the laminate, it looks especially good.
Benefits that flow from the windows’ laminate:

- A huge assortment of colors and textures can be easily selected for almost any interior.
- High reliability and wear resistance.
- Great resistance to mechanical influences.
- Simple care – fairly wet processing by rags.
- Modern appearance.
- Accessibility in the market.
- Aesthetics, combined with all types of windows.
- Moisture resistance for some modifications of external use.
- Long life from 15 to 30 years.
Vital. The high cost of waterproof laminates and their low water resistance for certain modifications, along with their sensitivity to temperature fluctuations, are the drawbacks of using laminates for window slopes.
Average prices
Installing window slopes made of laminate will cost more overall depending on:
- Type of work – external or internal.
- Work heights.
- Material class.
- Installation type – frame or frameless.
- Conditions of wall window openings.
- Cost of consumables.
Average cost of laminate for window slope finishing from well-known manufacturers:
- Kronostar, “cognac oak”, 32 class, 8 mm, 15 kg, RUB 1,594./package.
- Eurohome, “pine”, class 32, 8 mm, 15 kg, RUB 10,800 for 8 packs.
- Tarkett, “oak”, class 33, waterproof, 8 mm, 14.8 kg, 2803 rub./package.
- Wineo, “champagne oak”, class 34, waterproof, 8 mm, 16.7 kg, 6330 rub./package.
- Imperial, “golden oak”, class 34, waterproof, 8 mm, 18 kg, 2500 RUR./package.
- MatFlooring, “oak”, class 33, waterproof, 8 mm, 19 kg, RUB 2,584./package.
- Praktik, “Tudor oak”, class 34, waterproof, 8 mm, 21.1 kg, 3100 rub./package.
- HPL panel FUNDERMAX, class 34, 2800x1300x6, price RUB 30,652./sheet.
The primary tasks involved in building laminate slopes between 250 and 350 mm are as follows:
- Dismantling old slopes, 170 rubles./m.P.
- Leveling the base of slopes with plaster, 450 rubles./m.P.
- Cleaning slopes from old plaster, RUB 215./m.P.
- Installation of waterproof slopes with glue, RUB 360./m.P.
- Installation of conventional slopes with glue, RUB 290./m.P.
- Installation of waterproof slopes on wooden sheathing, 500 rubles./m.P.
- Installation of conventional slopes on wooden sheathing, RUB 470./m.P.
- Installation of waterproof slopes on metal sheathing, RUB 560./m.P.
- Installation of conventional slopes on metal sheathing, 520 rubles./m.P.
- Installation of hpl laminate, 660 rubles./m.P.
- Installing a corner on slopes, 150 rubles./m.P.
A satisfying do-it-yourself project that can dramatically improve the appearance and insulation of your house is making laminate slopes for your windows. You don’t need to be an expert carpenter to accomplish professional-looking results; just follow a few simple steps.
Measure your window openings carefully first to make sure the laminate panels are cut to the proper size. Precise dimensions are essential for a secure fit. When your panels are prepared, use the proper adhesive and finishing nails to fasten them in place. To stop moisture and drafts from leaking in, pay close attention to small details like caulking corners and edges.
Recall that accuracy and patience are essential for a successful laminate slope installation. To make sure everything lines up precisely, take your time at each step. Please don’t hesitate to refer to online guides or seek assistance from more seasoned do-it-yourselfers if you run into any problems.
Your window slopes can become a fashionable and useful feature with a little work and attention to detail. This project will not only make your house look better, but it will also increase its energy efficiency, which will lower your heating and cooling expenses. Savor the joy of knowing that you’ve given your living area a unique touch.


