
Slopes around plasterboard windows are an important detail for both practicality and beauty when installing them. The angled surfaces that surround the window frame and seamlessly join it to the wall are called slopes, sometimes referred to as reveals. They not only improve the window’s aesthetic appeal but also aid in moisture management and create a seamless transition between the wall surface and the window frame.
Prior to creating any slopes on plasterboard windows, make sure the window frame is level and firmly in place. These slopes will be made of plasterboard, commonly known as drywall or gypsum board. Plasterboard should be measured and cut to fit around the window frame, allowing space for the slopes. For a flush finish, the plasterboard’s thickness and the window frame’s depth should match.
Next, use screws or nails to fasten the plasterboard pieces to the window frame’s sides. It’s critical to firmly fasten them to prevent any spaces or uneven surfaces. Verify that the plasterboard pieces are uniformly aligned vertically and horizontally on all sides of the window by using a spirit level.
You can start shaping the slopes after the plasterboard pieces are positioned correctly. This entails slightly angling the plasterboard’s edges in the direction of the window frame. You can accomplish this by carefully trimming and shaping the edges with a rasp or utility knife. A gradual, smooth slope that melds in perfectly with the surrounding wall and window frame is the aim.
| Materials Needed: | plasterboard, measuring tape, pencil, saw, screws, screwdriver, jointing compound, sandpaper, primer, paint |
| Steps: | 1. Measure and mark the dimensions of the window opening on the plasterboard. 2. Cut the plasterboard pieces to fit the measurements, ensuring they are slightly larger than the opening. 3. Attach the plasterboard pieces to the window frame using screws. 4. Apply jointing compound to fill in the gaps between the plasterboard and the window frame. 5. Sand down the joints until smooth. 6. Apply primer and paint to finish the slopes, matching the existing decor. |
We’ll go through the step-by-step procedure for utilizing plasterboard to create aesthetically pleasing and useful window surrounds in our guide, "How to make slopes on plasterboard windows." These slopes offer practical advantages like improved insulation and a smoother transition between the window frame and wall, in addition to improving the visual appeal of your windows. We’ll go over the equipment needed, material preparation, exact measurements, and simple methods that are necessary to produce results that are professional. Whether you’re building from scratch or renovating, this skill will help you improve the appearance and functionality of your interior spaces with ease.
- What are slopes
- Materials and tools for work
- Preparatory work
- GKL sloping
- Finishing gypsum board slopes on frame
- Mixed method
- Is it possible to plant slopes on foam?
- Final work
- Sealing joints
- Strengthening external corners
- Putty
- Coloring
- Pros and cons of plasterboard slopes
- Conclusion
- Video on the topic
- DIY plasterboard slopes. All stages. RENOVATION OF KHRUSHCHEVKA FROM A TO Z #15
- Do-it-yourself arched, semicircular slope made of plasterboard.
- Installation of slopes on plasterboard windows / DIY installation.
- slopes made of drywall without add. fasteners and beacons
- How to make slopes on drywall windows
- Slopes made of drywall on windows
- Slopes made of drywall. How to make the right slopes of drywall? DIY slopes on windows.
What are slopes
A window or doorway’s front portion is referred to as a slope. A window or door needs to be sealed after installation for a number of reasons.
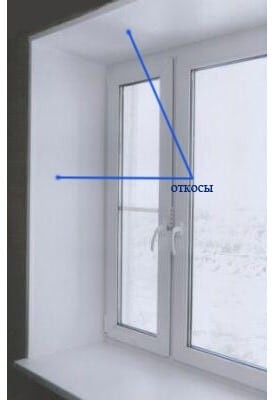
- give the window (door) an aesthetic appearance;
- isolate the room, in the case of a window or front door, from street noise, cold and moisture;
- ensure a smooth transition from the window (door) to the wall;
- hide wall defects in a window or door opening: notches, cracks, crevices, etc.d.
Slopes can be sealed using a variety of materials, including plasterboard, plastic, and cement-sand mixture (plaster). We’ve enumerated the benefits and drawbacks of each of them in the table.
The efficiency of using different materials to finish slopes.
| Plastic | GKL | Plaster | |
|---|---|---|---|
| Complexity of technology | Average | Average | High |
| Labor intensity | Low | Low | High |
| Aesthetic appearance | Average | High | High |
| Price of finishing materials | High | Low | Average |
| Cost of work | Average | Average | High |
When selecting a building material, buyers rank factors such as cost, ease of installation, and aesthetic appeal in a hierarchical manner. Thus, drywall has an indisputable benefit.
We will discuss how to create slopes on windows made of plasterboard.
Materials and tools for work
Plasterboard can be used to seal slopes in a variety of ways in real life. However, they’re all built upon four fundamental technologies:
- gluing;
- fastening to a rigid frame made of metal profile;
- simultaneous use of a metal profile and glue (combined or mixed method);
- fastening with mounting foam.
You will require the following supplies and equipment to complete the task:
- drywall – moisture-resistant (there is always high humidity in the window area), at least 12 mm thick (subject to significant mechanical loads, unlike the ceiling);
- Perlfix glue in the form of a dry gypsum mixture (can be replaced with ready-made gypsum-based putty);
- primer for treating walls and gypsum boards before painting;
- gypsum putty;
- water-based paint or acrylic enamel;
- mounting foam;
- mineral wool for insulating slopes;
- acrylic or silicone sealant for sealing joints;
- guiding profile NP (UD), size 28 × 27, is attached to the window sill and the upper part of the opening;
- ceiling profile PP (CD) section 60×27. Serves as a frame for gypsum boards;
- metal L-shaped profile;
- self-tapping dowel 6×60 mm (8×80 mm) for installing NP guide profiles;
- “bug” hardware (9 mm) for connecting the guide and ceiling profile;
- hammer drill or electric drill – necessary when using frame elements;
- grinder or hacksaw for cutting metal profiles;
- self-tapping screws 35 mm long. They are used to fasten sheets of plasterboard with sheathing;
- screwdriver with a cross-shaped tip;
- metal perforated plaster corner;
- construction knife;
- level;
- construction pencil;
- roulette;
- set of spatulas;
- glue container;
- paint brush.
The list above is typical. The supplies and equipment needed in a given scenario are chosen for each slope-building technique.
Preparatory work
It is essential to get ready for the installation of slopes before using any sealing technique on the wall of the aperture’s window space. During the preliminary phase, the following tasks are completed:
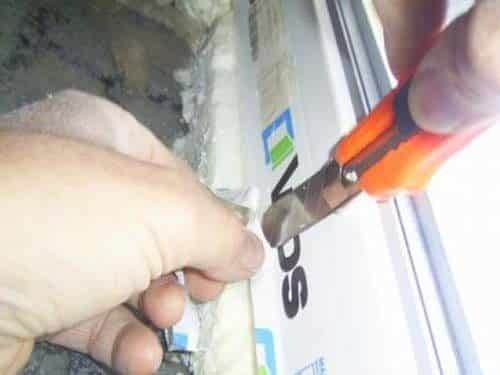
- excess foam is removed at the junction of the frame and the wall. The window structure is installed on plumb lines and fixed with mounting foam, which, when expanded, goes beyond the planned limits. It must be removed so as not to interfere. To do this, use a knife blade to carefully cut the foam parallel to the frame profile. Pieces are removed with a spatula. There is no need to be afraid to remove something unnecessary – when installing the slope, new foam will fill the voids that appear;
- the walls of the opening are cleaned of dirt, debris, and insulation residues. Protruding nails and screws are removed. Deep holes and cracks are sealed with plaster mortar or putty;
- the window opening is carefully inspected. If there are areas with mold or blackening, work is carried out to remove them – the plaster or part of the wall is knocked off, after which an antiseptic composition is applied;
- Using a knife and spatula, remove part of the protective film from the frame to a width of 1-2 cm from the edge – its presence disrupts the putty process.
- the wall and drywall are primed to ensure better adhesion to glue or putty;
- Pencil marks are placed on the window sill, frame and top of the slope for fastening the drywall sheet. In this case, it is necessary to ensure the verticality of the slope and the so-called “dawn” – the divergence of the slope towards the room for better passage of the light flux. A square and a level will help with the work.

Many specialists measure the window opening and cut drywall sheets based on the measurement results they obtain as part of their preparatory work. We don’t think it’s necessary to hurry. It is possible to measure the window opening’s height and width while construction is underway. Ultimately, it is challenging to estimate the amount of centimeters that the window opening will drop following the installation of the upper slope (always put first).
Tools and materials are on hand, and the necessary preparations have been finished. The instructions for creating drywall slopes still need to be provided.
GKL sloping
Adhesing slopes to the wall is the simplest method of installation. Power tools are not required in this situation, and even if they were, there would only be a tiny amount of GCL that could be damaged during work. This technique works on wooden houses and attic windows alike.
The work is done in the following order: the side is placed first, followed by the upper slope.
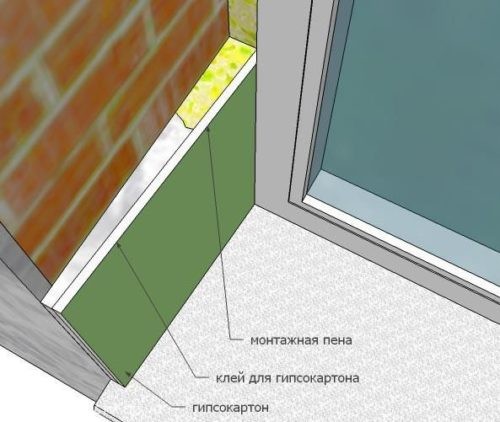
- The top of the window opening is measured. A sheet of gipper is cut out.
- Glue or putty (preferably finished composition) around the perimeter and a little in the middle are applied to the cut out part.
- The sheet assigned to the wall is slightly moving from side to side, so that the glue enters all the smallest pores of the wall material and grabs.
- The glued slope is fixed with stops – at least two.
- The glued sheet is left until the adhesive mass has completely dried.
Strips of 4-5 cm wide gypsum board are first glued to the wall if there is an installation gap greater than 3 cm between the frame and the wall. There is mineral wool in the space between them. The slopes are adhered to.
Finishing gypsum board slopes on frame
Plastered-in plastic window slopes can also be installed the traditional manner, on a metal profile frame. Slope construction done this way is limited to situations where the walls are sheathed in gypsum boards. This enables you to make a wall and window opening frame that is similar. The article "How to level walls with plasterboard with your own hands?" demonstrates the complexities of the technology when used independently. Let’s quickly review the method’s main points:

- the width and height of the opening are measured. Guide profiles (NP) are cut along the width, ceiling profiles (PP) are cut along the height;
- guides are alternately placed on the window sill and the upper part of the opening and drilled (the operation is necessary to obtain marks for future dowels);
- holes are drilled according to the marks, after which dowels are driven into them;
- guides are installed;
- a PP profile is attached to the fixed profile using “bug” self-tapping screws;
- Drywall is cut to the size of the slope;
- the space between the profile is filled with mineral wool or foamed with polyurethane foam;
- The gypsum board is screwed to the resulting frame using hardware.
Pros and cons exist with this method. Positive features include how quickly walls can be leveled and how gypsum plaster sheets work with walls. The only negative aspect of installing slopes at the door is that it reduces the opening space, which is entirely undesirable.
Mixed method
A combination method, which comes in several interesting varieties, can also be used to install plasterboard window slopes that are do-it-yourself.
1. An acrylic sealant is applied right away after a metal L-shaped profile is fixed to the window frame (see photo). Next, a plasterboard slope is positioned in line with the window sill and frame markings, fastened with self-tapping screws. The gypsum board sheet is then held in place vertically with sealant.
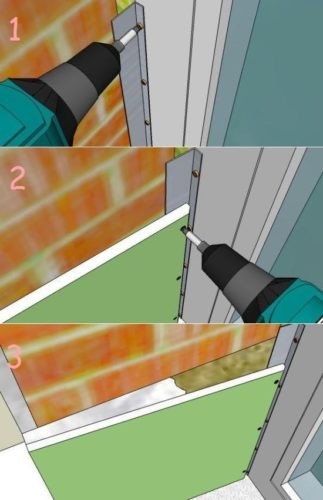
After the screws are tightened, two thirds of the space between the wall and the slope nearest the window is filled with mineral wool insulation. Putty or adhesive is used to cover the remaining portion of the empty space.
2. A PP (CD) ceiling profile is measured and trimmed to the slope’s height. On the floor, drywall is installed and cut to height (it should be wider). Self-tapping screws are used to fasten the gypsum board in increments of 25–30 cm to the profile. The resultant structure is positioned vertically or upside down.
The PP groove is filled with a damper tape. A thin layer of foam is applied to the window opening’s corner. In the vicinity of the window frame, the profile and the slope are pressed into the foam. A level is used to verify the vertical. If needed, use a rubber hammer or the handle of a spatula to gently knock down the projecting side.
Then, everything is the same as it was in the first option: glue and insulation (which can also be putty or foam). Using a knife, trim the portion of the drywall flush with the wall that extends into the room once the adhesive has dried. The task is completed swiftly and without incident.
Is it possible to plant slopes on foam?
The options that are easiest to face slopes were covered previously. There is one more, though, and it’s the hardest to execute: using foam to secure drywall. The technology is simple to comprehend on its own. Planting a slope on foam presents issues because the foam expands and makes it more difficult to fix a sheet of drywall in the desired location.
They use it when there are small spaces (up to 3 cm) between the wall and the frame and they need to insulate the window between the wall material and the window structure profile because the foam does double duty as insulation. This technique works well for straightening a window opening wall’s curved surface as well.
Let’s examine each step of the procedure in detail.
- All holes and potholes in the wall of the opening are sealed – if this operation is ignored, the drywall may fail in these places. Use foam, cement-sand mortar or starting type of plaster.
- After the holes and potholes are completely dry, polyurethane foam up to 1 cm thick is applied to the back side of the gypsum board using a snake.
- The slope is placed against the wall and pressed against it with force – the foam should adhere to the wall material.
- Sheet of drywall comes off. If everything was done correctly, the foam remains on the wall. After 10 minutes it will begin to expand.
- After the process of foam expansion begins, the gypsum board is again pressed against the wall and fixed with spacers.
Here, it’s crucial to accurately set the slope in accordance with the geometry. The sheet can be tapped to slightly press it if needed. It’s important to avoid going overboard because the foam lacks the properties of rubber and you won’t be able to squeeze it off the wall.
Final work
Regardless of how you installed them, after installing slopes on plasterboard windows by hand, there are a few finishing tasks you need to complete:
- seal the joints with sealant;
- strengthen the outer corner of the slope;
- putty the surface of the drywall;
- paint.
Sealing joints
Sealant is used to seal the joints of the slopes that meet the window sill, frame, and each other at the top (internal corners everywhere). Regarding its nature, opinions differ. While some experts choose silicone, others go with waterproof acrylic. Because both sealants are incredibly flexible and waterproof, the joint is prevented from cracking.
Although many experts complete this task prior to painting, the seam needs to be laid before putty. In the second case, the putty conceals the sealant, making it easily visible.
Strengthening external corners
The one flaw in GKL is its extremely thin edge. Marks are left on the outer corner by any mechanical impact. solves the issue by requiring reinforcing material to be placed in the corner. For these reasons, "serpyanka" is occasionally employed. Based on empirical evidence, a corner with a metal perforation maintains the reinforced corner’s geometry with greater reliability. There are multiple stages to the operation:
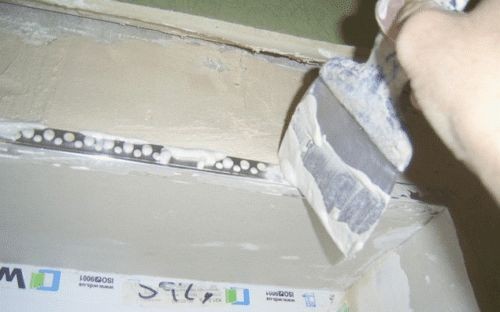
- the perforated corner is cut to size;
- putty is applied to the slope and wall in small portions. The layer must be continuous and can extend onto the slope to any depth;
- a corner is placed on the corner and lightly tapped with the handle of a spatula, it settles into place;
- Using a long level, the vertical of the newly formed angle is checked. If necessary, adjustments are made to its geometry;
- the putty protruding through the perforation is rubbed with light movements of medium width with a spatula.
For information, it is suggested in certain materials to use a construction stapler to secure the plaster corner. First off, this technique works only with plastic plaster corners. Secondly, a stapler cannot be used to secure a corner to a brick or concrete wall.
Putty
The slopes are puttied right away after the plaster corner is installed. The best kind of putty for these uses is premade gypsum. Using a wide spatula, it is applied to the slopes and rubbed. Puttying is done twice if you want the paint to adhere more strongly. Once the first layer has fully dried, the second layer is applied. It shouldn’t be thicker than one millimeter.
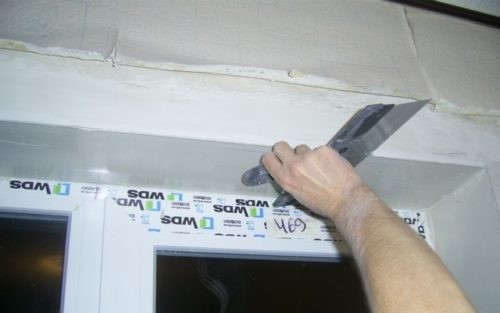
The surface of the slopes is sanded using an abrasive mesh or fine-grained (P 100 and above) sandpaper after the second layer has dried, which takes about 24 hours.
Coloring
Slopes are primarily finished using white water-based paint. Other hues are also employed, based on the design choice. For these uses, acrylic enamel is preferable over water-based emulsion. If you’re sick of the same old slopes and there’s no ready-made solution, you can search the Internet for a hint.
Important: priming the slopes’ bases is advised before painting.
Pros and cons of plasterboard slopes
There are several benefits to sealing a window or doorway’s slopes with drywall:
- simple installation, accessible to performers without special knowledge and experience;
- the service life of the installed slope coincides with the service life of the window structure;
- low costs for the purchase of basic and additional materials;
- The material is environmentally friendly, can be installed in any room (children"s room, bedroom, etc.).d.);
- allows for additional insulation of windows and doors;
- minimal care required;
- nice appearance.
Experts list the following drawbacks of gypsum plasterboard slopes:
- the need to completely replace the slope when swelling – cannot be repaired;
- the ability of the cut edge of a plasterboard sheet to absorb moisture on the windowsill that collects there when the windows fog up, as a result of which the slope can swell.
Conclusion
Installing gypsum plasterboard sheets on the walls is the easiest and least expensive way to create slopes. They can be put on a metal sheathing, glued, or foamed with polyurethane. In real life, these techniques are almost never applied in isolation; instead, they are typically combined.
There are various steps in the entire process:
- excess foam remaining after installing the window is removed;
- the wall of the window opening is cleaned of dirt, insulation residues, mold and blackening;
- markings are applied to the window sill and the top of the opening;
- walls and drywall are primed;
- slopes are cut to size, after which they are attached to the wall in one of the possible ways;
- the joints of the slopes with the window sill and frame are sealed;
- the outer corners of the slopes are reinforced with a metal plaster corner;
- drywall is puttied;
- Slopes are being painted.
Of course! For the article "How to make slopes on plasterboard windows?" on the website "Everything about construction and renovation," here is a brief summary:
Slopes on plasterboard windows are a useful way to improve your home’s appearance and usability. Plasterboard slopes provide a seamless transition between the window frame and the wall, as well as an additional layer of insulation and soundproofing, when you frame your windows.
Make sure you precisely measure and cut the plasterboard to fit the window frame snugly before beginning. To ensure a seamless finish, smooth out any joints or edges and secure the plasterboard in place using the proper tools and techniques.
Selecting the appropriate materials is essential to creating long-lasting and aesthetically pleasing slopes. Select premium plasterboard that blends in with the room’s current design. If you want to improve the appearance of your window slopes, think about adding ornamental elements like paint or moldings.
Finally, keep in mind that, with the correct planning and attention to detail, making slopes on plasterboard windows is a doable do-it-yourself project. Whether you’re building a new home or remodeling an old one, skillfully designed slopes can greatly improve the look and feel of your living area.


