
It’s critical to seal the space between a window and the wall to maximize energy efficiency and avoid water damage. These spaces may appear as a result of the building settling or the expansion and contraction of the materials over time. Your house will remain insulated and weatherproof if these gaps are sealed properly.
Getting the necessary supplies and equipment together is essential before you begin. Usually, you’ll need silicone or acrylic caulk along with a caulking gun. While acrylic caulk is easier to work with and can be painted, silicone is more resilient and ideal for areas exposed to moisture. Before using any caulk, make sure the area is dry and clean.
In order to start sealing, insert the caulk tube into the caulking gun and trim the nozzle tip at a 45-degree angle to regulate the caulk flow. Apply a consistent bead of caulk along the seam, starting at one end of the gap. To guarantee uniform coverage, move in a fluid, continuous motion. You can smooth it out later, so don’t worry if it looks a little messy at first.
After the caulk has been applied, smooth the bead with a caulk tool or your wet finger. This makes it more likely that the caulk will stick firmly to the wall and the window frame, resulting in a tight seal. Try not to press too hard or remove too much caulk from the gap when you gently smooth the caulk.
As directed by the manufacturer, let the caulk dry completely after smoothing. Usually, this takes several hours or even overnight. To avoid smudges or uneven drying, do not disturb or touch the caulk during this time.
Once dry, inspect the seal for any holes or areas that were overlooked. To make sure that every area is adequately sealed, add another layer of caulk if needed. Examine the window from the inside as well as the outside to make sure there are no more noticeable gaps.
In addition to increasing energy efficiency, properly caulking the space between your window and the wall improves the aesthetics of your house. It’s an easy yet effective way to keep your house safe and comfortable all year round by guarding against water damage and drafts.
- What is a window block installation unit??
- Why is a mounting seam needed??
- Is it possible to do without it??
- Regulatory requirements for junction points
- Calculation of the size of the gap between the window and the frame
- How to close correctly?
- What materials can be used to cover?
- Step-by-step instruction
- Possible mistakes
- Video on the topic
- Sealing the EXTERNAL assembly seam of WINDOWS AND DOORS.
- Gap between window and sill. Sealant for plastic windows. How to seal a joint
- Plastic windows. Quick sealing of joints and seams
What is a window block installation unit??
The standardized distance between the outside edge of the frame profile and the outer wall opening’s end is known as the assembly seam of the window structure. When installing a window unit, it is imperative to install an installation gap with standardized dimensions.
The current GOST 30971-2012, "Mounting seams of joints connecting window blocks to wall structures," governs the design of this structural element.
Vital. All seam filling components must fulfill the specifications specified by the manufacturer to guarantee dependability, safety, and a minimum service life of the transparent structure.
Why is a mounting seam needed??
To accomplish the following objectives while the window unit is operating, assembly is required:
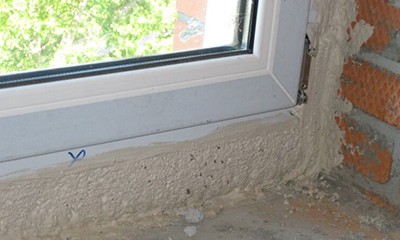
- Ensuring the required energy efficiency of the space being used.
- Sealing the joint between the frame profile and the opening material, which minimizes the risk of blowing through the enclosing structure and eliminates drafts.
- The seam material prevents the penetration of precipitation into the room, freezing of slopes and window sills.
- Compensation for errors during the construction of external walls and the construction of the opening – mounting foam laid in the seam allows deviations from the geometry of up to 3 mm along any side of the structural element.
- The seam also serves to install vapor and waterproofing membranes with a self-adhesive surface, which prevent the formation of condensation on the inner plane of the glass.
- Compensation for the movement of the lintel from the permissible deflection, the possibility of minor movements of the window unit due to wind pulsation. This requirement is especially relevant when installing translucent elements at a height above 30 m.
The window unit will not provide the necessary resistance to television transmission if there is not a gap of the minimum permitted width. It may also become deformed and collapse when the outer wall moves over time.
Is it possible to do without it??
Many owners of real estate are curious about the possibility of eliminating an installation gap. The following kinds of objects may not be arranged with this structural element:
- Frame houses made of wooden blocks – when sealing, it is enough to use pressure strips to frame the slopes.
- Cold contour of terraces, verandas, porches and other attached premises to private houses.
- Glazing of loggias and balconies on the top floors, provided there is no top floor slab, which can cause deflection and deformation of the glazing.
- Stained glass structures that have their own compensation gaps between the profile elements. In such situations, fastening to the elements of floors and walls is carried out using hinged mating units.
Vital. Building structures are subject to stricter requirements to guarantee a perfectly flat plane and installation area of the translucent element in the absence of an installation gap.
Regulatory requirements for junction points
The following specifications, as stated in GOST 30971-2012, are applicable to assembly joints between window block profiles and the ends of openings in exterior walls:

- The minimum permissible width of the installation seam should not be less than 15 mm.
- The optimal gap size is from 20 to 30 mm.
- The seam must be constant along the entire perimeter of the window frame.
- When filling the space with foam, the thermal properties of the enclosing structure specified in the energy passport of the facility must be ensured.
- Each seam must contain sealing self-adhesive tapes, which increase the vapor barrier and waterproofing of the enclosing structure.
- If a window is installed in a quarter, the seam on the front side is filled with porous PSUL tape.
- A correctly installed seam eliminates the risk of slopes freezing and atmospheric moisture entering the premises.
- When using a high-quality membrane, the seam should not contribute to the formation of condensation, which causes the growth of bacteria and the occurrence of fungus.
- The design of the seam must be used no less than the window unit itself.
Supervisory authorities verify that window unit installation satisfies the aforementioned regulatory requirements prior to initiating a capital construction project. In the event of a GOST violation, the property owner has the right to file an official claim by contacting the installation company.
Calculation of the size of the gap between the window and the frame
Before installing the window structure, you must compute the installation gap using basic arithmetic formulas.
The size of the support profile determines the gap’s lower dimension. These components’ typical sizes range from 15 to 25 mm. The window sill board and framing frame’s design elements determine the profile’s ultimate thickness.
A temporary plastic block or wedges are used to set the installation gap in the absence of a support profile.
The following formula is used to calculate side dimensions assembly seams:
- a1 And a2 – installation joints between the wall and the vertical window profile;
- b – width of the window opening;
- l – width of the window block.
For instance, if the window opening is 1600 mm in diameter and the window frame’s maximum dimension is 1550 mm, then a1 = a2 = (1600 – 1550) / 2 = 25 mm.
Height The following formula also determines the mounting gap at the top of the window:
- N – height of the window opening;
- h – second dimension of the translucent element;
- d – height of the stand profile.
When a building’s window opening is 1800 mm tall, the window is 1750 mm, and the stand profile is 25 mm, the calculation is c = 1800 – 1750 – 25 = 25 mm. After the window block is installed in the opening on the stand profile, this is the precise value that should be obtained.
Spacer wedges must be used to close the completed installation gaps, which should then be verified with a caliper.
An L-shaped cross section will appear at the installation seam when a window block is installed in an opening with a quarter. It is sufficient to install a PSUL if there is a gap of 10 to 20 mm between the inner edge of the projecting brick and the plane of the frame profile.
How to close correctly?
You must adhere to every step of the detailed instructions in order to arrange the necessary installation gaps when installing windows:

- The window opening is measured to calculate the width of the seams according to the algorithm given above.
- Select the desired height of the stand profile.
- The window frame is installed in the opening.
- The design is adjusted within the dimensions of the building structure until a uniform gap is formed.
- Along the entire perimeter, the frame is wedged in the opening, the sizes of the seams are verified with a caliper.
- The window is fixed on mounting plates.
- The entire profile line is carefully foamed with liquid insulation.
- Wait time for the material to polymerize.
- Excess foam is carefully cut to the plane of the main frame profile.
- The mounting wedges are removed.
- In places where spacer elements are installed, foam is re-installed, the excess of which is also cut off after hardening.
- Steam and waterproofing membranes are glued to the interior side of the window.
- On the outside of the window structure, silicone or acrylic sealant or PSUL tape is applied.
- At the final stage, the quality of the seam filling is inspected, after which it is allowed to proceed with the installation of double-glazed windows and sashes.
Vital. All of the wedges are taken out and the holes left by them are sealed with the same liquid insulation after the seams have been filled with foam and allowed to solidify.
What materials can be used to cover?
The following polymeric materials and elastic chemical compositions are used to seal seams:
- Polyurethane foam:
- standard;
- fire-resistant – if there are special requirements for the window unit;
- resistant to temperature changes – for winter installation.
- Liquid or viscous sealants:
- silicone;
- polyurethane;
- acrylic;
- butyl;
- thiokol.
- Sealing tapes:
- PSUL – on the front side of the window structure;
- sealing tape – to improve the adhesion of PSUL to building structures;
- vapor barrier tape for sticking under low tide on the outside;
- vapor-permeable waterproofing membrane – for installation on the interior side of the window;
- diffusion tape – to protect the foam from the inside of the opening.
Note: The durability and operating conditions of sealing materials should be carefully considered when selecting them.
The best course of action would be to buy formulations from reputable companies that have been in business for a while and whose goods have a large number of positive internet reviews from happy customers.
Step-by-step instruction
The steps listed in the following technological map should be followed in order when sealing the installation gap:

- Before installing the window unit in the opening, pre-compressed sealing tape is glued along its perimeter. It is necessary to ensure that the sealing material is installed strictly near the outer edge of the window profile.
- After installation, wedging and foaming of the structure, a viscous sealant is applied to the inside of the window block.
- Vapor barrier and waterproofing are glued on top of the polymerized substance. All materials are supplied in rolls with a self-adhesive surface.
- To protect the waterproofing, a diffusion tape is installed, the structure of which resembles durable fiberglass.
- On the outside of the seam, if there is a quarter, a PSUL is laid, after which a vapor barrier membrane with increased frost resistance is installed.
Vital. The window block features an ebb, a window sill board, and a decorative frame of slopes. Make sure the installation seam is completely impenetrable and free of drafts or cold bridges before masking it. Once this is done, you can add decorative elements or use plaster mixture to seal any gaps.
Sealing the seam of the external assembly:
Possible mistakes
Novices often make several mistakes in assembly seam creation and design that have unfavorable effects. In order to avoid this, experts and professional installers frequently discuss their experiences in online forums, highlighting several crucial details:
- Too small seam – 10 mm or less – a layer of foam will not be able to provide proper resistance to heat transfer – it is required to expand the opening.
- Too much gap – more than 30 mm – sealing materials begin to fall out, lose their reliability during operation, the whole structure does not have the proper strength. In such cases, it is recommended to plaster the opening on 3 sides, or the device of a high standing profile.
- Incorrect selection of mounting foam – the material must meet the operating conditions, as well as devices, depending on climatic conditions.
- Choosing a tape of psul with small dimensions – it is possible to freeze and blow the window. This material should be in the gap in a moderately compressed state.
- The use of low -quality sealing ribbons – over time, the destruction of the material is possible under the influence of the aggressive environment.
- The use of diffusion protective tape with insufficient width means that the material will not be able to adhere along the entire contact plane, which will cause it to delaminate during operation and disrupt the thermal properties of the assembly seam.
Note: If you strictly adhere to the above guidelines and do not make the mistakes listed, the window unit should last at least as long as the manufacturer says it will, without the need for structural element restoration, repair, or replacement.
It’s critical to seal the space between your window and the wall to preserve energy efficiency and avoid moisture problems in your house. Air leaks through these openings can result in uncomfortable drafts and increased energy costs.
Take a close look at the gap before sealing. You have a few sealing options to choose from, depending on its size and condition. Use caulking or weatherstripping for smaller gaps. These materials work well to seal small spaces and are simple to use.
Insulation made of expanding foam is a great option for larger gaps or irregular shapes. It fills the area and expands to form a tight seal that keeps out moisture and air. For optimal results, adhere to the manufacturer’s instructions when applying foam insulation.
To guarantee the seal’s adherence and durability, thoroughly clean the area before using any sealants. Clear away debris or old caulk that could impede the new sealant’s effectiveness. This preparatory step is essential for a long-lasting and functional seal.
Once the gap has been sealed, look for any areas that were overlooked or that might require touch-ups. In addition to increasing energy efficiency, properly sealed windows reduce outside noise and eliminate drafts, which improves comfort. To guarantee that these seals keep working well over time, give them regular maintenance and inspections.
You can greatly increase your home’s energy efficiency and indoor comfort by taking the time to properly seal the space between your window and the wall. Depending on the size and form of the gap, there are benefits to caulking, weatherstripping, and foam insulation. Maintaining and inspecting your seals on a regular basis will help them last longer and guarantee long-term energy cost savings.
For homeowners seeking to increase energy efficiency and stop drafts, we offer a practical guide on "How to Seal the Gap Between Your Window and Wall." Maintaining a cozy interior climate and cutting energy expenses depend on appropriately sealing this gap. We’ll go over detailed guidelines for selecting the appropriate materials, like weatherstripping or silicone caulk, and applying them successfully. You can improve the insulation surrounding your windows and reduce the amount of money you spend on heating and cooling by using these simple tips.


