
It makes sense to insulate a wooden house’s interior walls in order to improve both comfort and energy efficiency. Appropriate insulation can make a big difference, whether you’re trying to save money on heating or you’re just dealing with cold winters. Furthermore, completing it yourself can be an affordable and fulfilling project.
Prior to beginning, it’s critical to select the appropriate supplies and comprehend the procedure. Wooden houses are special because of their inherent ability to regulate moisture and breathe. This implies that in order to prevent problems like mold or moisture, the insulation technique must be carefully chosen.
We’ll walk you through the process of insulating the interior of your wooden house walls in this guide. You will discover what equipment and supplies you’ll need, how to prep the walls, and the most efficient methods for achieving a snug and efficient insulation job. Together, we can improve the comfort and energy efficiency of your house!
| Step | Description |
| 1. Prepare the Walls | Start by cleaning the walls to remove any dust or debris. Check for any signs of damage and repair them before insulating. |
| 2. Choose Insulation Material | Select an appropriate insulation material like fiberglass batts, foam boards, or spray foam. Each type has its own benefits, so choose based on your needs and budget. |
| 3. Measure and Cut Insulation | Measure the wall sections and cut the insulation material to fit. Ensure the pieces are snug but not too tight to avoid gaps. |
| 4. Install the Insulation | Fit the insulation into the wall cavities. For batt insulation, place it between the wall studs. For foam boards, adhere them directly to the wall surface. |
| 5. Seal Gaps | Use caulk or foam sealant to fill any gaps around the insulation. This step is crucial to prevent heat loss and drafts. |
| 6. Install a Vapor Barrier | Attach a vapor barrier over the insulation to prevent moisture buildup. This helps to keep the insulation dry and effective. |
| 7. Cover with Drywall | Finally, cover the insulated walls with drywall. Secure it in place with screws or nails, and then finish with joint compound and paint. |
- When it is worth performing and when not?
- Requirements for the thickness of thermal insulation
- Main options
- Sealing joints and seams
- Lathing and installation of the structure
- Tools and materials for interior decoration
- Step-by-step instructions: how to insulate your home inside?
- Waterproofing and vapor barrier
- Pros and cons
- Possible errors and difficulties
- What does the cost depend on??
- Useful video
- Video on the topic
- Fazenda. Insulation from the inside and Soundproofing of the wall with Ecoteplim
- Insulation of a wooden house
When it is worth performing and when not?
The requirements for a house’s thermal insulation are set forth in construction standards. The cottage has shrunk during the past three years. Because the properties of thermal insulation vary, it is necessary to insulate wooden walls from the inside or the outside.
Wood retains heat well. Properties of thermal insulation are sufficient in areas with a warm climate. You will need to install the insulation in places with severe winters.
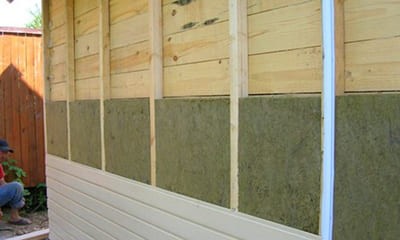
Due to the dew point shifting from the side of the wall to the external thermal insulation, wooden buildings are essentially insulated outside.
The surface is dry and shielded from fungus and decay. However, owing to the building’s architecture, this technique is not always feasible.
Producing internally is not required if an effective heat-insulating material was applied externally.
However, insulating the walls from the inside becomes the answer if you need to maintain the house’s exterior while still keeping it cozy and warm. All surfaces are thermally insulated during interior construction.
Take note! Only in cases where working from the outside is not feasible should insulation of the walls be done from the inside. However, it should be noted that felt, mineral wool, and jute are the most environmentally friendly materials out of all of them. The technology is costly and complicated in and of itself.
Requirements for the thickness of thermal insulation
It is important to consider several factors that influence the material’s parameters before determining on them. The building’s and its walls’ materials, as well as the climate, all affect how thick the thermal insulation is.
The computation needs the following parameters:
- the coefficient of resistance to heat transfer in the region;
- thermal conductivity of building, finishing materials, the thickness of each;
- characteristics of the insulation itself.
Building codes determine the coefficient of resistance to heat transfer. Region-specific data are specified in SNiP.
Table of some coefficients
| City | Resistance, m 2 degrees/W |
| Moscow | 3.28 |
| Krasnodar | 2.44 |
| Rostov | 2.75 |
| Sochi | 1.79 |
| Saint Petersburg | 3.23 |
| Voronezh | 3.12 |
| Kazan | 3.45 |
The technical documentation that is included with the product will tell you the material’s and the insulating membrane’s thermal conductivity coefficient.
If you don’t perform intricate computations in numerous scenarios, the ideal insulation thickness for a typical frame building is 150 mm. It is suitable for the climate of central Russia.
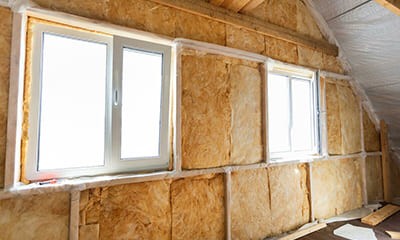
Thermal insulation and an extra frame must be added to the insulation layer in order to withstand harsh winters.
There is an increase in wall thickness to 200–250 mm overall. The insulation layer should be thinner the thicker the walls.
The thermal insulation properties of 50 mm mineral wool are similar to those of 50 cm timber.
In lieu of 450 mm timber, 150 and 100 mm profiled wood is used to build a permanent residence; the walls are then insulated with 50–100 mm thick material after shrinkage.
Standard insulation and wall thickness supplied by SNiP 02/23/2003:
- In houses for living only in the warm season, the wall thickness is 150-200 mm without additional insulation. Resistance coefficient – 1.26 m 2 degrees/W.
- To stay in a cottage in winter and summer, the heat transfer resistance should be about 3.06 m 2 degrees/W. If you try to achieve this only due to the thickness of the timber, the walls can be about 50 cm.
However, the design will be best if you use small-cross-section timber and insulation. In actuality, 100 mm of mineral wool is sufficient to achieve 3.1 m 2 degrees / W with a wall that is 150–170 mm thick.
If you take the proper approach, you can manage the important task of insulating a wooden house’s interior walls yourself. You can follow this article’s step-by-step instructions to choose the best insulation materials, prepare the walls, and install the insulation. You don’t need professional assistance to increase the overall value, comfort, and energy efficiency of your home by following these simple instructions.
Main options
The materials are laid out in a specific order when installing thermal insulation. An example of how to insulate a wooden cottage pie wall is as follows:
- main structure;
- sheathing;
- mineral wool;
- vapor barrier membrane;
- decorative finishing.
There are several methods for insulating interior walls. The configuration of thermal insulation can be done in a number of ways.
Sealing joints and seams
Tow or linen rope, silicone compounds, acrylic, or latex are used to completely seal the spaces between the logs.
The following order is followed when insulating walls:
- the edges of cracks and joints are protected;
- the gaps are filled with foam rubber, rope;
- the sealant is applied;
- the composition is leveled with a brush;
- the remains of the product are removed.
This option is advantageous from an economic standpoint, does not impede the release of moisture outdoors, and is convenient because it is simple to execute the work.
Lathing and installation of the structure
The thickness of the insulating material must be considered in this situation. The bars will have the same specifications. The most common sizes of bars are 100 mm wide by 10–50 mm thick.
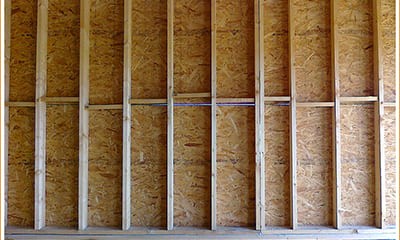
For dependable entry, the lathing is positioned across the logs in steps that equal the thermal insulation membranes’ width, minus three centimeters.
Each sheathing’s height is determined separately. Parallel to the logs is also installed a counter-lattice.
Building materials without flaws or faults are chosen for the task. The wood is treated with an antiseptic prior to installation.
Crucial! Lathing is not a good use for thin boards. The structure must be able to support the weight when cladding is installed.
Tools and materials for interior decoration
Wood facilitates good airflow and encourages ventilation within the structure. It is preferable to use wood-like insulation to maintain the material’s natural qualities.
Penoplex, penoizol, and polystyrene foam should not be used. An interior greenhouse effect is facilitated by sealed materials. You’ll need a powerful air conditioner or an expensive system for ventilation.
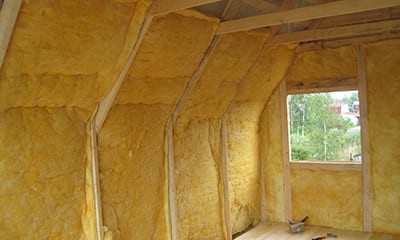
Mineral wool is the best material to insulate walls from the inside. Among the benefits of mineral wool are:
- efficiency;
- ability to pass air well;
- environmental friendliness, safety;
- ease of installation;
- fire safety;
- availability;
- reasonable price.
Additionally, there are drawbacks. For example, mineral wool retains moisture. You need to use steam, wind, and waterproofing to keep from getting wet.
There are various kinds of content. Insulation in slabs made of basalt is best. Fiberglass is an option, but it chips easily, making installation difficult.
Take note! Slag wool is the least expensive, but least desirable option. Waste is used to make it. Finding out what raw materials are used by manufacturers is not always possible. It is possible to buy a subpar product that poses a risk to your home’s interior design.
In order to install insulation Moreover, certain consumables will be needed (based on the technology and insulation used):
- remedy against fungus, insects;
- jute fiber;
- thermal insulation;
- bars 10 x 5 cm, 5 x 5 cm;
- saw;
- lining;
- roulette, level;
- stapler, chisel.
It is imperative to completely remove all dust and debris from the interior walls prior to beginning any work. To stop insects from reproducing, apply a surface rot-preventing agent.
Step-by-step instructions: how to insulate your home inside?
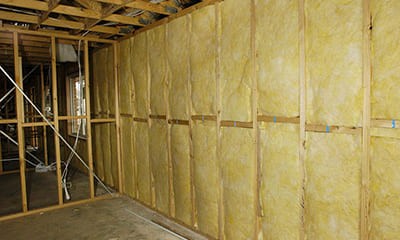
Wool made of mineral is the most efficient material. However, more vapor and waterproofing are needed because of the material’s propensity to retain moisture and let steam through.
Mineral wool is available as rolls and mats. It makes more sense to choose the first option when insulating.
Mounted between the sheathing profiles are the mats. Two millimeter spaces exist between the plates, which are sealed with foil or construction tape.
The following order is followed when installing insulation:
- Taking into account the square footage of the house, the required number of slabs is prepared.
- Mineral wool is inserted between the sheathing profiles.
- Top slabs are cut to height.
- Seams and gaps between mats are sealed with tape or tape.
Crucial! Due to its low cost, polystyrene foam is used by some owners of wooden houses. However, it prevents steam from passing through and produces a greenhouse effect when there isn’t a suitable hydro- and vapor barrier. Fungus consequently grows on the walls.
Waterproofing and vapor barrier
The positioning of waterproofing materials is the first step in the insulation installation process. The film guarantees proper air flow, shields the insulation from freezing and moisture, and stops mold growth and insulation degradation. An essential first step in insulating interior surfaces is waterproofing.
Vapor barrier boards, multilayer polymers, anti-condensation membranes, and breathable diffuse films are examples of applications. You must make sure that everything is completely tight when installing waterproofing. The joints are taped shut after the membranes are overlapped and fastened with staples and a stapler.
The last layer applied on top of mineral wool is called a vapor barrier. shields the insulating material’s structure from moisture. The vapor barrier is fastened, much like membranes used for waterproofing.
Pros and cons
A home’s interior finishing has benefits and drawbacks. According to builders, the benefits are:
- Prevents moisture accumulation, formation of fungus, mold.
- Allows to reduce heating costs.
- Preserves the natural appearance of the building facade.
- Ease of installation, no additional frames are needed.
- Acceptable cost of work.
Note: Only during the warm season do builders install exterior thermal insulation. Ventilate the wood well after it has dried. Regardless of the season, interior wall insulation is done.
Among this technology’s drawbacks are:
- Reduction of useful space, area of premises.
- Interior finishing does not allow to preserve the natural beauty of wood.
- The insulation must be chosen carefully, it must be resistant to fire, safe.
- Humidity inside the house can increase, the microclimate can be disturbed.
- Before work, wood is treated with antiseptics, which increases costs.
- Before installing the insulation, the cracks must be covered with jute fiber or sealant.
- Before work, check the electrical wiring and replace it if necessary. Access to it will then be closed.
- After installing a vapor barrier, a thermos effect is often observed. To prevent this, you need a good ventilation system, and this is heat loss.
- It is necessary to finish all surfaces – walls, ceiling, floor.
Old homes are often insulated by their owners. However, one must approach the task with complete responsibility. Since these buildings have already shrunk and the wood’s qualities have changed significantly, greater care must be taken with the surfaces.
Possible errors and difficulties
It is not possible to apply a thick layer of material because the dew point could seep into mineral wool, slabs, and membranes. The qualities of thermal insulation will drastically decline, and it won’t last very long.
Take note! Some owners of cottages install materials from the inside and outside, but this shortens the life of the structure by preventing the wall from drying out and allowing rot, mold, and mildew to develop.
When insulating interior walls, several considerations must be made:
- It is better to carry out work in the warm season, when the wood is dry;
- if the facade is finished with material, you need to check the presence of vents between the wall and the cladding, which allow the surface to dry;
- before insulation, the wood should be well treated with impregnation;
- when installing drywall, the sheathing is constructed taking into account the fastenings for gypsum boards;
- Foam cannot be used for interior lining.
The options for finishing an apartment are different from those for insulating a house, and if the cottage is constructed of wood, there are some expert recommendations that should be heeded. You must be well-prepared in order to complete the task correctly.
What does the cost depend on??
In the Russian Federation, labor costs range from 200 rubles per square meter on average. The work is divided into multiple phases. Insulation is installed independently:
The location, technology, and materials used will determine how much thermal insulation costs to install. In the event that there is an unheated basement, insulation is installed from below for the ceiling, interfloor ceilings, and floor. This is the most labor-intensive option; the material is installed at a height, and the prices per square meter are computed with the higher coefficient in mind.
Useful video
Watch the video to learn how to insulate the walls inside your home:
The comfort and energy efficiency of a wooden house can be greatly increased by properly insulating the interior walls. You can take on this project yourself and benefit from a cozier living space by using the appropriate materials and following the right procedures.
Make sure the walls are dry and clean before beginning. To stop moisture from entering the insulation and causing mold and decay, apply a vapor barrier. Select high-grade insulating materials with superior thermal performance and durability, such as rigid foam boards or mineral wool.
Make sure there are no gaps in the insulation when installing it by fitting it tightly between the wall studs. Put it in place and cover it with a membrane that breathes to let moisture out but protects the insulation. To give your house a finished look, add an interior wall covering, like wood paneling or drywall, to complete the job.
Don’t forget to properly seal all joints and openings to stop heat loss and drafts. The spaces around windows, doors, and electrical outlets require extra caution. If you take the time to do this correctly, your insulation will function well and keep your house cool in the summer and warm in the winter.
You can insulate your wooden house to a professional standard with a little perseverance and work. This will improve your comfort level and support a more sustainable lifestyle in addition to lowering your energy costs. Cheers to insulating!


