
Installing a wooden window can greatly improve your home’s usability and aesthetic appeal. To guarantee the greatest result for your remodeling project, there are a number of important choices and factors to take into account when installing new windows or replacing old ones.
Wooden windows are prized for their timeless appearance and inherent insulating qualities. They can add a timeless charm that improves curb appeal to homes of all architectural styles, from traditional to modern. Selecting wooden windows makes it easier to match the distinctive character of your home because they allow for customization in terms of size, shape, and finish.
When installing, you can choose to replace the entire frame or just the openings and fit new wooden frames into the existing ones. Retrofitting, which can be less disruptive and more affordable, entails installing new windows within the existing frame. In contrast, full-frame replacement—which might be required for older or damaged frames—involves taking out the entire window, including the frame, and installing a brand-new unit.
For wooden windows to function well and last a long time, proper installation is essential. In order to ensure energy efficiency and prevent drafts, it entails taking exact measurements. To keep a comfortable interior atmosphere and lower energy expenses, installation professionals usually use sealing and insulation materials to secure the window against moisture and air infiltration.
- Preparing the window opening
- We take measurements of the opening
- Window mounting methods
- How to install in a concrete opening
- Installation in a brick or cinder block wall
- Installation in a skewed window opening
- How to properly blow out a crack with foam
- Video on the topic
- Wooden window in an apartment in a brick house
- HOW TO INSTALL WOODEN EUROPEAN WINDOWS CORRECTLY
Preparing the window opening
You have to take down the old window first. Here, no particular expertise is needed. Building is not breaking. Plaster slopes that are clear. It will still be necessary to create new slopes.
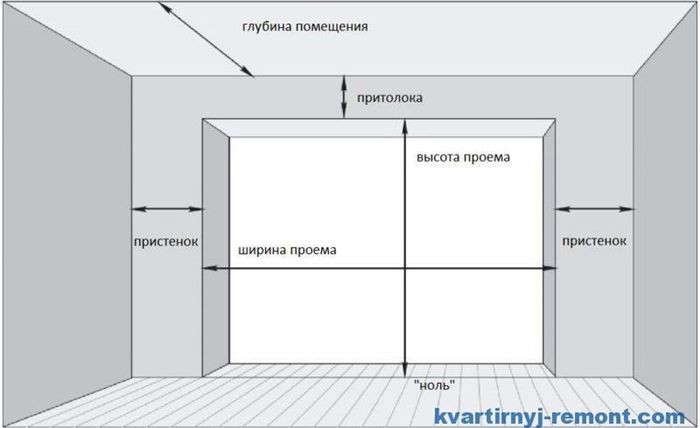
We take measurements of the opening
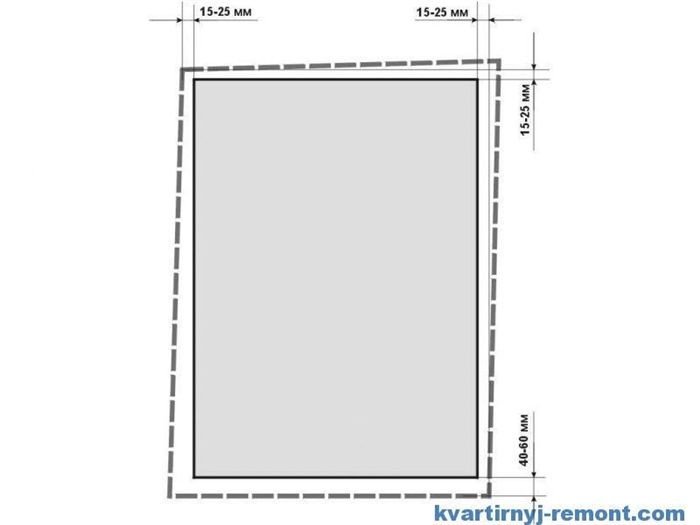
After the aperture is fully visible, take precise measurements of it. The primary objective is to ascertain the opening’s configuration, from which the new window’s measurements are derived. It’s exactly the same process if you’ve seen or experienced measuring openings for installing plastic windows.
Yes, shrinkage is a real thing. Every house shrinks, even the brand-new ones. Naturally, this may also have an impact on the window opening’s symmetry. Seldom is the opening flawless. If the window is not symmetrical, it is imperative that the window itself be marginally smaller than the opening. The gaps need to be kept as they are in the above figure.

A laser tape measure is a better tool to use for more accurate calculations. or a building thread that can be used to break through both vertical and horizontal surfaces. Your measurements will be accurate as well if they are even.
Window mounting methods
As the current window profile enables you to anchor it directly through the wall, you shouldn’t come up with any other strategies as this will be the most straightforward and dependable. You can also open the sash in any direction with this method.
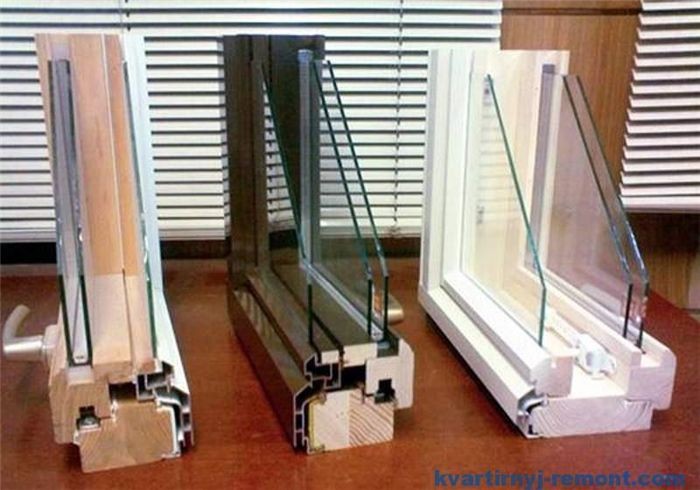
The thickness of the frame must be selected so that the dew point is precisely in between the glass. The internal glass shouldn’t become foggy. The width is at least twelve centimeters, and the maximum width shouldn’t be more than twenty-two centimeters if your walls are sufficiently thick.
A wooden window’s profile is created using the same principles as a plastic window’s profile. The fittings will frequently be identical. It takes some sweat to choose accessories, by the way. It will affect how long your window lasts. As a result, you ought to become knowledgeable about selecting the appropriate window fittings.
Ultimately, you should think about adding more thermal insulation, which is put in the openings during installation, if the frame is wider than 22 centimeters. The glass package itself should be tripled if this is unacceptable to you, but this adds to the load on the sash. This usually results in the sash starting to droop. Although it is not difficult to fix, a sagging sash will cause more trouble down the road.
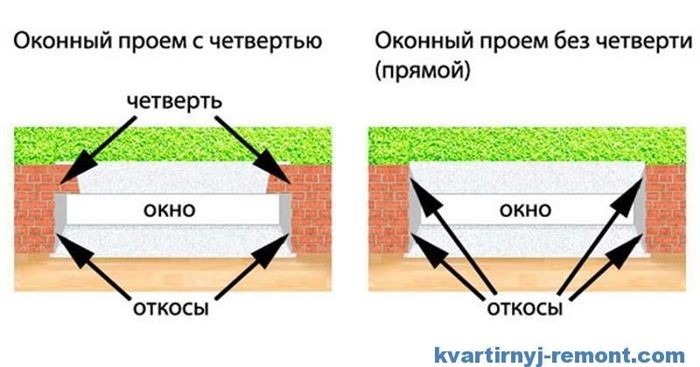
Again, there are specific proportions that need to be followed if the wall thickness is sufficient. Slopes on the inside should be at least 17 centimeters, and those on the outside should be 10 centimeters. A quarter is frequently used to make window openings, and the internal slope does not function within the specified parameters. Nothing too bad in this instance, as the quarter will act as extra insulation of sorts.
A wooden window installation gives homeowners a number of ways to improve the window’s appearance and usefulness. This article covers all the information you need to know, from knowing the different kinds of wooden frames that are available (such as solid wood or engineered wood) to selecting the style and finish that best matches the architecture of your home. It goes over important procedures like taking precise measurements, getting the opening ready, and making sure the insulation and sealing are adequate for energy efficiency. This guide will provide you with the confidence to install new windows or replace old ones, adding long-lasting and aesthetically beautiful elements to your house.
How to install in a concrete opening

Installing a window sill is typically the first step in installing a new wooden window if your walls are brick or block. In order to accomplish this, the base of the opening is filled with a level cement pad, and the surface is leveled horizontally. Since window sills typically range in thickness from 30 to 50 centimeters, the height of the window itself should be reduced.
Several dowels that are driven straight into the wall are used to nail the window sill. Keep in mind that the window sill shouldn’t extend past the window frame’s exterior edge. You can now start the process of installing a wooden window because everything is ready.

Windows are easiest to install on blocks. Blocks are regular, equal-thickness boards that should match the thickness of the space between the window frame and the wall. One edge of the block is ground down slightly to create a wedge-shaped opening that allows the window to be adjusted both horizontally and vertically if the opening is not level enough.
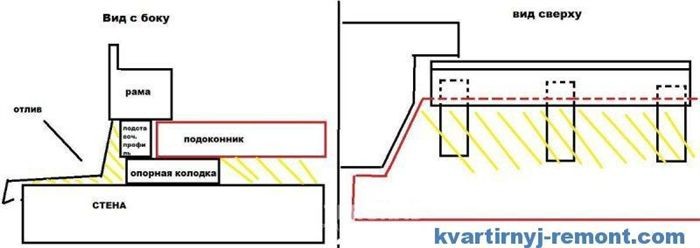
Installing spacers comes after installing support blocks, which are primarily where your new wooden window will rest. Always use a level to check vertical and horizontal alignment; if needed, make adjustments with blocks.
Once the window frame is in position and fully leveled, we remove the spacer pads one at a time, fill in the spaces with silicone, and replace the pads. Use a rag to remove any extra silicone. Polyurethane foam can be used to fill the spaces between the opening and the frame after the silicone has solidified. After it has completely dried, any excess is removed, and the window’s exterior is sloped.
Most frequently, it looks like this: polyurethane foam is used to fill the space created between the wall and the frame, and then the excess is cut off and plastered once it has dried. Do not forget to handle foam with caution. Should you go overboard, it might get so big that your window won’t close. The frame is bent by the pressure from the foam. Read the instructions carefully before using polyurethane foam.
Strong dowels are used to secure the frame, which amplifies the effect. The dowels are hammered into the wall after the frame is drilled with two holes in the top and sides. The window has been installed into the concrete wall and is now complete. All you need to do is create fresh, lovely slopes from the interior.
Installation in a brick or cinder block wall
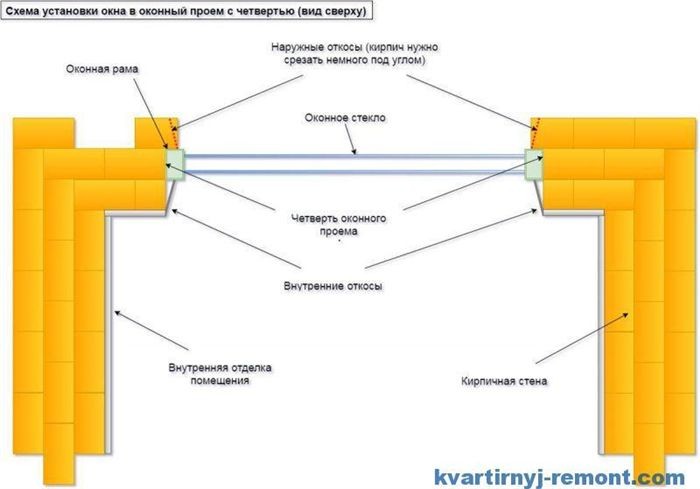
If your house is built from cinder block, ceramic brick, or shell rock – that is, from weak materials, then it is advisable to install a new window with fastening through it. First of all, for this purpose, through holes are drilled through the frame in the wall, two on each side. You can initially make holes in the frame, then align it in two planes evenly and mark holes in the wall, which are drilled after marking, naturally without a frame. Anchors or screws should be 8 centimeters longer than the frame itself, plus the gap between your frame and the wall. At the bottom of the window, do not install fasteners through the window sill. It is usually attached to the frame with ordinary self-tapping screws.
It is not appropriate to drill holes through the pads that hold the frame in place. Should this occur, it is preferable to shift the block to one side prior to tightening the screw. Make sure to label the pads with a pencil if you have been adjusting them for an extended period of time.
After that, the pads are removed, and polyurethane foam is used to blow out the cracks. Once it dries completely, create exterior inclinations. The window’s installation is now finished.
Installation in a skewed window opening
The window opening is frequently extremely skewed. In this instance, anchors—simple metal strips with holes—are the window’s most resilient fastener. Experts typically suggest using the small fastening intermediate strips to attach the anchors to the frame after first attaching them to the frame. However, this approach makes sense when multiple people are involved. It is not worth wasting your time on this if you are by yourself.
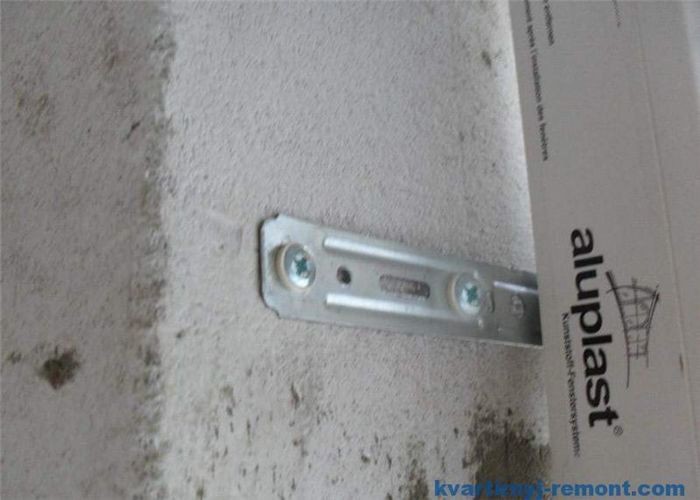
Self-tapping screws are used along the outer edge of the anchors to secure them primarily at the ends to the frame. Tails ought to point inward. Slopes will still conceal them. It can be inserted into the window opening after the anchors are prepared and fastened to the frame. As usual, we align the frame both vertically and horizontally because, well, our opening is skewed. We also drill and bend metal strips for dowels and mark the holes on the wall in accordance with the anchors’ holes. The pads are taken out once every hole is prepared. The anchors are where the frame must hang.
Uneven apertures can be attributed to either the builders’ negligence or the building’s shrinkage. As a result, the frame and the walls shouldn’t be joined rigidly. A window sill is installed and foam is used to fill the cracks. Most of the time, a window sill with an oblique opening is installed in a hanging manner.
Some attempt to use a screed to level the window opening, but this is a fool’s game because no screed can stop the building’s uneven shrinkage.
How to properly blow out a crack with foam
Using a gun or, worse, the tube that comes with a bottle of foam, window cracks are blown out. There are various methods for doing this, such as starting from the middle and working your way outward to extract thin sausages. By using this technique, the foam will be evenly distributed around the perimeter and won’t be able to put any pressure on the window frame.
| Option | Description |
| New Construction Installation | Installing a wooden window in a newly constructed opening, typically during the initial building phase. |
| Replacement Installation | Replacing an existing window with a new wooden window without altering the surrounding wall structure. |
There are several ways for homeowners to improve the appearance and functionality of their wooden windows. Every style of window, from the conventional single-hung to the contemporary tilt-turn, has certain advantages to take into account. You can customize your selection with these options by taking into account things like architectural style, ease of maintenance, and ventilation requirements.
Double-glazed wooden windows are a great option for people who want to increase energy efficiency without sacrificing a classic appearance. When compared to single-glazed options, they offer superior insulation, which contributes to the year-round comfort of interior spaces. For many homeowners, this upgrade is a wise investment because it can eventually lower energy costs.
Alternatively, tilt-turn wooden windows are versatile if you have limited space or want easy access to outside cleaning. They can tilt open at the top for ventilation without completely opening the window, and they open inward for easy cleaning. This design is especially useful for areas with difficult exterior access, such as upper floors.
The installation procedure itself is another factor to take into account, as it can change based on the kind of window and the design of your house. Wooden windows must be installed correctly to guarantee their longevity and best performance. In order to stop drafts and moisture intrusion, it requires accurate measurement, strong anchoring, and efficient sealing.
In the end, the installation of a wooden window should suit your aesthetic tastes and practical requirements. There is a wooden window option that can improve your home’s functionality and aesthetic appeal, regardless of your priorities: architectural harmony, ease of maintenance, or energy efficiency.


