
Improving comfort and energy efficiency in a timber house can be achieved in large part by adding interior insulation. Even though they are somewhat naturally insulated, timber homes can gain a great deal from extra insulation. This procedure lowers energy expenses, helps control indoor temperature, and makes the area more livable overall.
It’s crucial to use the proper materials and methods when insulating from the inside to prevent moisture buildup and preserve the structural integrity of the wood. An atmosphere that is more stable and comfortable all year round can be produced with proper insulation, which can stop heat loss in the winter and keep the interior cooler in the summer.
Using insulating materials that offer both thermal and acoustic benefits is one efficient way. Because of their adaptability and efficiency, materials like cellulose insulation, mineral wool, and fiberglass are frequently utilized. Depending on the particular requirements and design of the home, these materials can be applied directly to the interior walls or put in between the timber studs.
Prior to starting the insulation process, make sure there is enough ventilation and take care of any existing moisture problems. Controlling moisture is essential to avoiding the growth of mold and mildew, which over time can harm the timber structure and the insulation. Sufficient ventilation aids in preserving indoor air quality and controlling humidity levels.
- When to insulate and when not to?
- Recommendations for material thickness
- What methods are used?
- Materials and tools
- Steps to do it yourself
- Preparing for work
- Ventilation and moisture protection
- Insulation with mineral wool
- Vapor barrier and finishing
- Advantages and disadvantages
- What difficulties can you encounter?
- How much will it cost to order work??
- Video on the topic
- OLD HOUSE INSULATION AND REPAIR / INSULATED NOW THE HOUSE IS ROTTING
- How does a timber house shrink?? How to dry a house?
- What happened to the log house after insulation 5 years later??
- Vapor barrier. A visual experiment of what this mistake in building a country house can lead to.
- Is it possible to insulate a timber house from the inside?? Case Study
- house made of timber under foam plastic 10 years later. reviews
- WE INSULATE THE HOUSE CORRECTLY! / How NOT to install insulation?
- Insulating a house from the outside or inside? From A-Z, insulation of the facade of a private house with penoplex, HZ mineral wool
When to insulate and when not to?
Wood offers good cold protection. But you have to build houses with thick walls if you want to keep the house warm. Typically, however, 200×200 section timber is used for construction.
The walls are insulated inside:
- when they don’t want to spoil the façade or it’s prohibited by law;
- it is impossible to carry out work, access to the walls from the outside is limited;
- want to save money;
- if necessary, increase sound insulation.
Vital to keep in mind. If the process can be completed outside, it is preferable to decline internal insulation.
When calculating insulation thickness, skilled calculators issue a warning when moisture starts to show through and the walls get wet. They are vehemently opposed to performing such work.
Nonetheless, this is the easiest option for a do-it-yourself craftsman if you follow the guidelines.
Recommendations for material thickness
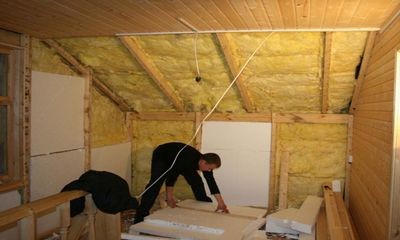
Building codes and mathematical computations are used to find the material’s thickness. Order services from experts if there is insufficient knowledge for this. Consider your options carefully and go for the thicker, riskier option.
What influences the insulation’s thickness:
- Construction climate zone.
- Thermal conductivity coefficient, k. Appendix 3 of SNiP describes the thermal parameters necessary for calculating.
- Wall heat transfer resistance, R. The value is determined by natural conditions. SNiP recommendations will help you find the correct value.
The thermal conductivity coefficient multiplied by the necessary heat transfer resistance yields the minimum insulation thickness, which is expressed as t = k x R. In addition, the wall’s thickness is considered.
We must be mindful. The total of all the layers’ resistance values determines a wall’s thermal resistance.
It turns out that 15 cm of wood can be replaced with 5 cm of thermal insulation material on average. The resultant value should be adjusted by 10%, according to builders, to account for air humidity.
Certain materials have higher thermal conductivities when air humidity rises.
Strict calculations are rarely used by skilled builders. Their decisions are based on intuition and experience. They provide a straightforward plan in which the diameter of the wood, the temperature, and the heating system all affect how thick the insulation is.
For instance. Insulation layer that is necessary:
| Thickness of a wall made of timber, pine wood, in m | Thickness of insulation, in m |
| For warm climate of the Russian Federation | |
| 0.15 | 0.05 |
| 0.2 | 0.025 |
| Middle zone | |
| 0.15 | 0.1 |
| 0.2 | 0.05 |
| Northern regions | |
| 0.15 | in the range of 0.150 – 0.200 |
| 0.2 | 0.125 – 0.150 |
Suggestion made. If given the option, it is preferable to use two 50/50 insulation layers rather than one 100 mm layer.
What methods are used?
Since wood "dries out" over time, insulation should be completed a year after the house is built.
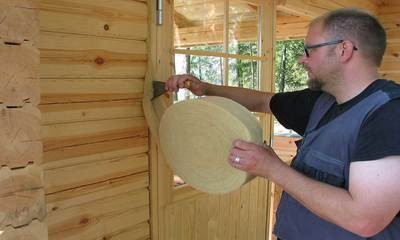
There are various techniques for insulating walls. Listed below are the most well-liked ones:
- Slab insulation directly on the walls.
- Installation of the base on the profiles, with subsequent laying of mineral wool. Quite often used.
- Seamless spraying using innovative technology. A promising type of wall insulation. But there is a significant drawback is the price. A special device is needed to perform the work.
Thermal efficiency is attained by carefully balancing the type, size, and placement of thermal insulation layers rather than by thickening the warm layer.
Materials and tools
They provide four exceptional technical insulation options for interior design:
- Mineral wool. The main property is low shrinkage of the material. Good air permeability. Has high vapor permeability. The material is non-flammable, chemically and environmentally friendly. When working, safety glasses and a respirator are required.
- Cellulose material, environmental wool. High environmental safety is confirmed by sanitary rules.
- Penoplex slab almost does not absorb water. During installation, it is necessary to especially think through the ventilation system so that condensation does not get inside the wall. Negative properties – the walls do not breathe. The material is flammable or melts at high temperatures.
- Polyurethane foam provides a 100% guarantee of seamless thermal insulation. Non-flammable, thermal conductivity of various grades: 0.02 – 0.03. Applies well to the surface. Negative parameter – high cost.
Extra accessories for construction:
- Wooden slats.
- Foiled polyethylene foam.
- Drywall for walls.
- Construction adhesive.
- Notched trowel.
- Sheets of plywood or plastic for finishing cladding.
- Acrylic paint or wallpaper.
Steps to do it yourself
There are four phases altogether. Let’s examine each in more detail.
Preparing for work
The tree needs to be thoroughly inspected and its surface area looked at before insulation is installed. Complete the following tasks:
- Remove dust and dirt from walls.
- Check the joints between the beams, seal the cracks.
- Level out protruding parts of the surface.
- Impregnate the wood with an antiseptic.
Note: Keep an eye on the electrical wiring when installing internal thermal insulation. It is best to conceal the wiring with ornamental covers for safety.
Ventilation and moisture protection
Install a windproofing membrane and leave a gap for air ventilation to prevent condensation from building up on wood.
There is at least a 30 mm ventilation gap. Water vapor can escape thanks to waterproofing, keeping the wall dry.

Installing the sheathing involves selecting a step that is two centimeters smaller than the insulation’s size on the prepared surface. The wood is first given a fire-retardant solution treatment.
The wooden lattice has a windproof film nailed to the top of it. employing a stapler. The side of the insulation that is rougher is facing the wood.
To finish this, you’ll need:
- wooden slats 40×50 mm;
- nails, staples and carpentry tools.
Insulation with mineral wool
Mineral wool is the industry leader in thermal insulation for wooden walls. There are three varieties, each with unique technical specifications. Wool made of basalt can be used internally.
Mineral wool doesn’t release any dangerous substances. but frequently results in allergies. You have to abide by safety regulations when working.
The walls have been lathed and covered with antiseptic. Use wooden blocks or fabricate a metal sheathing to accomplish this. Apply an anti-corrosion agent to wood and metal before treating.
The insulation is installed in a wooden frame. By using spacers, the heat-shielding material is firmly positioned in between the bars. The frame’s cells ought to be two centimeters less in size than the insulator.
Crucial! The edges of windows and doors are surrounded by wooden bars. When lathed properly, the cotton wool fits snugly. No further fixation is necessary.
Vapor barrier and finishing
Put the covering in place. The insulation is shielded from moisture and condensation by the vapor barrier. The vapor barrier won’t be required if the insulation has a foil surface.

Attach the film, leaving about 15 cm of overlap. Adhere firmly to the insulation. Construction tape seals joints and attachment points. Use reinforced tape if using foil material.
Because of the moisture buildup, using vapor barriers deteriorates the room’s microclimate. As a result, you must maintain the interior room ventilation system.
OSP plates are used for plasterboard sheets and decorative decoration. Screws are used to secure to the crate. GKLV is a moisture-resistant material that is used in bathrooms. The wallpaper is adhered, painted with acrylic paints, and plastered in accordance with their preferred style.
Advantages and disadvantages
In severe situations, experts say, internal insulation has to be used. Heat is retained in the house by the insulated interior walls. The external wall’s insulation principles are upheld during construction. However, indoor insulation technology is far more intricate. The most important thing is to select the appropriate thickness and avoid mistakes when installing insulation.
Positive aspects
- Repair can be carried out at any time of the year. When you want to.
- For work you need a ladder, no need to build additional stage.
Drawbacks:
- The area of the rooms is reduced. During renovation, the area must be cleared of residents and furniture.
- When using a vapor barrier film, the humidity inside the rooms increases. To avoid this, it is enough to carry out additional ventilation measures.
- Poorly protected places, "cold bridges" appear at the junction of the walls with the ceiling and the base. It is necessary to caulk the joints between the wall and other surfaces, not to let the heat escape. Insulate the floor, ceiling and roof.
What difficulties can you encounter?
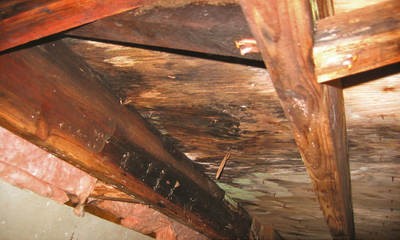
When a new house is built, the first issue that will come up is the wood drying out and various holes and cracks appearing.
If construction regulations are not followed, freezing of corners is a common issue. Condensation forms inside the space when the air temperature is below freezing. This is the reason why there is mold and mildew growing on the walls.
Sealing the seams from the outside is the right way to solve the issue. For such issues, builders advise applying "liquid thermal insulation." Starting at the bottom corner, sealant is applied around the perimeter.
Maintaining a home’s insulation is an obligation. It is essential to adhere to technology in order to prevent rot, wood rot, and other issues.
- before work, the condition of the timber was not inspected, the surface was not prepared;
- construction materials were not transported and maintained according to regulations;
- all cracks have not been sealed;
- the building material was chosen incorrectly;
- the insulation is not tightly secured.
Suggestions. For interior work, avoid using foam. It is inexpensive, but not appropriate for interior work.
For a timber house to remain comfortable and energy efficient, internal insulation is essential. You can create a barrier that lowers energy costs, keeps moisture buildup at bay, and helps regulate indoor temperatures by properly insulating the interior walls. In order to prevent gaps, this process entails choosing the proper insulation material that is appropriate for wood structures, installing it snugly, and taking precautions to maintain the wood’s structural integrity and beauty. For every timber home, effective insulation is a wise investment because it not only improves thermal performance but also creates a more sustainable and healthy living environment.
How much will it cost to order work??
The market for building supplies has a respectable assortment of the materials required for insulation.
Turnkey wall insulation work typically costs RUB 5,250 kv. m. The whole spectrum of services are provided by the work. The entire cost of the materials and delivery is included in the price.
Cost without consumables:
A timber house’s interior insulation can greatly increase its energy efficiency and level of comfort. Even though wood naturally insulates, extra insulation helps control interior temperatures and lower energy expenses. Selecting materials for interior insulation that let the wood breathe is essential to avoiding moisture buildup that can cause rot or mold.
Using breathable insulation materials that support a balanced humidity level inside the home, such as natural fibers or mineral wool, is one efficient way. Installing these materials in between the wall and ceiling’s wooden studs or beams will ensure even coverage without sacrificing the wood’s structural integrity.
To maximize the effectiveness of insulation, proper installation is essential. The best way to stop heat loss and keep the temperature inside constant is to make sure everything fits tightly and to seal any joints or gaps. To further stop moisture from seeping into the wooden structure, a vapor barrier placed on the warm side of the insulation can be added.
In the end, improving internal insulation in a timber house improves both thermal and acoustic performance, which quiets and cossets your living area. Through proper material selection and installation methods, you can maximize energy efficiency and establish a comfortable, environmentally friendly living space.


