
Replacing a window sill can appear like a difficult undertaking, particularly for contemporary plastic windows. However, practically anyone can complete the task if they have the necessary equipment and a little perseverance. Knowing how to replace your window sill yourself can save you time and money, regardless of whether it is broken, out-of-date, or just doesn’t go with your decor.
We’ll lead you through the process of taking apart and reassembling your plastic window sill in this guide. Everything from the required equipment and supplies to the thorough procedure of taking out the old sill and putting in a new one will be covered. Just caution and close attention to detail are needed—no particular abilities are needed.
You won’t need expert assistance to give your windows a brand-new appearance if you follow these easy instructions. Now let’s get started and discover how simple it is to change your window sills.
| Question | Answer |
| Can you dismantle and replace a plastic window sill yourself? | Yes, with the right tools and careful steps, you can replace a plastic window sill on your own. |
| What tools do you need? | Basic tools such as a utility knife, crowbar, screwdriver, measuring tape, and sealant are required. |
| How do you start the removal process? | First, remove any sealant around the window sill using a utility knife. |
| What"s the next step? | Use a crowbar to gently lift and remove the old window sill. |
| How do you prepare for installing the new window sill? | Clean the area and measure the space to ensure the new sill fits properly. |
| How do you install the new window sill? | Place the new sill in position, ensuring it is level, and secure it with screws. |
| What should you do after installation? | Apply sealant around the edges to ensure a secure fit and prevent drafts. |
| Any final tips? | Take your time and double-check measurements for the best results. |
- When it may be necessary to remove and replace?
- Tools and materials
- Rules and safety precautions during work
- Step-by-step instructions on how to replace it yourself
- How to dismantle correctly?
- How to install without dismantling the window?
- Difficulties and errors
- Average prices
- Video on the topic
- How to install a window sill with your own hands. Measurement and installation in detail.
- Replacing a window sill without replacing a window – instructions
- Installing a window sill on plastic windows – the whole work process
When it may be necessary to remove and replace?
Every type of window sill has unique protective qualities, lifespans, and service lives. Standard PVC or wood planks typically have a 15-year lifespan.
However, replacement might be necessary sooner for the reasons listed below:
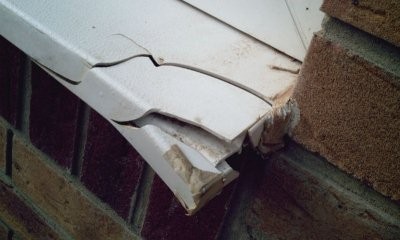
- The surface of the slab has minor external damage that does not reduce its effectiveness, but the appearance of the window sill has deteriorated. Most often, such defects can be removed using improvised means or laminating film, but in some cases replacement will be required.
- Serious damage to the window sill, due to which it loses its protective properties or may cause the window frame to break.
- Replacing the window sill with a newer one may be necessary when changing the design of the room or to organize an additional work area.
- Carrying out repair work to restore an adjacent wall that has begun to crumble or collapse. Due to such defects, the window sill may break, fall, become deformed, and will also cease to protect the room from the formation of cold bridges. In some cases, such damage will lead to deterioration of the window tightness or its breakage.
- The appearance of drafts from the stove or its insulation. If the insulating material behind the window sill has worn out or the window frame has become deformed, drafts may form. In some cases, in order to reduce the cost of heating or loss of thermal energy, the window sill is insulated (if this was not done during its initial installation).
- Replacing radiators with narrower or wide. If the windowsill will protrude too much over the heating element violated the circulation of warm air near the window, which will lead to the formation of condensate, tribe or fungus. With insufficient size, the plate will not be rational use of space.
- Another reason for dismantling and replacement may be the installation of furniture near the window, which will be too large in the window.
Tools and materials
To take apart and swap out the windowsill It might be necessary to:
- mounting foam;
- insulation (polystyrene or mineral wool foam);
- metal perforated tape;
- Z-shaped mounts;
- dowel;
- self -tapping screws;
- construction knife;
- drill or screwdriver;
- punch;
- drill on concrete, metal or wood (sometimes for tiles or stone);
- a hacksaw with replaceable blades – depending on the selected material, it may be required for cutting plastic, metal or wood;
- hammer;
- spatula;
- trowel;
- safety glasses;
- respirator;
- wooden or plastic wedges;
- tape measure;
- chisel;
- mallet;
- silicone sealant;
- crowbar;
- grinder;
- chisel.
Additionally, concrete mix may be needed to level the walls during installation, and plaster may be needed for finishing work after installation.
Once the window sill is installed, it must be filled with heavy objects from above, like 3-liter water jars. Although disassembly work may not require all of these tools, it is still advisable to have them on hand.
Rules and safety precautions during work
It is advised to follow these guidelines when removing and reassembling the window sill:

- In order for the foam to spread better under the slab, and also not to bend it, the surface of the window opening and window sill should be moistened with water. This helps the foam harden faster and also spread smoothly over the work area.
- After dismantling the old window sill, it is necessary to completely clean the window opening from debris, pieces of concrete or finishing materials. All irregularities must be sealed with concrete mixture, and the gaps between the window frame and the opening must be filled with foam (if any).
- If loose bricks appear in the masonry, they must be pulled out and placed on fresh mortar.
- During dismantling and installation, it is recommended to use a respirator, safety glasses, as well as work clothes that will cover all parts of the skin. This is necessary due to the fact that during the work a large amount of concrete or brick dust is generated (if the window sill has been insulated, then an additional basalt or fiberglass suspension may appear). If it gets into the respiratory tract, eyes or skin, it may cause irritation or damage.
- It is recommended to treat the surface of the window opening and slab with antiseptics so that mold or mildew does not form there after installation.
Step-by-step instructions on how to replace it yourself
It is advised to hire professionals to disassemble and replace a window sill made of stone or costly wood because these materials can be difficult to install, break completely, or sustain damage. There is work to be done in preparation before dismantling starts. You must first eliminate the slopes.
If plaster was used to create the slopes, you’ll need:
- Remove wallpaper around the window sill by 1 m in height and 30-35 cm along the edges (if any). Trellis can be trimmed using a construction knife and wrapped. You need to start removing wallpaper from the corners.
- Trim the plaster at a distance of 10-15 cm around the window sill to a depth of 30-50 mm (this is the standard distance at which the slab is recessed into the wall).
- Dismantle the cut plaster using a hammer and chisel (chisel).
If those were bills, you would require:

- remove decorative corners and panels (platband) – to do this, you need to cut off the sealant (glue) on which the panel was attached;
- unscrew the screws from the panel;
- cut through the silicone between the window frame and the casing;
- pull out the slope – you need to pull it towards you, while slightly shaking it up/down;
- remove polyurethane foam or insulation.
How to dismantle correctly?
Understanding how the window sill is attached is necessary for disassembly, as the type of installation varies based on the material.
A wooden or PVC plate, for instance, can be fixed:
- on metal support brackets (Z-shaped ones are most often used);
- with pinching under the window frame by a special section of the profile;
- mechanical fastening through the profile, for example, with screws or self-tapping screws;
- on glue or polyurethane foam – the plate is pre-installed on wooden dies (wedges);
- using foamed polystyrene glue, which can be used as additional insulation.
To disassemble the window sill, simply unscrew all of the fasteners, trim the sealant, and then carefully pull the board out of the grooves by loosening it if it is secured with self-tapping screws (through installation or a bracket).
In other situations, a sill, chisel, and crowbar will need to be used to rip the window sill off the window opening’s surface. In order to pull out the board, you must first remove the outer trim from under the slab, lift it up by two to three centimeters, and then attempt to trim any foam by gradually loosening it.
If a concrete window sill is cast directly on the opening, you will need to break the cement layer it was seated on or completely destroy the slab. For this reason, you will need to use a hammer, drill, and grinder to remove the sill.
One can dismantle in a variety of ways, such as:
- Use a hammer drill to chip off pieces, destroying the slab piece by piece.
- Cut it with a grinder, then knock it out piece by piece with a hammer and chisel.
- Drill a lot of holes with a drill, drive wedges into them, then disassemble it piece by piece with a hammer and chisel.
Because there will be a lot of concrete dust in the air while working, it is advised to wear protective gear and cover any furniture with film.
How to install without dismantling the window?
Requirements for installing a new window sill:

- clean the surface of the window opening from debris, dust or parts of concrete;
- check the seam under the frame for cracks – if there are any, then blow them out with foam, and after drying, trim off the excess;
- if there is no installation seam around the window (usually 5-7 cm), then you need to make a groove at the bottom of the opening, the depth of which should be 3-4 cm and the height up to 7 cm;
- level the surface of the opening with cement mortar if there are large depressions or irregularities on it;
- take measurements of the opening of the window sill and cut it to the required size (or order it); when taking measurements, you need to take into account that the slab should be recessed into the opening by 30-50 mm on each side.
As an example, let’s look at installing a window sill using a PVC board:
- First you need to install mounting wedges that will hold the slab. They need to be placed close to the frame. When installed, the window sill should have a slight slope towards the room.
- Next, you should lay a vapor barrier tape on the surface of the opening, and then secure it.
- Apply polyurethane foam into the grooves and onto the surface that will be under the slab.
- When it expands a little, but has not yet hardened, install the window sill in place.
- The surface of the board and concrete should be moistened so that the foam disperses more smoothly. Most often this is necessary when installing a window sill on wedges without foam. In some cases, it is blown out after installing the slab into the cavity that is formed between the board and the opening.
- In order for the foam to fit more tightly on top of the window sill, you need to lay a protective layer (for example, newspapers or film) and place a small weight on top. This could be bricks, weights or cans of water.
- After 15 minutes, blow out all remaining cavities with foam.
- Place an additional weight on the windowsill to create a weight of 8-10 kg and leave everything for 24 hours.
- After 1 day has passed, check that the installation is correct.
- Seal all gaps between the window and the window sill with silicone sealant.
- Cover the protruding parts of the slab with end caps.
In certain instances, you can use perforated tape to reinforce the window sill structure after the foam has solidified. The slopes and seams in the opening will need to be re-sealed once all the work is finished.
Video instructions for changing a window sill without changing the window:
Difficulties and errors
When removing and replacing a window sill, the following mistakes and challenges could arise:
- If you do not lubricate the surface of the slab and the opening with water, then when it hardens, the foam will begin to expand unevenly, which is why the window sill can swell, deform, bend or break.
- During operation, the mounting seam under the window frame or the window itself can be damaged. To avoid this, it is recommended to carefully familiarize yourself with all the nuances of installation or leave the work to specialists.
- If you incorrectly determine the type of fastening, then during dismantling you can break not only the window sill slab, but also the opening with the window frame.
- During the dismantling process, a large amount of dust and dirt will be generated, which is why it is necessary to protect yourself with goggles and a respirator, as well as cover (clean) furniture or electrical appliances.
- The layer of plaster around the slab will act as an additional fastener, so it must be carefully removed before removing the slab.
Average prices
The cost of installing and removing window sills varies depending on the area and the laborers involved. The average cost is:

- for installation is 450-500 r/p.m.(linear meter);
- work with dismantling and reinstallation of the old window sill – 1200-1300 r/p.m;
- if a colored slab up to 600 mm wide is used, then there may be a markup on work of up to 30%;
- dismantling without preserving slabs up to 40 cm deep – 100 r/p.m., more than 40 cm – 150 r/p.m.
It is possible to replace a plastic window sill on your own, and if you follow the right procedures and use the appropriate tools, the result will look professional. Whether you’re dealing with damage or just want to give your window a new look, this project can be affordable and satisfying to complete.
Make sure you have all the tools and supplies you need before beginning. Make sure the new window sill matches the old one precisely by measuring it beforehand. Plan every step to prevent common errors. It takes time and care to remove the old sill without breaking the surrounding wall or window frame.
After removing the old sill, make sure the area is ready. In order to guarantee a perfect fit for the new sill, this involves cleaning and smoothing the surface. To guarantee a strong and long-lasting fit, take your time installing the product and use the right adhesives and fastening techniques.
You can successfully replace your plastic window sill by paying attention to detail and following these steps. This do-it-yourself project not only helps you save money but also makes you feel good about improving the look of your house.
Using a few simple tools and cautious techniques, replacing a plastic window sill on your own is not only feasible but also manageable. This procedure entails taking out the old sill, cleaning the space, and firmly installing the new one. You don’t need to hire a specialist to achieve a professional result if you follow a few simple instructions and take the necessary precautions.


