
Aerated concrete wall insulation from the exterior is essential to increasing a building’s comfort and energy efficiency. Because of its lightweight and insulating qualities, aerated concrete needs to be installed according to certain guidelines to guarantee proper insulation. Homeowners can improve thermal performance without sacrificing interior space by tackling this task externally.
Applying layers of insulating materials directly to the outside surface of aerated concrete walls is known as an external insulation technique. This method helps maintain consistent indoor temperatures all year round by reducing heat loss through the walls. In addition to providing structural integrity protection against weathering and extending wall life, well-installed insulation also shields the walls from external influences.
External insulation on aerated concrete walls is usually achieved through a series of steps in technology. To ensure better adherence of insulation materials, these may involve cleaning and possibly roughening the surface. To improve durability and weather resistance, layers of insulating boards or other appropriate materials are then applied and fastened. Finally, a protective finish is applied.
Achieving the best results requires selecting the appropriate insulation materials and methods. These choices are influenced by various factors, including the climate, building codes, and targeted energy efficiency levels. In addition to lowering heating and cooling expenses, good insulation makes homes more comfortable and sustainable.
Selecting the appropriate technique for insulating aerated concrete walls from the exterior can significantly improve the energy efficiency of your house. This article examines several practical methods for installing exterior insulation, such as surface preparation, material selection, and application, to guarantee a strong and effective barrier against moisture and heat loss. With the correct technology and an understanding of these techniques, you can lower energy expenses and increase the comfort of your house.
- When is it necessary to insulate a house made of aerated concrete??
- External thermal insulation methods
- Wet – easy option
- Wet – heavy method
- Dry or ventilated façade
- Cladding without frame
- Materials and consumables for work
- Step-by-step guide: how to do it right?
- Wet light and heavy method
- Dry — ventilated facade
- Frameless cladding
- Difficulties and errors
- Video on the topic
- Insulation of aerated concrete / Insulation of a house made of aerated concrete from the outside
- Finishing the facade of an aerated concrete cottage without insulation (bark beetle, fur coat and other textures)
- Insulating a house with penoplex from A to Z with your own hands! Non-standard approach!
- How is foam plastic attached to aerated concrete?
When is it necessary to insulate a house made of aerated concrete??

Aerated concrete blocks are a type of wall material that are filled with cement, sand, and gas-forming agents. They are classified as cellular concrete.
By mixing them with a unique technology, an air-filled porous structure is created inside the block, lowering its heat conductivity.
All would be well, but there is one drawback to the material: its high hygroscopicity is caused by the internal structure’s porosity.
This phenomenon is especially dangerous at sub-zero outside temperatures, when the water turns into ice and breaks the block from the inside. Along with the air, the block’s "sponge" draws in wet vapors, which condense to form water droplets and destroy the block.
Furthermore, when determining wall thickness, developers frequently follow the GOST requirements for structural rigidity, which rely on a ratio of 1:20–1:25 of the object’s height; for example, a two-story house needs a wall thickness of 7000:20=350 mm.
This, however, is insufficient for the wall structure’s thermal protection functions; the wall should have a minimum thickness of 400 mm, and perhaps even more for the nation’s eastern and northern regions.
When designing an object, you need to compare the technical and financial aspects of the available options to determine whether a thick single-layer wall or a multi-layer one with layers that protect against heat and moisture is the best course of action.
The following are the primary situations in which external aerated concrete load-bearing walls must have thermal insulation:
- With block density d500 and below.
- For aerated concrete wall thicknesses up to 400 mm.
- When using cement rather than adhesive laying mortar with a joint thickness of more than 5 mm.
- Low-quality aerated concrete.
Although it is preferable to protect the walls externally, the developer must consider the advantages of using aerated concrete, a "breathable" building material, if this is not possible.
For this reason, in order for water vapor to pass through, the heat insulator for a wall gas block needs to have a higher vapor permeability. Mineral wool, for instance, has an indicator of 0.62 mg/m*h*Pa in the scenario where the vapor permeability of these blocks is 0.11 mg/m*h*Pa.
In order to utilize insulation materials with reduced vapor permeability, a ventilation system must be included in the thermal protection design.
External thermal insulation methods
In reality, the external insulation of aerated concrete structures is achieved through a variety of technologies. The materials used in the purchase and the degree to which the developer adheres to all installation guidelines provided by the manufacturer will have a direct impact on the systems’ quality.
It is not advised to separately swap out the thermal protection system’s consumables for less expensive, equivalent ones. For instance, inexpensive, low-quality tile adhesive is used in place of glue or plaster mortar for thermal protection.
Although it appears to be capable of handling the task, the multi-layer protective system’s vapor permeability will be compromised, leading to the swift disintegration of aerated concrete wall structures.
The developer must carefully review the work conditions, which are specified by the manufacturer and included in the building material documents, after deciding on the installation method and insulation type.
Specifically, for load-bearing walls made of aerated concrete insulation The most popular designs for thermal protection are:
- “wet” light/heavy version;
- dry or ventilated.facade;
- cladding without frame.
Wet – easy option
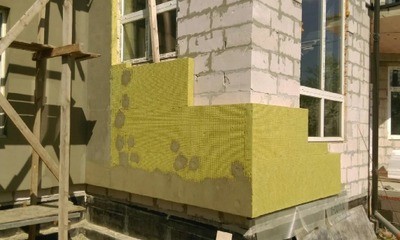
The installed protection is actually completely dry; it isn’t damp when it’s installed.
"Wet" refers to the process of attaching insulation to walls with glue and solutions that have been mixed with water; unique dowels are used to secure the structure as a whole.
With this technology, mineral wool with a density of more than 130 kg/m3 is typically installed using adhesive made specifically for this type of heat-resistant material.
In addition, dowels are used to secure the heat-protective layer. Two plaster leveling layers are then applied, with reinforcing fiberglass mesh placed in between.
Aerated concrete walls only need to be cleaned of dust because they are smooth at first. No further processing is needed. As a finishing touch, decorative plaster is used.
Benefits of protecting with a light wet method:
- high installation speed;
- availability of materials;
- low cost;
- high efficiency;
- the ability to do the work yourself.
Low structural strength and a comparatively short service life are among the drawbacks.
Wet – heavy method
This technique is applied if you want to cover the façade with stone or other substantial types of finishing materials made of ceramic. Here, the heat insulator is mounted using strong hooks rather than adhesive, and its top layer is covered in a long-lasting metal mesh.
Iron plates serve as reinforcement for this structure. On the reinforced mesh, a layer of sand-cement mortar up to 40 mm is applied. And then and only then is the stone placed.
Benefits of the approach:
- high strength;
- durability;
- efficiency;
- solidity and aesthetic appeal.
The high cost of such a protective system in the end and the lengthy lead times for the work are the drawbacks.
Dry or ventilated façade
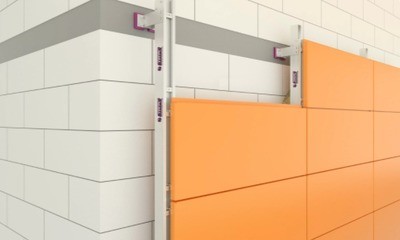
Considering the performance characteristics of the stone, this is the most efficient way to protect walls composed of aerated concrete blocks from heat.
Installed on a specific frame composed of metal or wood profile, the heat protection material allows vapors from the walls to pass through while also providing a layer of water and vapor protection with ventilation gaps.
You can use foam, glass wool, and any other heat-resistant material as protection.
Because of its high combustibility, it is best to avoid using foam in this design. The rate at which this insulation burns can be accelerated by the ventilation design’s air circulation speed. Siding, either plastic or metal, is typically used to line the layers of such a protective structure.
Benefits of the facade with ventilation:
- The most optimal design in terms of “price-quality” ratio, which takes into account the features of aerated concrete blocks;
- simple available materials;
- the possibility of manufacturing on their own;
- increased heat efficiency;
- powerful steam-hydraulic protection;
- high noise protection;
- A long service life of more than 10 years.
Many developers blame the structure’s high cost on its drawbacks. Although this protection method is significantly more advanced than the basic light wet thermal protection option, the energy savings realized during the installation of such energy-efficient measures will cover the owner’s entire cost within four years.
Cladding without frame
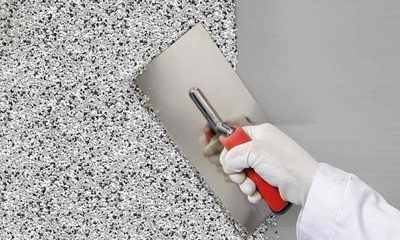
Previously, only the "wet" light thermal insulation option could be used for cladding without a frame. There are more frameless thermal protection options available today thanks to the development of new thermal insulation materials.
For example, even for walls that are quite thick, warm plaster can greatly enhance the protective effect.
Paper pulp, sawdust, and plasticizers and polymers are examples of such insulating materials. The efficacy of 40 mm foam plastic is substituted with a 15 mm layer of this composition. You can make your own version of this mixture or buy it from retail stores.
In addition to being inexpensive, thermal protection composed of an insulated plaster mixture offers the following benefits:
- possibility of sound protection;
- does not require layers of vapor and waterproofing;
- natural base of plaster, and therefore it can be used for internal and external protection;
- endurance at high outdoor temperatures;
- has protection against damage to rodents;
- Simplicity of application, no increased security measures are required.
Apply warm plaster in a conventional manner or with technology. An auxiliary will be needed for external installation; for this, warm plaster is sealed with a regular after the main installation.
Materials and consumables for work
Prior to beginning the installation of thermal insulation, the volume of the primary material and consumables for the installation of a heat-shielding layer must be determined. These items must then be bought from a retail network and transported to the construction site.
Among the implements, the expert will require:
- a set of carpenter;
- Bulgarian;
- Drill Perforator with nozzles;
- manual or electric saw;
- hammer;
- spatulas;
- buckets;
- Measuring tools: roulette, ruler and level.
Consumables needed to install a heat-shielding system on an aerated concrete house’s exterior:
- glue mixture;
- primer with antiseptic;
- external plaster;
- dowels for fastening insulation;
- timber or metal profile for sheathing;
- reinforced mesh made of fiberglass material;
- vapor barrier;
- waterproof film;
- fasteners;
- lining or siding, for exterior decoration.
Step-by-step guide: how to do it right?
The technology used to insulate a home from aerated concrete walls is not particularly complicated; typically, it is chosen during the house’s design phase and takes certain building requirements into consideration:
- wall dimensions;
- climatic region of the facility location.
The developer will need to buy high-quality materials and meticulously finish the thermal protection technological map in order to see a true impact. The installation process may vary somewhat depending on the heat protection system method selected.
Wet light and heavy method
When installing load-bearing aerated concrete walls with external thermal protection, the following procedures must be followed:

- Thorough cleaning of the walls of dust, dirt and layers of solution. Cracks and excavations are sealed with adhesive solution.
- The leveled and purified surface is primed.
- Install mineral wool on glue, with a checkerboard displacement.
- After the glue is completely hardened, the insulation is additionally fixed with dowels.
- Glue and fiberglass grid are applied to the insulation layer.
- The second leveling layer of the adhesive mixture is laid on the armored vegetable.
- Perform finish plaster.
To use brick or stone cladding as a "heavy" method of thermal protection The Ministry of Health of a lower density, which is fixed on a special fastener system that handles the fasteners and connection for external brickwork, will also need to be used in addition to the first method.
A ventilation gap of at least 40 mm is also made, and an extra vapor-waterproofing layer with a membrane is placed between the insulation and the masonry.
Dry — ventilated facade
It will also be necessary to meticulously prepare the walls for the installation of the heat-protective pie when installing a ventilated facade. Make sure the aerated concrete is dry before beginning the work, which is done in dry weather.
Technology for adding a ventilated facade composed of aerated concrete blocks to an exterior wall:
- install a sheathing made of timber or metal profiles;
- install a vapor barrier;
- install mineral slabs between the frame guides;
- install a hydro-windproof membrane, securing it with a stapler;
- install a counter-lattice for additional fixation of the heat-protective layers;
- siding or any panel material is installed on the frame.
Frameless cladding
A professional builder can cover 150 m2 of heat protection per day using a simpler scheme for frameless application of aerated concrete with special plastering compounds for external walls. The only places where reinforcing mesh is installed are corners and spaces with intricate wall layouts; this eliminates the need for initial wall leveling, which is particularly convenient for inexperienced builders.
More importantly, this plaster’s vapor permeability is superior to that of polystyrene foam, and it doesn’t have cold bridges. Applying such warm plaster results in a multi-layer structure of an aerated concrete wall that includes insulation and plaster.

Warm plaster application technology:
- Impregnating the wall.
- Prepare the mixture according to the manufacturer’s recommendations; you must work quickly, since the validity period of such solutions is no more than 2 hours.
- Apply the first layer of plaster up to 20 mm, the next one no earlier than after 4 hours.
Difficulties and errors
You must carefully follow the technology when working on the external insulation of load-bearing aerated concrete walls; otherwise, the effect of such measures could be negative rather than zero as the walls will start to flow as the dew point moves closer to the interior, causing the room to become damp and eventually destroying the wall structure.
The most typical errors made when installing thermal insulation are as follows:
- use of low-quality materials;
- poor quality insulation fastening;
- lack of a vapor barrier and waterproof layer;
- carrying out work on a damp wall and in damp weather.
| 1. External Insulation Boards | Using insulating boards on the outer surface of aerated concrete walls helps to create a thermal barrier, improving energy efficiency. |
| 2. Insulation Plaster | Applying special insulating plaster directly onto the exterior of aerated concrete walls provides a seamless insulation layer, enhancing thermal performance. |
It is essential to maintain adequate insulation for aerated concrete walls in order to keep your home comfortable and energy efficient. You can enhance thermal performance and shield the building from the elements by insulating these walls from the outside.
The use of external insulation systems is one useful strategy that was mentioned. Usually, these systems consist of aerated concrete surfaces with layers of insulating boards or panels fixed directly onto them. By establishing a continuous thermal barrier, this method lowers heat loss and avoids thermal bridges.
Using rendering or plastering with thermally insulating qualities is another method. This technique adds an extra layer of thermal protection to the walls while also improving their aesthetic appeal. Selecting materials that work well with aerated concrete and offer sufficient insulation is crucial.
Finally, good finishing and detailing are necessary to guarantee the insulation’s efficacy. It is important to pay attention to where windows, doors, and roof edges meet other building components in order to prevent thermal bridging and guarantee a seamless insulation envelope surrounding the entire structure.


