
The living room is the heart of our home, and everyone wants it to look perfect. One of the most effective ways to transform a space is to install a suspended plasterboard ceiling. This is not just a way to hide communications or unevenness in the base ceiling, but a real design tool that allows you to create unique multi-level structures.
With plasterboard, you can play with the light, shape, and height of the room. Built-in lights, elegant lighting, smooth curves — all this helps to set the mood and add accents to the interior. Such ceilings open up enormous scope for creativity, allowing you to realize your boldest ideas.
To inspire you and help you imagine how it looks in real life, we have compiled a selection of photos of completed projects. Here you will find examples of different styles, from classic to minimalist, and see how a well-chosen ceiling can make a living room truly stylish and cozy.
- Advantages of plasterboard ceilings in the hall
- Types of plasterboard ceilings in the hall
- Single-level plasterboard ceilings in the hall
- Multi-level ceilings
- Curved plasterboard ceilings
- Plasterboard ceiling design: style
- Classic
- Art Nouveau
- High-tech
- Loft
- Frame suspended ceilings
- Diagonal ceilings
- Plasterboard ceilings in a small living room
- Plasterboard structures combined with stretch ceilings.
- Materials and installation of a suspended system made of gypsum plasterboard
- Finishing touches
- Features of light fixtures for plasterboard ceilings
Advantages of plasterboard ceilings in the hall
One of the main advantages of this material is its affordable cost. But that's not the only thing that attracts buyers. Gypsum plasterboard has other undeniable advantages:
- environmental safety;
- the ability to give the material any shape;
- relative ease of installation (two people can completely assemble any type of structure);
- good thermal and sound insulation properties;
- ability to conceal electrical wiring and other utilities;
- fire safety;
- the ability to create any type of ceiling, even the most complex ones, including those with curved elements.
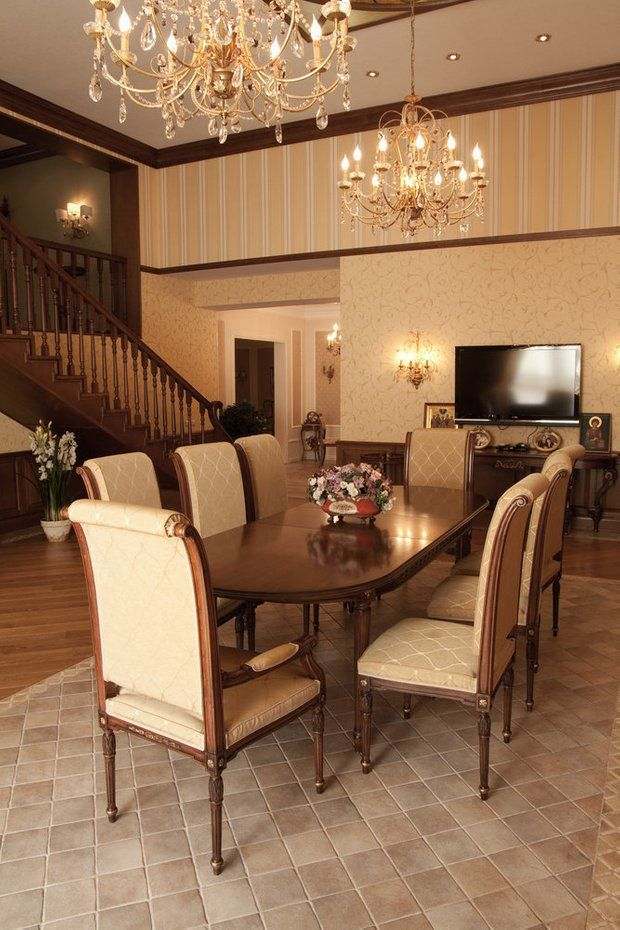
Types of plasterboard ceilings in the hall
The malleability of gypsum plasterboard allows you to create the most bizarre designs. Gypsum plasterboard is easy to cut and can take on various geometric shapes, which allows designers to realize their boldest ideas. All designs created in the living room can be divided into several types.

Single-level plasterboard ceilings in the hall
These are simple and reliable systems that are well suited for small living rooms. Using this material is a guaranteed way to level a defective ceiling without using plaster. There is another important advantage—the ability to hide electrical wiring, which is impossible when installing a classic ceiling. After the drywall sheets are fixed and the seams are covered with masking tape and putty, you can finish the surface using any suitable material. Decoration is carried out using wallpaper or alkyd enamel. Many people prefer to paint the surface by hand. It is worth noting that for rooms with low ceilings (less than 3 m), it is recommended to use light colors, as dark colors visually reduce the space.

Design: Pavel Polynov interior design studio
Suspended plasterboard ceilings are an excellent choice for the living room if you want a stylish and smooth ceiling without any hassle. They allow you to hide wires, pipes, and unevenness, as well as add comfort with multi-level structures, lighting, or unusual shapes. You can make this kind of ceiling for any interior, from minimalist to classic. The photo shows how drywall can change a space, making it more expressive, modern, and neat.
Multi-level ceilings
Such designs with two or more tiers look original and luxurious at the same time. This is where designers have a wide field of activity! Wavy borders between levels, zigzags, matte and glossy details, decorative inserts, mirrors, colored lighting, 3D wallpaper—all of this can be achieved using drywall. Of the multi-tiered designs, two-level ceilings are the most common due to their relative simplicity: the construction of multi-level ceilings involves significant time and financial costs, plus the need to hire specialists, which also requires money.

Curved plasterboard ceilings
Their distinctive feature is their unique design, which involves a wide variety of complex elements: ornamental details in the form of leaves, flowers, curls, as well as stars, the moon, and even clouds. Creating such figures requires special skill. However, the result will be impressive: you will have a beautiful, one-of-a-kind plasterboard ceiling in your living room. When creating a figured ceiling, it is important to remember that the color palette of its elements should harmonize with the shades of the walls and furniture to create a cohesive design.
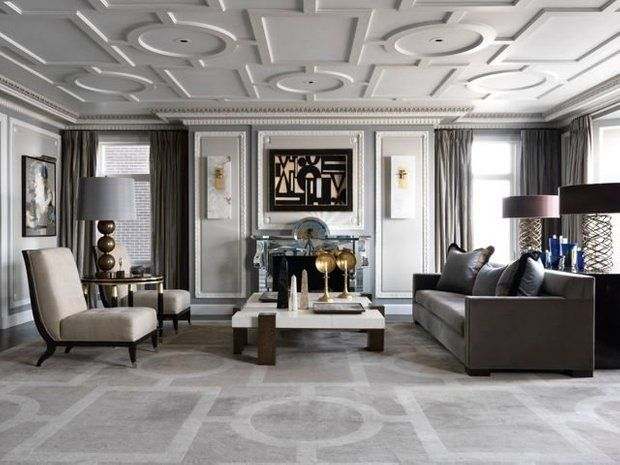
Plasterboard ceiling design: style
The versatility of gypsum plasterboard allows you to create structures that suit virtually any style. Below are the most popular options for plasterboard ceilings in the living room, depending on the chosen style.

Design: Natalia Tarkhanova
Classic
Here, preference is given to strict straight lines. As for the living room itself, it features massive furniture, many additional accessories in the form of large vases, figurines on shelves, and heavy curtains. All this will harmonize well with the ceiling, which is decorated in gray and white tones. It is better to make the design with two or more levels. An example of this is a ceiling where a luxurious classic chandelier in the center of the hall is placed in a kind of square or diamond-shaped niche.

Art Nouveau
This style, somewhat forgotten, has burst back into the 21st century, striking the imagination with its unusual curved lines of interior elements combined with modern materials. A ceiling made in this style is characterized by a multi-level design with smooth lines. A composition with an unusually shaped chandelier in the center of the ceiling, fixed in a unique protruding rosette with a complex configuration, will look original. Along the edges of the hall, one tier lower around the perimeter, you can install spotlights with edging.

High-tech
First and foremost, these are regular geometric shapes that are easy to construct using plasterboard sheets. One of the distinctive features of this style is a glossy surface, so the ceiling must be covered with a suitable paint that gives a shine after drying. It is best to choose a gray color reminiscent of metal. Mirrors are also welcome, which are placed on the walls and the ceiling itself, creating a reflective effect.

Design: MEDIANA interiors studio
Loft
Many people find the combination of comfort and industrial interior design strange. But this is exactly what the “loft” style is all about. Walls can be finished with red or silicate brick (the material is covered with varnish on top) or made of concrete panels. Partitions are made of glass, and water and sewer pipes are not concealed in any way; on the contrary, they are displayed prominently. If there are no classic metal pipes or cast iron radiators, imitations are made (modern polypropylene products and heating batteries are inappropriate here).
When installing a plasterboard ceiling in the hall, it is advisable to make false beams—using gypsum plasterboard, this can be done quite quickly. Choose from shades of terracotta, beige, gray, and dark white. For accent (for example, to emphasize the same beams), use blue or dark red tones.

Frame suspended ceilings
This is a design that initially involves the construction of a box made of gypsum plasterboard, placed around the perimeter of the room. The corners of the rectangle or square can be either straight or slightly curved. If the ceiling is two-level, the box can be located in the center of the ceiling, or, conversely, it can look like several interconnected rectangles forming a niche in the middle. A frame ceiling is a relatively simple structure that you can build yourself.

Diagonal ceilings
This is a more complex system, but it allows you to create a ceiling design that will decorate any living room. This involves the construction of several levels, not in straight lines, but in the form of zigzags, waves, or arcs. This solution will not only allow you to stylishly decorate the room, but also, if necessary, divide it into zones, which is very relevant for small apartments. For example, you can separate the relaxation and play areas if you have a one-room apartment.

Plasterboard ceilings in a small living room
If the room is not very high, it makes sense to use a single-level structure. With the right arrangement of the surface and accompanying elements, you can achieve a visual expansion of a small room. For high ceilings, feel free to use multi-level systems. There are several proven techniques:
- install mirrors on the ceiling (a two-level design is required).
- combine a suspended plasterboard ceiling with a glossy stretch ceiling.
- do not emphasize the border between the walls and the ceiling; both surfaces should be the same color (in this case, it is better to avoid baseboards and choose only light shades).
- if the living room is rectangular, a square on the ceiling in the form of a niche or a protruding tier will visually expand the room.

Plasterboard structures combined with stretch ceilings.
Such systems are called hybrid. Their main feature is the wider possibilities for creating an unusual plasterboard ceiling design. There is a combination of the advantages of two different systems: plasterboard structures allow you to build curved elements, and a PVC ceiling provides a perfectly smooth glossy surface. You can build a frame structure around the perimeter from gypsum plasterboard and place a square or rectangle of stretch type (in the form of a niche) in the center. The use of a diagonal method of installing gypsum plasterboard sheets and PVC sheets also gives good results.

Materials and installation of a suspended system made of gypsum plasterboard
In addition to the gypsum plasterboard sheets themselves, you will need metal profiles, hangers, and connectors. The elements are installed using self-tapping screws. If the walls and base ceiling are concrete, dowels will be required. Before starting work, you need to decide on the type of lighting. If you plan to hang only a chandelier, the height of the room will be reduced by 5 cm. When using recessed lighting fixtures, this parameter will be 10 cm. Below, we will consider this option as the most complex.
The first step is to mark the floor using a plumb line and a spirit level (preferably a laser level). Find the lowest corner of the room and measure the distance from the floor at this point so that the line does not reach the ceiling by 10 cm. Now draw parallel lines around the perimeter of the wall with a marker. The metal strips are attached along these lines. Next, mark the ceiling, where you also need to draw lines. Do not forget to take into account the width of the sheets so that their edges fit exactly on the profiles. Fasten the hangers at a distance of 15-20 cm from each other, and you can already screw the metal strips to them. To give the frame rigidity, use “crabs” to fasten perpendicular strips. The result will be a lattice frame.
The next step is to determine the location of spotlights, chandeliers, and run electrical wiring to the desired locations. Usually, two switches are installed: one is connected to built-in appliances, and the other to the chandelier. After that, you can start attaching the sheets to the frame (this should be done by two people). Plasterboard is cut with a knife: a line is drawn with some force and the plasterboard, laid on the edge of the table, is broken (this is similar to working with glass).
The sheets are fixed in the right places and, at the same time, holes for spotlights are drilled with a drill with a special attachment (run the wires in advance in the places where they will be fixed). It is worth noting that the chandelier is attached to the base ceiling, not to the profile. When fixing gypsum plasterboard, self-tapping screws are screwed in at a distance of at least 1 cm from the edge. The fastening pitch is 10-15 cm. Make sure that the screw heads are recessed into the sheet by no more than 1 mm, otherwise the cardboard will tear and the plaster will crumble, and the fastener will not hold the sheet.

Finishing touches
Once all the sheets are secured, wait a couple of days for the structure to “settle” and achieve a natural balance. Apply reinforcing mesh tape to the joints to prevent cracks from forming in the finishing material in the future. Next, fill all the joints and recesses formed by the countersunk heads of the screws with putty. At the final stage, all that remains is to paint the ceiling in the chosen color or cover it with wallpaper in accordance with the style of the entire living room. And the last step is to install the lights and chandelier.

Recommendations from Olga Pochueva
Features of light fixtures for plasterboard ceilings
On the one hand, a suspended ceiling with built-in spotlights reduces the height of the room by 10 cm, but with the right lighting, this can be compensated for (visually, of course). But first, you need to choose the right fixture. What does the market offer, and which products are best suited for plasterboard ceilings? In terms of design, lamps are divided into:
- recessed: installed almost flush with the ceiling surface, may have a swivel mechanism, which is very convenient for lighting specific areas;
- suspended chandeliers: fixed to a pre-installed metal profile.
There is also a classification based on the type of light emission. Here, you need to make a choice based on energy consumption, lamp size, service life, the possibility of connecting to a dimmer (a device for smoothly adjusting brightness), and cost. The following types of products are available on the market:
- incandescent filament lamps: operate directly from 220 volts, are inexpensive, can work with a dimmer, but are large and heat up significantly during operation, so it is not recommended to install them in stretch structures (if you have a combined ceiling);
- fluorescent: consume less energy compared to the previous type, are also large in size and cannot be connected to a dimmer;
- halogen: economical and compact (no more than 4 cm in height) devices that operate with a step-down (up to 12 volts) transformer and allow the use of a dimmer.
- lED lighting: the most preferred option – these lamps are characterized by a long service life, minimal power consumption, fire safety, no heating of the body, and the ability to emit colored light, but they are relatively expensive.

As you can see from the photos, a suspended plasterboard ceiling can completely change the atmosphere of a living room. It is not just a way to hide communications, but a real design tool. With its help, the room acquires its own character, becomes more comfortable, modern, or, conversely, classically austere.
The main advantage of this design is its versatility. You can create simple and concise planes, or you can implement complex multi-level projects with hidden lighting. The choice of shape, height, and lighting depends solely on your taste and imagination.
If you are planning a renovation, feel free to consider this option. A plasterboard ceiling gives you enormous creative freedom. It allows you to make your living room exactly as you see it in your dreams — bright, stylish, and unlike any other.


