
A strong foundation is essential for building a bathhouse, and many do-it-yourselfers find that a shallow strip foundation is a sensible option. This kind of foundation reduces the need for excavation and material costs while offering sturdy support. Make sure you have the required licenses and that the location and design of your foundation are well thought out before you begin.
Marking out the area where the foundation will be laid is the first step in building a shallow strip foundation. As per your plans, define the perimeter using string lines and pegs. Before moving forward, it is imperative to verify the dimensions and make sure everything is square.
After that, excavation starts to the depth and width needed for the foundation. This usually entails excavating a trench to make room for the concrete footing. The depth will be determined by the soil’s properties and local building codes, guaranteeing the structure’s stability and sufficient support.
It’s time to prepare the base after the trench has been dug. To create a solid foundation for the concrete, this entails leveling the trench’s bottom and compacting the soil. Before continuing, it is imperative to clear the trench of any debris and make sure it is clean.
The foundation’s formwork can be erected once the base has been ready. Formwork is made up of metal or wooden panels that hold the concrete in place while it sets and define the shape of the foundation. Make sure the formwork is level and secure by carefully measuring and cutting it to fit the trench’s dimensions.
It’s time to pour the concrete now that the formwork is in position. Make sure the concrete mix is well combined and lump-free when preparing it for a foundation. To ensure even distribution, pour the concrete into the formwork starting at one end and working your way to the other.
After the concrete has been poured, level and smooth the surface with a screed board. After removing any extra concrete, smooth out the surface with a float to make sure it is flawless. Before continuing with the rest of the bathhouse construction, let the concrete cure in accordance with the manufacturer’s recommendations.
By following these instructions, you can build a strong shallow strip foundation for your bathhouse, which will guarantee long-term stability and durability and serve as a solid base for future construction.
Pros and cons of MZLF
A strip foundation is a closed-in structure with load-bearing walls around its perimeter that transfers the building’s weight.
Bathrooms are light-colored structures. As such, it suffices for them to erect low-profile support strips.
Much like any building structure, MZLF has its share of benefits and drawbacks.
Benefits

- The tape support evenly distributes the load from the structure onto the ground, which avoids local shifts and deformations in the foundation.
- Due to the small height of the MF, the amount of materials (concrete, reinforcement) spent on its construction occupies a small volume, which determines the low cost of the foundation.
- The simple installation of the supporting structure does not require the use of lifting or special equipment.
- Digging trenches, making formwork, knitting reinforced frames with steel wire without welding – all this allows you to get by with simple hand tools (shovel, saw, hammer, etc.).).
- Due to the continuous support area, the strip foundation has a high load-bearing capacity. Developers build such a foundation for low-rise construction without fear, including for baths.
Drawbacks:
- A shallow strip foundation cannot be built on weak and heaving soils.
- A monolithic MF is built by pouring concrete into the formwork, which eliminates the need to carry out work in winter.
- Waiting for the concrete to harden for 30 days.
When to use?
Bath buildings are typically modest in size, which is more than enough for the building of low-height strip foundations. A reinforced concrete structure can support a large weight.
MFs are only constructed on solid, dense foundations in spite of this. These soils are loamy, rocky, and stony.
Soils that are weak and peaty have low resistance. The strip foundation will ultimately collapse on such foundations as a result of its sagging under load.
The depth of soil freezing primarily determines the tape’s level of laying. Ice is created when frozen water expands in volume. As a result, the frozen soil layer starts to expand and rise. Soil heaving is the term for this process. It is crucial that the sole is situated beneath this zone for this reason.
The foundation’s height (height above ground level) will be 200 mm greater than its depth. The ideal tape height is 400 + 200 = 600 mm if the freezing depth is 300 mm.
This is a succinct thesis statement for your paper: We offer simple instructions in this guide for building a shallow strip foundation intended for a bathhouse. Our instructions are designed for do-it-yourself enthusiasts who want to construct a strong base without a lot of construction experience. They cover everything from site preparation and load-bearing capacity calculations to foundation laying and proper drainage. This article emphasizes safety, efficiency, and cost-effectiveness throughout the process in order to equip readers with the necessary knowledge to successfully complete their own bathhouse foundation project.
How to make it yourself?

The foundation’s construction involves a number of steps that must be followed precisely in that order:
- Preparation.
- Marking.
- Excavation.
- Installation of formwork.
- Installation of reinforced frames.
- Dismantling of formwork.
- Waterproofing.
Preparation
Among the preparatory tasks are:
- choosing a place for a bath;
- site preparation;
- procurement of materials;
- selection of tools.
Choose the building site before you begin marking. The bathhouse is situated between the house and outbuildings at a safe distance of 15 to 20 meters. This is required to stop the fire from encroaching on nearby structures.
The area where a bathhouse will be built has been cleared of vegetation and debris. The entire site is cleared of its fertile soil layer.
When making concrete mortar on the spot, sand and crushed stone are kept in different piles, and bags of cement are stacked on pallets under a canopy. The fixtures shouldn’t be left out in the open. Water is gathered in a container at a convenient distance from the location if there isn’t any running water.

Before beginning any excavation work, you must:
- shovels,
- cart (wheelbarrow) for removing soil.
The mains are linked to the mortar mixer. Ready:
- roulette,
- cord,
- pegs and laser level.
Marking
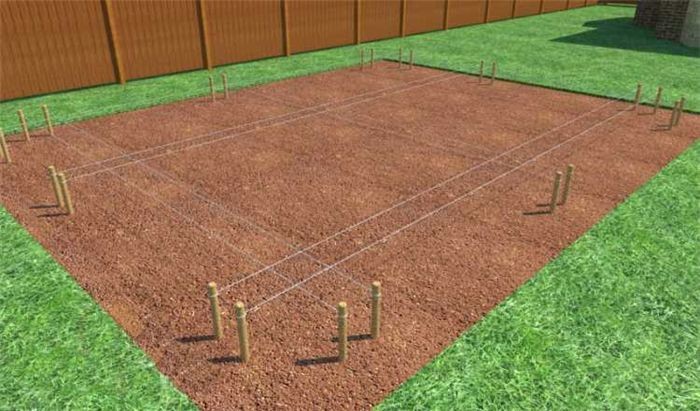
Sketch out a foundation plan on paper. Trench boundaries are indicated on the ground using pegs and a cord, as shown in the drawing. By measuring the diagonals of the marking rectangle, the marking’s right angles are verified.
Excavation
What they carry out:
- According to the markings, trenches are dug to a given depth.
- The level of the bottom of dug trenches is controlled with a laser level and a rod. Deviations from a given mark are corrected with bedding.
- A layer of crushed stone and sand 150 mm thick is poured onto the bottom of the pits. The pillow is tamped with water.
- The trenches are covered with PVC film or geotextile. The edges of the covering are brought up and secured with wood chips to the walls of the pits.

Installation of formwork
How to carry out:
- formwork is assembled from boards and timber or metal or polymer sheets are used;
- shields are lowered into trenches, strengthening them with stops and spacers made of timber;
- The surface of the formwork is covered with film, fastening it to the panels with a stapler.
Formwork installation in the video:
Installation of reinforced frames
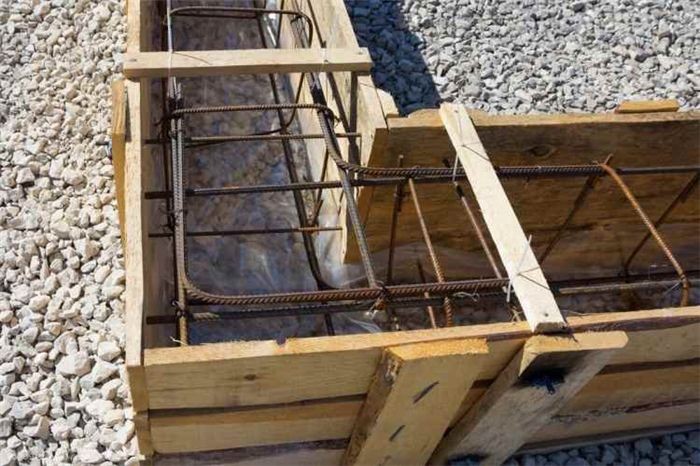
They are knitted with steel wire using smooth rods ø 6 mm and periodic profile reinforcement ø 8 mm. Two horizontal meshes with 100 x 100 mm cells make up each frame. Vertical rods that are smooth are connecting them.
The formwork is connected together by the placement of reinforcing sections inside of it. The lower meshes are positioned atop 50 mm-tall supports.
This prevents metal corrosion by forming a protective layer of concrete. Gaps 30 mm in width are kept between the formwork and the reinforcement for the same reason.
Pouring concrete
Concrete must be compacted using a vibrator before being poured into the formwork. Failure to do so will result in air bubbles staying in the solution’s mass, weakening the monolith.
Interruptions to the filling process cannot last longer than six hours. If not, solidification layers will form inside the solution’s mass, jeopardizing the monolith’s integrity.
You must create 10 kneels with the mixer solution in order to prepare 1 m3 of the solution. It can take a while to fill the foundation.
Rapid continuous filling is the most efficient way to fill the formwork with concrete solution. You can accomplish this by placing an order for the delivery of the concrete-finished solution.

Dismantling of shields
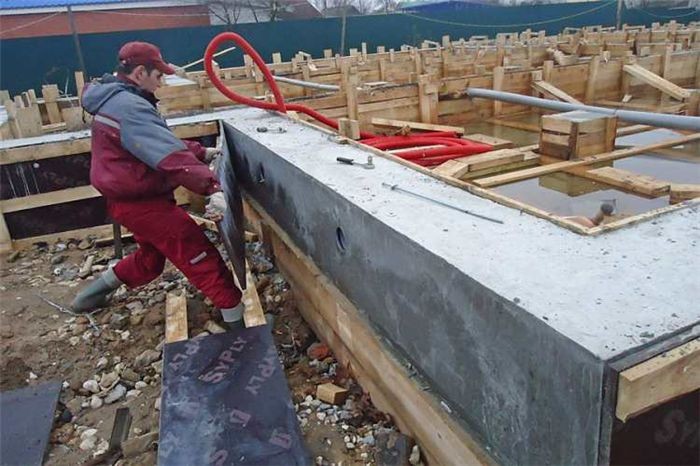
One month following the pour, the formwork is taken down. The shields are carefully disassembled without going above and beyond to preserve the integrity of the monolith’s side surface. Cement mortar is used to erase flaws and other imperfections.
Waterproofing
Bitumen mastic is applied to the strip foundation’s surface. It is made liquid by heating it. Additionally, protective compounds are employed, but they must first be diluted with solvents.
Roofing felt is also applied to the foundation for more dependable waterproofing. Backfilling takes place following the drying of the insulation.

This section contains all the most pertinent and useful information regarding building a bathhouse strip foundation.
| Step | Description |
| 1 | Choose and mark the location for the foundation, ensuring it"s level and compact. |
| 2 | Dig a trench according to the planned dimensions and depth, accounting for soil type and load. |
| 3 | Prepare formwork for the foundation walls, ensuring it"s sturdy and aligned. |
| 4 | Place a layer of gravel at the bottom of the trench for drainage. |
| 5 | Install reinforcement bars (rebar) in a grid pattern within the formwork. |
| 6 | Mix and pour concrete into the formwork, ensuring it fills all spaces evenly. |
| 7 | Smooth the surface of the concrete and let it cure for several days. |
| 8 | Remove the formwork carefully to avoid damaging the newly formed foundation. |
| 9 | Backfill around the foundation to ensure stability and drainage. |
Preparing and carrying out a shallow strip foundation for a bathhouse is a rewarding do-it-yourself project. Make sure the foundation is square and level by first tracing its perimeter with strings and stakes. Dig the trench to the necessary depth; this will usually be between one and one and a half feet deep, depending on the local building codes and the state of the soil.
After that, level the trench by compacting the dirt and covering it with gravel to provide drainage. Install a waterproof membrane to stop the foundation from getting wet. Next, build the formwork out of sturdy boards, making sure that it is braced securely and well-supported to hold the concrete in place.
Use steel rebar to strengthen and stabilize the foundation prior to pouring concrete. Make sure the concrete fills the trench evenly by mixing it to the proper consistency and pouring it into the formwork. To eliminate air bubbles in the concrete, vibrate it after smoothing the surface with a trowel.
After the concrete has had time to cure completely, remove the formwork carefully and backfill the foundation with dirt. Before starting any additional bathhouse construction, let the foundation cure completely. To guarantee long-term durability, check the foundation frequently for any indications of settling or cracking and take quick action to fix any problems.


