
Adding a roof window to your home is a great way to increase natural light and enhance attic ventilation. In order to guarantee that the window is both functional and energy-efficient, there are a few crucial steps in this process. You can add more light and warmth to your space by taking the appropriate approach.
First and foremost, it’s critical to select the best kind of roof window for your requirements. There are various sizes and styles that are appropriate for various roof types and space needs. The installation will go more smoothly and successfully if you choose a window that fits your space and blends in with the style of your roof.
Next, the window’s performance depends on its installation. This include taking precise measurements, cutting the roof opening, installing the window, and caulking the area around it to stop leaks. By taking these precautions, you can guarantee that the window functions as intended while also preserving the structural integrity of your roof.
Adding a roof window to your house can make a big difference in the living area. You can reap the long-term advantages of better lighting and ventilation by being aware of the installation procedure and paying close attention to details.
| Step | Description |
| 1. Preparation | Ensure all necessary tools and materials are on hand. Verify the roof structure can support the window. |
| 2. Marking | Mark the exact location for the window, considering both the interior and exterior positions. |
| 3. Cutting | Cut the opening in the roof, following the marked lines, and remove the cut-out section. |
| 4. Framing | Install the frame for the window, ensuring it is level and securely attached to the roof structure. |
| 5. Flashing | Apply flashing around the window frame to prevent water leakage. Ensure it is tightly sealed. |
| 6. Installation | Place the window into the frame, secure it in place, and check for proper alignment. |
| 7. Insulation | Insulate around the window to improve energy efficiency and prevent drafts. |
| 8. Interior Finishing | Finish the interior around the window with trim or other suitable materials. |
Installing a roof window can transform your attic into a bright, welcoming space, improving ventilation and adding value to your home. The process involves careful planning, selecting the right materials, and following precise installation steps to ensure the window is secure and watertight. With the right approach, you can achieve a professional finish that enhances both the functionality and aesthetics of your roof. Installing a roof window can significantly enhance the natural light and ventilation in your home. It’s a project that, with careful planning and the right tools, you can manage on your own or with professional help. Start by choosing the right spot for your roof window, considering factors like room layout and roof structure. Follow the manufacturer’s guidelines for cutting the opening and installing the frame to ensure a secure fit. Pay attention to sealing and insulation to prevent leaks and maintain energy efficiency. Proper flashing is crucial to protect your roof from water damage. Once installed, a roof window can transform your living space, offering beautiful views and improving the overall ambiance. With these simple steps, you can achieve a successful installation and enjoy the benefits for years to come. Step Description 1. Preparation Ensure all necessary tools and materials are on hand. Verify the roof structure can support the window. 2. Marking Mark the exact location for the window, considering both the interior and exterior positions. 3. Cutting Cut the opening in the roof, following the marked lines, and remove the cut-out section. 4. Framing Install the frame for the window, ensuring it is level and securely attached to the roof structure. 5. Flashing Apply flashing around the window frame to prevent water leakage. Ensure it is tightly sealed. 6. Installation Place the window into the frame, secure it in place, and check for proper alignment. 7. Insulation Insulate around the window to improve energy efficiency and prevent drafts. 8. Interior Finishing Finish the interior around the window with trim or other suitable materials.
- Installation of roof windows
- Planning and calculations
- Work plan and tool
- Window installation
- Frame installation and adjustment
- Insulation and drainage
- Salary setting
- Installation of double-glazed windows and interior finishing
- Video on the topic
- Installation of a Fakro roof window in Klikfalz Pro Grand Line / Video instructions
- Installation of a dormer window on a seam roof / Velux flashing for Click Seam Grand Line
- Installation of a roof window into a finished roof
Installation of roof windows
The delivery package typically consists of the following parts:
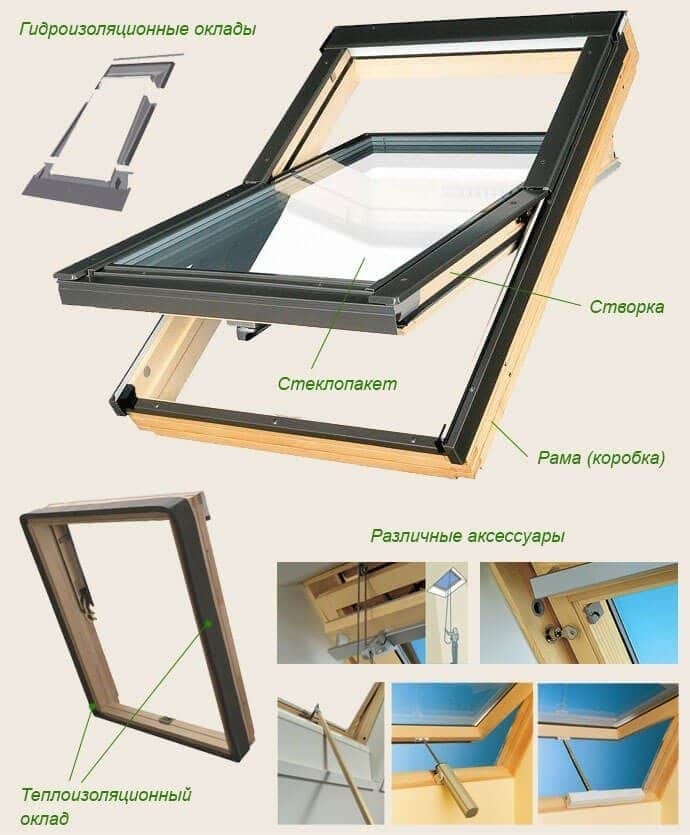
- awning or roller shutters for external shading;
- salary for protection from negative atmospheric influences;
- the window itself is a closed hermetically sealed system;
- waterproofing sealant;
- internal slopes.
Naturally, more understated sets are available for purchase, but going with a model that has built-in curtains is advised. The structure itself will be angled, so traditional methods of darkening might not work well there.
Planning and calculations
When installing a roof window in a completed roof, the planning stage should be the first. You must first determine the necessary dimensions. The calculation formula is very straightforward: For every ten square meters of space, there is one square meter of glazing.
Additionally, you must determine the ideal height for the windows to be installed. The lower portion of the frame should rise one to one and a half meters above floor level when choosing the location of the roof windows.

When installing a roof window in a soft or metal tile roof, the location and size of the window should be chosen so as to minimize any potential impact on the rafter system during installation. The measurements should provide a margin of roughly 10 cm and enable the window frame to be installed between the rafters.
Work plan and tool
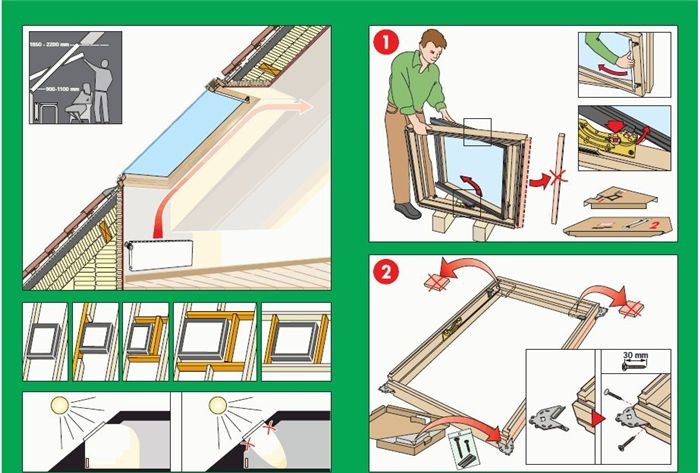
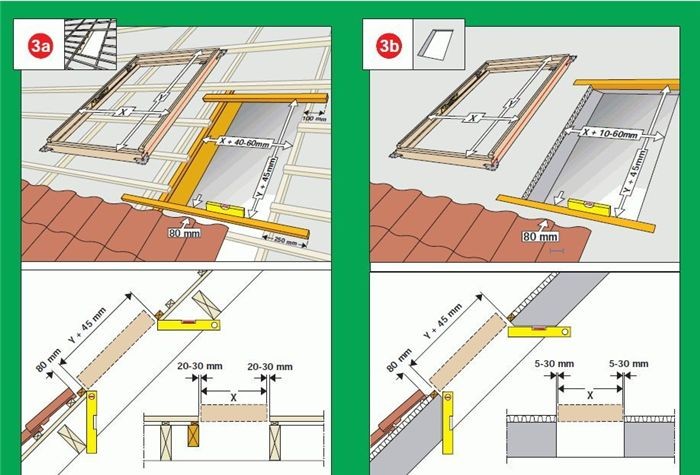
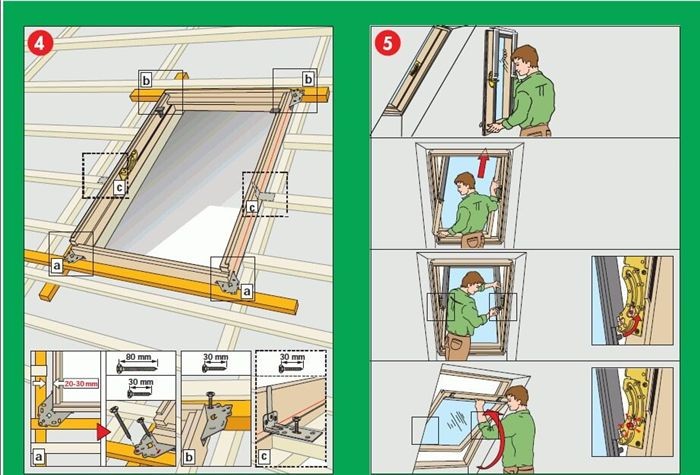


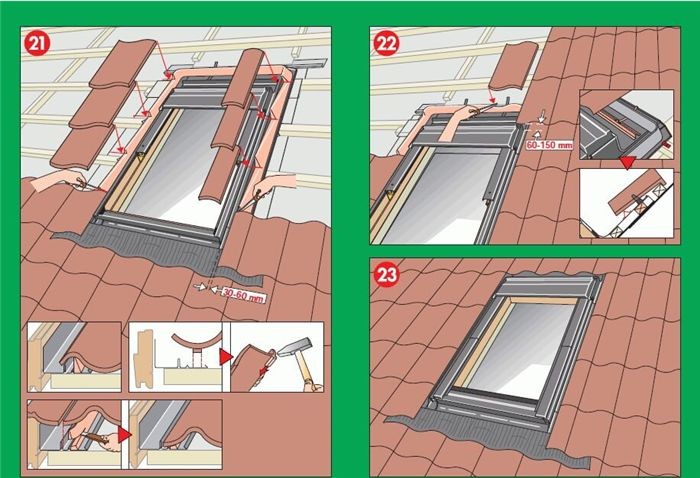
The following installation instructions apply to both metal tiles and soft roofs when installing roof windows:
- preparing the opening;
- frame installation;
- heat and waterproofing;
- preparation of the drainage system;
- installation of flashing parts;
- installation of double-glazed windows;
- interior finishing, including installation of slopes and vapor barrier.
Although installing roof windows by hand is quite possible, the master will need the right tool to complete the task:
- screwdriver and screws;
- wooden slats and beams;
- level;
- nails;
- materials for thermal and waterproofing.
Window installation
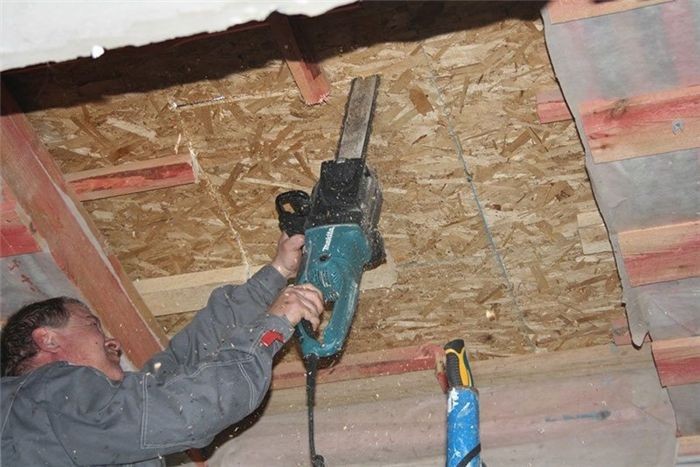
Once the skylight installation location has been determined, you should prepare the work area ahead of time by marking it off. In order to unload the roofing pie’s materials, multiple holes are cut in the material after the outline; this will help prevent damage to the materials during the process. Use a tape saw or circulation to cut the opening. Cutting diagonally, rather than along the contour, is crucial. After that, cut off the vertices of the resulting triangles, and only then should you form an opening.
The work with roofing materials warrants special attention. Installing roof windows in metal tiles is done in the same manner as installing windows in sheet iron or corrugated sheets. The casing must first be disassembled if we are discussing skylights in seam roofs or other materials.
Frame installation and adjustment
Important: frames are mounted without glass for safety reasons. Only at the very end can it be proven.
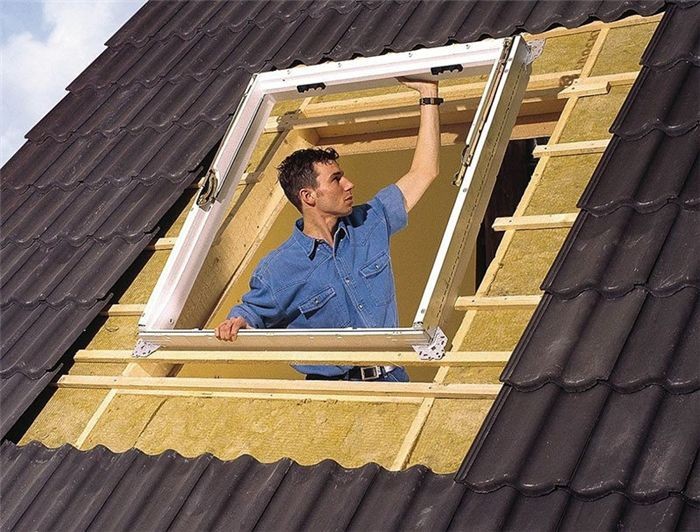
When installing a roof window frame, you should carefully fasten the lower brackets right away, but you shouldn’t tighten the upper brackets all the way to the end because doing so will make adjusting the sash easier. To do this, a level is used. Plastic corners, which are frequently included as spare parts, should be used to remove any deviations of the inserted window that are discovered. To ensure proper installation, it is also advised to briefly insert the glass into the frame. After making the necessary adjustments, tighten the screws.
Insulation and drainage
For increased tightness, thermal and waterproofing material must be layered around the frame once the fasteners are firmly wrapped. With a stapler, the waterproofing apron is secured.
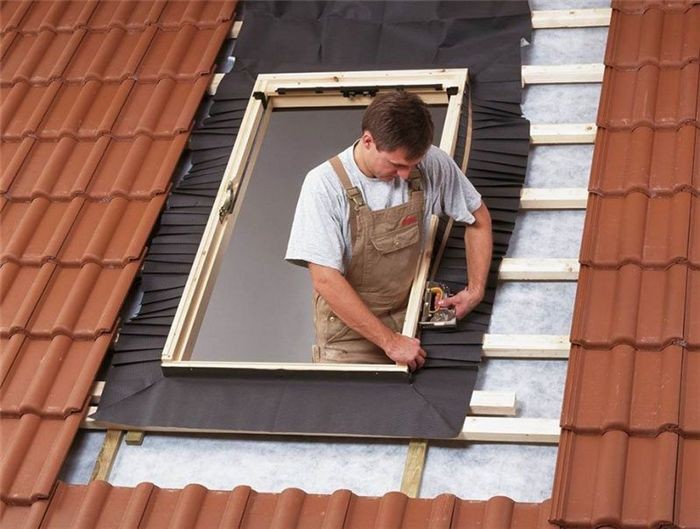
At the top of the frame is where the drainage gutter is made. The sheathing exactly above the drainage gutter opening is divided into two sections. A comparable-sized piece of waterproofing material is also ready. The gutter is fastened to the sheathing by being inserted beneath the waterproofing cuttings. Installing it at an angle is necessary to prevent rainwater from escaping the window and compromising the sealing.
Salary setting
Currently, there are two primary flashing techniques used for various rebates. In the first, flat roofing material is worked with, and in the second, wavy roofing material. Skylight manufacturing companies include the frame in the delivery package. Working with both types follows the same principle.
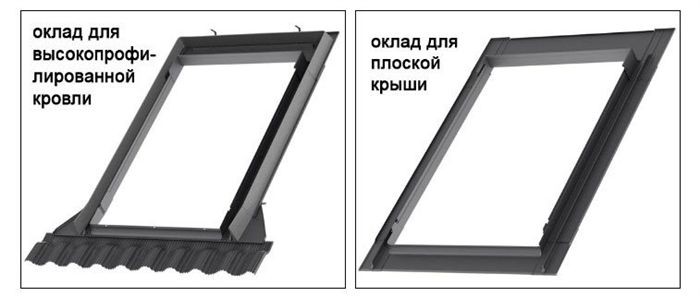
Attaching the bottom portion of the roof window frame is the first step. The waterproofing apron should be installed so that it extends past both the roofing sheets and the frame. After that, you ought to proceed to the auxiliary parts. These components’ edges have to be aligned with the frame.
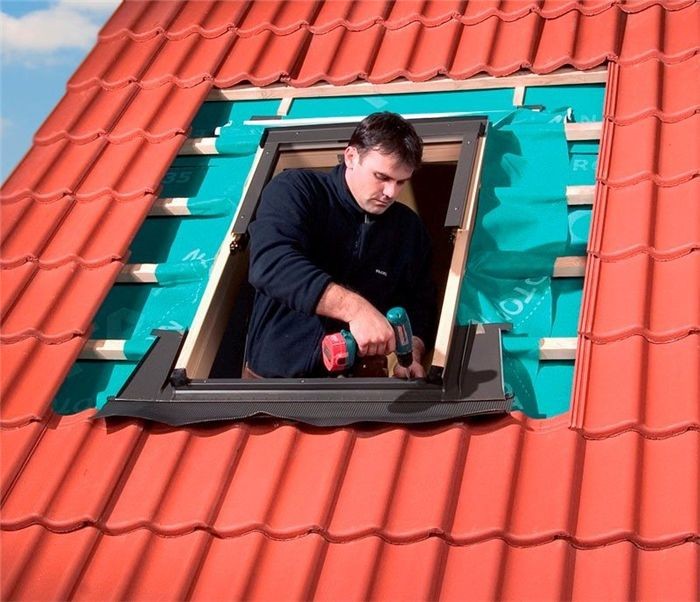
The seal is applied along the frame’s exterior. Fasteners and all other parts are usually included in the delivery kit, but occasionally they need to be bought separately. Regardless, following these procedures, you should thoroughly review everything for precision and robustness, i.e. If necessary, replacing or repairing roof windows will be very difficult.
Installation of double-glazed windows and interior finishing
Reinstalling the double-glazed window in its frame is the next step in installing attic windows. This is done very simply, but the technology used varies depending on the manufacturer; therefore, the handbook provides a detailed description of the process.

Furthermore, there shouldn’t be any issues with the skylights’ interior design—it all comes down to personal taste. Furthermore, a lot of manufacturers supplement the set of roof windows with unique cladding options. A miter box, a template, and sealant are typically included in the kit. If needed, it is also quite simple to install and remove these templates.
You can also use regular drywall in this situation, but mechanical installation structures need to be discarded.


