
Installing metal tiles on a gable roof can be a satisfying do-it-yourself project that gives your house a sleek, durable appearance. Because of their durability and strength, metal tiles are a popular option for roofing. If you intend to take on this task, knowing the proper process is essential to producing a polished result.
It’s crucial to determine how much material you’ll need first. This entails calculating the area of your roof and accounting for the metal tile dimensions. Making accurate calculations guarantees that you buy enough tiles without going over budget or needing to make several trips to the store.
The actual installation is the next step after obtaining your materials. This entails getting the roof ready, placing the tiles in the right alignment, and properly fastening them. By following the right process, you can prevent common errors and make sure your roof looks great and functions well for many years to come.
- Pros and cons of the material
- Average cost
- Roofing device
- Cold
- Warm
- How to lay it correctly?
- Preparatory work
- Tools and materials
- Determination of area
- Material calculation
- DIY installation – step-by-step instructions
- Scheme of laying tiles
- FAQ
- Video on the topic
- How I made the roof part 14 (the process of laying a sloping roof)
- Do-it-yourself metal tile installation. THE BEST WAY!
- How to fasten a transverse joint of metal tile sheets
Pros and cons of the material
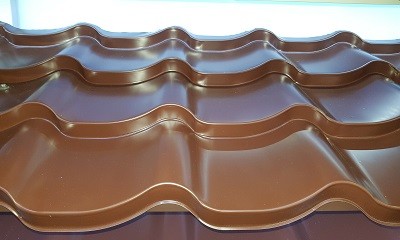
Metal tiles have benefits and drawbacks that should be considered when selecting a roof, just like any other material. However, it’s crucial to comprehend this coverage option before giving them any thought. A metal sheet with a thickness of 0.3–0.6 mm is profiled to create metal tiles, a type of sheet material.

Following molding, the sheets are coated in multiple layers of protective coating to shield the core from the damaging effects of the outside environment. A zinc layer, a passivation layer, a primer, and a decorative layer made of polymers are applied in order to achieve these goals.
The outcome is a coating that is long-lasting and resistant to a variety of external factors, provided that installation guidelines are observed.
Thus, the following are some benefits of metal tiles:
- Presentable appearance – the sheets are molded to imitate natural tiles and replicate them to a sufficient extent, while the wide palette of available colors creates an almost unlimited variability of application.
- Relatively low weight – depending on the thickness of the core and dimensions of the sheet, its weight can be 3-6 kg, which can be considered an excellent indicator, both in comparison with its natural analogue and other options for hard roofing.
- Mechanical strength – the use of molding technology made it possible not only to improve the appearance of the coating, but also to increase the metal rigidity of the sheet, which had a positive effect on the roof’s ability to resist snow and wind loads.
- Durability – the use of several layers of protective coating provides metal tiles with a high level of protection against corrosion and increases the potential service life of the coating.
- Versatility – during its presence on the market, the material has become widespread, and manufacturers have saturated the segment not only with the main types of sheets, but also provided a wide selection of additional elements that allow you to realize any design ideas.
Here, we can also observe that the material is non-flammable, resistant to temperature and humidity fluctuations, and highly installable, making it one of the greatest choices for a private residence.
Metal tiles have a number of drawbacks, including:
- Despite the presence of a polymer coating, the metal sheet retains excellent sound conductivity, and therefore the roofing pie must be equipped with an additional layer of sound protection, especially if the attic space is used as a living space.
- The tiles are supplied in the form of fairly large sheets, so when cutting and fitting the elements, a large number of scraps remain.
- The use of a protective coating and the specific shape of the outer surface require strict adherence to the conditions for installing the coating, especially with regard to the angle of the slopes, so as not to allow excessive snow retention on the surface.
One conditional disadvantage that necessitates greater caution at all work stages is the relatively high likelihood of damage to the coating during transportation and installation.
Average cost
The question of the material’s cost ought to be handled separately. The cost of metal tiles varies in many businesses based on a number of factors, including seasonal, regional, and other considerations.
The offer of one of the Moscow area’s construction hypermarkets serves as the basis for the price comparison.
- Metal tiles ~ from 530 rubles / m2.
- Flexible tiles ~ from 850 rubles / m2.
- Ceramic tiles ~ from 1500 rubles / m2.
The visually closest analogs are taken into account.
This article walks readers through the process of installing metal tiles on a gable roof step-by-step, with an emphasis on do-it-yourselfers’ and homeowners’ practical advice. We go over important details like figuring out how much material is needed, getting the roof ready, and efficiently installing metal tiles. This guide tries to make the roofing process simpler, from comprehending roof measurements to selecting the appropriate tools and techniques. Whether you want to start a roofing project or improve the longevity of your house, this article offers step-by-step instructions that will help you install metal tiles on your gable roof successfully.
Roofing device
We can differentiate between two primary kinds of these roofing pies based on the structural characteristics of a metal roof. They are commonly referred to as insulated roofing and cold roofing.
Although they are not fundamentally different from one another, there are a few aspects that should be taken into account when installing them and planning the initial work.
Cold
The construction of a roofing pie without the need to apply an insulating layer is what is meant to be understood as a cold roof.
This option can only be selected if the attic space will be used exclusively for technical needs. It is also faster to implement. The steps involved in structurally cold roofing are as follows:
- First, the rafter system is installed.
- Rolled waterproofing material is laid on top of the rafters and secured according to technological standards.
- An additional counter-lattice is placed over the waterproofing and along the rafters.
- The main sheathing is mounted on the counter-lattice.
- Sheets of metal tiles are laid on the sheathing.

The use of a counter-lattice is required because variations in humidity and temperature will inevitably cause condensation to form on the inside surface of the roofing material, which needs to evaporate over a technological gap.
Extra sheathing is inserted so that there is a chance for ventilation in the area beneath the roofing sheets.
See our articles on whether installing waterproofing beneath metal tiles is required and about the best material to use here.
Warm
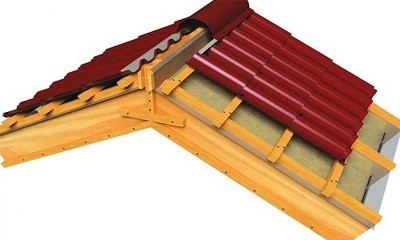
The installation algorithm for the roofing pie in an insulated version will roughly look like this:
- A rolled vapor barrier is stretched from the inside of the rafters, which is necessary to prevent rising warm air from entering the insulation, which can lead to its getting wet.
- To further strengthen the vapor barrier, internal lathing can be filled, which is later used when installing the attic space finishing.
- On the outside, insulation is placed in the space between the rafters.
- Rolled waterproofing is laid on top of the rafters.
- Next, the counter-lattice and sheathing are filled.
- Then follows the stage of installation of roofing material.
It is crucial to remember that the waterproofing and the outer surface of the insulation should be separated by at least 5 cm, and the waterproofing and the metal tiles should be separated by roughly the same amount of space. This increases the overall structure’s thickness, which needs to be considered during the planning stage but is essential for the roofing pie to ventilate normally.
How to lay it correctly?
It is imperative that you fulfill certain mandatory conditions before starting the metal tile installation process. Failure to do so will prevent the coating from being installed with optimal quality.
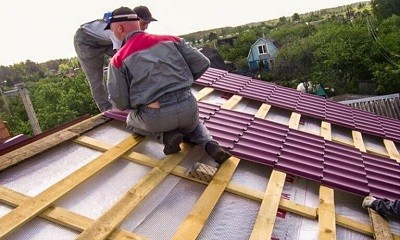
- The rafter system and under-roof layers are once again checked for quality. It is necessary to pay attention to the accuracy of fastening the elements along the vertical and horizontal axes, as well as relative to each other. The joints of sheets of insulating materials must be additionally taped with mounting tape.
- Even at the stage of forming the rafter system, it is important to ensure that the angle of inclination of the slopes is in the range of 14°-45°, while the most “universal” angle can be considered an angle of 22° relative to the plane. Here, the actual climatic conditions of the region are taken into account, namely the amount of snow falling, the duration of winter, the intensity of the winds, as well as the location of the house and other factors.
- At small angles of inclination, the potential snow load on the roof increases, so the rafter system should be strengthened by a more frequent arrangement of the sheathing elements and the rafter legs themselves.
Installation work can be done at any time of year because metal tiles are fairly resistant to temperature changes, but you should pick a day with little wind and no precipitation.
Preparatory work
There are several preparatory steps that should be completed in order to streamline future work before moving on with the actual installation of metal tiles.
Tools and materials
You’ll need the following supplies and equipment for the job:
- Marking – rulers, tape measures, plumb lines, painting threads, building levels, etc.
- Installation – screwdriver, screwdrivers, metal scissors, hammer.
During installation, unique self-tapping screws with a sealing washer are used as fastening components to seal the mounting hole and prevent moisture intrusion.
Determination of area
In the scenario at hand, the covering is to be installed on a basic gable roof made up of two rectangles that are conjugated at an angle to one another.
You must calculate the area of one of them and multiply the result by two to get the area of the roof. The width of one cornice edge from the other and the distance from the ridge to the cornice determine one of the slopes’ heights.
Material calculation
When calculating the necessary quantity of tiles, it is imperative to consider the existence of protruding components such as ventilation pipes and furnaces. Generally speaking, there aren’t many challenging areas on straightforward gable roofs, and they’re all on one of the slopes.
This actually means that the amount of roofing material square meters will roughly match the area of the roof. If any elements need to be adjusted, there should be an additional 15–25% added to this amount. Other potential effects of transportation and installation include unexpected deformation, coating damage, and other issues.
DIY installation – step-by-step instructions
The first steps in the work include material delivery and calculation, creating a sheet fastening diagram, setting up scaffolding, and assembling tools for raising lumber and tiles to the top. Next, in reverse order:
- The main frame elements and rafter legs are being fastened. Manufacturers of metal tiles recommend laying it on systems made of boards with a thickness of 50 mm and a height of 100 or 150 mm (the exact value is selected based on the need for insulation and loads) at a pitch of 60-90 cm, but no more. The rafter system of such roofs is ventilated; to improve air exchange rates, manufacturers advise drilling small holes in the rafters with a diameter of 20-25 mm. For obvious reasons, the last recommendation is carried out after eliminating the risks of weakening the structure (high-quality and well-dried wood is selected for the work, holes are drilled closer to the ridge, but not near knots, edges or chips).
- If necessary, the roof pie is insulated and insulated from moisture.
- The slopes are covered with thin sheathing according to the specified and recommended by the manufacturer scheme and reinforced with a cornice board. At the same stage, the main elements of the cornice are laid and areas are prepared for fastening elements of the system for collecting and draining water, protective contours of passage structures.
- The dimensions and diagonal of the slopes are checked, and a leveling cord is pulled along the cornice.
- The installation of sheets is carried out: starting with attaching the starting sheets according to the scheme to the first lath with an extension of 5 cm beyond the edges. All subsequent sheets are attached to the wave recessions with final fixation after checking the correct position of all elements in the circuit.
- The work is completed by installing the ridge, auxiliary and additional elements, filing the cornice and eliminating defects. All final stages are thought out taking into account minimal movement on already laid tiles.
If you are going to cover the roof with metal tiles, you will need to perform several steps of work on your own.

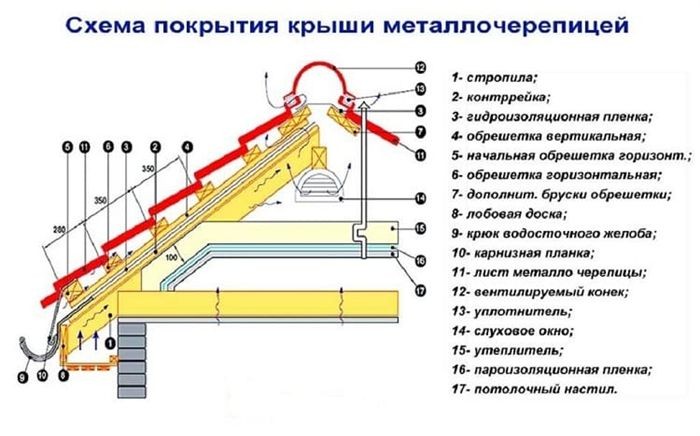
- Arrangement of waterproofing – the rolled material is laid horizontally on the rafters, from bottom to top, with each subsequent strip overlapping the previous one with an overlap of ~25cm. The joints are taped with mounting tape. A staple gun is used to attach the canvas to the rafters.
- Countergrid – it is stuffed over the insulation to the rafters and is needed to form the under-roof space necessary for ventilation.
- Lathing – mounted perpendicular to the counter-lattice and serves as the basis for securing the roofing material. The first sheathing board (50/100mm) is fixed parallel to the cornice, the second board (25-30mm/100mm) is installed at a distance of 300mm from the first element. Subsequent parts of the sheathing are packed at intervals of 350mm. On the side of the roof ridge, two boards are installed back to back for reinforcement.
You can read the hip and pitched metal tile roof construction instructions in a different document.
Scheme of laying tiles
You should think about installing metal tile sheets separately. For a basic gable roof, the length of the sheets should match the slope’s length plus an additional 30 centimeters to create an overhang. The sequence of events in this instance is as follows:
- The first sheet is mounted from right to left, and it must be aligned as much as possible on all sides (cornice, pediment).
- The second sheet is laid overlapping the first and also aligned.
- Subsequent elements are laid according to the same analogy, after which they are fastened together with self-tapping screws.
- The resulting single canvas is finally leveled, after which it is finally pulled to the sheathing.
The initial element laying is done using the first and second from below, third and fourth from above principle if a material that is half the length of the slope is used. In addition to being leveled, the wide covering element that results is fastened to the supporting frame. Such broad layers are used for subsequent laying.
After the job is finished, the ridge and end strips are put in place. Additionally, 4.8×70 mm self-tapping screws are used to secure them. Installing each component is done in a bottom-to-top manner with a 50mm overlap.
Since the skate bar is utilized flat in gable roof applications, plugs and other auxiliary components do not need to be installed separately. The same screws’ carrier attracts and aligns certain parts of the ridge bar.
FAQ
| Question | Answer |
| How many and what screws are needed for installation? | Roofing screws 4.8×28 mm, 4.8×35 mm. Consumption ~ 7 pcs/m2 material. |
| How long to choose sheets? | The best option is length height from the skate to the cornice +300mm for the formation of an overhang. The length of the sheet should not exceed 4.5m. |
| What timber is needed for the counter? | At least 50/50mm, which is necessary for the formation of a ventilation gap. |
| In what order the screws are screwed? | The chess order of fasteners is preferred, while the bottom of the sheet is fixed "in the line". |
| How to understand that a self -tapping screw is enough? | Used roofing screws are equipped with a rubber seal. With normal tightening, the diameter of the seal uniformly exceeds the diameter of the metal washer by 0.5-1mm without sheet deflection. |
| Is metal roofing suitable for maintenance?? | You cannot step on such a roof; snow removal is not provided. |
To achieve a long-lasting and visually beautiful finish, carefully consider your options before installing metal tiles on a gable roof. Precise measurements of the roof’s dimensions, including its slope and surface area to be covered, are taken at the start of the process. In order to prevent shortages and maintain the integrity of the roof, proper calculation of materials such as metal tiles, underlayment, and fasteners is essential.
After the calculations are completed, the roof surface needs to be prepared. This include clearing away any trash, fixing any broken areas, and making sure the base is level and smooth. By adding an extra layer of protection against heat and moisture, installing the proper underlayment can improve thermal efficiency and weather resistance.
It’s crucial to adhere to the installation instructions provided by the manufacturer when installing metal tiles. To stop water from seeping in and to guarantee stability in inclement weather, this usually entails overlapping each tile starting from the bottom edge of the roof and working your way upward. Maintaining structural integrity and longevity can be facilitated by fastening tiles at specified locations with recommended fasteners.
Finally, a comprehensive inspection following installation guarantees that all tiles are firmly in place and that any exposed areas are appropriately sealed. Maintaining the overall integrity of the roof structure and extending the life of the metal roof tiles can be achieved through routine maintenance, which includes debris removal and damage inspection.


