
A finishing floor screed is essential for creating a level and long-lasting floor surface in building and remodeling projects. To create a level and even surface for the final flooring material, this crucial layer is applied over the structural base, which can be made of wood, concrete, or another material. In essence, it serves as a layer of preparation that makes sure the floor is ready for the finish—tiles, laminate, vinyl, or some other kind of flooring—that is desired.
A few crucial steps are involved in producing a finishing floor screed of superior quality. The base substrate must first be carefully prepared, making sure it is dry, clean, and devoid of any impurities that can compromise adhesion. The substrate and screed layer may then be strongly adhered to by applying a bonding agent or primer. This step is essential to the finished floor’s long-term performance and durability.
In order to apply the screed properly, a precise mixture of cement, sand, and water must be combined to produce the required consistency. Using trowels or floats, the mixture is then poured or pumped onto the substrate that has been prepared and evenly spread. Maintaining a uniform thickness across the space is carefully considered in order to prevent uneven surfaces that might compromise the final flooring installation.
For the finishing floor screed to reach its maximum strength and longevity, it must be properly cured after application. Keeping the screed wet and shielded from drying too quickly are typical steps in this process, which can be crucial for avoiding cracks and guaranteeing a smooth finish. Curing times can vary depending on the type of screed used, so it’s important to follow the manufacturer’s instructions.
- What it is?
- Characteristics
- Kinds
- By composition
- By humidity
- In connection with the base
- Construction and layers
- Dry coating
- Wet base
- Laying technology
- Wet and semi-dry
- Stages for dry
- Difficulties and errors
- Average prices
- Video on the topic
- Grouting cement screed, useful tips
- APARTMENT RENOVATION. SCREAD OR WALLS FIRST? #108
- Floor Screed 7 MISTAKES Everyone Makes. Everyone Should Know.
What it is?

Finishing, also known as finishing screed, is the last layer applied before installing certain flooring components.
Installed in rustic homes, it rests on a coarse cement-sand mixture foundation or concrete if a hydraulic level measures a horizontal height differential of 5 to 20 mm every 2 meters.
It is the final layer of concrete applied over the first layer of concrete that was placed on top of the ground with a crushed stone backfill, which explains its name.
A finishing screed is required to remove any uneven subfloor. It is necessary if you want to install linoleum, laminate, or parquet flooring inside the building. Additionally, it has everything needed to paint and varnish the base when needed.
If you intend to install porcelain stoneware or tiles as a floor covering, you can skip it as long as the height difference is less than 5 mm per square meter.
For instance, you can only apply coating waterproofing prior to tiling if the bathroom has an existing rough coating. Installing a finished floor and a vapor barrier will be far more expensive than this. Furthermore, this will free up space in a bathroom that is already compact in a typical panel house, where the ceiling height is rarely higher than 2.45 meters.
After installing waterproofing and laying soundproofing substrate, finish the screed layer. Installing heated floor systems requires it because it shields the cables from mechanical harm.
The updated version of SNiP 2.03.13-88, SP 29.13330.2011 Floors, includes requirements for finishing screed.
Flat floor slabs in apartments make it difficult to install laminate or tiles; therefore, a finished base needs to be laid.
Characteristics

Building codes require a minimum thickness of 20 mm for the finishing floor. You can obtain the strength of the concrete coating with this value without running the risk of it being destroyed.
When heat-insulating and sound-proofing systems are installed in the floor pie, the screed height must meet standards of 40 mm or more, without accounting for the thickness of the layers that came before it. In conjunction with the coarse coating, this may measure 140–180 mm.
A wet screed can be as thick as 45 mm when applied over the edges of a heated floor. This is the minimum height that the concrete covering that is installed over heating systems must be.
The type of cement-sand mixture used and the intended use of the rooms where the floor is installed determine the quality indicators of concrete foundations.
Concrete with a class of at least B12.5 can be used in residential spaces with low traffic, such as bedrooms. In this instance, the screed is 20 mm thick.
Concrete with a minimum class of 22.5 is utilized in living and dining areas. For this specific brand, the minimum coating height is 25 mm.
A cement-sand mixture that can withstand 30 MPa is advised for use in areas like hallways and kitchens where there is a high risk of heavy objects falling. M300 concrete is identified by these characteristics. Since it can tolerate high humidity, it’s also a good choice for installing screeds in bathrooms. Such a structure must have a minimum thickness of 30 mm.
A pie of cement-sand mixture with a compressive strength of at least 20 MPa is installed beneath a polymer self-leveling floor if you intend to use one.
For sound absorption and waterproofing, the concrete grade used must be at least M200–250.
This article describes every feature of concrete pavement.
A finishing floor screed is essential for building a level and smooth surface prior to installing the final flooring in construction and renovation projects. It serves as a foundational layer that evens out flaws and offers stability. Preparing the substrate, blending the screed material to the proper consistency, and spreading it uniformly over the floor are all essential steps in making this screed correctly. A perfect finish is ensured by methods like careful smoothing and leveling tools. This post walks you through each step and provides helpful advice on how to get a beautifully leveled and long-lasting floor for your house or construction project.
Kinds
Finish screeds in the same apartment may differ in terms of their characteristics, uses, and methods of installation. This is dependent upon whether the floor is made of chipboard, polymer, cement mixture, or another type of building material.
Concrete and gypsum fiber sheets (GVL) have different qualitative qualities from one another. They can now be utilized in various rooms thanks to this.
By composition
The screed is: depending on the kind of material

- Cement-sand. The most popular type of coating for residential premises. Quickly made by hand. It contains not only cement and sand, but also fiber fibers – plasticizers that strengthen the mixture.
- Concrete. Here, in addition to cement, there is crushed stone or fine stone. The most popular type of finished floor; a ready-made mixture sold in bags is used for pouring.
- Plaster. Dry version of floor mortar in residential areas with low traffic. This type of coating does not require much labor effort to install, but is more expensive than concrete mixtures.
- Mosaic. This composition is made on the basis of cement and marble chips. Features high performance characteristics.
- Polymer. Synthetic polyurethane and other mixtures are used for the arrangement of self-leveling floors. It is an expensive option, often used for shopping centers, government agencies.
Advantages and disadvantages of the finishing coat based on the material:
- The advantage of a concrete screed is its high resistance to moisture and monolithicity. It can easily level out all differences in height. Cement and mosaic floors have the same advantages. The disadvantage of such a base is a large load on the floor slabs, so it is not used in all rooms.
- Gypsum screed is very light – this is its biggest advantage. It can be laid regardless of the initial state of the base.
- Self-leveling floors made of synthetic components are a modern type of coating that is resistant to high humidity, so they can be used in the kitchen and bathroom.
There are also differences in the floor laying techniques and the kind of connection with the rough base.
By humidity
The screed is typically separated into wet, semi-dry, and dry categories based on the amount of moisture present. Every type of coating has different qualities, so not every room can use them all.
- Liquid. The composition is prepared on the basis of concrete or cement-sand mixture (CPS). Requires careful preparation of the base. The floor is poured using beacons and dried using a special technology. Used in cases where it is necessary to cover large irregularities, make a difference in heights (podiums and slopes for drainage, laying heated floors). Mandatory for use in wet rooms – bathroom, kitchen, sauna, laundry. Pros: strength, withstands high mechanical loads. Cons: takes a long time to dry.

- Semi-dry. It is called so because it contains 2-3 times less moisture than the first one. Used in dry areas where there is no risk of water spills or exposure to aggressive chemicals. Poured onto a relatively flat subfloor. Pros: weighs less than a monolithic base. Cons: cannot be used in wet areas.

- Dry. This is a technology for attaching sheets of plywood, OSB or gypsum to an expanded clay base. Due to this, it can only be used in dry rooms with little traffic, and can also be laid on wooden floors. Pros: expensive coverage option. Cons: low impact resistance.

In connection with the base
The type of topcoat can vary depending on how it is attached to the base:
- Prefabricated.
- Floating.
- On the separating layer.
- Related.
Further information about each:
- Team – the same type of dry floor. Mounted using gypsum fiber or OSB boards and backfill.
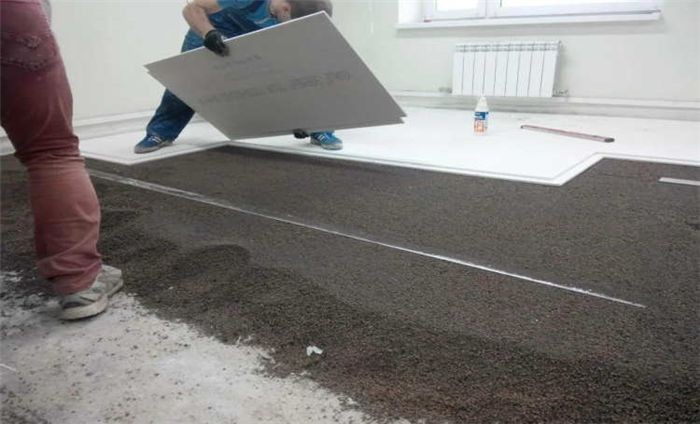
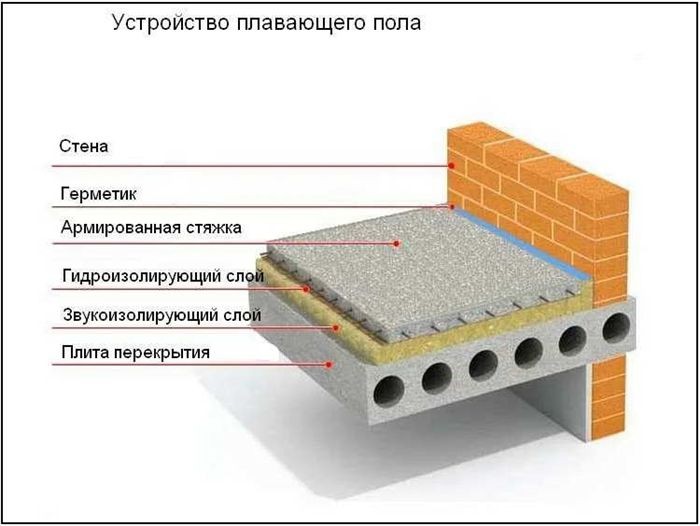
- Floating option. Used if it is necessary to lay layers of insulation together with waterproofing. Separated from the subfloor by damper tape and additional layers. One of the widespread types of such a base is a warm floor laid with a layer of insulation.
- On the separating layer. Used when it is necessary to lay one type of material on top of another. For example, expanded clay is poured over a rough concrete floor and gypsum fiber sheets are laid. But between the monolithic base and the dry backfill, a substrate must be used.

- Related. Connects materials together without a separating layer. Self-leveling floor, cement-sand mixture can be used on top of concrete.

Construction and layers
Dry coating
The kind and quantity of finishing coat layers utilized determine the installation technology.
What’s in the dry flooring pie is:
- From thermal insulation and sound insulation substrate.
- A layer of expanded clay or other filler, poured over the beacons.
- Plywood boards laid with glue.
As a result, a dry floor cake may have multiple layers, contingent upon its intended use. This can be a waterproofing and insulating layer that is applied prior to the dry screed.
This page has all the important information regarding dry floor screed.
Wet base
- Pie with floating structure:
- Thermal insulation bedding. (20-30 mm).
- Reinforcing mesh with cell diameter no more than 4 mm.
- Edge tape (damper).
- Wet DSP thickness from 60 mm to 80 mm.
Make sure to install a backing underneath any laminate you intend to install before fixing it.
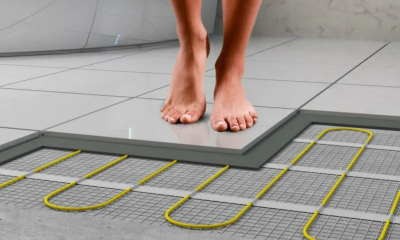
Because waterproofing is necessary, the floor pie is thicker in wet rooms. For instance, in a shower stall that is laid independently of tiles or mosaics, you will need to apply a coating waterproofing or fix an elastic in addition to the previous layers with a floating screed.
The porcelain or ceramic tiles are installed using glue after the final layer is applied.
- Floor slab in the apartment.
- Reinforcing mesh.
- Polymer floor mixture.
Laying technology
Wet and semi-dry
In order to lay a wet or semi-dry surface, the following procedures need to be completed:

- Sealing cracks in floor slabs.
- Dust removal and coating of the base with a deep penetration primer.
- Insulation of joints with damper tape.
- Marking and installation of beacons.
- Irregularities are sealed with the same solution that is planned to be used to fill the screed. Cracks are cut to a width of at least 5 mm and then filled.
- The primer is passed over the floor twice with a treatment interval of 12 hours.
- All grooves and wall joints are taped.
- After all the preparatory work, marking the height differences is done. Mark the highest and lowest points from the base. Accordingly, they plan to install beacons, each at its own level.
- Before laying a heated floor, you will need to lay polyethylene or another vapor barrier layer. The joints should extend onto the walls by 20 mm or more, depending on the thickness of the screed. The overlap of one strip on another can be at least 30 mm.
- Installation of the wet screed is carried out after diluting the DSP to the desired consistency.
Strangenesses! The cement mixture should form a well-formed lump on a semi-dry floor, without spreading.
Additional work:
- For semi-dry screed. Throw the mixture in thickness below the level of the beacons and trample it down. The second layer is thrown over the first layer and leveled using the rule. This structure is covered with polyethylene after sanding.
- To install a wet floor, first use expanded clay mixed with cement, and then immediately use the entire DSP solution, which is poured along the beacons. It is moistened for 3 days or a week, while covering it with film after the procedure.
A video showing the final floor screed being poured:
Here are some more details about setting up a wet screed.
Stages for dry
The stages of work involved in getting ready to lay such a coating are as follows:
- Cleaning the surface of debris and sealing cracks with dry mortar.
- Laying vapor barrier.
- Gluing with edge tape.
- Aligning beacons by level.
On a concrete base, regular thick polyethylene can be used as waterproofing.
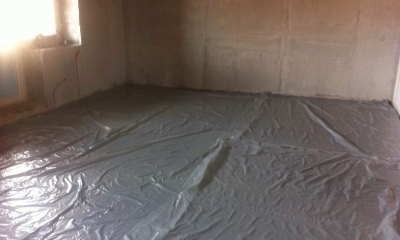
Use corrugated paper if the screed is going to be made on wooden joists. 25 mm is the material overlap.
Tape for laying edges must be used. It reduces noise and accounts for material expansion.
The method used for beacon work is the same as it was in the previous iteration of the wet floor. The screed’s height is subject to variation, which is the only warning. It ranges from 4 to 15 mm here.
- Having carried out the preparatory work, proceed directly to the installation of the dry floor. It begins by filling the base with expanded clay.
- After the highest point of the floor has been marked, work begins. Take expanded clay and level it level, starting from this point. To make the backfill layer more durable, tamp it using a rubber hammer.
- In some cases, instead of expanded clay, extruded polystyrene foam is used. For example, Penoplex boards – as a leveling substrate under sheets of OSB or plasterboard.
- Next, the GVL is installed. The sheets are glued to each other one by one and secured with self-tapping screws.
- All places where the edge tape sticks out are cut off. If there are cracks, it is recommended to coat them with putty.
The dry floor is thus installed.
Dry screed for floors:
Difficulties and errors
Inaccuracies in the work are linked to inadequate subfloor preparation or using the wrong amounts of cement mortar when preparing it yourself.
Crucial! You must wait for the coating waterproofing to dry before adding the DSP.
Expanded clay used in a semi-dry screed needs to be filled with liquid DSP or covered with a layer and pre-mixed with concrete mortar.
Typical Errors:
- Laying thin floors up to 60 mm using reinforcement. Here you can pre-coat the subfloor with a primer.
- Creating forced ventilation in the room. Risks cracking of the solution.
- Pouring a floor without damper tape. Expansion joints must be provided according to the screed pouring technology, otherwise this will lead to cracks and peeling of the DSP.
Average prices
The type, thickness, and quantity of finishing coat applications all affect how much the job will cost.

The cost to install screed:
- Cement-sand (wet version) – 380 rubles/sq.m. m.
- Concrete – 400 rub/sq.m. m.
- Self-leveling mixture – 300 rub/sq. m.
- With expanded clay (semi-dry) – 260 rub/sq. m.
The cost of installing sound insulation or waterproofing is extra and can reach up to 100 rubles per square meter. No matter what kind of screed is used, adding expanded clay can run you between 50 and 70 rubles per square meter.
A dry floor installation will set you back at least 350 rubles per square meter.
Rental of specialized machinery for screed application: concrete mixer with pump for 15,000 rubles per shift.
Using a floor screed to create a smooth finishing surface is essential to giving your house a polished appearance. Before installing the final flooring material, a layer of material called a finishing floor screed is put over a concrete subfloor to level and smooth it out. Your floors will look better and last longer after this procedure, which also increases their aesthetic appeal.
The concrete subfloor must first be meticulously prepared in order to properly create a finishing floor screed. Make sure all debris is cleaned and free of grease and dust. Afterwards, use a primer or bonding agent to help the screed material adhere to the subfloor. This step keeps the screed from delaminating over time and is crucial for a solid bond.
After everything is ready, mix the screed material as directed by the manufacturer. Usually, to get the right consistency, this is mixing cement, sand, and water. Using a trowel or screed board, evenly spread the screed mixture after pouring it onto the subfloor that has been prepared. As you carefully work your way from one end of the room to the other, make sure that the entire surface is the same thickness.
It’s critical to compact and smooth the screed after it’s been spread in order to get rid of any uneven spots or air pockets. To achieve a smooth finish, use a trowel or float, but be careful not to overwork the screed as this could weaken its structure. Before installing the flooring material of your choice, let the screed cure in accordance with the manufacturer’s recommendations.
In conclusion, using a floor screed to create a smooth finishing surface requires careful planning, mixing, application, and curing. These steps will help you create a level, long-lasting foundation that will improve the appearance and longevity of your flooring. A well-executed finishing floor screed is necessary to achieve high-quality, aesthetically pleasing floors, whether you’re building a new home or remodeling an existing one.


