
Pitched roofs require trusses because they give the roof’s shape support and structure. It is a structure, usually composed of metal or wood, that is intended to support the roof coverings and disperse the weight uniformly throughout the structure. Trusses are an essential component of any building project involving pitched roofs since they guarantee the roof’s stability and longevity.
For your roofing project to be successful, truss design is essential. A well-thought-out truss guarantees that the weight is securely transferred to the building’s walls in addition to supporting the roof. This keeps structural problems at bay and increases the roof’s longevity. Considerations like the roof’s span, slope, and load requirements are necessary when designing a truss. You can choose the ideal materials and design for your unique needs by taking these factors into account.
The design process entails drawing up a comprehensive plan that specifies the truss’s measurements and arrangement. You must compute the loads that your roof will experience, taking into account the weight of the roofing materials, snow, and wind. You can choose the right truss member type and size with the help of this information. To make sure your design complies with all building codes and safety standards, it’s usually beneficial to speak with a structural engineer.
Creating a truss for your pitched roof can be a doable task if you take the proper approach. You can build a roof that looks fantastic and endures over time by attending to the little things and making sure your design is strong and effective. Any construction enthusiast can benefit from knowing the fundamentals of truss design, whether they’re building a new home or remodeling an old one.
For pitched roofs, a truss is an essential structural framework consisting of connected triangles that gives the roof stability and support. Proper truss design keeps the roof from sagging and guarantees longevity while allowing it to bear different loads like snow, wind, and the weight of the roofing materials. In truss design, proper material selection, calculation of dimensions and angles, and guaranteeing of connection points are crucial elements. An intelligently designed truss system can significantly increase the longevity and security of a pitched roof with meticulous design and construction.
- What it is?
- Key device requirements
- Design features
- Kinds
- Selection of materials
- Tree
- Profile metal pipes
- Choosing a roof shape
- Types of loads and nuances of calculations
- Example for a roof with a span length of 6 m
- Production
- How to strengthen the frame?
- Installation
- Metal
- Wooden
- Video on the topic
- Wooden garage truss, pitched roof.
- Trusses for a pitched roof 8 meters long.
- FUCKED WITH RAFTER TRUSSES – THREE BIG PROBLEMS and how to solve them
What it is?
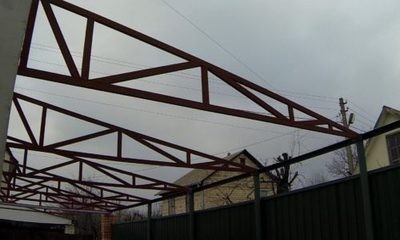
An interconnected component that supports one or more roof slopes is called a truss.
The design’s goal is to equally distribute the load, to which the building’s walls and roof are exposed.
Using metal or lumber, a structure this rigid is created. Furthermore, wood components are more frequently utilized in the low-rise construction of dachas, pet outbuildings, and residential buildings. Sheds, gazebos, garages, greenhouses, and warehouse hangars are all assembled using metal trusses.
Key device requirements
It’s crucial that you become familiar with and factor in the information from the regulatory documentation SNiP 2.01.07-85, SNiP II-23-81, before you start building a truss for a pitched roof. Select the ideal structure’s dimensions and shape.
Need to ascertain with precision:
- optimal slope angle;
- types, degree of load on the roof;
- material, method of connecting structural elements;
- type of roofing material;
- Is a ceiling necessary or not?.
Use one of the choices for online construction calculators if you are having trouble locating source data for a particular area and ensuring the accuracy of the calculations. Both novice and seasoned builders will find this electronic assistant helpful.
Design features

Every roof truss is made up of several interconnected components. Among the principal
- Upper belt.
- Bottom belt.
- Lattices. Placed between the top and bottom belts. Serve as structural reinforcement.
- Racks. They are also stiffening ribs that are fixed at right angles to the upper and lower chords.
- Braces. They also add rigidity to the truss. Mounted to the surface at an angle. One of the types of braces – sprengel.
- Knot. This is the name given to the point where several edges meet.
- Panel – distance between adjacent nodes.
- span. Part of the truss between the supports (posts).
Experience with successful construction demonstrates that a roof’s strength increases with the number of grids on each farm span.
If a wooden truss assembly is done right away on top of the building, it is preferable to construct and assemble a metal truss on the ground in accordance with the developed drawing, and then lift it up with helpers.
Kinds
The following truss types are used in private construction, depending on the structure’s shape and complexity:
- Triangular. The simple shape allows you to assemble the truss quickly, there is no need for complex calculations. Used when constructing roofs at a large angle, canopies. Provide good natural lighting of the under-roof space. The thickness of metal and wood for the arrangement is selected taking into account the weight of the roofing material. When welding metal parts, you will have to work hard to get sharp corners on the supports.
- Polygonal. Made from profile pipes. Application – roof of warehouses, hangars. The spans are large. Welding parts requires serious skills. Plus – economical metal consumption.
- With parallel belts. An excellent option for a durable truss. Convenient to assemble from metal. All elements are repeated. The number of joints is minimal. This design can be welded on your own.
- Trapezoidal with pillar support. It will be the optimal solution when it is necessary to securely fix the building. Has braces on the sides.
The type of roofing directly affects the shape of the truss. The best option for a flat pitched roof covered with ondulin or roofing felt is a rectangular or trapezoidal truss. It is preferable to use a triangle truss made of corrugated sheeting for a steeply sloping roof where metal tiles are to be installed.
When building a farm, there are three options to consider when considering the slope of the roof:
- 6-15 degrees;
- 15-20 degrees;
- 22-35 degrees.

It is preferable to construct a pitched roof using a trapezoidal truss for slopes up to 15 degrees. Furthermore, the truss should be higher the lower the roof’s weight. Greater inclinations call for more intricate rafter system designs.
Selection of materials
The standard states that profile pipes of various sections are made of metal or hardwood. Combination rafter systems are very common. Let’s take a closer look at the qualities, advantages, and disadvantages of each material.
Tree
Common raw materials for building low-rise structures. Softwood and edged boards are the most popular types of wood. This is because it’s inexpensive, simple to process, and adjustable.
You may use two different kinds of wood:
- Glued laminated timber. It is obtained by gluing several boards together in a factory setting. It costs expensive. But even over time it does not crack or shrink. The humidity indicator ranges from 8% to 12%.
- Boards, timber of natural humidity. It"s cheap. But often, as it dries, it begins to deform, shrink or crack.
The advantages of constructing a rafter system from wood include:
- availability of raw materials;
- low price;
- environmental Safety;
- convenience, ease of processing (cutting, drilling, sizing);
- original appearance (will fit perfectly into country style, half-timbered, chalet);
- Possibility of self-assembly.
There are drawbacks to this design as well:
- limited service life;
- the need for periodic care;
- supports the combustion process.

Before being installed, lumber must be impregnated with fire retardants (for fire safety) and antiseptics (for moisture and insect protection) to increase its service life.
Accurate calculations are necessary for the installation of wooden rafter elements, which eliminates the possibility of the wood sagging under the weight of the roof.
In order to accomplish this, it is crucial to consider where cross beams or spacers should be placed. The center purlin from a thick piece of wood should be placed across the running rafters. Wooden components can be joined together by cutting them or by utilizing metal fasteners such as dowels, bolts, anchors, and nails.
Using metal and wood components together can save time and increase the lifespan of a shed roof truss.
Warehouses and other industrial buildings are built with open trusses. The rafter system is closed and covered in ceiling materials in private construction.
Large buildings, where the span length can exceed 16 meters, do not use wood for their trusses. Only metal racks can ensure the structural units’ dependability and strength.
Profile metal pipes
Pipes with square or rectangular profiles are used to make trusses. The building’s size and load determine the metal profile’s diameter and wall thickness.
The following considerations should be made when choosing the dimensions of profile pipes:
- For small buildings, pipes up to 4.5 m long with dimensions of 40 * 20 * 2 mm are enough.
- When you need to assemble a truss with a length of 5 m, the profile dimensions should be 40 * 40 * 2 mm.
- If this is the roof of a large house, office, production workshop, then the dimensions of the profile pipes for the farm should be 40 * 60 * 3 mm.
It is preferable to use square pipes that range in thickness from 3 to 5 mm when creating trusses by hand. Dealing with them will be less difficult.
The primary benefits of a metal roof structure are:
- It has a high load-bearing capacity, due to which it does not deform under heavy loads.
- Possibility of using any type of roofing material.
- Unlike wood, metal does not burn and does not rot.
- Creation of complex frames without the risk of loss of strength.
- Long service life.
- Does not require periodic maintenance.
- Ready-made metal trusses are lightweight.
- Affordable price of metal profile.
- Production of frames of non-standard shapes.
- Economical material consumption.
The right selection of metal profile thickness determines the overall frame’s rigidity and stability. In this instance, trying to save money is not warranted.
Choosing a roof shape

Other roof designs, besides the lean-to style, are also in demand in private construction:
- domed;
- hipped;
- arched;
- gable.
Because of its straightforward design, a pitched roof is easy to construct on your own. If metal is selected as the material, the frame will have the following components:
- upper chord;
- lower chord;
- posts;
- diagonals;
- trusses (braces);
- fasteners (rivets, gussets, welds).
Pitch roofs with a Polonso-style truss are becoming more and more common for summer kitchens, garages, and tiny summer cottages. This frame is triangular in shape, with the lower chord broken and raised.
Types of loads and nuances of calculations
You must consider the effects of various loads on a pitched roof truss in order to precisely calculate its parameters:
- Permanent. This includes the weight of the roofing structure itself, the chimney, television antennas.
- Temporary. Exposure to snow, wind and other external influences.
- Special. Considered in exceptional cases. For example, when the building is located in a seismic area, near a volcano.
The following elements must be considered in order to calculate the wind load:
- building height;
- the prevailing wind direction in a certain region;
- densely built-up area or open area.

You must know the weight of snow per square meter of roof in order to compute the snow load. Each particular region’s unique table is where the data is taken from. These figures are multiplied by a correction factor (which varies based on the slope’s angle of inclination).
The most common type of roof truss used when building a pitched roof for a private home is a triangle one, with angled rafters.
Use the following formula to determine a triangular truss’s height:
1/5*L, where L is the span length of a single frame.
An angle of 35 to 50 degrees is used to erect the triangle truss. For an indicator, 45 degrees is ideal. One can calculate the height of a rectangular truss by multiplying 1/6*L.
An additional crucial factor to consider when calculating large metal trusses with a span length of 30 meters or more is the construction lift.
Characteristics of figuring out wooden structure parameters:
- When flying up to 4.5 m solid rafters are used with a recommended cross-section of 50×150 mm at a pitch of 0.6 m, 75×175 mm at a pitch of 1.1 m.
- When flying up to 6 m. With a large slope, you need to join the rafters along the length and use struts. Recommended cross-section 50×200 mm at a step of 0.6 m, 100×200 mm at a step of 1.1 m.
- When flying more than 6 m. Here all the rafters will be composite; intermediate racks will be needed to redistribute part of the load and reduce the sagging of the beam. The cross-section will be the same as for a span length of up to 6 m.
Use the following information to ascertain the metal structure’s dimensions:
- with a width of up to 4.5 m — product size 40*20*2 mm;
- with a width of 4.5 – 5.5 m – product size 40*40*2 mm;
- with a width of more than 5.5 m — product size 40*40*3 mm or 60*30*2 mm.

The maximum distance between two supports is 1.7 meters, so keep that in mind when you calculate the step. The strength and dependability of the structure will be called into question if this parameter is broken.
To make computations easier Utilizing an online construction calculator is preferable since it already has tabular data for every region.
Entering the building’s original dimensions—including its width, length, and diameter—as well as the farm’s pipe thickness are the only things left to do.
Example for a roof with a span length of 6 m
We will examine the features of figuring out a metal truss for a 4 by 6 m canopy, for instance.
- Material – square metal profile 3*3 cm with wall thickness 1.2 mm.
- In the device diagram, the length of the lower run will be 3.1 m, the upper – 3.9 m.
- On the side of the narrow perpendicular part of the frame, vertical supports 0.6 m high are placed.
It’s essential to weld oblique jumpers with a triangle to reinforce the frame. A thinner profile is appropriate to use. A 6 m span will require 5 lintels. Set them apart by the same amount. Spacers can be used to strengthen jumpers by positioning them at a right angle. A spacer’s profile of 20 by 20 mm is sufficient, and there should be a 0.5 m gap between them.
Production
Regarding metal trusses, past construction experience indicates that supplying a previously created drawing makes it much simpler and faster to order a set of required roof frame components from the factory.
Not every owner of a private home is capable of performing the experience and preparation necessary to make parts for the frame themselves.
In order to guard against rot and insect damage, wooden structures are pre-treated with specific compounds during manufacturing.
A construction company can provide turnkey roof installation if you have absolutely no time to design and install the frame.
How to strengthen the frame?
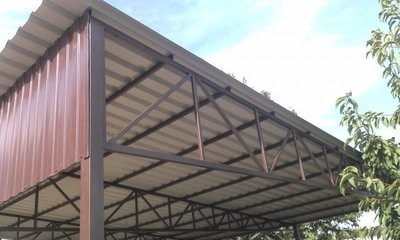
Auxiliary ties from boards are fastened to wooden trusses and positioned in the same plane as the central support. This will fortify the frame’s upper and lower belts.
Make sure the load is applied to the nodes when creating a metal frame project.
The braces and upper and lower chords will only compress or stretch in this situation. This will enable you to economize by taking portions of a smaller cross-section.
When a truss is assembled on hinges, it is very practical—as long as the load applied to it is evenly distributed.
Installation
The sequence in which the various materials of the frame are assembled and fastened varies. Let’s examine each of them in isolation.
Metal
- Farm preparation. It is better to assemble and weld elements together on the ground.
- Fastening of vertical frame posts. Vertical installation is checked with a plumb line.
- Pipes are welded to the racks in a horizontal position. All welds are cleaned.
- The farm goes up. You won’t be able to do this alone, so you’ll have to hire help.
After degreasing and applying an anti-corrosion compound, the completed frame is painted the desired color.
It is preferable to provide specific support bridges that will be wider than the frame for ease of assembly on the ground. The structural elements will be easier to weld onto them.
Wooden

The following is the sequence in which the installation process is completed:
- Impregnate wooden elements with a protective agent – antiseptic.
- The Mauerlat is fastened. Its thickness is equal to the thickness of the supporting walls. The Mauerlat is waterproofed and fixed horizontally.
- Marks are made on the Mauerlat where the rafters will be mounted. Openings are cut out for them.
- If the spans are long, then the rafters will need to be spliced along the length, reinforcing them with metal corners or plates.
- The trusses are secured so that there is a protrusion of at least 30 cm beyond the Mauerlat. Fixation is carried out with bolts and metal brackets.
- Props are being placed. They are needed when the length of the rafters is over 4.5 m.
- The sheathing strips are stuffed.
- A ceiling is mounted inside the frame. Insulation of the under-roof space, if provided for by the project.
| Aspect | Explanation |
| Definition | A truss is a structural framework designed to support a pitched roof. |
| Components | A truss consists of beams, braces, and connectors. |
| Importance | Trusses distribute the weight of the roof evenly, providing stability. |
| Materials | Common materials include wood, steel, and aluminum. |
| Design Tips | Ensure proper load calculations and use quality materials. |
| Installation | Follow manufacturer guidelines and local building codes. |
| Maintenance | Regularly inspect for damage and repair as needed. |
Anyone working on building or remodeling projects needs to understand and design trusses for pitched roofs. Trusses give your roof the essential support and shape it needs to withstand different loads and weather conditions. They support the structural integrity of your building and distribute weight evenly throughout the roof.
It’s crucial to take into account elements like the pitch of the roof, the materials chosen, and the general style of your house when designing a truss. The strength and functionality of the truss are determined in part by each of these components. In addition to increasing the longevity of your roof, well-designed trusses also improve the visual appeal of your house.
Using the proper design principles and techniques guarantees that the performance of your roof trusses will be at its best. This include deciding on the right kind of truss, measuring and cutting materials precisely, and making sure the assembly is done correctly. Using reputable design software or seeking professional advice can make a big difference in the quality of a truss system’s design.
Your pitched roof will be strong and aesthetically beautiful if you pay attention to these details and adhere to best practices. Gaining an understanding of truss design is essential for any builder, novice or experienced, hoping to complete a construction or remodeling project successfully.


