
Homeowners and builders frequently have to decide between a traditional screed and a self-leveling floor when planning a new floor. Both approaches seek to produce a smooth, level surface, but they vary greatly in terms of the materials, techniques, and outcomes. Having a clear understanding of these variations will enable you to choose wisely for your flooring project.
The modern solution is to pour a special mixture onto the floor, and the floor spreads out and levels itself with little help. This is known as a self-leveling floor. When preparing a surface for the final flooring material, this kind of floor works perfectly. It is especially well-liked in homes and businesses where speed and accuracy are crucial.
Conversely, a screed is a more conventional technique that requires manual application and leveling of a sand, cement, and water mixture. In building projects, screeds are frequently used to create a solid foundation for different kinds of floor coverings. They are a mainstay in the construction sector because of their reputation for toughness and adaptability.
The optimal choice will depend on a number of variables, including the project’s budget, schedule, and floor covering specifications. You can select the self-leveling floor or screed that best suits your needs by contrasting their features and advantages.
| Aspect | Self-Leveling Floor | Screed |
| Definition | A thin layer of flooring that levels itself when poured, providing a smooth finish. | A thicker layer of material applied to create a flat surface before installing flooring. |
| Application | Used for finishing touches and minor leveling. | Used for major leveling and preparing the subfloor. |
| Drying Time | Usually dries within 24 hours. | Can take several days to dry completely. |
| Thickness | Typically 1-5 mm thick. | Typically 25-80 mm thick. |
| Ease of Installation | Easier to apply; flows and levels itself. | Requires skill to apply evenly. |
| Durability | Good for light to moderate traffic. | More durable, suitable for heavy traffic areas. |
| Cost | Generally more expensive per square meter. | Usually more cost-effective for larger areas. |
| Best Use | Ideal for residential areas and final surface preparation. | Ideal for industrial and commercial spaces needing strong foundations. |
- What is a screed
- "Wet" screed
- Advantages of a “wet” screed
- Disadvantages of “wet” screed
- Semi-dry screed
- The advantages of a half -dry screed
- Disadvantages of semi-dry screed
- Dry screed
- Advantages of dry screed
- Weaknesses of dry screed
- What is self-leveling floor
- Pros and cons of self-leveling floors
- Performance Comparison
- Which is cheaper?
- Cost of 1 m 2 screeds
- Durability
- Complexity of technology
- The thickness of the leveling layer
- Surface quality
- Strength
- Strengthening time
- Shrinkage value
- What and in which case to choose
- What"s the point of combining?
- Video on the topic
- How and how to level the floor, floor screed, floor leveler, self-leveling floor, what to choose? What"s better?
- Self-leveling floor or finishing floor leveler. What is better to choose, what is the difference, what is the difference?
- Screed or self-leveling floor? Secrets of materials and advice from a professional
- DO NOT BUY Self-leveling Floor Until You See THIS!!!
What is a screed
A layer of expanded clay or cement-sand mortar called floor screed is applied to the ceiling or subfloor to provide a sturdy, level foundation for the final floor covering, which can be carpet, laminate, linoleum, parquet, or tiles. Could be:
"Wet" screed
One of the traditional methods for leveling the subfloor beneath the floor covering is wet screed. There are only three things you need to fill it: one part cement, three parts sifted sand, and two parts or so water. More recently, they have started to purchase plasticizers (liquid soap that makes the solution more fluid) and fiberglass, which keeps the surface from cracking.
It is impossible to account for every factor when preparing the solution, including the grade of cement (which decreases with each month of storage), the composition of the sand fraction, and the required strength of the concrete in the screed. All you need is a container and a shovel. As a result, you almost always prepare the dry portion of the solution by eye.
The process is made easier by the trade’s ready-made mixture, which only needs to be mixed with water to the right consistency. The final mixture offers a few more benefits. After adding plasticizers and modifiers, the following happens:
- the mobility of the solution improves;
- the time before the diluted mixture begins to set;
- the moisture resistance of the screed increases;
- the strength of concrete increases and its resistance to deformation during expansion under the influence of temperature changes.
The strength of the concrete that has been laid is greatly increased by using plastic mesh or metal reinforcement to reinforce the screed.
For information, it was enhanced with the addition of clay and lime in the middle of the previous century.
Advantages of a “wet” screed
There are benefits to "wet" screed laying technology:
- the base is strong and solid – can withstand high static (compression) and dynamic (impact) loads. In addition, it resists vibration well;
- there are no restrictions on pouring in rooms with high humidity – concrete absorbs water, but does not lose its properties;
- you can greatly raise the base of the floor – by 30-100 mm (the technology allows for 20-30 cm, but it is impractical – it is expensive);
- simple technology – allows you to reduce repair costs when performing all the work yourself;
- cheap components of the solution reduce the financial burden on the family budget;
- it is possible to vary the grade of concrete by changing the proportions of cement and sand;
- durability of the final product (screed) – service life is measured in several tens of years.
Disadvantages of “wet” screed
The "wet" method of laying screed has benefits, but it also has drawbacks:
- long period of strength development – 70% is achieved in a week, 100% in 28 days, which hinders further work;
- significant specific weight – 1800-2200 kg/m 3 (1 m 2 screed with a poured layer thickness of 3 cm will weigh about 54 kg);
- risk of downward leakage of unbound water;
- shrinkage and cracking of the surface upon drying;
- the need to regularly moisten the poured screed in the first days of gaining strength;
- dirt accompanying “wet” technology;
- it is not possible to obtain a smooth surface immediately after pouring – a large difference in heights, about 5 mm, requires finishing leveling.
Semi-dry screed
The primary characteristic that sets apart semi-dry screed is the cement-sand mixture, which has the same composition as the wet method but is mixed with three times less water. The cement mortar will hydrate with this minimal amount. After compaction, the screed layer must be at least 4 cm thick.
Making a semi-dry solution is extremely physically challenging. You therefore require a concrete mixer. Furthermore, the requirement to add fiber to the solution—which is impossible to manually distribute evenly throughout the dry composition—argues in favor of the mechanical stirring method.
Compaction and simultaneous grinding complete the half-dry screed laying process. A grout machine performs the operation.
The advantages of a half -dry screed
There are several benefits to using semi-dry screed technology.
- after grasping the surface is smooth, not requiring additional alignment operations;
- quick grasp – in special shoes (concrete machines) on the surface you can walk immediately after laying;
- relatively high (slightly lower than the “wet” screed) strength characteristics: strength and hardness;
- no shrinkage;
- In the screed, you can hide communications: pipes, cable;
- The leak of water is excluded – there is no superfluous;
- the ability to lay on the ground and a black wooden flooring;
- a relatively clean process – there is no dirt;
- It takes a minimum of time to continue work: tiles and porcelain tiles can be laid after 72 hours, linoleum and carpet are covered after 7-8 days. But laminate and parquet can be laid in a month, just like with a “wet” screed;
- high speed of work completion.
Disadvantages of semi-dry screed
Although significant, the technology used to construct this kind of screed has drawbacks. Minuses:
- It is difficult to do the installation on your own (with proper preparation it is possible – full information about the technology of installation with your own feet is here);
- the height of the room is eaten away due to a thicker screed: at least 4 cm, under a “warm floor” at least 5 cm;
- high demands on sand – only quarry, sifted, and this is expensive.
Note: You can find more specific information about the advantages and disadvantages of semi-dry screed here.
Dry screed
Alternatively, dry technology can be used to level the floor’s base without the need for cement. Here, expanded clay, vermiculite, or perlite are the main materials used. The method is straightforward: after the subfloor is ready, a layer of expanded clay that is at least 4 cm thick is poured; the backfill is then covered with sheet material (OSB, plywood, chipboard, or gypsum fiber board), which is then covered with the final floor covering. The work "Dry floor screed with expanded clay" is for those who would like to learn more about the dry screed technology.
Advantages of dry screed
Dry screed experts are drawn to a number of benefits in addition to speedy installation:
- ability to work at any temperature;
- no need to use small mechanization;
- simple backfill technology;
- minimal load on supporting structures;
- there is no risk of leaks and dirt due to waterless technology;
- repair work can be continued immediately – there is no need to wait for the concrete to gain strength;
- the screed acquires thermal insulation properties, although with a layer thickness of over 5 cm (some experts believe that after 6 cm);
- there is no need for sound insulation – expanded clay granules perfectly absorb sound waves.
Important: seeming ease of living can be deceitful. Mold and screed subsidence can result from poor selection of the expanded clay fraction, inadequate compaction, and badly executed waterproofing work. That means that everything will need to be redone.
Weaknesses of dry screed
The technology has drawbacks as well. Experts weigh in on the following drawbacks:
- Restrictions on use – expanded clay cannot be poured into damp rooms: bathroom, shower, basement, cellar due to the increased hygroscopicity of the material;
- Increased requirements for waterproofing work;
- A large thickness of the floor pie – 4-5 cm of the bulk layer are added to waterproofing, flooring and flooring. This greatly steals the height of the room, which is critical for an apartment in a "Khrushchev";
- Low resistance to vibration and impact loads;
- Significant costs for materials despite their apparent cheapness (the problem is that you need a lot of them, unlike cement);
- Unsuitability for carpet and linoleum, especially in places with heavy traffic.
The only way to level the subfloor is with dry screed, despite its drawbacks in some cases.
The primary distinction between a screed and a self-leveling floor in construction is the way they are applied and finished. Self-leveling floors are a fast and effective way to get a smooth, level surface. They are great for hiding flaws and getting a floor ready for a final finish like laminate or tiles. Conversely, screeds are thicker and offer a stable foundation layer for floors that are appropriate for uneven terrain and larger loads. The particulars of your project, such as the intended finish, load-bearing requirements, and time constraints, will determine which option is best.
What is self-leveling floor
A self-leveling mixture-filled screed is referred to as a self-leveling floor. The 3.5 mm minimum thickness requirement is what makes it unique. Two varieties of self-leveling flooring are actually in use:
- finishing coating, which in the classical sense is a self-leveling floor;
- quick-hardening screed on a cement or gypsum base with the addition of polymer materials for flooring made of laminate, parquet boards, parquet, linoleum, carpet, tiles, etc.d. In this way, you can eliminate minor errors in the base of the floor and obtain a smooth surface. The method is based on the ability of the mixture to spread over the surface in the same way as water does.
The finishing coating techniques for floor leveling are compared in this article. As a result, we will only discuss screed, the second kind of self-leveling floor, going forward.
Pros and cons of self-leveling floors
There are several benefits to using self-leveling mixtures instead of alternative techniques for leveling the subfloor.

- durability – if the technology is followed, the poured layer will last for decades. Therefore, for floors with a long service life, for example, porcelain stoneware, experts recommend using a self-leveling floor instead of a screed;
- resistance to changes in temperature and humidity – practically does not change linear dimensions when heated;
- small fill thickness. For polymer mixtures 3.5 mm, for self-leveling mixtures based on cement or gypsum – 15 mm;
- perfectly flat surface;
- strength – stronger than concrete. By the way, there is also a big disadvantage of self-leveling flooring – it is difficult to remove. Construction workers say: “at least gnaw with your teeth”;
- lower specific gravity, and, consequently, less load on supporting structures;
- tightness – fits closely to the walls, preventing insects from entering the house from the basement;
- simple pouring technology – the liquid solution poured onto the base of the floor will spread throughout the room itself. You just need to help him in the corners and near the walls;
- rapid development of strength – there is no need to wait for weeks to continue work;
- suitable for “warm floors” and all types of floor coverings.
Unfortunately, there are drawbacks to this technology as well.
- more thorough preparation of the leveled surface is required, and it is expensive; hiring a construction team will cost more than one thousand rubles;
- extremely difficult dismantling – this is an important difference between a screed and a self-leveling floor: concrete breaks quickly, albeit with noise and dust, and you will have to sweat over the self-leveling floor;
- high cost of the mixture. Making a screed with a thickness of more than 2 cm from it is extremely expensive – the cost increases almost 10 times;
- For work you need special shoes – paint shoes, and a special needle roller.
Understanding the advantages and disadvantages of the primary subfloor leveling technologies provides a broad understanding of the differences between a screed and a self-leveling floor. This, however, is insufficient information to make a well-informed decision in support of a specific technology. Thus, let us proceed with a comparison of the performance characteristics.
Performance Comparison
The following criteria will be used to compare the performance characteristics of self-leveling floors and screed floors:
- price of materials;
- cost of 1 m 2 screeds;
- durability;
- complexity of technology;
- thickness of the leveling layer;
- surface quality;
- strength;
- time to gain strength;
- shrinkage amount.
Which is cheaper?
The cost is a deciding factor when doing repairs. Let’s make a comparison. For screed, utilize:
- sand concrete mixture. The average cost of 1 kg is about 3.5 rubles.;
- cement screed with modifiers (marketed as a base mixture for floor leveling) – price starts from 4.8 rubles./kg.
Cement or gypsum-based self-leveling floors cost 10.8 rubles per kilogram ("Axton"). Two-component polymer compositions cost between 310 and 520 rubles per kilogram.
In conclusion, screed material costs are significantly lower.
"Materials have different consumption per 1 m2," the skeptics might protest. Consequently, the cost of floor leveling work is unknown.
Cost of 1 m 2 screeds
The total cost of screeding is a significant factor as well. We’ll utilize a particular case study from practice for the computation. First information:
- room area – 24 m2;
- maximum height difference – 3.4 cm;
- average difference – 1.8 cm;
- sand concrete consumption – 2.0 kg/m 2 per layer 1 mm thick;
- base mixture consumption – 1.8 kg/m2 per layer 1 mm thick;
- consumption of cement-based self-leveling floor – 1.6 kg/m2 per layer 1 mm thick.
We tally the screed.
The screed layer has an average thickness of 4.6 cm. Of these, 1.6 cm must be poured within the height differential (3.4 cm – 1.8 cm), with 3 cm being the minimum layer size above the highest point of the floor base. After that, the screed will cost:
- from sand concrete – 7728 rubles (24 m x 2.0 kg/m 2 x 46 mm x 3.5 rubles.);
- basic mixture – 9538 rub. (24 m x 1.8 kg/m 2 x 46 mm x 4.8 RUR).
We calculate the price of flooring that levels itself.
The screed’s minimum thickness above the highest point is 1.5 cm, and it is 1.6 cm inside the drop. The average layer thickness is 3.1 cm. In total, 1285 63 rubles. Approximations are made based solely on material considerations.
Conclusion: The computations’ findings don’t require explanation; the DSP will be less expensive.
Durability
Although self-leveling floors are thought to have a longer service life, there is currently no empirical evidence to support this theory. The mixtures were introduced relatively recently, and their manufacturers’ stated operating timeframes were not met. The latter were ascertained by deliberately aging the screed in a lab.
In conclusion, self-leveling mixture screeds should have a longer service life in theory. However, the editors of the website wouldn’t rush to offer them a benefit.
Complexity of technology
Pouring cement screed involves far more sophisticated technology. Work on waterproofing must be completed first, followed by insulation (which can be stoves made of "Penoplex"). Next, determine the horizon’s level, position the beacons, get the solution ready, apply the screed, and level the surface. To prevent cracking, cover with a film and water and leave for a few days. Eliminate beacons and all traces of them.
Self-leveling mixtures make the process simpler. I just mixed the mixture, poured it onto the floor, used a needle roller, and straightened the corners and areas close to the walls. The only drawback is that large areas require assistants because one cannot complete the task alone due to the mixture’s quick grasp.
In conclusion, bulk floor technology is simpler.
The thickness of the leveling layer
Various technologies have varying minimum thickness requirements when obtaining a screed.
- "Wet" method – 3 cm;
- half -dry – 4 cm;
- dry-4-5 cm;
- from polymer self -leveling mixtures – 3.5 mm;
- self-leveling mixtures based on cement or gypsum – 1.5 cm (15 mm).
The thinnest screed for a self-leveling floor, in conclusion.
Surface quality
Even with careful leveling, variations in height in strengthened concrete can reach 7 mm. As a result, the screed’s surface is nearly always sanded (self-leveling floors can level it, but they are more expensive). The surface of the solidified self-leveling mixture is mirror-like and smooth.
In conclusion, you must decide whether to use a self-leveling floor and level the surface with the mixture, or to grind the concrete screed.
Strength
Self-leveling floors have a higher durability. A basic example that you can use to confirm this is to beat off a piece of concrete and self-leveling floor with a hammer drill. The first task should be easy for you to complete, but the second one will require some tweaking.
In conclusion, there is less scroed strength.
Strengthening time
After 28 days, you can resume working on a cement screed. The manner in which the self-leveling floor solidifies entirely varies based on the mixture’s composition:
- on a gypsum basis – 12 days;
- cement — 7-14 days (depending on additives);
- polymer — 4-6 days;
- polyurethane — 3 days.
In conclusion, a self-leveling floor can help expedite the repair process if needed, as it has a full strength gain rate that is two to nine times higher.
Shrinkage value
Cement mortars shrink by roughly 2 mm during the hydration process in a screed that is 3 cm thick. Fiber can be used to solve the issue. However, adding fiber to the dry mix presents some challenges since it has a tendency to ball up. Floors that level themselves don’t shrink. First, due to the mixture’s composition (which prevents shrinkage), and second, due to the screed’s thin layer.
In conclusion, shrinkage is a unique issue with cement-sand mortar.
Through the analysis, we are able to distinguish between a screed and a self-leveling floor with greater clarity and make more informed decisions.
What and in which case to choose
Through performance characteristic comparison, we are able to make multiple recommendations.
- A screed made from self-leveling mixtures is effective in leveling differences in height at the base of the floor up to 2 mm. In other cases, other technologies are needed.
- For tiles and porcelain stoneware, a “wet” screed is optimal. Semi-dry and dry are used depending on the situation, but self-leveling flooring is completely excluded – a mirror surface is not the best material with which the glue has good adhesion.
- Dry screed is not suitable for linoleum, carpet and PVC tiles. It is also undesirable to use this technology on an open balcony, in a bathroom, shower and, with some reservation, in the kitchen.
- Self-leveling floor solves the problem of wear of the balcony slab – it creates small loads when pouring.
- A dry screed will help raise the floor by 10-50 cm. Other methods will either ruin or collapse the ceiling.
- The ideal solution for thin and flexible flooring (carpet, linoleum, PVC tiles) is a self-leveling floor with a mirror surface.
- In a panel house, the self-leveling floor can be poured onto a ready-made screed.
- If the angle of inclination of the floor base is large, a combined method must be used.
What"s the point of combining?
To avoid grinding the concrete, many experts and do-it-yourselfers simplify the process of applying self-leveling mixtures on top of screed to create a layer on top of the concrete. This subfloor finishing technique has a life of its own. However, there are two more intriguing ways to combine things.
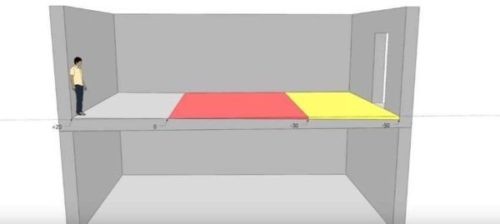
1. By using a unique combination and a large base slope, you can save a significant amount of money (up to 20%) without sacrificing the room’s height. In order to accomplish this, areas requiring more than 3 cm of leveling are filled in the DSP. Simultaneously, boundaries are established from the slats to prevent the solution from spreading and to ensure that it is at least 3 cm thick everywhere.
Once the level of the self-leveling mixture matches that of the cement screed, it is poured over the remaining base. The figure, which depicts the poured floor in red and the cement leveling in yellow, effectively captures the essence of the process.

It should be noted that applying traditional leveling technology would result in an additional 3 cm of screed thickness, raising both the load on the floor and the associated costs.
In cases where there is a notable deviation in the floor slabs, which is a common issue in older homes, they take different action and purposefully reduce the zero mark. The method’s main idea is to leave a portion of the floor completely screed-free. In order to accomplish this, DSP is poured into the recess, but only if there is a minimum of 3 cm of thickness throughout. The floor self-levels the remaining area.
Tile adhesive or a laminate backing will be used to conceal the exposed ceiling. Saving money is not the goal of the approach. This facilitates the removal of building flaws.
A self-leveling floor or a traditional screed, depending on your project’s requirements, can be chosen. Self-leveling floors are the best choice if you want to quickly and easily create a perfectly smooth surface. They come in especially handy when installing carpet, tiles, or other floor coverings and you want a perfect finish.
Traditional screeds, on the other hand, are more robust and flexible, making them appropriate for a larger variety of applications. For heavy-duty floors in commercial or industrial settings, screeds work better at building thicker, more durable layers.
Every option has advantages and disadvantages of its own. Although self-leveling floors are simple to install and have a smooth finish, they might not be as sturdy when carrying large objects. Conventional screeds are more resilient and adaptable, but they take longer and more skill to use.
The optimal option ultimately depends on your unique needs. Take into account the floor’s intended use, the amount of traffic it will experience, and the desired finish. You can choose a flooring solution that best suits your needs by being aware of the distinctions between these two approaches.


