
Is there a draft coming through the plastic windows in your home? This can be very annoying, particularly in the winter. In addition to making your house uncomfortable, a blowing window can increase your energy costs because it forces your heating system to work harder to keep your house warm.
You can take a few steps to determine and address the issue before thinking about replacing the window entirely. Many times, making a few small fixes or adjustments will solve the problem.
We’ll walk you through the typical reasons why plastic windows draft and offer workable fixes to keep the cold air out of your house. You will discover how to take care of any issue—be it a broken seal, an asymmetric window frame, or a hardware issue—well.
- Common causes of blowing
- Violation of installation technology
- Building shrinkage
- Violation of operating rules
- Physical wear and tear of window elements
- Poor quality frame, fittings and seals
- How to check a window for ventilation
- When is the best time to insulate a window?
- When to contact a specialized company
- Solving the problem depending on the place of blowing
- Eliminating airflow between the sash and frame
- Restoring the sash geometry
- The sash is sagging
- Village door
- Replacing the seal
- Preparatory work
- Laying the seal
- Adjusting the strike plate
- Elimination of uneven pressure
- Elimination of draft when the geometry of the window block is violated
- Window sill insulation
- Insulation of slopes from the inside
- Insulation of slopes from the outside
- Video on the topic
- What to do if there is blowing from the window, we repair the plastic window ourselves, eliminate the blowing
- Plastic windows blow, purge, adjustment effect 100!!!
- Blowing from the junction! What to do if it blows from plastic windows
- Blows from plastic windows? What is the reason? How to eliminate blowering from a window?
- The reasons for blowing the plastic windows how to determine from where it blows out the windows
Common causes of blowing
There are various reasons why windows can blow:
- mistakes made during installation work;
- building shrinkage;
- violation of the rules for operating windows;
- physical wear of fittings and seals;
- low quality of window components.
Let’s examine the shortcomings of contemporary glazing in more detail.
Violation of installation technology
Installers of plastic windows in residential buildings today hardly ever deviate from GOST requirements because they respect their reputation. It is true that you may lose clients when there is intense competition (new construction is an exception, as you can read about here).
Fifteen to twenty years ago, everything was different (and that’s usually when issues with drafts from windows opened now occur). A few businesses were compelled to employ people off the street in the truest sense due to the public’s enthusiasm for replacing the wooden window blocks made in the Soviet Union.
No need to study; a general understanding of windows and their installation is sufficient for the job applicant. The lengthy line of people wishing to replace the glazing made the issue worse. Workers thus tried to wrap up at one location as soon as possible and move on to another. Winter heat loss is the outcome.
There are numerous locations where technology is violated:
- the workers forgot or did not want to put the strip on the street side on the assembly seam. The foam crumbled under the influence of ultraviolet light, opening loopholes for cold air;
- Foaming of the installation seam was carried out in one step, as a result of which gaps remained;
- We regretted the foam – the seam turned out to be uneven, with a thin layer in some places. Over time, it began to blow through them;
- The distance between the wall and the window block is less than the permissible-when the wall is expanded under the influence of high temperatures, the thermal insulation layer was slowly destroyed due to the lack of compensation depth;
- the walls were not wetted before applying the foam – dust remained. As a result, the polyurethane foam came off the wall material in some places, allowing the cold to enter the room;
- the slopes were not insulated or glass wool was used as insulation. Over time, it sank, leaving the top uninsulated;
- the polyurethane foam should form a closed loop around the frame. Little follow up on this. Result: it blows from under the sill of a plastic window;
- the window sill panel was placed incorrectly on the foam – it either bent or burst from below. Sometimes mechanical damage to the window sill occurs. Workers, in order not to pay out of their own pockets for damaged plastic, openly reject it;
- when attaching the frame to the wall, cold bridges are left from anchor bolts or direct hangers.
Building shrinkage
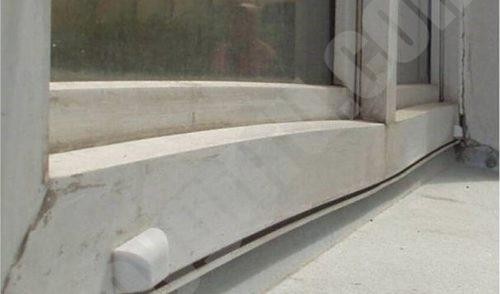
Whether we like it or not, all new construction experiences building shrinkage. Seldom do exceptions occur. There shouldn’t be any issues if there is a sizable space left at the top of the window between the wall and the window block. If not, the frame will warp and there will always be a sealing violation as a result. In this instance, the distortion may occur on the bottom as well as the sides (see photo).
Violation of operating rules
It is surprising to learn that, despite installer advice and the Internet, owners still frequently break the guidelines for using plastic windows. They’re not just one, there are several.
- Seals are not washed or lubricated on a regular basis. The reaction to this attitude of the owners is the same – thinning and drying of the rubber, the appearance of microcracks in its structure. The result is a decrease in the tightness of the fit to the frame and deterioration in thermal insulation;
- Windows are not switched to winter-summer mode – fittings and seals gradually fail.
- Sagging sash requires adjustment of fittings. This operation is not carried out for a number of reasons (inability, reluctance, ignoring the fact of sagging).
Physical wear and tear of window elements
The window block’s various components have dissimilar service lives. The first to break are the seals. Then some fittings, including strikers and trunnions. It is planned that they will be replaced. The most important thing is to not pass up the opportunity to replace worn-out components.
Poor quality frame, fittings and seals
Both consumers and performers have an innate desire to cut costs. Low-quality profiles, fittings, and seals are consequently installed. As a result, owners experience drafts from plastic windows rather than saving money on glazing. Compared to using high-quality materials, eliminating heat loss will require more financial investment.
The saying "the miser pays twice" has an impact. Should issues arise as a result of the installer’s error—trying to outbid rivals in the battle for the customer by cutting costs on foam, insulation, seals, and fittings—the window unit may be exchanged under warranty for a period of three or, in certain circumstances, five years.
How to check a window for ventilation
You must identify the areas where cold air from the street enters the room before caulking a window opening. You will need to redo the work if not. This can be accomplished in a few ways:
- the simplest is to wet your palm and run it along the perimeter of the window, under the window sill and around the sash. There will be a feeling of sharp cold in places where there is blowing;
- using a lit match or candle – a slightly more complex method, but more reliable, t.To. tactilely in severe frost it is almost impossible to determine the location of the cold breakthrough. But the flame will react to the slightest movement of air;
- a sheet of paper will help check the level of pressure of the sash to the frame, but is useless in other places. You can see how to do everything correctly here;
- chalk will help identify places with a changed seal configuration. To do this, a rubber band is painted on the sash or frame, the window opens and closes several times. From the traces of chalk, or more precisely, their absence, one can determine the pressing force between the seals along the perimeter of the sash;
- Without closing the window with the handle, try to press the sash harder against the frame. If the background noise of the street has decreased, you need to either adjust the clamping force or change the seal.
When is the best time to insulate a window?
Repairs can, in theory, be completed at any time of the year. However, it is hard to locate areas where cool air can enter in the summer, and the frost makes using a window uncomfortable in the winter. For this reason, spring and fall endure. Some artisans claim that spring is the best season because of the lower humidity and more consistent weather. However, there are also spells of warm, dry weather in the autumn. The "Indian summer" is also the best time to insulate window openings.
If a draft appears to be coming from your plastic window, it’s probably the result of worn-out seals, incorrect installation, or general wear and tear. Using weatherstripping, adjusting the hinges, or inspecting and replacing the window seal can all be easy solutions for this issue. To maintain energy efficiency and comfort in your home, make sure your windows receive regular maintenance and timely repairs.
When to contact a specialized company
Because of the general state of well-being, a large number of owners of private homes and apartments make an effort to perform maintenance and repairs on their own. However, this isn’t always feasible. These circumstances occur when:
- insulating a window from the outside above the third floor requires specialists with permission to work at height and special equipment;
- complex technological process (replacement of a window unit, reinstallation of fittings, dismantling and installation of a window sill, slopes, etc.d.);
- window repair under warranty.
Solving the problem depending on the place of blowing
It blows from plastic windows in the following locations, according to the reasons mentioned above:
- along the perimeter of the sash. In this case, the location of the gap may be different – it is necessary to establish the exact location;
- from under the windowsill;
- between the frame and the wall;
- because of the slope.
Eliminating airflow between the sash and frame
It usually blows in between the frame and the sash. There could be various reasons:
- the sash sagged;
- the seal is damaged or worn;
- the strike plate does not hold;
- uneven pressure;
- bent side frame strut.
The easiest way to solve the issue in each of the aforementioned situations is to use window tape (special tape) to seal the sash during the fall and winter or, as millions of Russians did in the Soviet era, to seal the cracks using cotton wool, soaked paper, tow, or melted paraffin. However, a few things are present here. First, the heat leaks are temporarily stopped; second, it looks bad; and third, there is an additional issue with the room’s ventilation. These aren’t wooden frames that, when sealed, allow for air exchange.

Restoring the sash geometry
Sash sagging usually occurs when windows are used extensively, meaning they are opened wide on a regular basis. At the same time, it may sag in two different ways: one where it moved away from the frame near the top hinge, and the other where the metal insert in the plastic profile underwent equal deformation beneath the hinges. The geometry restoration technology is therefore unique.
The sash is sagging
A "furniture key" will assist in moving the sash back to its original location. The following order is followed when performing the work:
- decorative caps are removed from the hinges;
- the sash opens;
- Use a wrench to tighten the adjusting screw in the upper loop clockwise (see. photo);

- in the lower hinge a vertical screw also rotates clockwise – lifts the sash.
Please take note that all hardware manufacturers require you to tighten the sagging sash to the window frame by turning it in a clockwise direction. Fittings made by Winkhaus are an exception. It is necessary to rotate the adjusting screw counterclockwise.
Every time, you must turn 180 degrees and make sure the sash fits securely against the frame and impost (the horizontal or vertical element that divides the opening).
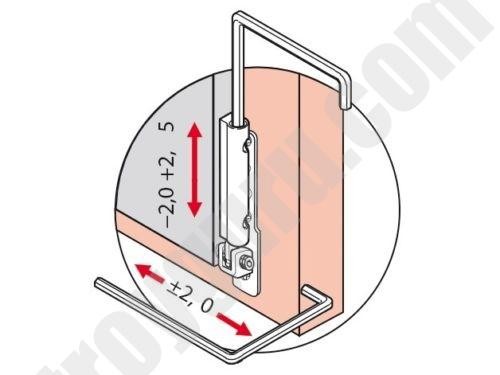
The bottom sash is either tightened or, more likely, taken out of the frame if the perfect geometry cannot be achieved. Turning the horizontal screw is necessary.
Village door
It is typical for the profile to be equally deformed around the hinges. In this instance, a vertical screw in the lower hinge is used to raise the sash. Once the task is finished, the ornamental caps are put back in their original positions.
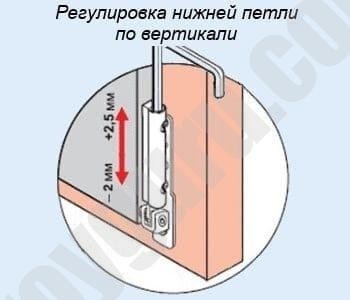
We go into more detail about this kind of window adjustment here.
Replacing the seal
Modern seals should ideally last at least 15 years. However, the rubber bands that were installed ten or twelve years ago need to be replaced now. The indicated period accurately calculates the rubber bands’ service life. Furthermore, seals need to be replaced because they can lose their consumer properties much earlier for a variety of reasons (all of which are detailed here). The work is not very complicated, but it does call for patience and focus. It is preferable to consult experts if they are absent.
Prior to beginning any work, you should follow these three easy guidelines.
- Both seals are changed at the same time (on the frame and sash), even if one is damaged and the other is intact. Replacing one at first will give results, but after 3-4 years they will stop working properly – the rubber band left will not provide the required pressing force of the sash to the frame.
- Work on replacing seals is carried out with the sash removed. Otherwise, it will not be possible to properly glue the perimeter of the window opening.
- The joint must be well glued. If you miss this moment, over time, as the material shrinks, the seam will separate, forming a gap for cold air.
In order to work, you’ll need:
- seal. How to choose it correctly, you can see in the material “How to replace the rubber seal on plastic windows?";
- glue;
- construction (stationery) knife with replaceable blades for cutting sealing cord;
- a set of screwdrivers with different heads;
- hex key (furniture);
- spatula or thin slotted screwdriver;
- rags;
- hammer;
- water;
- liquid soap;
- bucket or basin for water.
The actual technological process is split into two sections:
- preparatory work;
- laying the seal.
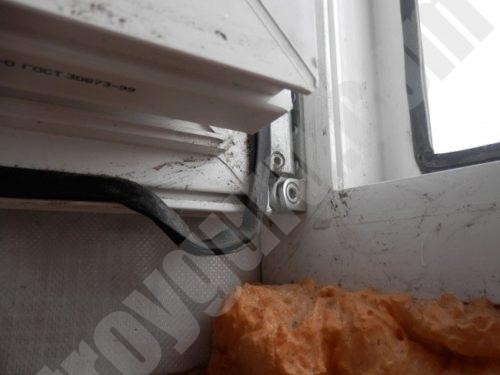
Preparatory work
The initial steps in replacing the seal are as follows:
- the sash closes;
- Remove the protective caps from the hinges with a slotted screwdriver;
- from the top hinge the pin is pressed down. This can be done in several ways, including gentle hammer blows;
- the pin is pulled out of the loop by the bottom;
- the window opens, rises, and is removed from the lower canopy;
- With a thin sharp object (trowel, slotted screwdriver, knife) the rubber bands are removed from the profile of the frame and sash – they are pryed off with a tool, then removed from the groove by hand;
- The places where the seal is attached are cleaned of dirt and then thoroughly washed;

- the washed groove is wiped dry with a rag, after which it dries for some time;
- when placed on glue, the plastic is degreased with acetone or white spirit, or, in extreme cases, with vodka.
Laying the seal
There are a few small tips that can help novices do the job correctly when laying the seal.
- The sealing cord is cut approximately 5 cm longer than the required length – this makes it more convenient to work.
- It is better to start work on the frame from any corner, on the sash – in the middle of the groove on the hinge side.
- The initial piece of sealant is glued to the plastic in any case. If this is not done, it will be difficult to keep the elastic in the desired position when laying it.
- The seal is tucked into the groove without tension or compression – it should lie freely. Ends need to be tied up.
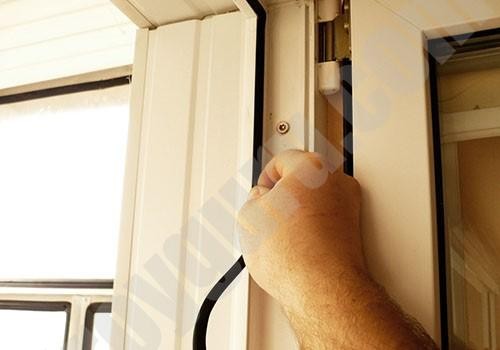
- The elastic inserted into the grooves is rolled with a roller. Surgery is desirable, but not necessary.
- The excess piece of seal is cut off. The ends of the cord are glued together end to end.
Then the sash goes back in place once the glue hardens. The process of assembly is the opposite of removal. Following this, the fittings must be adjusted to the new seals. The material "How to adjust plastic windows yourself in winter-summer mode, if they close poorly in other cases" shows the entire work cycle.
Here is a more detailed discussion of the technological procedure involved in replacing the seal.
Adjusting the strike plate
The striker plate may also cause a space to open up between the sash and the frame. There are various causes:
- worn out;
- the door sank;
- frame profile deformed.
In this instance, there are multiple approaches to removing the drafts’ cause:
- replace this element of fittings with a new one;
- reset the bar;
- place a spacer under the strike plate.
Visit the link to learn about all the subtleties of the technology.
Elimination of uneven pressure
With time, tilt windows deteriorate. As a result, the sash’s corner pulls away from the frame, creating a space big enough to let cold air pass through. In this instance, it won’t take more than ten minutes to remove the draft from plastic windows. The following order is followed when performing the operations:
- the locking handle is moved to a horizontal position;
- the window is opened;
- the handle is moved further until it takes a vertical position (the picture shows how ventilation);
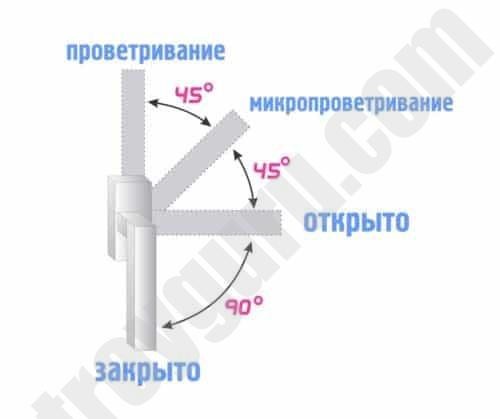
- the window is tilted back;
- there is an adjusting screw on the scissors;
- it is turned clockwise by 180 o with a hex key;
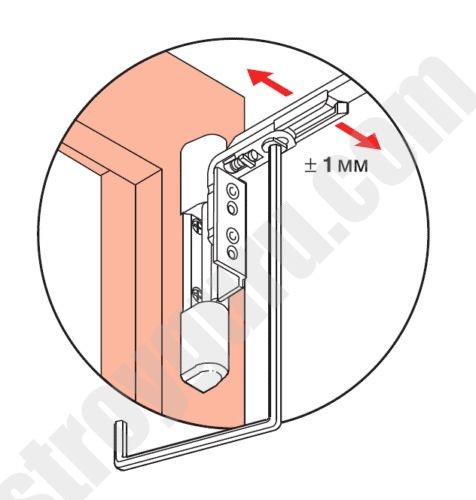
- the sash is pressed tightly against the frame profile;
- the handle is placed in a horizontal position;
- the window is pressed to the frame and closed;
- the tightness is checked (the methods are described above). If there is still a draft, it is necessary to adjust until a tight fit is achieved along the entire perimeter of the sash.
Elimination of draft when the geometry of the window block is violated
When there is air flow occurring simultaneously between the sash and the frame and between the window block and the wall, it is frequently unclear how to insulate plastic windows. There’s only one explanation: the house’s shrinkage has caused the frame to distort. However, the answers might differ. Replacing the glazing entirely is the most appropriate course of action. However, money is needed for this, and not every homeowner or apartment owner has access to it when they need it. As a result, we can only take limited action, but we must stress that this is only a temporary solution to the issue.
There are multiple causes. First, the load-bearing capacity of the metal profile is altered due to the altered geometry of the window block. Nobody can predict his next move. Second, the glass unit will eventually break as a result of the altered frame configuration. Thirdly, since no other technologies have been developed to date, you will probably have to seal the space where the sash and frame meet at the hinges by just sealing the window. Fourth, you must disassemble the window sill or slope and re-insulate it.
Window sill insulation
Many years of working with windows have taught us that anything can be found, but not good insulation, in the space between the wall and the window sill. There are cement, construction waste, and broken bricks. But most of the time, polyurethane foam is used to foam the entire area. This is not the best solution, though, since over time a heat insulator of that kind can shrink and crack, opening up spaces for the cold.
Making sure it doesn’t blow from under the window sill is a simple task. Several tasks must be completed in the order listed below:
- wet the wallpaper in the work area and remove it from the wall. It is possible partially;
- remove the plaster layer not only under the window sill, but also along the edges;
- remove old foam;
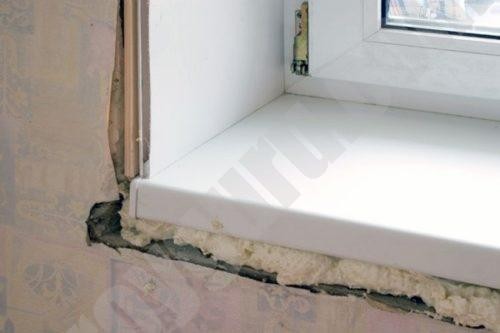
- carefully, so as not to damage, pull the window sill panel towards you and slightly downwards;
- clean the wall of debris and foam residues;
- search for places through which cold is actively entering;
- seal the cracks;
- install the window sill correctly. The technology with all the nuances is described in the work “How to install a window sill on a plastic window?";
- apply a layer of plaster;
- restore wallpaper.
Insulation of slopes from the inside
You are able to stop yourself from losing heat through a slope. For this:
- remove the slope. If it"s made of drywall, you"ll have to destroy it. The plastic panel can be carefully removed without damage;
- remove polyurethane foam and fiberglass insulation, if present;
- plaster an uneven wall;
- treat the wall with an antibacterial compound to prevent mold from appearing;
- insulate the slope with basalt wool or a sheet of foam plastic (cut to fit the available free space;
- install a slope. There are several technologies here. Each of them is described here.
Insulation of slopes from the outside
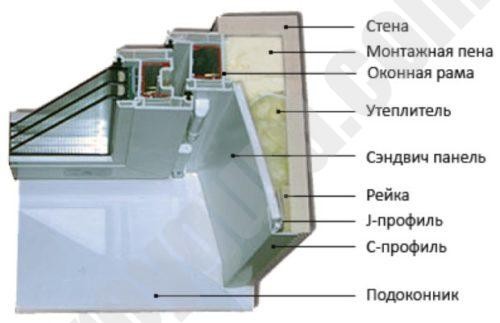
Insulating the technological gap from the exterior is another way to stop heat loss through slopes. This is accomplished by removing the sun-aged foam. Re-foamed is the space between the window block and the wall. The cover plate is put in place (this page shows the technology used during installation).
| Problem | Solution |
| Window isn"t sealing properly | Check the rubber seals for wear and replace if necessary. |
| Gaps between window frame and wall | Fill the gaps with insulating foam or caulk to stop drafts. |
| Loose window handle | Tighten the screws on the handle to ensure it closes tightly. |
| Incorrectly installed window | Reinstall the window or call a professional to fix the installation. |
| Damaged or worn-out seals | Replace the seals to improve the window"s insulation. |
| Improper ventilation | Ensure proper ventilation to reduce condensation and drafts. |
Don’t worry if drafts are coming in through your plastic window; there are workable fixes for that. First, look for any obvious cracks or damage to the seals. Frequently, the problem’s origin can be found with a quick inspection.
Replacing any damaged seals can have a significant impact if you find any. Although seals deteriorate with time, they are comparatively simple to replace and can greatly enhance the performance of your window.
Inadequate installation is another prevalent problem. The window may not be sealing properly if it was installed incorrectly. To make sure the window is airtight in this situation, you might need to hire a professional to adjust or reinstall it.
Future problems can also be avoided with routine maintenance. To maintain them in good working order, lubricate the moving parts and clean the seals. This keeps drafts from evolving over time and helps preserve the window’s functionality.
You can maintain the comfort and energy efficiency of your house by taking care of these typical issues. By keeping your windows in top condition all year round, routine inspections and maintenance can help you avoid more serious problems later on.


