
If you’ve noticed a draft under your plastic window sill, it could indicate a problem with the sealing or installation. If ignored, this frequent issue may result in discomfort and increased energy costs. Maintaining a more efficient and comfortable home can be made easier if you know why this occurs and how to fix it.
Although they are usually good at keeping out heat, plastic windows occasionally develop leaks or gaps over time. These spaces frequently appear where the sill and window meet, as well as where the frame and wall meet. Your indoor climate control may be impacted by even tiny gaps that let cool air escape in the summer or allow cold air to seep in during the winter.
Finding the cause of the draft under a plastic window sill is essential to resolving it. It might be the result of poor installation, old seals, or structural changes to your house. Promptly taking care of these problems not only increases comfort but also contributes to energy conservation, making your living area more effective and comfortable.
- Why is there a draft from below??
- Structural defects
- Other reasons
- How to identify the problem?
- What tools and materials will be required?
- Ways to eliminate blowing
- When simple repairs are not enough?
- Video on the topic
- Why is there a BLOW/DRAW from under PLASTIC WINDOWS (from below). HACKWORK! Reasons, what to do, how to eliminate.
- Why is it blowing from under the slopes and from under the window sill.
- Blowing from plastic windows between the window sill and the frame, ice freezes on the glass, repair and finishing of slopes
- Why is it blowing from under the slopes of a plastic window
- Blowing from the joint (solving the problem)
- If it is blowing between the window sill and the frame
Why is there a draft from below??
The following circumstances result in blowing from under the window sill or at the point where the board meets the PVC profile frame:
- If the cold weld between the plastic frame and the window sill is broken. This defect can occur both during operation and upon completion of installation of the structure.
- In case of violation of the technological map when installing foam or sealant while filling the installation gaps.
- In the absence of a sealing tape, or in case of its loose connection to any of the orthogonal surfaces.
- In case of incorrect positioning of the window frame before fixing it. If the structure is skewed, the installation gap has a variable thickness, which is why the foam does not provide effective insulation.
- When using low-quality sealing materials to fill seams and gaps.
- In case of physical damage or destruction of the foam due to direct sunlight.
- In case of mechanical damage to the window structure and window sill from impact, strong wind or in the event of an emergency.
Without hiring professionals, you can usually fix the majority of these flaws on your own.
Structural defects
The reasons for blowing may also be due to flaws in the structural elements themselves, in addition to inadequate installation:
- Cracks in PVC frame or window sill board.
- Deformation of the window sill when using a large amount of foam.
- Breaking out of anchors, screws or mounting loops that hold the window in a static position.
- Violation of the structure of the outer wall, which causes blowing even with a correctly installed and intact window.
- Installation of a window sill that is too short or narrow and does not match the dimensions of the window profile.
Suggestions. Experts advise a comprehensive restoration of the window structure, replacing critical components that have failed and lost their functional qualities, if there are such violations.
Other reasons
If the technician checks and finds no issues with the installation or design, but the window is blowing from under the window sill, Indirect factors could conceal the reason behind the violation:

- Insufficiently efficient heating system, small number of radiator sections.
- Heat loss through building envelopes associated with the installation of thin double-glazed windows, insufficient number of chambers, or weak insulation.
- Accumulation of ice on the windowsill due to opening the window sash in winter.
In the event that such issues emerge, a thorough analysis of the engineering systems and building structures is necessary, followed by replacement or repair in accordance with a project that has already been developed.
How to identify the problem?
It is sufficient to use readily available methods or basic techniques to determine where it is blowing:
- Inspect the joints with the wall and PVC profile with the palms of your hands. If the outside air temperature differs significantly from the indoor microclimate, the skin will feel cold or drafty.
- You can also determine the blowing using a sheet of thin paper. As the material approaches the gap or joint, the paper will begin to sway due to the draft.
- The most reliable household way to detect a draft from a windowsill is to use a candle flame or lighter. In a calm position, the fire burns evenly, without hesitation, but at the slightest movement of air masses, the flame begins to deviate.
Crucial! Experts advise against limiting repairs to just these regions when identifying local issues because complete sealing of the window structure is necessary for a double-glazed window to operate dependably and comfortably.
What tools and materials will be required?
The following set of instruments and consumables will be needed by the master for repair work and sealing the window sill’s junction with the window structure:

- Polyurethane foam for filling the joint between the window and the opening after dismantling the window sill.
- Silicone, acrylic or rubber sealant for additional protection of the joint.
- “Liquid plastic” glue, if necessary, to seal the junction line of the window sill and PVC frame.
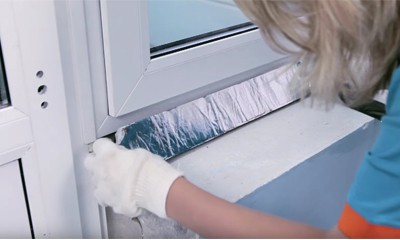
- Sealing tape with foil coating, preventing the penetration of moisture and vapors into the installation gap.
- Tape cutting scissors.
- Tape measure, if necessary, to measure the lengths of joints.
- A mounting gun that makes it convenient to apply sealant.
- Construction knife for removing old sealing materials and foam.
- Bubble level, which is used to position the horizontal window sill board after re-installation.
- Chisel and abrasive materials for grinding, removing dust and cleaning the surface after dismantling.
- Fixing elements – a heavy clamp or masking tape, necessary to ensure the constant position of the window sill after it is installed on foam.
- In the case of fastening the window sill after dismantling on mechanical anchors or self-tapping screws, the master will need a set of hardware, a screwdriver or screwdriver, as well as auxiliary materials for installation using this technology.
Suggestions. It is advised to buy all premium consumables from reputable manufacturers in order to get the best results. These manufacturers’ products have a high number of positive reviews from happy customers on online forums.
There are doable solutions to address any drafts you may be feeling under your plastic window sill. Simple ways to prevent drafts are discussed in this article, such as caulking or weather-stripping window frames to seal any gaps or cracks. Gaining insight into the reasons behind drafts, such as faulty installation or old seals, will enable you to address the issue successfully. These easy-to-follow guidelines will help you keep your house warm and energy-efficient all year long.
Ways to eliminate blowing
The home handyman must carry out several tasks in order to repair window sills, as indicated by the following technological map:

- If blowing occurs only through the joint of the window frame profile and the window sill, it is necessary to remove the old sealant, clean the surface and apply liquid plastic into the resulting gap. It should be noted that this adhesive composition polymerizes within a few minutes, which is why the master will have little time to adjust the freshly laid material.
- If a draft is detected under the window sill, it is necessary to dismantle the board.
- The back side of the structure is cleared of foam residues, after which it is necessary to carry out additional inspection of the blowing area.
- The old polyurethane foam is cut off with a knife, and the gap is filled with new material.
- After drying, the remaining foam protruding beyond the mounting plane is also cut off with a knife,
- Sealing tape is glued over the foam. You should purchase consumables with a self-adhesive surface for ease of installation.
- The window sill is installed on foam or mechanical hardware.
- The structure is pressed and then waited for the adhesive to dry.
- At the final stage, all joints on the sides and along the length of the window sill board are sealed.
- The plane of the window sill is checked with a building level.
Regarding a note. The window sill board should operate without issue for the next 15 to 20 years if you heed the advice, refer to the technological map, and fill any gaps or joints with foam.
You will discover how to independently stop the blowing between the window sill and the frame by watching this video:
When simple repairs are not enough?
In some cases, more significant work on the building structures is needed, so fixing the window sill board and caulking the seam might not be helpful.
- If there is insufficient amount of insulation in the external wall, it is necessary to install additional insulating material on the facade of the building. In old-built apartment buildings, such work is carried out as part of a major overhaul by local authorities.
- In case of insufficient power of heating devices, they must be replaced, since the heat input must ensure heating of the entire volume of the room.
- If there are cold bridges or cracks in the wall structure, it is necessary to carry out finishing or restoration work after a detailed examination of the structure.
Note: If a residential or public property owner chooses to undertake a full renovation of his building, professionals suggest utilizing every one of the aforementioned techniques at the same time.
When strategies are combined, the operated space can reach its maximum energy efficiency, and external structures nearly totally prevent heat loss.
| Issue | Solution |
| Blowing from under the sill of a plastic window | 1. Check for gaps or cracks around the window frame. 2. Apply weatherstripping or silicone sealant to seal any gaps. 3. Ensure proper insulation around the window sill. 4. Consider installing draft excluders or draft stoppers. 5. If problems persist, consult a professional for a thorough inspection and repairs. |
If you’ve discovered drafts coming from under your plastic window sill, taking quick action to fix the problem will improve the comfort and energy efficiency of your house. Examine the sealant surrounding the window sill and frame first. Sealants may deteriorate or crack with time, letting air seep through. Replacing or reapplying the sealant is frequently an easy fix that effectively stops drafts.
Inadequate installation or spaces between the window frame and the wall are frequent reasons why there are drafts beneath window sills. Examine these sections closely, searching for any openings or crevices that might allow cold air to enter. To stop additional drafts, the gap may need to be filled with expanding foam or suitable insulation, depending on how big it is.
Future draft problems can be avoided by performing routine maintenance. Pay close attention to the state of the frames and seals around your windows, particularly following severe weather. You can extend the life of your windows and keep your interior temperature comfortable all year long by promptly fixing any wear or damage.


