
Plasterboard partitions provide a flexible and useful option for partitioning areas within a house or business. Known by other names like drywall or gypsum board walls, these partitions are strong, lightweight constructions that are simple to erect and modify to suit different room configurations and aesthetic tastes.
Plasterboard partitions are highly versatile, which is one of their main benefits. They can be used without bulky building materials to define functional areas, create distinct rooms, or offer privacy. They are therefore perfect for environments where efficiency and flexibility are crucial, such as homes and businesses.
There are various types of plasterboard partitions to suit varying requirements and aesthetic tastes. The most popular type of partitions are made of standard gypsum board, which is an easy and affordable way to divide areas. Acoustic plasterboard partitions are perfect for spaces that need more sound insulation because they reduce noise transfer. These areas include conference rooms, offices, and even homes where privacy is important.
Fire-rated plasterboard partitions meet strict building code requirements by providing a safe barrier against flames and smoke in environments that require additional fire resistance. When fire safety is a top concern, these partitions are crucial in hotels, multifamily homes, and commercial buildings.
Plasterboard partitions combine practicality, affordability, and aesthetic versatility, making them ideal for both home and office renovations. Homeowners, architects, and interior designers all favor them because of their simplicity of installation and versatility in adding features like windows, doors, and outlets.
- What it is?
- In which rooms are such walls needed??
- Living room
- Bedroom
- Kitchen
- Varieties
- By design
- Open
- Closed
- By shape
- Which gypsum board sheets are suitable??
- Rules for taking measurements
- Calculation example
- Tools and materials
- Step-by-step DIY installation instructions
- Installation Features
- Features of fastening sheets
- Difficulties and errors
- Advantages and disadvantages
- Examples of dividing space in photos
- Video on the topic
- Plasterboard partitions in the room
- Interior partitions. Sliding partitions.
- INEXPENSIVE SLIDING PARTITIONS, HOW TO CHOOSE AND SAVE?
- Zoning a studio apartment using an interior sliding partition
- Top 100 Modern Partition Divider Ideas Home Partition Design Catalog 2026
- 17 options for how you can make PARTITIONS in dressing rooms, niches, or how to divide your home into zones.
What it is?
According to the interior design project, a plasterboard partition for zoning a room is a type of enclosing structure that is composed of a supporting frame made of profile guides, covered with gypsum plasterboard sheets, and then finished.
Such a partition may have functional or ornamental door or window openings, as well as an interior filler composed of efficient insulating materials.
One possible arrangement for zoning walls is:
- straight;
- radius;
- individual;
- curly.
Be aware that the primary distinction between these enclosed structures and complete gypsum plasterboard partitions is their intended use and architectural characteristics.
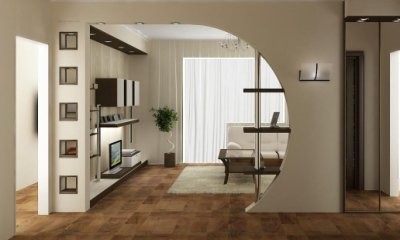
Zoning partitions might not span the full width or height of the room, but interior partitions are made to totally segregate a specific area within an office, private residence, or apartment.
Such structures serve the primary purpose of semantically separating a distinct zone within a single exploitable space.
The provision of noise-absorbing or heat-insulating qualities is not implied by zoning.
In which rooms are such walls needed??
Zoning plasterboard partitions serve a variety of purposes depending on the use of the space in an office, private residence, or apartment.
A thorough explanation of these enclosing structures and their purposes in various categories of premises can be found below.
Living room
The most common method for dividing up the various functional sections of the living room area is to use plasterboard partitions:
- Delineation of the hall, or hallway and room in studio apartments.
- Selecting a relaxation area with upholstered furniture.
- Improving room acoustics when installing a home theater.
- Zoning the workplace when combining a living room with a home office.
- Limiting direct sunlight if the windows in the living room face the south side of the building.
Crucial! Ensuring partial isolation of the designated recreation space is the primary objective when building partitions.
Bedroom
Effective space zoning decisions are seldom made in bedrooms.
The following are the uses of enclosing structures:
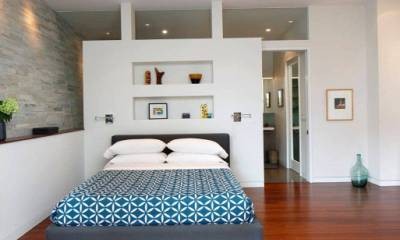
- Delineation of the sleeping area and dressing table.
- Allocation of places for storing clothes without organizing a full-fledged dressing room.
- Decorating the bedroom space to create coziness.
- Artificial bedroom shading.
These partitions are full-fledged enclosing structures and are not meant for zoning purposes when they are part of a dressing room that has its own entrance.
Kitchen
Modern apartments and single-family homes frequently have kitchens that open into dining rooms or living rooms.
Particular enclosing structures are used to improve comfort when using the premises:
- Separation of the dining area and cooking space.
- Allocating a pantry for storing kitchen utensils and dry foods.
- Arrangement of a mini-living room in the space of a large kitchen.
Expert designers also advise adding lightweight sliding or folding doors to these partitions. These doors allow you to completely block the area used for food preparation, preventing the spread of offensive odors.
Plasterboard partitions provide adaptable ways to divide spaces without requiring permanent walls in home building and renovation. These partitions serve a variety of purposes, including establishing private spaces, boosting safety, and improving acoustics. They range from straightforward stud and drywall constructions to sophisticated soundproofing and fire-resistant designs. In order to ensure effective and aesthetically beautiful room zoning solutions, homeowners and designers can make well-informed decisions by being aware of the various types and their applications.
Varieties
Divided by design, installation location, and operational features, there are various partition types for room zoning; each type has pros and cons of its own.
By design
Zoning partitions are divided into the following categories based on their design:.
Open

This enclosing structure eliminates the total isolation of a portion of the space while fitting in flawlessly with the interior design of numerous decorative openings and openings, as well as shelves for storage.
Constructed in line with the design project, it may feature apertures of varying sizes and arrangements.
To store useful items, wooden or plastic shelves can be installed on the lower horizontal portion of the partition opening.
Mainly used for aesthetic reasons, as well as for the conditional division of space and the dispersion and absorption of background noise.
Prior to their construction, a supporting frame with an asymmetrical configuration of racks and imposts is installed. The walls are reinforced with wooden blocks or double profiles between the openings.
- attractive appearance;
- the ability to realize the designer’s most daring plans;
- reducing echo in the living room.
- poor sound insulation characteristics;
- complexity of installation of the structure;
- a greater number of prunings, which inevitably leads to the generation of waste and increased costs.
Closed

There are no surface openings in this solidly designed fencing, ensuring total zoning and isolation of a distinct, useable area of the room.
They can be put in in conjunction with sliding portals to guarantee total isolation of a distinct space.
In order to improve noise absorption, insulating materials are frequently placed inside partitions.
Intended to divide a single exploited space into two distinct functional areas that are housed in separate rooms.
A complete frame is assembled during installation using wooden blocks or galvanized profile guides with a 400 x 400 or 600 x 600 mm cell. Around the whole perimeter, GK sheets are fastened to self-tapping screws at regular intervals.
- the possibility of a complete redevelopment of the room;
- high sound insulation performance.
- eat up part of the exploited space;
- fixed enclosing structures must be completely dismantled when remodeling premises;
- due to the regular supporting frame, it is impossible to create arbitrary openings and other space-planning elements.
Be aware that wooden components of the supporting frame are frequently utilized when building open plasterboard partitions because they have more spatial rigidity and don’t need to form a 400 x 400 or 600 x 600 mm cell.
By shape
Plasterboard partitions for zoning premises are classified into the following categories based on their shape:
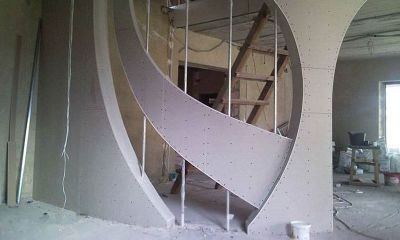
- Direct. Lined up strictly in a straight line, usually orthogonal to load-bearing or enclosing vertical structures made of other materials. Can be erected to the entire height of the room, or to a certain level. Some straight partitions play the role of a partition to partially divide the space of a room.
- Curly. Openings with different configurations are formed on the facing plane, playing a decorative role. Design elements may have arbitrary edges, which requires trimming the guides and using special technology for cutting drywall.
- Radial. They are built in bedrooms and living rooms, subject to appropriate planning solutions.
The partitions are shaped like a segment of a circle with a fixed radius in plan. The racks are rigidly arranged along a curved path, and the lower guides are divided into segments.
Every impost undergoes partial trimming and deformation in order to create a radius plane.
The design project, which includes a 3D model and the main components of the supporting frame, dictates the shape of partitions for zoning spaces made of gypsum plasterboard. This makes it simple to carry out the designer’s plan.
Which gypsum board sheets are suitable??
While almost any type of gypsum plasterboard sheet can be used to create zoning partitions, it is usually advised to use facing materials from the following categories to ensure stability, a robust front surface, and economy:
- For straight continuous zoning partitions in bedrooms, living rooms or offices, standard gypsum board sheets with a core thickness of 9 to 12.5 mm are suitable.
- In the kitchen and other rooms with high temperature and humidity conditions, it is recommended to use gypsum board sheets with polymer additives. Thickness – at least 10 mm, structure density – from 850 kg/m3, moisture absorption rates – no more than 11%.
- In the case of decorative partitions, thin restoration sheets of GKL or GKLVO should be used, which are characterized by ease of cutting, material density of 880 kg/m3 or more, mechanical strength of at least 9.5 MPa, flammability group – G0 or G1.
- To delimit spaces with increased fire hazard, solid partitions made of GKLO or GKLVO with a fire resistance rating from EI45 to EI60 should be used.
- In case of installation of solid partitions to highlight the office area. Experts advise using two layers of acoustic plasterboard, the sound insulation properties of which ensure complete absorption of sound waves. Such structural elements ensure the penetration of third-party vibrations from the adjacent area from 25 to 30 dB, which significantly increases the comfort during operation of the room.
Crucial! Plasterboard sheets should only be purchased from reputable manufacturers, whose goods have received numerous favorable online reviews from happy customers.
Rules for taking measurements
To install gypsum plasterboard zoning partitions, measurements must be taken and future design drawings must be created before any work is done.
For this, several significant details must be considered:

- The future partition is placed on the wall, ceiling, and also at the junction with the load-bearing wall.
- To take measurements it is necessary to measure a right angle from each plane.
- The radius is checked using the right triangle rule (the midpoint of the hypotenuse of an inscribed figure with a right angle is the center of an arbitrary circle).
- After marking the floor and ceiling, you need to check the vertical plane with a laser level.
- If it is necessary to install reinforcing posts to frame openings, the corresponding marks are drawn on the horizontal plane – the places of installation and fixation of profile elements. The same marks should be placed on the wall for imposts.
- When installing a double volumetric frame, it is recommended to mark two center lines of each flat supporting structure from profiles with an accurate determination of the distance between them.
- For frame guides, two marking lines should be applied – axial and duplicate (for the outer edge of the profile).
- After taking measurements, it is recommended to carry out a preliminary design, which contains a plan of the partition, a section of the design of the supporting guides, development of the frame, as well as nodes for connecting the profiles to the walls and ceilings. It is recommended to draw up drawings in CAD format with dimensions, which are subsequently transferred to the building structure.
A thorough specification of the components, hardware, and other aspects of the future partition is created in accordance with the graphic materials. The consumption sheet enables you to buy each structural part in the precise quantity needed, giving the property owner the most savings possible.
Calculation example
The following is a thorough example of calculating the materials of a zoning partition so that you can fully comprehend the sizing algorithm:
- It is necessary to build a zoning partition to highlight a relaxation area in the living room.
- According to the project, the partition is installed to the entire height of the room, to a length of 2000 mm from the edge of the load-bearing wall.
- The distance is measured from the corner of the room to the installation site of the partition.
- A line is marked indicating the axis of symmetry of the septum.
- A square is applied to the existing wall to ensure the orthogonality of the partition.
- A distance of 2000 mm is set aside from the wall, the corresponding mark is applied to the floor slab in the right place.
- Next, the thickness of the cladding is deposited from the end of the future partition (for example, 2 x 12.5 mm = 25 mm). This point marks the edge of the horizontal guide and the last post.
- The procedure is repeated to mark the partition on the ceiling.
- The vertical plane is checked between the axes of symmetry on the lower and upper floor planes.
- According to the drawing, the installation locations of the racks are marked, taking into account the areas of reinforcement of the partition.
- All risks are connected by lines to eliminate installation errors.

Please take note that you will almost always need to account for the factory dimensions of the products when ordering materials (such as profiles and sheets of gypsum board), which will result in a small amount of waste.
Tools and materials
You will require the following tools in order to erect zoning structures in the exploited space:
To obtain measurements:
- Laser or standard tape measure with steel blade.
- Metal square.
- Ruler with blade length from 1000 mm.
- Laser or bubble level.
- Pencil or marker for marking.
Finishing materials for cutting gypsum boards and profiles:
- Metal scissors.
- Hand saw with fine teeth.
- Construction knife with retractable blade.
- Grinder with abrasive disc.
- If it is necessary to erect a large volume of partitions, use a cross-cutting machine with a rotating bed.
- File for processing edges after cutting.
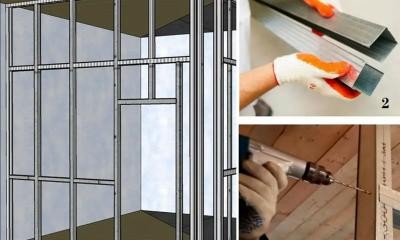
To put the frame in place:
- Drill or hammer drill with a set of drills.
- Screwdriver with different types of bits.
- Phillips or slotted screwdriver.
- Pliers.
- Hammer or wooden mallet.
To cover the frame:
- Screwdriver.
- Construction knife.
- Trowel for sealing seams.
- A grater for finishing and polishing the surface after finishing.
Crucial! To guarantee that the desired outcome is achieved, all tools must be in good operating order, sharpened, and prepared for use.
Step-by-step DIY installation instructions
It is best to leave the complicated and responsible task of installing partitions for room zoning to professionals.
In the event that this is not feasible, it is advised that independent enclosing structure construction adhere to every point on the technological map:
- Markings are applied on all contact planes of building structures.
- Profiles are cut to the required size.
- Profile guides are fixed to the adjacent wall, ceiling and floor.
- Fastening is carried out using dowel-nails after preliminary drilling of holes with a hammer drill.
- Racks are fixed to the horizontal guides with self-tapping screws, the location of which is determined by the project, taking into account the reinforcement of openings in figured partitions.
- Imposts are attached to vertical guides and posts to form a cell.
- Plasterboard sheets are being cut.
- The cladding elements are fixed to the frame guides with a screwdriver until the heads of the hardware are recessed at least 1 – 2 mm into the core.
- Galvanized corners are glued to the corner joints.
- All joints are reinforced with polymer serpyanka.
- The partition is being finished.
Watch this video for comprehensive instructions on how to install a partition made of gypsum plasterboard:
After the work is finished, it is important to verify that the vertical and horizontal planes are being followed; if the structure has a figured structure, the dimensions of its decorative elements should match. Revision is strictly completed prior to the start of finishing, if necessary.
Installation Features
Several considerations must be made when installing a frame for zoning partitions, depending on the kind of structure and its dimensions.
Typical:
- Guides are installed on the ceiling and floor.
- The frame is erected with a regular arrangement of imposts and racks to form square or rectangular cells.
- The location of the guides is selected in such a way that the multiplicity of a standard gypsum board sheet is maintained, usually 2500 x 1200 mm.
- When installing a zoning partition at part of the height of the room, it is necessary to firmly fix reinforced metal racks in the ceiling structure.
Radius:
- All horizontal guides – starting profiles and imposts are partially cut and deformed with the desired curvature.
- The location of the racks directly depends on the circle radius.
- The need to install an enhancing frame depends on the degree of curvature of the partition – with a radius of less than 1000 – 1500 mm, the structure automatically ensures spatial stiffness.
Decorative:
- Racks and imposts are placed irregularly, according to the working drawings – all elements of the frame should simultaneously serve as a frame of openings.
- When installing the frame, it is recommended to use special connectors – crabs, which eliminates the need for complete cutting of imposts.
- When installing curved curly openings, a local cutting of the guides is necessary and their bending according to the previously created plywood or GKL template.
Crucial! The rule of installing two fixing supports for every guide must be adhered to when assembling a complex frame in a curved plane. This means that there may be a violation of the standard procedure for setting up frame cells.
Features of fastening sheets
There are guidelines to adhere to when installing partitions as well as when cutting and repairing plasterboard sheets.
Typical:
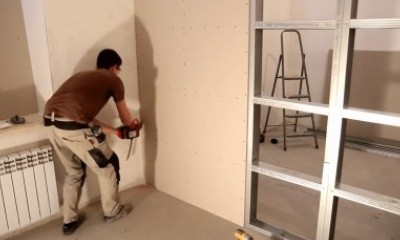
- Before installing gypsum board sheets, it is recommended to draw up a drawing with an outline of the enclosing structure.
- It is recommended to use whole sheets with a minimum amount of trimming.
- When installing cladding in 2 layers, you need to follow the rule for bandaging joints.
- The sheets are attached to self-tapping screws located at regular intervals along the entire perimeter of the products.
Radius:
- It is recommended to purchase deformable sheets with polymer additives in the core in advance.
- Before bending GKL, GKLV or GKLVO, you should use a router with a triangular cutter or a construction knife to cut segments.
- Fastening the cladding begins from the extreme vertical edge of the element, after which it is gradually pressed with self-tapping screws along the entire plane of the cladding element.
Decorative:
- Sheets are pre-cut after marking.
- Each opening is cut with a knife, without cutting the entire structure.
- It is recommended to join the sheets along the entire plane, and not at the location of the opening.
- To cladding the ends of openings, you should make maximum use of scraps of the main cladding elements.
- Framing of openings should be done only with solid pieces of plasterboard sheets along the entire length and width of the end of the structure.
- When finishing decorative openings, galvanized corners should be installed around the perimeter of the joints of gypsum board sheets to prevent the formation of cracks.
Note: To avoid gypsum binder delamination when finishing the thirds after cutting, it is advised to buy only moisture-resistant products with a lot of polymers in the core structure for figured partitions with a lot of cuttings.
Difficulties and errors
Inexperienced individuals building zoning partitions by hand may run into a number of problems and commit grave errors that will cause irreversible damage:
- Incorrect markings, neglect to check the alignment of the vertical alignment of the top and bottom of the future partition – a high risk of distortion of the structure.
- The absence of separate reinforcing posts when erecting a partition to part of the height of the room means the risk of structural destruction from external influences.
- Incorrect cutting of sheets into segments for radius partitions – the risk of brittle destruction of the plasterboard core with the impossibility of its further restoration.
- Lack of gypsum board fasteners along the perimeter of the framing of openings in figured partitions – weakening of the entire structure, risk of local destruction.
Before beginning work on building the enclosing structure, you should acquaint yourself with video lessons and master classes from experienced installers. These are frequently shared with other users on popular Internet channels, and they will help you avoid the mistakes mentioned above.
See this fascinating video to learn how to install gypsum plasterboard partitions for zoning rooms step-by-step:
Advantages and disadvantages
Due to their many undeniable benefits, plasterboard partitions are the most widely used enclosing structures for zoning residential or public spaces.
- Simplicity and speed of installation.
- Construction requires a minimum set of simple tools.
- Minimum number of wet processes.
- Low dead weight, no increased loads on the floor slab or other span structure.
- Sufficient mechanical strength of the structural element.
- One of the most inexpensive room zoning options.
- Possibility of finishing the front part of the partition with any decorative materials.
- Possibility of specifying almost any configuration and shape of the enclosing structure.
- High fire resistance.
- Ease of cutting material.
- Environmentally friendly material – toxicity group no higher than T1.
However, these designs come with a number of subjective drawbacks, which is why some homeowners would rather use different materials:
- Low impact strength index of sheets.
- The need for finishing.
- This design does not always fit the overall style of the room’s interior.
- The complexity of installing a zoning partition for part of the height of the room.
- If there is no adjacent wall, the partition will be unstable.
- Impossibility of installing a movable or transformable partition.
Notwithstanding the drawbacks, plasterboard partitions are still frequently used by designers to zone spaces, and the market for these products in our nation is expanding quickly each year.
Examples of dividing space in photos
Here are actual images of partitions used for zoning purposes:

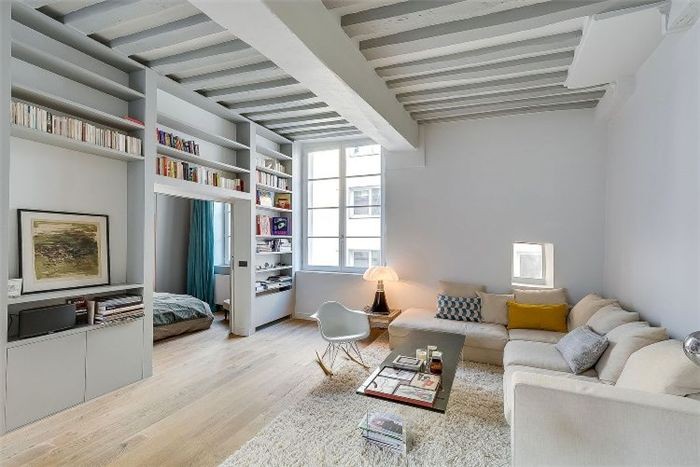
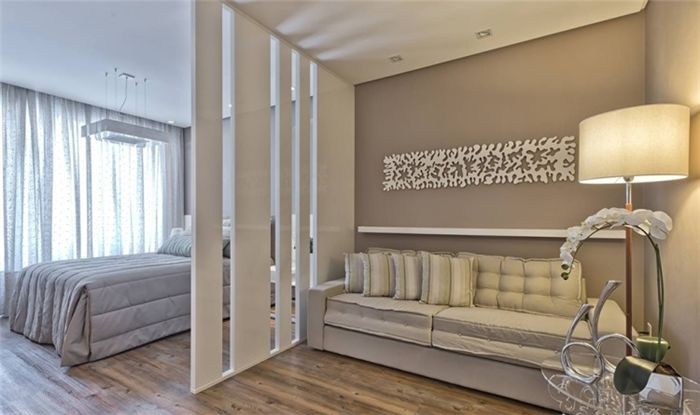
Without requiring traditional walls, plasterboard partitions provide flexible options for dividing spaces. Plasterboard partitions are a popular option in modern interior design, whether you’re looking to create separate rooms, define areas within an open-plan layout, or add privacy to certain zones.
Plasterboard partitions have a number of benefits, one of which is their flexibility. They are easily adaptable to suit different aesthetic tastes and spatial requirements. Plasterboard can be made to match any interior design, whether you want a smooth, minimalist design or something more textured and ornate.
Plasterboard partitions are comparatively quick and simple to install in comparison to traditional brick or concrete walls, in addition to their design flexibility. Because of this, they are the recommended choice for both new construction and renovations when timing is of the essence. Plasterboard’s light weight also makes it easier to handle and move around during installation.
Furthermore, plasterboard partitions have advantages beyond appearance and convenience of installation. They can use insulation materials to enhance the thermal and acoustic qualities of a space, improving comfort and energy efficiency. This enables them to serve as useful room separators in addition to being advantageous for establishing calmer and cozier spaces.
Overall, plasterboard partitions offer a flexible, affordable, and effective way to zone rooms whether you’re remodeling your house or place of business. These partitions meet a variety of needs and have the adaptability to change as needs do. They can be used to improve privacy or acoustic performance.


