
For a pitched roof, the design of the truss system is an essential part of house building that guarantees the longevity and stability of the building. In addition to supporting the roof, a well-designed truss system equally distributes the weight across the walls to avoid structural deterioration over time. A basic understanding of truss design can make homes safer and more sturdy for builders and homeowners alike.
A truss system’s design must take into account a number of variables, such as the building’s span, the pitch of the roof, and the kind of materials to be used. Both the functional aspects, like snow load handling and water drainage, and the aesthetic appeal of a roof are impacted by its pitch, or angle. To guarantee that the trusses can support the roof in a variety of weather scenarios, precise measurements and computations are necessary.
To assemble the truss system correctly, there are specific procedures that need to be followed. Each truss is built on the ground using a precise blueprint before being lifted into position and fastened. While working at heights can be dangerous, it is crucial to abide by safety regulations. The longevity and dependability of the roof will also be enhanced by the use of high-quality supplies and equipment.
The quality of your roofing project can be substantially improved by knowing the fundamentals of truss design and assembly, whether you are an expert builder or a do-it-yourself enthusiast. You can design a truss system that not only satisfies your structural requirements but also enhances the beauty and value of your house by paying close attention to details and following best practices.
| Step | Description |
| 1. Planning | Start by planning your truss system. Determine the type of truss, dimensions, and load requirements. |
| 2. Cutting Materials | Cut all the truss components (top chords, bottom chords, and webbing) to the required lengths. |
| 3. Assembling Trusses | Assemble the truss components on a flat surface. Use gusset plates to join the joints. |
| 4. Installing Trusses | Lift the trusses into position on the roof and secure them to the top plate of the walls. |
| 5. Bracing | Install temporary and permanent bracing to ensure the trusses are stable and correctly spaced. |
| 6. Roof Sheathing | Cover the trusses with roof sheathing, securing it with nails or screws. |
- Roofing diagram
- Kinds
- Layered
- Hanging
- sliding
- Differences for different types of roofing
- Corrugated sheet
- Ceramic tiles
- Metal tiles
- Ondulin
- Slate
- Nuances for various buildings
- DIY rafter installation
- Video on the topic
- Installation of pitched roof rafters. Boiler room | change house | barn | utility block
- Installation of a pitched roof truss system. Construction of a frame house together with the customer.
- Flat roof rafter system! House 9×12
Roofing diagram
A pitched roof’s rafter system is made up of several load-bearing components called rafters or rafter legs. They bear the weight of the snowdrifts in the winter and the roofing.
These are the primary components, but there are also several supporting ones:
- Mauerlat (horizontal timber strapping, taking the load from the rafters and distributing it evenly around the perimeter of the external walls);
- racks (vertical timber elements that provide the support of the rafters at a great distance between the walls);
- Straws (inclined supports that enhance the rafters);
- sill (horizontal beam laid along the roof and serves as a support element for racks).
From a design perspective, the rafter system is a framework that offers a level surface with a predetermined slope for installing roofing. It’s made of wood, either trim boards or a beam.
Although they are available, metal rafter elements are primarily used for industrial buildings and are not frequently utilized for pitched roofs.
An illustration of the pitched roof’s truss system in the picture:
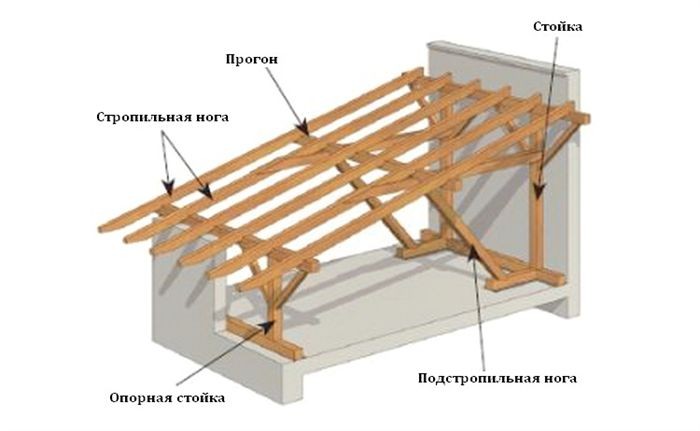
A pitched roof’s truss system design and assembly are essential building components that guarantee stability, longevity, and aesthetic appeal. The fundamentals of designing and building a truss system, such as material selection, component measurement and cutting, and safe framework assembly, are covered in this article. You can build a sturdy roof structure that resists the weather and improves the overall integrity of your building project by following this simple process.
Kinds
Rafter systems come in a variety of designs, each with unique features and intended use in varying environments. They vary in the type of load distribution on the walls and in how the rafter legs are supported. Let’s examine each of them in turn.
Layered
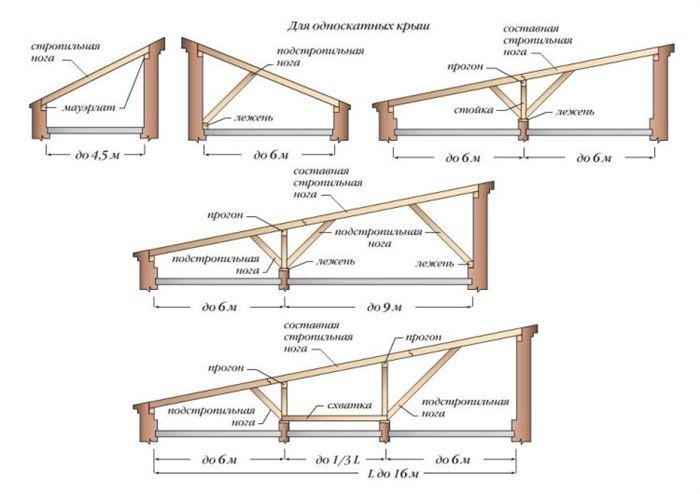
Homes with an internal, middle load-bearing wall typically use the layered rafter structure. The center portion of the rafter legs rests on the internal load-bearing wall (more specifically, on a bed through struts or intermediate posts), while the ends rest on the mauerlat (opposite points).
The layered system is applied with specific characteristics for a pitched roof. Supporting the rafters are two opposing load-bearing walls. The highest wall serves as the internal partition when it is not in use.
Struts are added to the system in order to boost the frame’s ability to support more weight. You can extend the spans’ lengths at their expense. Layered rafters without struts can be used for 1-slotted roofs, but their spans cannot be longer than 4.5 meters. With struts, the maximum length is 6 m.
Hanging
Ready-made farms are the form of hanging rafters, which are raised to the roof in a gathered manner. All that’s left to do is position them correctly and fasten the ends to the Mauerlat. Generally speaking, there are intermediate supports because a horizontal board called a puff connects the ends of the rafters.
It stops walls from bursting, allowing hanging rafters to be used on homes built of flimsy materials (like cellular concrete). Such a design is rarely used for tall buildings because of the increased difficulty in moving and installing them because of their size and weight.
Roofs where the house’s width is between four and five meters are more likely to use hanging rafters. Struts are used for reinforcing wider buildings.
sliding
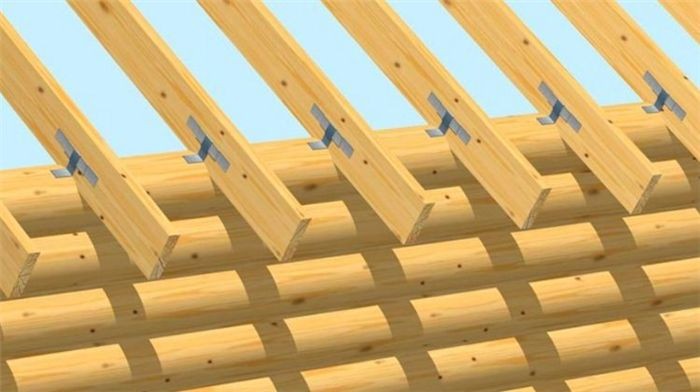
Sliding rafters are an accessory component, not a stand-alone structure. The material will shrink during operation as a result of absorbing and releasing atmospheric moisture, so compensation is required.
The sliding support, a fastening element with an oblong hole for the fastening element (bolt), is the primary and defining element.
The bolt adjusts for changes in the length of the part by moving along the length of the hole when the rafter leg’s size is altered. The general design of sliding rafters can be either layered or suspended.
Differences for different types of roofing
Every kind of roofing has unique qualities.
- weight,
- load bearing capacity,
- installation method, etc.P.
However, even though it is considered when designing the project, the roofing material does not significantly affect the rafter system’s design. The nature of the sheathing, which includes the thickness, density of the planks, and other characteristics, is what primarily distinguishes rafters for various coatings.
Corrugated sheet
Dense lathing is not necessary for rafter systems made of corrugated sheets because longitudinal strip joining is not required. Generally speaking, the planks are positioned so that there is enough space between the corrugated sheet fastening components.
The layout of the rafters itself is decided by the number of additional supports and the distance between the opposing walls.
Ceramic tiles
It is necessary to use a thick sheathing with a waterproof backing when installing ceramic tiles. Due to the significant weight of the sheathing and roof, extra supports like struts and racks are required to reinforce the rafter structure.
Metal tiles
Compared to corrugated sheets or other sheets, metal tiles are made up of individual sheets that are relatively small in size. The sheathing underneath it is installed so that the fastener installation points and sheet joint lines are precisely above the planks.
Generally, the rafter structure does not need to be reinforced; however, on steep slopes, extra supporting components must be used. This article describes how to build a pitched roof out of tiles and metal tiles.

Ondulin
Since ondulin weighs less than most materials, a continuous sheathing installation is not necessary. The size of the building and outside variables are taken into account when choosing the rafter system. In this instance, there are no unique needs for the roof.
Go here to learn how to lay ondulin on a pitched roof.
Slate
Slate resembles ondulin in appearance but is heavier. After determining the roof’s weight beforehand, a reinforced rafter system must be installed. This is particularly crucial when installing the covering over a sizable roof area because the rafter legs cannot be allowed to sag excessively.
No matter what kind of roof covering is used, snow load needs to be considered. Since shed roofs typically have a small inclination, snow usually just sits on the roof rather than rolling off. When designing a project, one should consider that it can weigh several tons. Go here to learn how to install slate on a pitched roof.
Nuances for various buildings
The type of building has little bearing on the lean-to rafter design. In any case, rafter supports will be on opposing walls, and the length of these supports will dictate whether or not additional supporting elements (such as struts and racks) are present.
The rafter system of the extension differs in that the upper portions of the rafter legs are fastened to the wall like brackets rather than resting on the Mauerlat.
The weight of the upper edge rests on the adjacent wall, while the main load is supported by the extension’s outer wall. Here, the support is a horizontal board that is firmly fixed to the wall in place of a mauerlat beam.
DIY rafter installation
You must get ready for rafter self-assembly.

- edged board 50 mm thick, 140-150 mm wide for rafter legs, struts and other structural elements;
- timber 100 × 150 mm for racks and Mauerlat;
- metal connecting elements;
- threaded rods M12 or M14 with nuts and washers;
- roofing felt for waterproofing wall ends.
Equipment required:
- hacksaw, electric saw;
- electric drill with a set of drills;
- wrench;
- shoe knife;
- measuring tools (tape measure, ruler, building level, etc.).P.).
How to install:
- Installing a double layer of roofing felt on the upper ends of the walls. Laying timber frames (mauerlat) on them with fastening to anchor bolts.
- Installation of an intermediate support beam – a bench (if required by the distance between opposite walls). Installation of racks, fixing their position using metal perforated corners and inclined strips – struts.
- Laying rafter legs. If the length of the boards is not enough, perform longitudinal joining using overlays from the same board attached with bolts. Sometimes, to create a reinforced structure, double boards are used for rafter legs.
- Aligning the rafter legs on a plane. Check the horizontal and inclination angle of the slope, place wooden scraps under the sagging boards.
- Installation of struts. Checking the strength of connections.
- Installation of sheathing. The planks are laid so that the roof covering can be installed according to technological requirements.
You can then start installing the roof.
Pitch roof truss system installation – in the video:
Developing a pitched roof truss system is essential to guaranteeing the longevity and steadiness of your roof. This procedure calls for meticulous assembly, accurate measurement, and careful planning. Understanding the design principles and adhering to the correct assembly procedures will enable you to build a sturdy structure that can sustain different weather conditions and adequately support your roofing material.
It’s critical to focus on the alignment and safe fastening of every component during the assembly process. Utilizing top-notch supplies and suitable equipment will have a big impact on the result. Long-term time and cost savings can be achieved by routinely inspecting assembly for alignment and structural integrity.
The most important thing to remember when working on roof truss systems is safety. Accidents and injuries can be avoided by providing a safe working environment and wearing the appropriate protective gear. Whether you’re an expert or a do-it-yourself enthusiast, following these safety measures will help you finish the project effectively and safely.
In the end, a well-thought-out and correctly put together pitched roof truss system offers vital structural support in addition to improving the visual appeal of your house. You can get a sturdy roof that will last for many years by adhering to best practices and keeping an emphasis on quality and safety.


