
It’s a rewarding project that needs careful planning and execution to build a DIY bathhouse foundation. A foundation is the essential base upon which all other constructions, even larger traditional bathhouses or tiny backyard saunas, are supported. Stability, durability, and moisture resistance are essential elements that guarantee the integrity of your bathhouse over time. These qualities are provided by a well-built foundation.
Selecting the ideal site for your bathhouse is crucial before you start building. To avoid water buildup beneath the foundation, pick a level location with adequate drainage. Remove any rocks, debris, or vegetation that might compromise the stability of the foundation from the site. To make sure that the structural requirements are met, take into consideration the local building codes and regulations.
Next, choose the kind of foundation that will work best for your spa. Wooden post foundations, concrete pier foundations, and concrete slab foundations are typical choices. Depending on your bathhouse’s size, climate, and soil conditions, each type has advantages. For example, wooden post foundations are more adaptable for uneven terrain, while concrete slab foundations offer a sturdy base and are relatively simple to build.
After deciding on a foundation type, mark the location’s dimensions and excavate trenches or holes in accordance with the plan you have in mind. Make sure the trenches are deep enough to hold the foundation material and any necessary reinforcement, and that the dimensions are accurate. To create a solid foundation for pouring concrete or installing posts, be sure to level the trenches and compact the soil.
It’s time to pour the concrete or install the posts after the trenches or holes have been prepared. To guarantee correct mixing and pouring methods, adhere to the manufacturer’s instructions or seek advice from a local specialist. To withstand the weight of your bathhouse and the local soil conditions, use high-quality materials and reinforce the foundation as necessary. Before starting any more work, give the concrete enough time to cure or the posts enough time to set.
Paying close attention to detail and following safety regulations are essential when building your own bathhouse foundation. You will build a solid base that will support your bathhouse for many years to come if you take the time and make the effort to complete this fundamental step. Your DIY bathhouse foundation can serve as a solid starting point for your construction project and a monument to craftsmanship with the correct design and execution.
| Materials Needed: | Concrete blocks, gravel, sand, cement, waterproofing membrane, rebar |
| Steps: | 1. Prepare the site by clearing and leveling the ground. 2. Dig trenches for the foundation, ensuring they"re deep enough for stability. 3. Lay gravel at the bottom of the trenches for drainage. 4. Place rebar and build the concrete block walls, ensuring they"re level. 5. Fill the blocks with concrete and reinforce with rebar. 6. Apply waterproofing membrane to prevent moisture penetration. 7. Let the foundation cure for several days before further construction. |
- Recommendations for choosing a foundation for a bathhouse
- General rules and nuances of construction
- Strip foundation
- Calculation of basic foundation parameters
- Materials and tools
- Marking
- Excavation
- Formwork
- Reinforcement
- Fill
- Removing formwork
- Brick strip foundation
- Rubble concrete tape
- From foundation blocks
- Columnar foundation
- Pile foundation
- Screw foundation
- Bored pile foundation
- Slab
- Video on the topic
- Foundation for the bathhouse 6.5×3 m / The foundation for the bathhouse is 6.5x3m
- Do-it-yourself bathhouse foundation. / Foundation for a bathhouse with his own hands.
- HOW TO MAKE A FOUNDATION FOR A BATH WITH YOUR OWN HANDS? Cost of materials for a 6×4 bath in 2026.
- HOW TO MAKE A BATH FOUNDATION YOURSELF !!!
Recommendations for choosing a foundation for a bathhouse
You must consider the kind of walls and soil when selecting the kind of foundation. Thus, building walls out of brick and expanded clay concrete blocks may put too much weight on a columnar foundation. Screw piles are the best option for slopes. They’ll find a solution to the marshland issue. Screw or driven piles can be used on peat bogs with layers as thick as three meters, or a monolithic slab.
Money is saved with a columnar foundation. However, in order to lay it, two prerequisites must be met: the building must be lightweight, and the soil must not be prone to heaving during frosts.
Depending on the kind of soil, a slab is the best choice for fluid and plastic soils like loams and clays, and screw piles are the best option for sand.
For information, try rolling a rope to identify the kind of soil this is. This kind of soil is fluid-plastic if it adheres to your hands instead of rolling out.
On firmly compacted plastic (clay breaks into fragments upon contact with the ground) and firm soils – a column base or strip.
Strip foundation is used everywhere. Most often, it’s poured by home craftsmen. even when there are less expensive alternatives available. The explanation can be found in the method that has developed over many centuries for the kind of shallow monolithic strip foundation that underlies small buildings like bathhouses.
Important note: conducting engineering and geological surveys is not required if you are unsure about your foundation choice. Your neighbors are a good source for interesting details. You won’t have to pay for everything unless a new area is being developed for construction. However, there is also the option to pool resources with other developers, which will result in cost savings.
Visit the link to view comprehensive recommendations for selection.
General rules and nuances of construction
You must consider both general guidelines and specific details that are contingent on the building’s weight and dimensions when constructing a strip foundation for a bathhouse.
- Construction work is carried out in strict sequence: determining the thickness of the tape and the depth of the trench, purchasing materials and tools, marking, excavation, filling the cushion, installing formwork, installing the reinforcing frame, pouring concrete, dismantling the formwork.
- When constructing residential buildings, the width of the plinth is usually 10-15 cm greater than the thickness of the walls. This is due to the large mass of the building under critical operating conditions: heavy snowfalls accompanied by squally winds. For baths, the calculated thickness of the foundation is almost always less than the walls. Here, in accordance with building regulations, it is necessary to equalize the indicators. For example, the estimated width of the foundation for a 6×4 m bathhouse made of timber with a cross-section of 25×30 cm is around 20 cm, with a possible deviation of 1-2 cm in any direction. The base will have to be poured with a thickness of at least 25 cm. And these are extra costs for materials, and significant ones at that. The exit in the tape is in the form of a trapezoid, where the bottom is not widened, as is observed in the construction of residential buildings, but, on the contrary, is narrowed.
- A sand cushion must be poured and compacted. By the way, this requirement applies to all types of foundations, except driven and screw piles.
- Before work begins, it is determined how the water will be drained. If pipes are laid in advance in a septic tank or sewer system, public or individual. With a shallow foundation – under it, with a fully buried foundation – through the concrete of the base. Otherwise, you will have to spend a lot of time and effort on laying the sewer pipe.
- In order not to constantly check the level of the base with a level, a horizontal line is drawn on the formwork in advance or nails are driven in at 50-60 cm intervals. A hydraulic level will help you quickly draw a horizontal line.
- Between the wall and the base there must be any type of cut-off waterproofing: roll, coating, penetrating. The durability of the building depends on its quality. After all, concrete, like a pump, draws moisture from the soil and transfers it to the walls. Recommendations to carry out complete waterproofing of the poured strip will only increase construction costs. This is not a basement, where such an operation is mandatory.
- Work on the construction of the building can be carried out only after the concrete has gained strength – 28-30 days.
- You can independently determine the level of groundwater and the type of soil. To do this, you need to dig a hole 1-1.2 m deep and see if water appears at the bottom, as well as whether there is clay (peat layer) and what is its plasticity (heaving is determined).
- When choosing a shallow strip foundation (SSF), in many cases, formwork can only be installed for the base – the lower part will be held by the walls of the trench. But then you need to dig carefully and exactly according to the markings. As a last resort, the walls can be lined with plywood or flat sheets of slate. Some experts advise using foam sheets for these purposes. But here you need to assume that it will cost less.
Strip foundation
The strip foundation may be prefabricated or monolithic. You need to execute every technological operation required for foundation construction when pouring concrete mortar into a tape. So let’s get started with it; we offer detailed instructions. We will address any subtle differences in technology for other wall base types individually if they occur.
Calculation of basic foundation parameters
You don’t need to perform calculations for a bathhouse. The structure itself sets the parameters.
Width. The upper part of the plinth must be equal to the thickness of the wall. This is at a minimum. If internal or external insulation of walls or simply facing them will be carried out, this must be taken into account and included in the dimensions of the foundation (frame construction). Following the logic, the supporting part of the base under the walls should be the same. But in order to save materials (cement and sand), it can be made narrower, and the tape hidden in the ground can be poured in the form of a trapezoid with a drop-down top, unlike the foundation for heavy buildings, where everything is done the other way around.
In order to provide context for these recommendations, the following formula is used to determine the first indicator: P=S:L:Q, In Which Case:
- P is the width of the supporting part of the foundation;
- S is the mass of the building;
- L is the length of load-bearing walls;
- Q – soil resistance.
The following formula is used to determine the mass that the building presses against the earth: S is equal to M + N + C + B.
- S is the mass of the building in kg;
- M – the weight of the foundation, walls, ceilings and roof, as well as the floor, if the logs rest on the foundation or are attached to the walls;
- N is the payload exerting pressure on the foundation through the floor (people, furniture, etc.).d.) and walls (attachments, for example, a boiler);
- C – the maximum possible mass of snow on the roof (the snow load can be viewed on the map and then calculated independently or using an online calculator);
- B – wind load. Determined similarly to snow. Online calculator on the same site.
The obtained result needs to be multiplied by 1.2-1.25 in order to provide an extra support area for out-of-the-ordinary scenarios.
GOST 25100-95, "Classification of soils," is a source for information on soil resistance. Here are the features of the most prevalent soil types (in kg/cm 2) from the whole list:
- loam – 1.5-2.8;
- dense, dry clay – 1.6-3.0;
- fine sand – 2.2-3.4;
- medium-grained – 2.5-3.6;
- sandy loam – 2.6-3.6;
- coarse sand – 3.6-4.6;
- gravel, crushed stone, pebbles – 5.1-6.5.
We will perform a particular calculation using the formula for a bathhouse composed of lightweight materials (aerated concrete, foam block).
Thus, 105,600 kg was found to be the mass of a 6 x 6 m bath as a consequence of computations. The external wall cladding was responsible for the additional length of 24.3 meters found in the base tape. The soil type is sandy loam, and it can support 2.8 kg of weight.
We perform the calculation by entering numbers into the above formula: 105600 lbs: 2.8 kg/cm 2 at 2430 cm. 15.5 cm is the outcome. Increase by 16 centimeters. As you can see, the computed value is much smaller than the wall thickness (20 cm plus 3 cm of cladding).
Length. Each wall’s monolithic tape length is equal to the wall’s length plus the sheathing’s thickness.
Depth. It is sufficient to dig 50–70 cm deep in regions with stable soil, including dry, dense clay (typically go through the fertile soil layer and add 20 cm to the cushion), and below 1.5 m for heaving soils when building with wood and light building materials. It is necessary to descend below the freezing point.
Base elevation. Aerated block walls should have a base that rises at least 15-20 cm above the ground; cinder block walls should rise 25–30 cm, brick walls should rise 30–40 cm, and log walls should rise roughly 60 cm. We want to be clear that these are professional recommendations. The only requirements are a minimum height of 15 cm and no other restrictions. As a result, the bathhouse’s owner must determine how much to raise the structure above the ground.
Materials and tools
You will need the following to fill a shallow strip foundation for a bathhouse:
- a plumb line to control the vertical position of the pegs;
- pegs – wooden or pieces of reinforcement. Driven into the outer and inner corners of the foundation. With a large length of the wall and along the perimeter of the base;
- a roll of twine – helps to mark;
- roulette;
- level;
- hydraulic level;
Be aware that the laser level can be substituted with a level or a hydraulic level.
- knife or scissors for cutting twine;
- bayonet and shovel;
- ax – to cut out encountered tree roots, sharpen pegs;
- a pickaxe, or even better, a crowbar – to turn out stones that interfere with deepening the trench;
- trolley for removing soil;
- finished formwork. In its absence, edged boards of grade II or III (with wane of any size on one side) with a thickness of at least 25 mm, and for the top also with a width of at least 10 cm, plastic panels, plywood or OSB with a thickness of 10-15 mm;
- chainsaw or hand tool for cutting boards and beams;
- nails or screws for assembling formwork with a length of at least 7 cm;
- a hammer for nails or a screwdriver with a bit for self-tapping screws;
- spacer wedges for fixing the formwork (bars no less than 5×5 cm);
- large cross-section timber for posts, metal pipe, square or round, with a wall thickness of no more than 1.5 mm. If the thickness is greater, difficulties will arise when attaching the shields;
- sand for filling the cushion, as well as for preparing a cement-sand mortar, if you decide not to buy ready-made concrete due to the steep price;
- reinforcing mesh or rod with binding wire with a diameter of 0.8-1.2 mm;
- Bulgarian;
- plastic linings for reinforcement. Can be replaced with bricks;
- pliers;
- sewer pipes;
- ready-made concrete or materials and tools for preparing the solution:
- concrete mixer – without it, it will not be possible to pour the foundation in one go during daylight hours;
- Portland cement M400;
- fiberglass;
- sand;
- water.
Marking
Making a layout diagram, which establishes the orientation of each wall and where it starts, should come first when marking the foundation. Peg No. 1 (the starting point, according to builders) is hammered in here. Following this, a line is drawn outlining where the wall’s foundation will be placed. Usually, it runs parallel to the fence and is fastened to it.
After being given the go-ahead to lay the foundation, you must mark the foundation’s outer and inner boundaries at right angles. To accomplish this, use:
- spider web method;
- golden triangle rule (Pythagorean theorem);
- cast-offs.
The easiest method is to apply the Pythagorean theorem, which you probably learned in school, to the marking. It states that the square of the hypotenuse’s length equals the sum of the squares of the lengths of the two legs. Few people considered the useful advantages of this equality while they were in school. Nonetheless, experts in right angles have observed that legs measuring 4 and 3 meters result in a hypotenuse that is precisely 5 meters long (note: a discrepancy of 1 centimeter causes a minor inaccuracy, regarding which we caution you). This is how the entire markup procedure appears:
- two strings are tied to the starting peg;
- the first is stretched along the line of the wall already marked on the site;

- using a tape measure, find the length of the foundation strip under the wall, after which peg No. 2 is driven in (the accuracy should be up to a centimeter);
- Exactly 3 m is measured from the first peg in the same direction and peg No. 3 is driven in. A cord is tied to it and cut off exactly after 5 m;
- the second twine tied to peg No. 1 is cut off after 4 m;
- the cut cords are brought together at the ends, without overlapping, but end to end and stretched on the adjacent wall;
- peg No. 4 is driven in at the connection point.
The hardest marking step, which was the first, is now finished. An angle of 90 degrees is the outcome. You can keep using the previously established algorithm to display each corner. However, it’s a time waster. Sufficient:
- measure the length of the foundation for the adjacent wall and drive in peg No. 5;
- tie to pegs No. 2 and No. 5 along a cord and cut off a piece equal to the length of the parallel wall (again, accurate to the nearest centimeter);
- bring the ends together and tighten. Drive in the last peg (sixth) at the convergence point.
When everything is done properly, all of the angles should be right. However, the completed work still needs to be quality-checked. Measure the diagonals in order to do this. If it’s very large, you can use a tape measure, but twine works better. The lengths ought to coincide precisely to the millimeter. An error has occurred if the difference is greater than one centimeter. Here, there are two possible outcomes:

- start over again;
- ignore the deviation if it is within 1-3cm. If there is a larger difference, experts still advise re-marking and checking all the lengths again.
Pulling the twine along the base’s inner border completes the marking. Remind yourself that calculations are used to determine the foundation’s width.
Excavation
The soil will determine the kind of trench needed for the foundation. It digs along the marking line while preserving the walls’ verticality (as confirmed by a plumb line) if it is dense and does not crumble. In this instance, the plinth’s formwork is installed. Certain experts advise enlarging the trench’s perimeter a little bit and putting in permanent plywood or foam sheet formwork along the walls. The right to life is shared by both choices. The building’s owner has the final say over what to select. All we need to know is that our ancestors filled the earth end to end with concrete.
The trench is made wide when the walls are collapsing, allowing the formwork to be installed along the full height of the foundation.
Using a bayonet shovel, excavator work starts by removing the top layer of soil along the foundation’s edge. In order to avoid disturbing the markings, you must work carefully. The trench is then filled in to the designated depth, cleaned, and manually compacted (manually compacted if a vibrating tool is available).
Verifying the trench bottom’s horizontal level. You will need a board and a level for this; the board can be taken from the future formwork. Take note of the fact that practically all recommendations state that a hydraulic level should be used for the check. However, they don’t say how to accomplish this. And they’ll be unable to do so. For this kind of operation, the tool is worthless.
The level is set on the board that has been laid out at the bottom of the trench. When there are deviations greater than one centimeter, the bottom is either leveled or cleaned.
The last step forms a pillow beneath the foundation. Sand, crushed stone, broken brick, or a combination of these materials can be used to make it. Density:
- 6-10 cm for a shallow foundation;
- 15-20 cm – fully recessed.
Sand is pressed down, then wetted down and compressed once more. If the thickness is significant, it is best to break the process up into multiple steps, adding 5 to 7 cm at a time. Once the pillow has dried, you can resume your work. That works out to be about two or three days.
Important note: before the sand cushion is filled, the sewer pipe must be installed beneath the foundation, below the freezing point of the soil, if water is to be drained into a septic tank or sewer.
Formwork
Only the base—the portion of the foundation that is above ground—needs formwork for shallow tape. Some owners in this situation just level the trench’s walls. However, some people also sheathe in inexpensive plastic or plywood sheets. In this instance, the makeshift formwork is fastened to the ground using nails that are 20 cm long—or, to use carpenter terminology, 200—in steps of roughly 50 cm.

Here is the step-by-step installation procedure for the upper section of the formwork.
First step. The external wall length is measured for every wall, and then the internal wall lengths are measured in the same way.
Step two. The boards are trimmed to size with a chainsaw. It is best in this situation to arrange them individually on each wall.
Step three. They are gathering shields. They should be about 5 cm wider than the base’s height. In case the boards’ dimensions prohibit it, you have the option to surpass the indicator. It is best to avoid joining two boards together at the pouring level in this situation. If not, plastic film covering the formwork from the inside will be required. The bars are fastened in the center and around the edges from the back.
For information, the step of installing panels can be omitted by assembling the formwork directly on stakes inserted into the ground.
Step three. Wooden stakes or metal pipes are pushed in 60–80 cm intervals around the perimeter and corners so that the space between the attached panels is equal to the foundation’s thickness. Take a step back if you are worried about the walls collapsing when driving stakes. However, spacers will need to be used in between the stakes and the shield (board trimmings are typically used for this purpose).
Step #4. In order to prevent the formwork from being ruptured by the central fiber structure, each driven stake is additionally fastened with a spacer. The stakes for replacing the spacer bar in this instance need to be raised higher.
Step Five. Stakes are fitted with shields. After that, it’s best to cover them with plastic wrap so the boards can be removed and still remain clean for future use.
Step Six. Every 50–60 cm, strips are nailed to the top of the shields to provide rigidity to the system.
Step seven. The corners of the boards have their joints inspected. Less than 2 mm should separate any gaps. If there are more, they are covered with film or sealed with homemade materials, which would be the best course of action.
Step 8: The panels are covered with earth (a heap is formed) to stop cement laitance from leaking between the soil and the formwork.
Reinforcement
Knitting wire, wire rod (d6–8) mm for vertical and horizontal rods, and reinforcing rod (d12–16 mm) for longitudinal rods are needed to make a reinforcing frame.
Because of the bath’s small size, you can use a template to knit the frame on the surface rather than in a trench. Making it yourself isn’t that tough. At the building’s corners, the completed frames are tied together and placed in a trench.
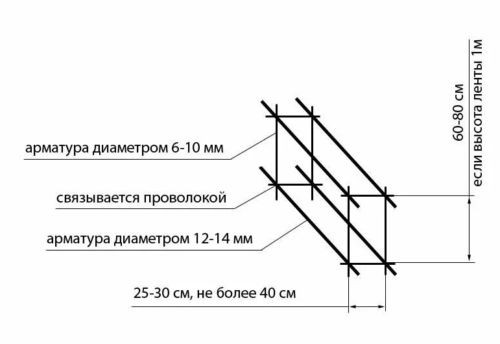
The frame may have six or four rods. Two from below and one from above in the first instance, and three in the second. The rods have vertical and transverse rods attached to them at intervals of 50 centimeters; it is best to bend them using the letter "P." When utilizing 30-cm-long, short horizontal rods, they are laid overlapping.
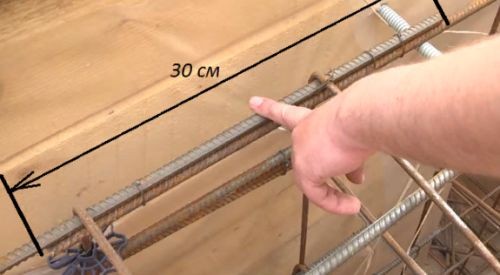
Reinforcing bars are overlapping and 90° bent to strengthen the corners. You will need two pieces of pipe, one measuring 50 cm in length and the other 80–100 cm in length, with an internal diameter of 20–30 mm in order to give the rods the necessary configuration.

Wire that is 18 to 20 cm long is used for the tying. It is first trimmed to length, bent in half, and the fastened parts are clasped multiple times, leaving 3–4 cm of free ends. They’re crocheted. Readers familiar with the information on semi-dry screed (found here) will recall that a screwdriver works well for these kinds of tasks.
A frame is assembled and then lowered into a trench. The following requirement is crucial to meet: the reinforcing belt needs to be placed inside the concrete strip, 5 to 7 cm away from any of its edges. For this reason, linings made of brick, wood, or plastic are used below. Special clamps in the shape of a multi-beam star are used on the sides to ensure that the frame does not lean against the formwork when concrete is poured.
The diagram below illustrates how the inner and outer foundation strips are connected.
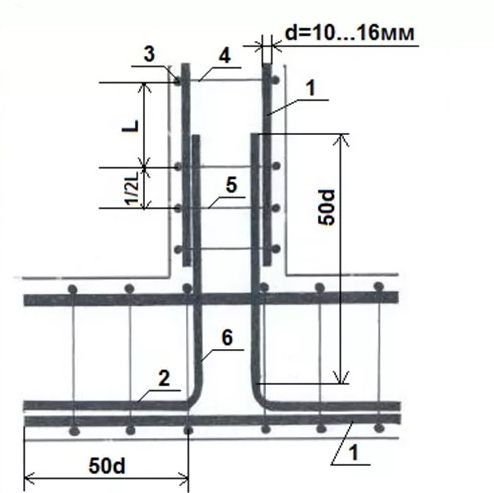
Diagram showing how the inner and outer foundation strips are connected. 1. Supporting horizontally 2-the intersection of an L-shaped rod 3. Supporting structure vertically 4-the transverse rod at the frame’s end 5-additional rod Sixth — An L-shaped rod
Fill
The consistency of the pouring process and the quality of the concrete determine the foundation’s strength. In the event that the first condition is met without issue, there may be challenges with the second because it can be challenging to fill one during the day. As a result, a lot of people come up with a workaround: they buy a ready-mixed concrete mixer and make the remaining portion of the solution by hand.
Concrete of grade M300, the most widely used, is required. It is made up of four parts: three parts sifted sand, four parts crushed stone free of foreign inclusions, and one part Portland cement M400 or M500.
A shovel or trowel is used to level the pour at a thickness of 20 to 30 centimeters. Here, a vibrator is used to compact the layers or a reinforcement bar is used to bayonet (pierce) each layer.
Film should be applied to concrete for seven to eight days, either at night or in the rain. It is advised to pour a large amount of water at this time of day.
Removing formwork
After the 14-day period, the formwork is removed, and the base’s outer walls are either finished with decorative elements or sanded using a grinder (both of which are optional). Building walls should begin once the concrete has strengthened; it can take 28 to 30 days for the concrete to dry.
Some builders start building walls out of lightweight materials as soon as the formwork is taken down. Although there is a slight chance, the foundation tape could get damaged. As a result, the owners choose when to start building again.
Brick strip foundation
Old, solid red brick (new ones are much more expensive) works best for the foundation of a 4×6 bathhouse built with your hands on sand (other types are not used due to high hygroscopicity). Pouring a concrete base is preferable if the level of groundwater is high.
The marking and calculation procedures are the same as for monolithic tape. Because it is more convenient to work in, the trench during excavation is wider than the intended foundation. Formwork and an reinforcing frame are not necessary. Masonry is a craft that almost anyone can do at home.
- you need a well-compacted cushion of crushed stone (bottom layer) and sand;
- masonry joints must be treated with coating-type waterproofing materials – cement mortar absorbs water well, as a result of which frost can tear the joints.

Rubble concrete tape
When there are a lot of stones in the fields, you can save a lot of money on sand and cement. It is true that if the landowners did not use machinery to remove the stones, you will have to spend time assembling.
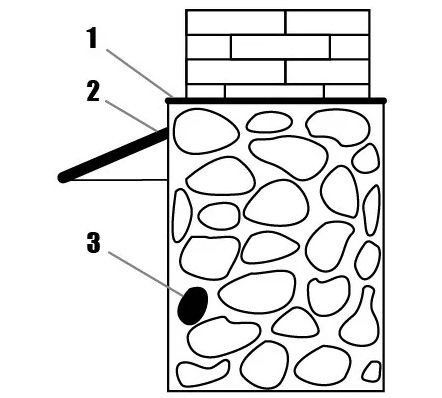
The technology is similar to pouring a monolithic tape in that stone fills the role of reinforcement, which is removed. It should be smooth and free of cracks; you can tap it with a hammer to make sure. The following order is followed when filling an order:
- a layer of concrete consisting of 3 parts sand and one part M400 cement is poured onto the prepared cushion;
- stones are placed in it at a distance of approximately 5 cm from each other (in practice, the rule is not observed);
- another portion of the solution is poured onto them;
- stones are laid again and so on until the very top.
The plinth’s top needs to be leveled and entirely covered with mortar.
From foundation blocks
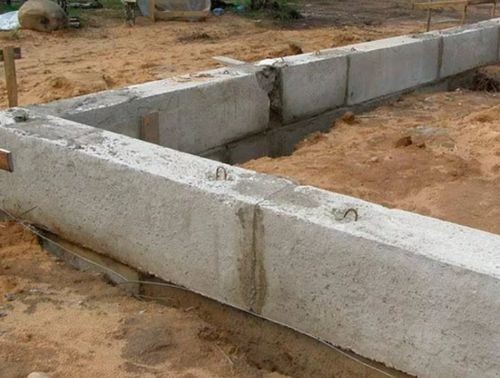
It is rare to use foundation blocks for a bathhouse’s base. Their usage is only warranted when a basement or semi-basement is being built beneath the structure, or when expediency in the completion of the project is required.
In addition, the FBS’s dimensions—2380 cm in length, 30 cm in width, and 500 mm in height—are perfect for a bathhouse because they can support any weight. The multiple length of the FBS in relation to the length of the foundation strip is resolved by the presence of additional blocks of varying lengths, enabling you to create any foundation configuration.
The bricklaying method (with ligation) is used to lay the blocks on a sand bed without the need for formwork. Cement mortar, which is made by mixing one part cement with three parts sand, is used to fill the spaces between the blocks.
The foundation’s exterior is insulated and waterproof.
Columnar foundation
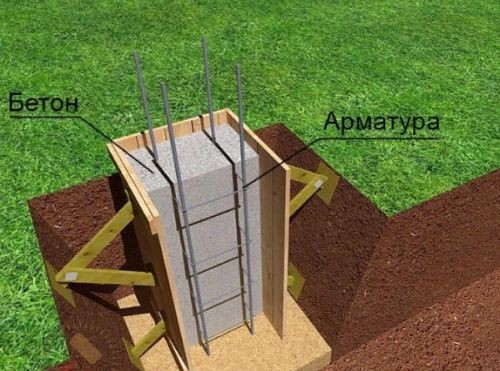
Similar technology is used to erect the columnar foundation as well as the other foundations. This holds true for excavation work, markings, and computations. Depending on the wall’s material, supports must be placed at the building’s corners, where the internal and external walls converge, and every 1.5 to 2.0 meters along the perimeter.
You can use a hand drill or a shovel to dig holes. In the latter scenario, smooth-walled wells are produced. The material from which the pillars will be made determines the holes’ width, length, and, in certain situations, diameter. Thus, these are the ideal parameters:
- for brick – 50×50 cm;
- rubble stone – 60×60 cm;
- reinforced concrete – 30×35 cm;
- asbestos-cement pipes – Ø 20 cm.
Sand that is about 20 cm thick is placed in the bottom of the holes, compacted, spilled with water, and then compacted once more. You can start the main work on days 2-3. We’ll use brick pillars as an example to show how this kind of foundation is built.

The following is the work algorithm:
- a reinforcing mesh cut to fit the size of the pit is laid on the sand cushion. Considering that the reinforcement should be in the lower third of the concrete, and the layer thickness is recommended to be kept at around 20 cm, a piece of brick or wood 3-5 cm high is placed under the mesh;
- cement-sand mortar (preferably M300) is poured onto the mesh;
- The pits are covered with film at night and watered during the day. Work can be continued after 8-10 days.
After bricklaying is finished, all sides of the masonry joints are waterproofed. This is a need that must be met. If not, the pillar might collapse due to tearing of the cement-sand mortar caused by frost.

Concrete or asbestos-cement pipe pillars are thought to be more dependable (formwork is required). In both situations, the column’s full height is covered with a reinforcement cage, and then cement-sand mortar is applied.
Pile foundation
A pile foundation is required in areas with shifting elevations, wetlands, and weak-bearing soils. It can be bored, screwed, and driven. A hammer-in structure is not necessary for a bathhouse right away because the labor costs associated with building one would be extremely high. Pointed-end logs can be used to cut construction costs, but the bathhouse won’t last long on such piles.
So let’s examine how to build a bathhouse foundation using:
- metal rods – this is the simplest option, but not always cost-effective;
- piles obtained by filling holes drilled in the ground with concrete.
Preparing to construct a do-it-yourself bathhouse foundation requires important actions to guarantee stability and longevity. Every choice you make affects the strength of the foundation, from picking the ideal location and preparing the ground to selecting appropriate materials like concrete and gravel. Longevity also depends on knowing the building codes in your area and making sure your drainage is adequate. This post walks you through each step, providing helpful hints and things to think about so that you can successfully lay the groundwork for your bathroom renovation.
Screw foundation
In low-rise construction, screw piles are a relatively recent development. Nonetheless, they are spreading incredibly quickly. They appear to be about to significantly relocate the strip foundation. All the necessary conditions are met for this:
- short installation time – a team of 3-5 people can complete it per shift;
- acceptable cost of materials and installation;
- The possibility of re -use.
The technology is simple. Begins with calculating the number of piles. Here you can use the data SP 24.13330.2011 "Pile foundations". For example, with a barrel length of 2.5 m, its diameter of 108 mm and wall thickness 4 mm, a blade diameter of 300 mm and its thickness of 5 mm, a screw sovere withstands a load of at least 5 tons. Next, the mass of the bath is calculated (the calculation is given above). The resulting amount is divided by the permissible load on the pile. The result is the number of piles. Then they must be evenly distributed under the walls, noting the place of screwing with pegs.
Another piece of advice comes from the construction rules, where the diameter of each pile’s trunk is used to determine how many piles are needed:
- 76 mm-step 1-3 m. Used for small baths or built of light materials;
- 89 mm-step 2-4 m. For small buildings made of any materials.
At least 50 cm of solid soil is buried beneath the piles. Furthermore, it’s possible that they are screwed in at different depths in a small space. The blade must fully surpass the typical freezing point as the second prerequisite. After being cut to the head, the trunk must jut out above the ground by at least 0.5 m.
Keeping an eye on the vertical is crucial when screwing in piles. If there are any deviations, manual adjustments are made. Take it off and start over from the beginning if it doesn’t work. Corner piles must meet this criterion. At intermediate posts, a small deviance is permitted.
Hand tensing is simple. The following order is followed when performing operations:
- Use a garden drill to make a hole 20-30 cm deep. Anything more is strictly prohibited;
- for better passage of the pile, water is poured into the hole;
- crowbar is inserted into the mounting hole. Pipes are put on its ends to increase the length of the lever;
- two or four people screw in the pile.
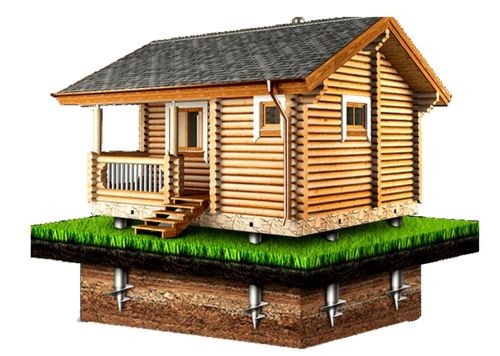
Cement-sand mortar is poured into the pipe’s interior cavity following installation and trimming. This simultaneously resolves two issues:
- the pile shaft is strengthened;
- the metal is protected from the inside from moisture, and, consequently, from rapid corrosion.
The cut piles have the grillage caps fastened to them. In the restroom, it could be wooden or metal. In this instance, the pile field may be made more rigid by using the lower logs of the log house.

Bricks or blocks are used to seal the space between the soil and the grillage, or pick-up as builders refer to it. Additionally, you have the choice to fill, sprinkling all the way around the perimeter of the grillage.
Bored pile foundation
Bore holes are an additional option for piles. The technology is straightforward: a hand drill is used to drill boreholes into the earth. They are enlarged at the bottom to fill the sand cushion (see the picture below).
Sand should be poured and tamped. There is roofing felt covering the walls. Create a formwork of asbestos-cement pipes above the well. Bring the supporting frame down. Pour the concrete. Once the piles have gained strength, strap them together using an I-beam or channel. Using a bar makes it feasible as well.
Blocks or bricks are used to cover the filler as well.
Slab
In the far north of Russia, a slab foundation for a bathhouse is as uncommon as an African native. However, it still happens. So let’s think about it. We’ll point out right away that there are two potential foundation choices:
- monolithic – concrete is poured over the reinforcement;
- precast – standard floor slabs are used.
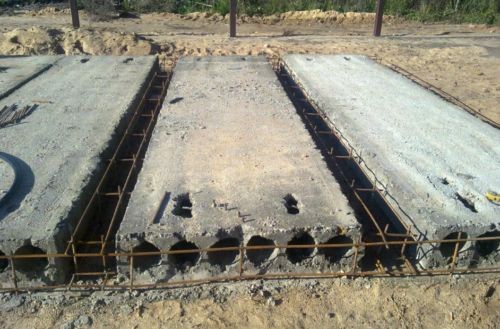
With the exception of marshy areas, both approaches can be applied to any kind of soil. This is advantageous. However, the high cost of labor and supplies is a drawback. Therefore, the cost of a monolithic slab will exceed that of the bathhouse. Slabs of flooring will cost a little less. However, they will also take a lump sum from the household spending plan.
To assist individuals who are not numerate, we provide the step-by-step work algorithm:
- a jelly dug a bulldozer or an excavator. Its dimensions should be 10 cm larger, on each side, compared with the length of the walls of the building. Depth: at least 20 cm (if peat, then 1.0-1.5 m);
- the bottom is aligned;
- a pillow is put at a thickness of at least 10 cm. With soil waters close to the surface, it is necessary to make 2 layers of disposal of 10 cm. First of the crushed stone, the second of the sand. To prevent mixing layers, crushed stone is covered with geotextiles. Each layer is trimmed;
- The sand is aligned – there should be a horizontal with a height drop of not more than 1 cm;
- Lighthouses are installed;
- A reinforcing mesh with cells 20×20 cm is laid over the entire surface. It should be in the lower third of the plate. Given that it is recommended to fill the plate with a thickness of about 25 cm, the reinforcement should be raised above the sand 3-5 cm. If a frame is being made, then take a rod with a diameter of 10-16 mm and knit it with wire (it is not advisable to weld – when the concrete expands, the welding seam may break);
- Formwork 20 cm high is installed along the perimeter of the pit;
- M300 grade concrete with water permeability of at least W8 and frost resistance F200 is poured. The operation must be performed in one step. T.To. You won’t be able to prepare such a quantity of solution yourself even if you want to, you will have to buy it;
- the surface of the slab is leveled along the beacons;
- upon completion of work, the foundation is covered with plastic film for 2 weeks. In the first 6-8 days, the stove is watered once a day.
Constructing a bathhouse foundation on your own is a rewarding project that needs to be carefully planned and carried out. First things first: picking the ideal spot and getting the ground ready. A strong foundation is ensured by leveling the land and removing any vegetation.
Next, consider your local climate and soil type when selecting a suitable foundation type. Pier foundations and concrete strip foundations are popular choices. Depending on the soil conditions and the weight of your structure, each has a benefit.
As you lay the foundation, precision is essential. To make sure the forms are straight and the concrete is poured evenly, use a level and string lines. Concrete must be properly cured in order for it to be strong and durable.
Finally, keep in mind that your project may need to comply with building codes and regulations. To make sure that safety regulations are being followed, it’s crucial to consult your local government or a trained specialist.
You can lay a strong foundation for your bathhouse that will last for many years by following these steps. The longevity and stability of your bathhouse depend on a well-built foundation, whether it’s for personal use or as a project to improve your property.


