
Are you considering putting lights in a suspended ceiling? Any room’s appearance and functionality can be improved with this useful and satisfying do-it-yourself project. Drop ceilings, sometimes referred to as suspended ceilings, offer a useful area for wiring and fixtures above the main ceiling. You can confidently brighten your space by following this guide, which will walk you through the process of installing lamps into your suspended ceiling in a safe and efficient manner.
Getting all the tools and supplies needed is crucial before beginning the installation process. Generally, you’ll need safety equipment like gloves and goggles, electrical wires, wire connectors, ladders, voltage testers, and lamps or light fixtures appropriate for suspended ceilings. Make sure the fixtures you select fit the safety requirements for electrical installations and blend in with the design of your room.
Make a plan for the locations of your lamps in the suspended ceiling first. Think about how your room is laid out and the lighting effects you want. Make sure each fixture is positioned according to the room’s measurements and is equally spaced out by measuring and marking its location. This planning stage guarantees even lighting throughout the room and expedites the installation process.
Next, use a sturdy ladder to enter the area with the suspended ceiling safely. Turn off the ceiling lights’ power supply at the circuit breaker before starting any electrical work. Make sure the power is off and that there are no electrical currents in the wiring you plan to work on by using a voltage tester.
As soon as the electricity is off and everyone is safe, start installing the lamps in accordance with the manufacturer’s instructions. Usually, this entails attaching each fixture’s wires to the ceiling’s preexisting electrical wiring. To safely join the wires, use wire connectors, and make sure you follow the right electrical wiring procedures to avoid any hazards. To preserve functionality and safety, make sure all connections are secure and insulated.
After every fixture has been firmly fixed and connected, turn back the circuit breaker’s power and check that each light is operating as it should. To create the ideal lighting effect in your room, move and align the lamps as necessary. Lastly, tidy up any leftovers and take pleasure in your freshly lit area, knowing that you’ve accomplished a useful and satisfying do-it-yourself project.
- Installation of recessed lamps
- Drawing up a scheme
- Required materials and tools
- Marking
- Installation of racks
- Installation of built-in light sources
- Installation of an overhead lamp
- How to install a chandelier on a suspended ceiling
- The nuances of installing LED strip on a suspended ceiling
- Conclusion and summary
- Video on the topic
- How to make a MORTAR FOR A LAMP UNDER A STRETCH CEILING. Installing a lamp in a suspended ceiling.
- Do-it-yourself stretch ceiling: Installing embedded parts for lamps, chandeliers and ceiling cornices
- How to install a lamp in a suspended ceiling with your own hands.
- Installation of lamps in a suspended ceiling
- No. 5 Correct wiring for a spotlight. Say no to loops and trains.
- AND WHAT, SO IT WAS POSSIBLE?! Installation of a STRETCH CEILING Step-by-Step Instructions from A to Z without a gun
Installation of recessed lamps
There is a precise order of steps involved in installing recessed lighting in a suspended ceiling:
- determining the layout of the cable route on the wall, switches, junction boxes and, if necessary, drivers;
- calculation of the cross-section of cables and wires;
- laying wiring on the wall, installing switches;
- drawing up a diagram of the mounting of lamps;
- ceiling marking;
- installation of a mortgage platform;
- assembly of the lamp;
- Installation of a chandelier.
For the record, the first three points will be covered in a different piece of writing.
Drawing up a scheme
Starting with the development of the distribution boxes, drivers, lamps, chandeliers, and electric wire routes, along with the locations of their fastening to the ceiling, you should begin working with your hands to install lamps in the stretch ceiling. Here are some guidelines that need to be adhered to:
- The distance of lighting devices from the wall is at least 20 cm, from each other – 30 cm, from the seam on a film – 15 cm;

- The wires in relation to the walls and each other should go in parallel or perpendicular. Diagonal routes are prohibited;
- The change in the direction should only be at an angle of 90 o;
- After installing the tension web, there must be access to the distribution boxes – they cannot be under the baguette or on the wall in the inter-ceiling space;
- On the ceiling, not only the mounting locations for the lamps, but also the clamps for attaching the cables should be marked.
Required materials and tools
The following supplies, equipment, and devices are needed for installing spotlights in a suspended ceiling:
- stepladders or strong table;
- cable VVGng;

- APPV wires;
- pliers with a narrow nose (“platypus”);
- indicator screwdriver;

- corrugated tube for wires if you plan to use an APPV cable;
- clamps for fastening a cable or corrugated tube;
- a hammer drill with a set of drills (for concrete with a pobedit tip) or an electric drill;
- laser level;
- dowels and self-tapping screws – for fastening clamps;
- dowel-nails for lamps;
- self-tapping screws “bug”;
- chandelier hook;

- Plastic rings for the embedded frame (platform), universal or for a specific size;


- perforated tape 12×0.7mm or a rigid stand with adjustable height (as an option, you can use direct hangers used to attach the ceiling profile);
- terminal blocks;
- crayons for marking the ceiling and tape for the floor;
- roulette;
- thermal rings made of heat-resistant ABS plastic 0.2 cm thick – protect the film from overheating and tearing (can also be square or rectangular);

- electrician"s knife for stripping wires;
- construction knife;
- glue for PVC;
- Phillips screwdriver.
Marking
When installing lamps in a suspended ceiling, it is necessary to mark the locations of the light sources on the ceiling, noting the distances between each point and the wall as well as between the points on the diagram.
The main reason for doing this is to enable precise cutting of a hole for the bulbs beneath the embedded sections once the web has been installed. It takes effort and caution to use a tape measure; a mistake of just 3–4 cm can be lethal, making it impossible to install the light.
With the invention of contemporary laser levels, everything was altered. Instead of making marks on the ceiling, people started making them on the ground. The lamp installation location is then precisely millimeter-accurately projected onto the ceiling using laser beams.
Where the mark is projected from the floor, onto the ceiling, or onto a stretched canvas is irrelevant in this instance. By now, a certain amount of experience has been gained:

- It is more convenient to measure distances on the floor not with a tape measure, but with a template with marks. This can be any long object, such as a mop handle or a piece of cable;
- It is not very convenient to place crosses on the floor with chalk or other coloring objects: the chalk may be erased during the installation of the ceiling, and traces of the felt-tip pen will have to be washed away. Markings made with tape do not create problems – after finishing the work, it is easily removed.
There are two stages to the installation of lighting in suspended ceilings:
- Before installing the film ceiling, install racks (platforms);
- After installation – assembly of the lamp.
Installation of racks
There is a precise order of work in the technology for installing a platform for mounting lamps:

1. The stand is attached to embedded rings. An all-purpose platform is used for this. Using a knife, cut out rings with a smaller diameter so that the hole left is the same size as the lamp body (if everything is cut out carefully, the lamp should fit freely into the embedded ring). Nothing needs to be cut if the platforms were bought for a specific size of lamp.

The length of the perforated tape for the racks is calculated at the following step. It is equivalent to the embedded ring’s outer diameter times the length of the suspended ceiling (two racks) plus an additional 2 centimeters for each rack.

Note: according to many experts, installing a baguette (a mount for the tension fabric) must come first before beginning any electrical work. This will allow you to accurately determine the length of the stand. The installers of the tension structure, however, are not interested in coming to install the baguette and then come back a day or two later to stretch the canvas, so this work plan is against their interests. The quality of an electrician’s work is unaffected by changing the sequence of tasks; for example, racks can be installed longer and then bent to shorten their length. The platform canvas is attached and then lowered to the necessary size.
Note: The type of light bulb must be considered when calculating the height of the interceiling space (lowering the film by 35–50 mm for an ice lamp with a GX53 base, and 50–70 mm for the remaining amount) (see photo).


The cut tape is bent into a "P" shape, with "bug" self-tapping screws fastened to the top bar, which is the same size as the embedded ring. Certain kinds of platforms are fastened using bodily slots. They are bent after a direct suspension—a perforated tape—is passed through them. A stand that can be adjusted can be used in place of punched paper tape.
2. The ceiling is fixed to the completed platform. This is accomplished by driving a dowel into the ceiling, attaching the platform, and drilling a hole with an electric drill.
Installation of built-in light sources
There are only a few things to consider when installing a spotlight in a suspended ceiling:
- Using a laser level, the installation locations of built-in light sources are projected onto the stretched ceiling;

- The thermal ring is glued to the film with special glue so that the mark on the film is in its center. To do this, the ring is smeared with glue and applied to the ceiling. In this case, it should not be allowed to shift along the film;
Important: The thermal ring’s maximum allowable internal diameter is 15 cm.


- The film is cut out inside the ring with a knife;
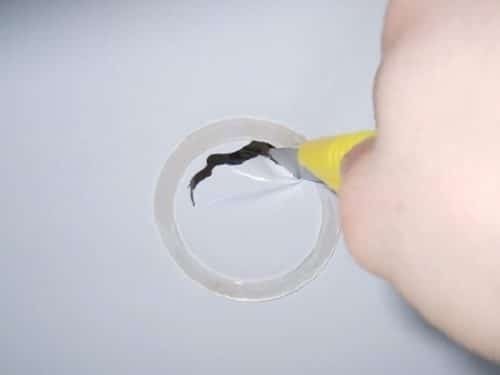
- The platform extends down to the plane of the stretched ceiling;
- Terminals are attached to the wires;
- At the socket, the wires are stripped with an electrician"s knife and secured in the terminal block. At a voltage of 220V, it is not necessary to observe the color of the wires; at a voltage of 12 or 24V, zero must be connected to zero (blue wire), phase to phase (black or red). If this requirement is not followed, many types of LED lamps will not work;
- The light bulb is inserted into the socket;
- The lamp springs are pressed against the base with your fingers and inserted into the platform ring.

Up until the final lamp, the process is repeated with each one.
Installation of an overhead lamp
The overhead lighting fixture is mounted to the ceiling with the same technology and matching instructions as a chandelier on a frame. Although they are mostly mounted on a suspended ceiling, track lamps, which are becoming more and more popular, are also mounted on a frame. The route attachment points and cable exits from the interceiling space are hard to hide on film or fabric.
How to install a chandelier on a suspended ceiling
The chandelier can be installed on cross-shaped or linear strips, or it can be mounted on a hook.
Hook. Depending on how many shades the chandelier has, the hook can either be hammered into a drilled hole or threaded—that is, screwed into a dowel. for chandeliers with three to five arms. Use a butterfly hook for larger lighting fixtures. To accomplish this, the internal slab cavity is reached by drilling holes in the concrete floor. It is pierced with a hook until the petals separate.

A stiff plywood frame is fastened to the ceiling so that the decorative cap will have a rigid stop and secure the lighting fixture above the stretched film. This is accomplished by drilling a circular hole in the center with a hammer drill or a drill equipped with a crown attachment for cables and suspension (cable or chain).
The plywood is then fastened to the main ceiling so that the hook and cable are above the cut hole using self-tapping screws and perforated dowel tape. Direct suspension or perforated tape should have a generous length.
Similar to integrated lighting, the platform is held in place by hands against the ceiling so that, once the stretch ceiling installation is finished, it can be lowered until it touches polyester fabric or polyvinyl chloride film.

A hole is cut in the canvas following the installation of the stretch ceiling, but only after a plastic ring is adhered to it. This ring can be made by hand out of any plastic, as thermal protection of the film is not necessary—it is merely meant to keep it from shattering.
The chandelier is hung on a hook after being connected to the wires by a terminal block through holes in the plywood and film. It gets challenging to connect the wires if you hang it straight away. The ornamental cap is raised all the way to the ceiling to complete the process. However, you will need to lower the frame or the cap if the plywood does not lie flat and the cap leaves a mark on the canvas.
Plane. Additionally, one or two strips placed in a cross at right angles are used by chandelier manufacturers to fasten their products to the ceiling. In this instance, place a beam beneath each plank—a little longer than necessary to prevent the chandelier from swinging—and fasten it to the ceiling using a metal strip that has holes in it. However, a solid beam must first have a bolt hole drilled in the center of it.
A self-tapping screw can be used to replace the bolt in a chandelier that has lighting. After that, drilling a hole is not necessary. In order to increase stability, the second beam is also half-cut and fastened to the ceiling and the first plank using corner fasteners. In order to allow for the possibility of lowering the beam to the stretched ceiling, the mounting posts’ length should be sufficient.

Following the stretching of the polyester or PVC film for the chandelier installation, you need to:
- wrap the ends of the planks with inserted bolts with electrical tape so that the ceiling fabric is not damaged;
- attach the overhead strip to the beam;
- connect the chandelier through the terminals to the electrical network;
- attach the chandelier body to the slats;
- cover the attachment point with a decorative cap – raise it to the stretched ceiling.

The nuances of installing LED strip on a suspended ceiling
The primary use for LED strips is in decorative lighting. It allows you to enhance the main lighting with a variety of lighting effects. Either place the tape above or below the ceiling.

In the first example, double-sided tape or PVA glue are used to secure the LED light to the ceiling. It is first degreased and then primed along the route to guarantee good adherence of the tape or glue to the overlap. Using a connector, join the tapes together.
Previously, a two-level ceiling system had to be installed in order to install the tape beneath the stretched film or fabric. The area between the levels was covered by a side strip that had the LEDs installed. As of right now, unique fasteners made of profiles can be positioned in any direction along a stretched ceiling.
Mounted inside the profile as an LED strip. It is concealed from view by a unique lampshade. Lighting can be primary or auxiliary depending on how many LEDs are used per linear meter; 240 crystals are needed for every linear meter.
Conclusion and summary
After reading the information above on installing lamps in a suspended ceiling, you’ll be able to complete the task on your own before the ceiling installer visits your apartment. The most important thing is to follow a specific workflow:
- draw up a diagram of the location of point light sources and chandeliers, lay out routes for power cables;
- transfer the drawing to the ceiling;
- conduct and secure electrical wires;
- mount and then attach to the platform ceiling;
- Draw a diagram for attaching lamps along the stretched ceiling;
- under the platforms, glue thermal rings to the film or polyester and cut holes in them;
- connect the lamps to the power cables.
This is a simpler process for a chandelier:
- attach the hook to the ceiling;
- glue a thermal ring to the stretched film and cut a hole in it;
- connect the chandelier wires to the supplied wires through the terminal block;
- hang the chandelier on a hook and cover the hole in the ceiling with a decorative cap.
| Step 1: Plan the Layout | Determine the placement of each lamp in your suspended ceiling grid. |
| Step 2: Mark the Positions | Mark where each lamp will be installed on the ceiling grid using a pencil or marker. |
| Step 3: Cut Openings | Use a drywall saw to cut openings in the ceiling tiles or panels where the lamps will be placed. |
| Step 4: Install Mounting Hardware | Attach the mounting hardware for each lamp fixture according to the manufacturer"s instructions. |
| Step 5: Connect Wiring | Connect the electrical wiring for each lamp, ensuring all connections are secure and follow local electrical codes. |
| Step 6: Install Lamps | Securely mount each lamp fixture into the prepared openings in the suspended ceiling. |
| Step 7: Test and Adjust | Turn on the lamps to test their functionality, and make any necessary adjustments to their positioning or wiring. |
Lamp installation in a suspended ceiling can be a satisfying do-it-yourself project that improves the room’s appearance and usability. It gives the space a contemporary feel while enabling you to adjust the lighting to your specifications.
Prior to starting, make sure you have the required equipment and supplies. The lamps themselves, the necessary wiring, a screwdriver, wire cutters, and safety goggles are usually included in this. Before beginning any electrical work, make sure to always turn off the electricity at the breaker out of concern for your safety.
Next, mark and measure the exact locations of each lamp in the ceiling grid. Here, accuracy guarantees a tidy and well-proportioned finish after installation. Pick a marker or pencil that will show up clearly on the ceiling tiles.
After marking your locations, install the lamp fixtures according to the manufacturer’s instructions. To make room for the lamps, this frequently entails drilling holes in the grid or ceiling tiles. To prevent breaking the nearby tiles, take your time completing this step.
Once the appropriate holes have been made, wire the lamps using the supplied wiring diagram. To make sure everything is done safely and correctly, it’s advisable to speak with an expert if you have any questions regarding electrical connections.
Lastly, before permanently fastening any lamp, make sure it works by giving it a test. To get the desired lighting effect, reposition as necessary. You can add style and illumination to your space by installing lamps in your suspended ceiling with skill and careful planning.
For your article on "Do-it-yourself installation of lamps in a suspended ceiling," the following is your main thesis statement: We offer a comprehensive method in this guide to enable you to safely and competently install lights in a suspended ceiling on your own. We’ll go over the necessary instruments, safety measures to take, and useful advice for selecting the appropriate fixtures and arranging them properly. Our mission is to equip you with the knowledge and abilities to successfully brighten your space with a professionally installed lighting solution, regardless of your level of experience as a do-it-yourself enthusiast.


