
Sandwich panels are becoming a common option in construction because of their superior strength, ease of installation, and thermal insulation. They provide a strong and effective solution and are frequently used in the construction of walls, roofs, and facades. However, extra components are frequently required to guarantee sandwich panels function at their best and last a long time.
These extra components are essential to improving sandwich panels’ usability and visual appeal. They aid in joint sealing, enhance weather resistance, and offer superior thermal insulation. Corner profiles, edge trims, and fastening systems are a few of these components.
Sandwich panels’ edges are covered with corner profiles, which give the panels a polished appearance and shield them from moisture and other environmental elements. In order to maintain a continuous insulation layer, seal the spaces between panels, and stop water and air infiltration, edge trims are crucial.
Sandwichpanelsareintendedtobefirmlyfastenedtothebuildingstructureusingfasteningsystems. These systems must be robust and able to withstand a range of loads and pressures. The stability and safety of the entire construction are guaranteed by proper fastening.
The performance and longevity of sandwich panel installations can be greatly improved by adding these extra components. To get the greatest results in any construction project, it is essential to comprehend their functions and select the appropriate components.
- What are sandwich panels
- Why are additional elements needed?
- Basic additional elements for sandwich panels
- For joining roof panels
- For connecting angles and basement
- For framing window blocks
- Seals and sealants
- Adhesive and sealant
- Useful video
- Video on the topic
- #Installation of additional elements for a #house made of #sandwich panels. With your own hands.
- Installation of additional elements for buildings made of sandwich panels
- Production of additional elements for sandwich panels
- Sew up the end of the SANDWICH panel
- additional elements for sandwich panels
- Installation of finishing elements (gaskets, extensions) on a sandwich panel
What are sandwich panels
Sandwich panels consist of three layers of insulated metal sheets stacked one on top of the other. Right away, it should be mentioned that there are samples with outer layers made of PVC, magnesite boards, OSB (SIP panels), and other materials in addition to metal panels.
A multilayer protective polymer coating covers the surface to shield the metal from moisture and stop corrosion.
Because of their limited ability to support weight, the panels themselves cannot be used as a complete building material. A supporting frame that can support all loads is used to guarantee appropriate structural strength. Installed on it, the panels serve as both heat-saving devices and essentially enclosing structures.
The side edges of the panels have locking and counter profiles to join them together. During installation, a special cover is placed over the open end parts. The panels can be arranged either vertically or horizontally, and they are mounted on the frame starting from the bottom.
Self-drilling screws (screws) with a unique gasket painted the same color as the panel’s front surface are used to make the connection.
Apart from wall panels, there are also roofing panels with nearly identical structure, but with a slightly different lock design that joins the front portion with a wave-width overlap. Moreover, the ends of some roofing panels have locking profiles.

Why are additional elements needed?
All connection types that do not involve standard locking connections require shaped elements to be designed or protected.
- Angles.
- Longitudinal joints.
- Adjunctions.
- Roof ends.
- Various cracks or gaps, etc.d.
In order to account for the metal’s thermal expansion, additional components are also required to shield the insulation placed in the installation’s temperature and deformation gaps (10–30 mm) from the effects of atmospheric moisture.

Sandwich panels function and perform better in construction projects when they have extra components. These components guarantee appropriate insulation, weather resistance, and structural stability. They include different kinds of joints, trims, and seals. Sandwich panels become more adaptable to a range of architectural specifications and environmental factors by incorporating these elements, which makes them a cost-effective and flexible option for contemporary building solutions.
Basic additional elements for sandwich panels
For any situation in which the panels are not locked together, additional components are offered.
Among them are:
- Corner elements internal or external.
- Docking strips.
- Base ebb.
- Base plates.
- Butt strips (there are varieties for joining a concrete wall or for joining panels of different thicknesses).
- Window frames, external and internal.
- Window tides.
- Top and side gate strips.
Furthermore, unique components exist for roof panels:
- Ridge (2 elements, internal and external).
- Connecting elements for connecting a wall panel to a roof panel.
- Cornices.
- End elements.
- Gutters.
- Low tides.
- Parapets, snow guards, etc.d.
While some of these components are interchangeable, others have specific uses and are not suitable for other contexts.
To prevent misunderstandings or inconsistencies, each element has its own designation. As an illustration, the elements that join the roof to the wall are DKS-1 and DKU-2, the upper valley is designated DR-1, and the lower one is designated DR-2.
Different manufacturers or sellers may have different labels for extra components. As an illustration, consider the designations FE-1, FE-2, etc.d., What is meant by "Facade Element"?
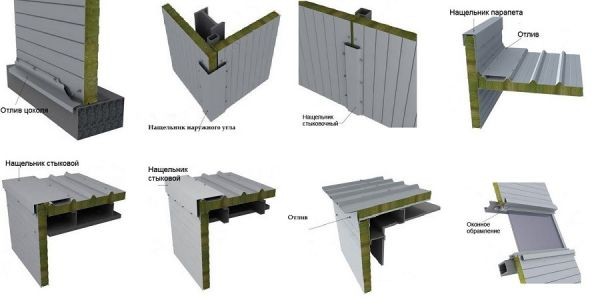
For joining roof panels
When joining roofing panels, the proper extra components are used.
One aspect of roofing components to take into account is:
- Mandatory presence of sealant in the gap between the panels.
- Double configuration of some elements.
The horizontal (sloping) arrangement of the roofing panels is the cause of these characteristics. When installing a roof ridge, for instance, the lower ridge beneath the panels is put in place first, followed by the upper part that closes the gap and a coat of sealant to bridge it.
The only difference in the design of valleys is the slopes’ inverse angle of inclination with respect to one another. Furthermore, the point at which the roof meets the wall is shaped with a blunt inside corner and a sharp outside corner (due to the overhang).
Since the frame’s horizontal corner is on the back, the roofing locations to the wall without an overhang are unique. Furthermore, the internal corner profile is installed if the frame cannot be adjusted from the back.
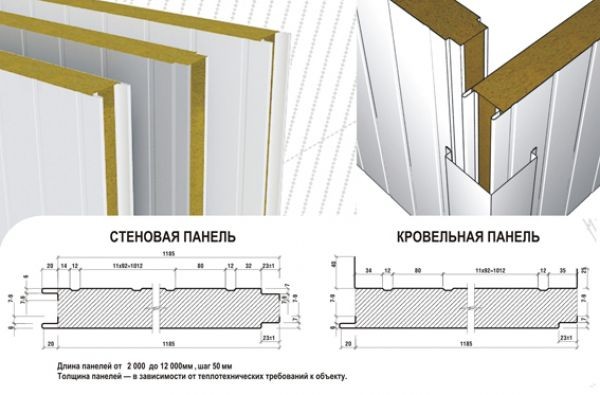
For connecting angles and basement
The standard procedure is used to install external corner components. Since the reverse side has a vertical crossbar, there isn’t an extra component there, and the angular connection isn’t accessible.
Similar to external corner compounds, internal corner compounds have no design on the back because of the placement of vertical crossbars that prevent the advice from being fixed.
The purpose of the basement elements is to either protect or enhance the lower panel’s aesthetic appeal. They have internal and external settings. The external ones resemble an internal corner, with a horizontal shelf that is pressed firmly against the base using dowels.
Because of the longitudinal bend in the vertical shelf, only the upper portion touches the wall, and the lower portion lags behind. This is done to prevent the protruding screw heads from getting in the way of the element’s installation.
To ensure condensate drainage, the horizontal has an extra downward bend, and the inner corners fit tightly with their vertical and horizontal parts. More sophisticated solutions are also available for the systematic drainage of rainfall from the exterior. The external corner plinth element is then installed outside, followed by the ebb.

For framing window blocks
Specialized components are available to decorate gates and window or door openings.
The horizontal and vertical crossbars that make up the frame are where window blocks are installed. An internal corner element forms the window block’s perimeter from the inside. One shelf is fastened to the window frame directly, while the other is fastened to the trim bar.
Externally, slats are affixed to the panel on one side and the window frame on the other to create varying levels of installation. Water flow prevention is achieved by pre-covering the upper portion of the opening with an upper sill and a transition profile, respectively, while the lower portion of the opening is embellished with window sills.
Instead of being installed like window units, door units are overlapped from the inside and secured to the binding crossbar. U-shaped elements are therefore first used to decorate the opening, covering the inner end portion of the opening. The door unit (or gate) is then attached, and a strip covering the screw heads is installed on the outside.
Installing a door unit inside the crossbar binding is an alternative method. Less significant openings are handled using this technique. Afterwards, a unique profile is used in the mate’s design to run along the slope’s visible portion, wrap around the wall, and cover the screw heads.
The crossbar is entirely covered by a corner profile that is fitted from the inside. One portion is fastened to the sandwich panel, and the other to the crossbar that is situated next to the door block along its edge. Consequently, all that is left to see is the wall and the door block, which are adorned with an extra profile surrounding the edge.

Seals and sealants
Reliable insulation is necessary at the joints between panels; otherwise, condensation will eventually form, at best. In the worst scenario, there will be wind blowing through the room, making any attempt to heat it futile. There won’t be any impact from the rise in heating expenses.
Use sealant and sealing tape to solve the issue. The sealing compound is pushed into the opening and fills the cavity, preventing the entry of cold air from the outside, while the tape is cemented into the locking connection’s groove.
Used as insulators in joints:
- Polyurethane sealant (spray foam, etc.).d.). The option is good, but its cost may be excessive for large volumes. At the same time, the foam completely fills all the gaps and cracks, is not afraid of moisture, and is durable.
- Butyl rubber cord. Experts are somewhat pessimistic about him. The fact is that this type of seal becomes rigid in cold weather and requires heating for installation, but in hot weather it melts and begins to “float”.
- Polyethylene foam cord. It is considered the most convenient, durable, and also the cheapest way to seal joints.
During installation, "liquid tape" glue is advised to secure the seal in the grooves. This type of glue can adhere to and hold nearly any kind of material, including inert ones.

Adhesive and sealant
When installing sandwich panels, the adhesive-sealant used for installation needs to be moisture- and temperature-resistant, as well as meet operating conditions. The best types of adhesive sealants for such needs are polyurethane ones that can tolerate mechanical loads, temperature changes, and vibration.
The material has high elasticity, can tolerate temperature swings from -30° to +95°, can withstand deformation of up to 20%, and is resistant to chemicals. The high cost of adhesive sealant is its only real drawback, but since it’s an one-time investment, it can be fixed completely.
Useful video
You’ll discover what extra sandwich panel components are in this video:
| Element | Description |
| Corner Elements | Used to finish and protect the edges and corners of panels |
| Joint Profiles | Ensure a tight and secure connection between panels |
| Base Profiles | Provide a sturdy foundation for the installation of panels |
| Flashing | Prevents water ingress at junctions and roof edges |
| Seals and Gaskets | Enhance airtightness and insulation properties of panels |
| Fixing Elements | Includes screws, bolts, and other fasteners for secure attachment |
As we come to the end of our conversation about supplementary sandwich panel elements, it is evident that these parts are essential to guaranteeing the general efficacy and longevity of building projects. They improve a building’s structural integrity while also offering vital insulation, sealing, and aesthetic appeal support.
These components, which include fasteners, sealants, and flashings, may not seem important at first, but they have a big impact. The proper fasteners keep the panels stable under a variety of circumstances, sealants guarantee airtightness, and flashings prevent water intrusion. Together, all the parts form a strong and well-coordinated building envelope.
In addition, choosing the right extra components based on the demands of your particular project can eventually lead to lower maintenance costs and increased energy efficiency. The longevity and functionality of the sandwich panels can differ significantly depending on this meticulous selection process.
Comprehending and skillfully applying these supplementary components can revolutionize your building endeavor, guaranteeing its durability. By focusing on these details, you’re making an investment in your building’s long-term functionality and durability, which will make it a more secure and dependable structure for many years to come.


