
Selecting the appropriate floor screed is essential when building a garage. A high-quality screed has an impact on your garage floor’s overall performance and ease of maintenance in addition to its appearance and durability. With so many options at your disposal, it’s critical to select the one that best fits your needs and price range.
This post will walk you through the various floor screed kinds that work well in garages. We’ll examine the benefits and drawbacks of each so you can decide wisely. We’ll also go over the installation procedure in detail so you can understand what to expect. Lastly, we will deconstruct the expenses related to the task so that you can better organize your project.
Whether you plan to install the garage floor yourself or by hiring professionals, being aware of these factors will help make the process go more smoothly. Let’s get started and learn how to properly install a garage floor.
- Is it possible to arrange?
- Requirements
- Regulatory regulation
- Pie bottoms
- Types of structures
- Tips for choosing
- How to make it yourself?
- How to equip a place for a pit?
- Protection and processing
- Top coating options
- Prices for installation work
- Video on the topic
- Garage floor screed with slope and tray
- How to make a concrete floor in a garage
- CONCRETE FLOOR IN GARAGE AND PRICES. Greenhouse film for sand cushion Arm.Beacons mesh from pipe profile
- How to make a concrete floor with a pit in the garage
- Screed. Garage
- Floor screed on the ground. Floors on the ground without extra expenses. Is steel reinforcement necessary??
- THE EASIEST way to install beacons on a screed ⭕️ Few people know about it!
Is it possible to arrange?
Whether it’s going to be done on the ground or a slab, it has to be done in the garage. The floor in this room is subjected to mechanical stress, including abrasion, shock loads, abrasive friction, and other factors, in addition to heavy loads from the weight of the machinery or equipment. For this reason, screed is the best option for setting up a garage floor.
Requirements
The floor needs to be different in order to be dependable and to simultaneously provide the best environment for vehicle maintenance or repair:
- Durability. It must be able to withstand the vehicle’s load and be resistant to fuels and lubricants. With frequent use, the integrity of the floor may be damaged due to abrasive friction or impacts, so neither linoleum nor other coatings can match the strength of a concrete screed.
- Fire safety. Since there are flammable substances in the garage, the floor must be fire resistant.
- Moisture resistance. Moisture is a common problem in garages, because these are unheated rooms. In addition, a car on wheels brings snow and dirt into the room. If the floor isn"t waterproof, all that moisture will seep through or cause mold to form.
- Tightness. Any cracks or seams can lead to destruction of the base, so a solid screed is the best option for a garage floor.
Regulatory regulation
The floors in all of them, whether they are parking lots in buildings, state-owned car dealerships, or private garages close to homes, have to meet building codes. Every kind of screed, whether wet or semi-dry, has specific needs. The following regulatory documents specify them:
- SNiP 2.03.13-88 from 01.01.1989. Floors.
- GOST 1.0-2015. Concrete. Methods for determining abrasion.
- GOST 25192 Concrete. Classification and general technical requirements – applicable in all areas of construction.
- GOST 7473-2010 Concrete mixtures. Specifications.
- GOST 10180-2012 Concrete. Methods for determining strength using control samples.
- GOST 12730.1-78 Concrete. Methods for determining density. Method for determining water absorption.
- GOST 23732-2011 Water for concrete and mortars. Specifications.
- SP 71.13330.2017 Insulating and finishing coatings.
- SP 63.13330.2018 Concrete and reinforced concrete structures.
It is preferable to get guidance or assistance from experts in order to complete everything in compliance with the standards and GOSTs.
Pie bottoms
The simplest, if not the fastest, way to get a garage working is with a concrete floor. It differs from traditional screed used in homes or apartments because of the coatings or additives that give it strength and longevity. The screed cake in the garage tastes pretty much the same, filler or no filler.
When planning a ground floor, one must consider the aquifer’s location, which should be at least 5 meters below the surface, and its stability—that is, the fact that it shouldn’t be movable.
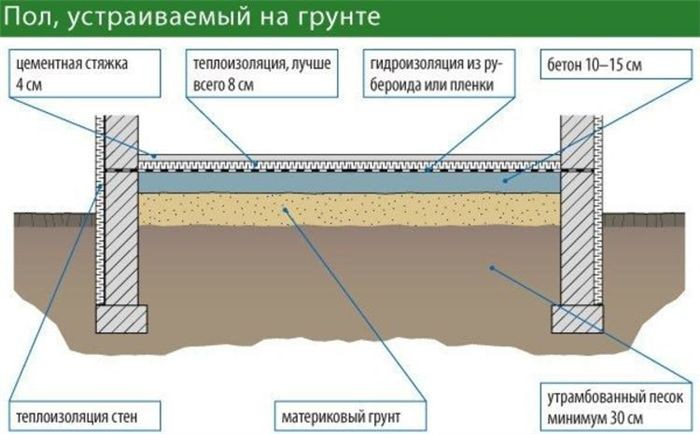
Typically, the floor is between 13 and 15 cm thick and is composed of:
- the bottom layer is soil or gravel poured on top of it (0.8 mm);
- sand (up to 10 mm layer);
- polyethylene film or membrane;
- concrete reinforced layer (20 mm);
- waterproofing (5-10 mm);
- thermal insulation (if necessary up to 10 mm);
- final reinforced concrete layer;
- finishing coating.

The following layers may also be present in the cake:
- crushed stone;
- clay;
- first layer of cement mortar;
- waterproofing mastic;
- main layers of waterproofing (2);
- insulation layer;
- main screed;
- leveling/protective coating.
Types of structures
The best screed options, given the specifications for floors in rooms of this kind, are as follows:
- Concrete. It must be reinforced and at least 15 cm thick, including some kind of filler, for example, expanded clay or crushed stone. Pros: allows you to even out differences, lay the necessary communications, for example, a “warm floor” system in the garage, strong, durable, inexpensive. Minus – the duration of the process;
- Cement-sand. This screed is suitable as either a leveling layer laid over concrete slabs or a finishing layer on a subfloor. You can also tidy up old screed using cement-sand mortar. In this option, large filler such as crushed stone or expanded clay is not added to the solution. Plus: forms an even coating, you can do it yourself, minimal materials used. Disadvantage: more suitable for leveling or repairing an already finished screed; it takes a long time to pour and dry;
- Semi-dry. In this version of the screed there is less water in the solution, but fiber fiber is added (800 g per 1 m³ of solution) as a reinforcing additive. The advantages of this type of screed are rapid hardening, providing a high-quality surface, strength. Disadvantages: you cannot do the work yourself, which means you will have to resort to the help of specialists who know this technology. Also, for the floor in the garage you will need to use polymer concrete that can withstand heavy loads and pressure;
- Dry. It is made without water using ready-made compositions, which mainly contain perlite and expanded clay sand. A layer of 5 to 12 cm thick mixture is thoroughly leveled and covered with OSP slabs or road slabs. Pros: can be done quickly and independently, no need to make a solution. The downside is the cost of materials; during installation, you need to take into account the humidity level (no more than 60%) in the garage and the air temperature (not lower than +10 °C).
Tips for choosing
The requirements that the screed needs to meet should be taken into consideration when choosing the type. Concrete is the most popular option, but it takes a while because the solution takes a while to dry. But it’s affordable, easy to use, robust, and long-lasting.
In a garage, a dry screed is OK, but a finishing coat that can support the weight of the car is required. The semi-dry version will not be less expensive than the dry type because it requires expertise and multiple workers.
How to make it yourself?
In order to prepare the garage for concrete screed, you must:

- Remove old coating, if any. In order for the screed to be strong, it is not enough to simply “tweak” the existing floor – to repair cracks or potholes. All old floor cake should be removed. The coating must also be removed from the inspection hole.
- Mark the floor.
- Clear and compact the soil.
- Make a cushion of sand (can be replaced with oily clay) and gravel/crushed stone.
- Level the sand and crushed stone layer. After compaction, the height of each layer of the pillow should be from 2 cm to 5 cm. To increase the strength of the entire cake, it is better if the total height of the entire pillow is 12-15 cm. The same pillow needs to be made in the inspection hole.
- First concrete covering. It is poured directly onto the pillow with a layer of 1.5 cm.
- After the rough screed has dried, waterproofing is applied on top of it. To do this, bitumen mastic is used to treat not only the floor, but also the places where it meets the walls, having previously glued rubber waterproof tapes – “self-adhesive” tapes – to the last ones.
- After this, the main layer of waterproofing is laid. The best materials for this are polyethylene film with a thickness of more than 1 mm or bitumen roofing felt. The material is laid overlapping so that it covers the bottom of the walls by 10-12 cm. Then all strips of waterproofing are secured with waterproof tape. This work needs to be done both in the pit and in the garage.
- Laying thermal insulation. The materials you can use are mineral wool, polystyrene foam or extruded polystyrene foam. The layer thickness must be at least 10 cm. the joints of the insulation strips are secured with damper tape.
- Reinforcement. A metal mesh with cells of 15-20 cm is suitable for this. The reinforcement is laid on supports so that there is a gap of 4-5 cm between it and the previous layer. The place where the machine or heavy cabinets with tools will stand should be reinforced in two layers.
- Main screed. To ensure the reliability of the finished screed, experts advise using a concrete mixture consisting of fine gravel (5 parts), M200-400 cement (1 part), sand (3 parts) and water (1/2 part cement). The thickness of this layer of pie, whether in a hole or in a garage, should be at least 12 cm.
Before pouring the solution, beacons should be installed to guarantee that the final screed is level. One full pour of concrete is required.
The following video will teach you more about pouring concrete screed in a garage:
To make a cement-sand screed
- Prepare the slab or soil: remove debris, compact the soil.
- Add a layer of sand/gravel and compact it.
- Lay waterproofing.
- Lay a 10 cm layer of thermal insulation.
- Install reinforced mesh.
- Fill with cement-sand mortar.
How to equip a place for a pit?
If the aquifer is less than 2.5 meters deep, the pit can be set up in the garage. Drainage will be required if the indicator is different and closer to the surface.
Making the floor in the inspection hole yourself is simple, and since there won’t be any large weights on it, all you need is:
- pour a layer of clay;
- compact it;
- lay sheets of roofing material;
- pour the solution in a layer of 7-10 cm.
The walls of the pit can be completed once the concrete has dried.
Protection and processing
No matter what kind of screed is used, it must be shielded from lubricants, fuels, moisture, and dust. A concrete floor can be coated with the following compounds to increase its service life:
- Primers. They are used to remove dust from concrete surfaces and increase adhesion. This primer penetrates 1-5 mm inside the floor, strengthening it from the inside and giving a varnished shine to the outside.
- Polymer paints. These can be polyurethane, epoxy or polymer concrete compounds. As a rule, they are two-component. They need to be mixed immediately before applying to the screed.
Top coating options
Over the screed, the following substances can be applied as a finishing coating:
- Rubber cover. It is sold in rolls and slabs, there are prefabricated modules and bulk. Roll and tile options must be glued to the floor, while modular ones can be simply assembled and connected using locks.

- Linoleum. Special version designed for heavy loads. Sold in rolls. There is linoleum with an adhesive base and one that needs to be “planted” with glue.

- tiles. For a garage, you can use either a clinker type, which is very expensive, or a paving one. Both types of tiles are durable and wear-resistant. They need to be placed on a special glue or cement mortar.

- Polymer modules. These are ready-made slabs with an open or closed lock type that just need to be assembled.

Prices for installation work

The cost of materials and, if you choose to do the work yourself, the cost of renting equipment will affect the final cost. It is therefore preferable to leave the screed to experts who can compute the materials and fill the floor rapidly. The estimated costs for the work listed below may differ depending on the location.
| Type of Floor Screed | Installation Procedure | Cost of Work |
| Cement-Based Screed | Mix cement with sand and water, apply over a dampened base, level with a screed bar, and let it cure for 7 days. | $2-$4 per square foot |
| Anhydrite Screed | Mix anhydrite binder with sand and water, pour and spread over the base, smooth out, and let it cure for 3-4 weeks. | $3-$5 per square foot |
| Self-Leveling Screed | Mix with water to a thin consistency, pour and spread to self-level, use a gauge rake to ensure even thickness, and let it dry for 24-48 hours. | $5-$7 per square foot |
A good floor screed for your garage should balance affordability, ease of installation, and durability. Because of its strength and durability, a cement-based screed is frequently the best choice for most garages. This kind of screed is strong enough to withstand large loads and is resistant to chemicals and oil, which are common in a garage setting.
Screed installation requires careful planning. Prior to applying the screed, ensure that the surface is level and clean. To guarantee a smooth and even finish, mix and apply the screed according to the manufacturer’s instructions. To get the best results, the screed must be allowed to cure completely.
The type of screed you select and the size of your garage will determine how much it costs. In general, cement-based screeds are reasonably priced and provide good value, particularly when taking into account their long-term durability. If you are not going to be doing the work yourself, don’t forget to account for the cost of any additional materials or labor.
In summary, because of its strength and affordability, a cement-based screed is a good option for garage floors. You can have a floor that withstands the rigors of a garage environment by following installation instructions and doing proper preparation.
It’s important to weigh cost-effectiveness, durability, and ease of installation when selecting a floor screed for your garage. This post will help you make an informed choice for a dependable and reasonably priced garage floor by going over the top screed material options, outlining a simple installation process, and breaking down the related costs.


