
A private home’s foundation needs to be insulated from the outside in order to remain cozy and energy-efficient. It is possible to lower energy costs and create a more sustainable living environment by stopping heat loss through the foundation. In order to effectively create a barrier against cold temperatures and moisture infiltration, this process entails applying insulation materials around the exterior perimeter of the foundation.
Reducing heat transfer through the building’s foundation walls is one of the main advantages of exterior foundation insulation. By using this insulation technique, you can keep your home warmer in the winter and cooler in the summer by preserving a constant interior temperature. Reduced thermal bridging—the loss of heat through uninsulated regions—will improve your home’s overall energy efficiency.
To get the best results, selecting the appropriate insulation material is crucial. insulated concrete forms (ICFs), spray foam, and rigid foam boards are typical choices. Regarding moisture resistance, heat resistance, and installation ease, each material has special benefits. Your choice should be based on factors like the desired insulation R-value, your budget, and the local climate.
Excavating the area around the foundation to reveal the walls, applying the selected insulating material, and finally covering it with a long-lasting waterproofing membrane or coating are the usual steps in the installation process. To guarantee that the insulation works well over time and can withstand environmental conditions, proper installation is essential. It is advised to follow thorough installation instructions or hire qualified specialists to get the best results.
The chosen insulation material, the size of your foundation, and the difficulty of the installation can all affect the cost. Even though the upfront costs could seem high, they are frequently outweighed by the long-term energy savings and improved comfort. To ensure you select the best insulation solution for your home’s unique requirements, do your research on local suppliers and contractors. This will help you obtain competitive quotes.
- Is it necessary to do external insulation and why??
- Requirements for insulation
- Choosing material and installation rules
- Penoplex
- Polyurethane foam
- Expanded clay
- Styrofoam
- Minvata
- Do-it-yourself thermal insulation: step-by-step instructions
- Differences in technologies for different types of bases
- Useful video
- Video on the topic
- Waterproofing and insulation of the foundation. What I had to experience!
- Foundation insulation. If necessary?
- I insulate the basement in winter. How not to freeze? WE BUILD FOR OURSELVES
- you can"t do that! insulation with extruded polystyrene foam
- INSULATION FOR FOUNDATION. COMPARISON OF MAIN INSULATIONS.
- Insulation of the foundation of the PENOPLEX workshop
- NEVER INSULATE YOUR FOUNDATION WITHOUT WATCHING THIS VIDEO
Is it necessary to do external insulation and why??
The following examples show the benefits and necessity of the external method:
- Laying a protective layer between the ground and the foundation, extending the service life of the structures.
- Bringing the dew point outside and eliminating the risk of condensation accumulation inside structures and on the internal walls of the foundation.
- Combining protective and insulating functions. Properly placed insulation not only protects structures from seasonal soil heaving, floods and freezing, but also significantly reduces heat loss through the bottom of the building.
- Saving interior space in houses with basements and residential basements.
Strict insulation requirements and installation guidelines are linked to certain drawbacks. External insulation of the foundation is done at the construction stage, either after labor-intensive and sometimes unfeasible excavation work, or before backfilling the soil (which is the ideal option). The latter are typically more costly and are regarded as hazardous because of the possibility of base displacement and cracking.
Requirements for insulation
Materials for external insulation are subject to a number of specifications, which include the following:

- Exverting the weight of the soil itself and partial pressure of soil moisture. The service life of the insulation layer filled with soil directly depends on its compression strength, the higher this indicator, the better.
- Hydrophobic and low absorption properties.
- Resistance to biological influences, decay and aggressive effects of soil.
- Low coeff. thermal conductivity (optimal – in combination with low weight of the insulation itself). The effect of the weight of thermal insulation materials of the base is not critical, but when the foundation is laid on the floats or weak soils, this factor has to be taken into account.
- Acceptable price and availability.
- Simple installation and maintenance technology.
Choosing material and installation rules
The materials listed above, which include expanded clay, PPU, and compacted brands of polystyrene foam, have a closed-porous structure. The specific uses of each group are considered when determining the insulating layer thickness, adjacent zone, and installation technique.
Penoplex
The best moisture absorption (about 0%), thermal resistance (thermal conductivity no more than 0.034 W/m√°C), compressive strength (up to 30 t/m²), and durability (up to 50 years of service with preservation of forms and properties) are found in specialized slabs of compacted polystyrene foam (Penoplex and similar brands).
Even when installed in a single layer, the majority of the suggested systems have L-shaped or grooved edges and create a minimum number of joints; however, better outcomes are obtained when they are laid in two or more layers. You can safely complete insulation work on your own using Penoplex as long as you adhere to the manufacturer’s recommended scheme.
The requirement to complete the outer portion of the thermal insulation skirt and its immediate destruction upon coming into contact with several adhesives are the only operational drawbacks of this material. The material can be used to arrange foundations of any kind and load capacity; in fact, its only drawback is that it is quite expensive, starting at 8,000 rubles per square meter.
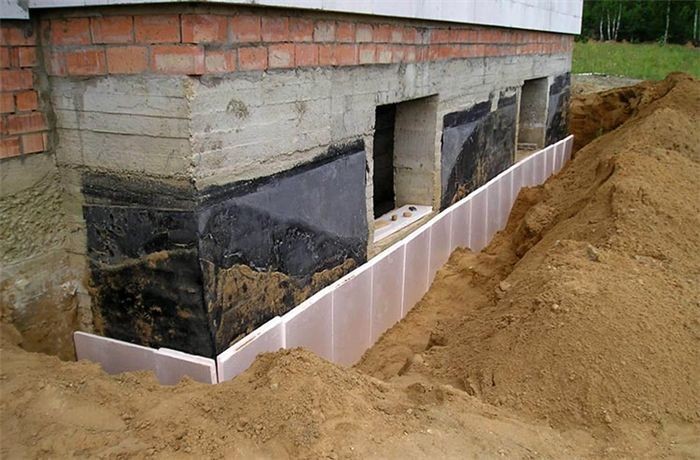
Watch the video below to see how to use Penoplex to insulate a house’s foundation from the outside:
Polyurethane foam
Sprayed polyurethane foam is highly valued for its high adhesion to any base material and its ability to form a seamless layer that combines heat, moisture, and vapor barrier functions.
Only closed-cell polyurethane foam types with a density of 33–35 kg/m³ and above are used to insulate the foundation; a 50 mm layer thickness is advised. When the base has a complex shape, there is a need to completely eliminate cold bridges, and the work time is limited, the technology is deemed optimal.
On the other hand, an expensive work estimate results from the requirement for specialized equipment. Although insulating polyurethane foam bases start at 300 rubles per square meter, a layer with the necessary density and thickness actually costs at least 850 rubles per square meter. Equipment rental is only profitable in large processing areas (100 m² and up).
Penoplex-like technology can be used to mount PIR boards as an alternative to sprayed polyurethane foam. However, it’s not always possible to find brands with the necessary density and quality, and insulation still comes at a hefty price in the end.
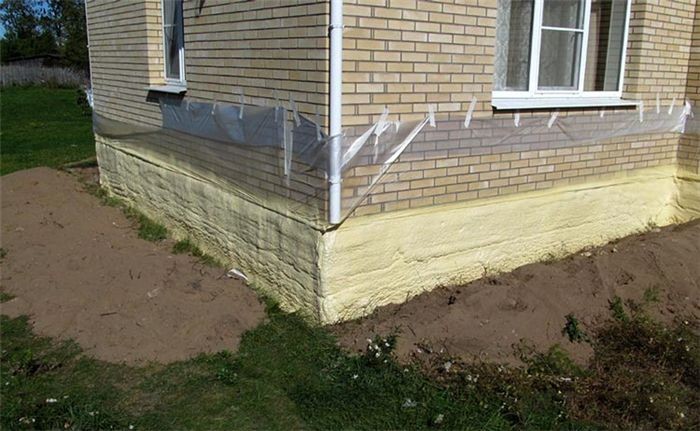
A video demonstrating the application of Polynor polyurethane foam for insulating a home’s foundation
Expanded clay
This type is regarded as traditional; loose expanded clay granules are prized for their affordability (between 1200 and 2000 rubles/m2), light weight, resistance to moisture, and potential for reuse on other items. The best outcomes are obtained when expanded clay is used to fill the internal spaces between the foundation’s strip or columns and the trenches surrounding structures. Backfilling technology varies depending on the type of foundation.
The type of insulation—loose granules are inappropriate for insulating exterior vertical areas—and the relatively high coefficient are drawbacks. thermal conductivity, the challenge of estimating the backfill’s thickness, and a reduction in insulation efficacy as a result of the expanded clay’s frequent wetting.
Crucial! Although properly fired closed granules do not hold moisture, expanded clay does not shield underground structures from freezing or seasonal temperature fluctuations and actually makes them move in the absence of a dependable water barrier or the ability to remove precipitation.
The choice of whether or not to use it varies depending on the circumstances; in most cases, protecting the expanded clay layer with an external moisture-proof blind area yields the best results.

Watch this video to find out how to use expanded clay to insulate a house’s foundation:
Styrofoam
In general, inexpensive foam plastic grades with densities less than 25 kg/m³ are not appropriate for insulating heavily loaded foundation structures; when choosing this kind of insulation, extra care is taken to verify its qualities and attributes.
Foam is readily used and mounted with dowels or glue for insulating shallow strips, plinths, and other above-ground portions of the foundation. UV light causes beneficial properties to be lost, so the foam needs to be finished right away. Generally speaking, extruded foam has far superior qualities than regular brands, even though the foam is less expensive. Insulation is expected to cost 4900 rubles per square meter.

Minvata
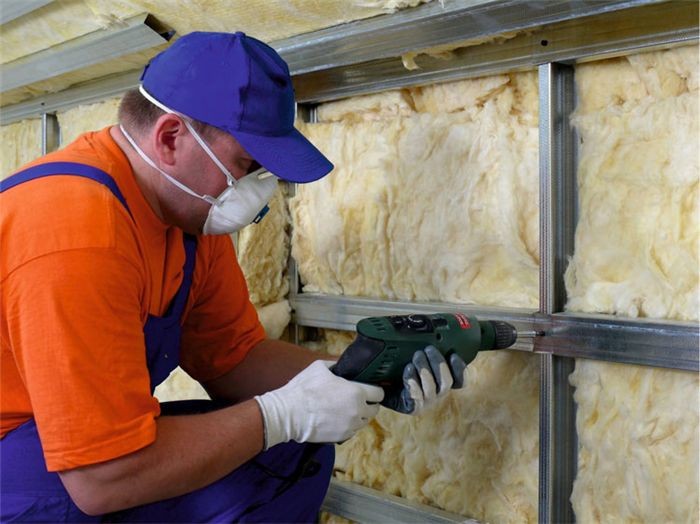
Be advised that, despite their many benefits, fibrous stoves made of stone and mineral wool are not intended to operate under soil pressure without the ability to draw random moisture and condensation from the interior.
In such cases, even the best varieties of rigid hydrophobicated wool must be protected with roll materials, which has a negative impact on the cost and difficulty of the insulation job.
Because of this, this kind of insulation is only utilized for the isolation of structural elements such as pits, suspended grillages, floors along lags, and exterior basement sections that are not purchased or in contact with the earth. Brands that meet the necessary standards for moisture resistance and hardness can be purchased for as little as 6,000 rubles per square meter, not including the cost of finishing or fasteners.
Do-it-yourself thermal insulation: step-by-step instructions
When completing the task on your own, gradually:
- Inspect and prepare trenches, foundation surfaces or work sites. The bases, covered with insulation, are cleared of soil and debris, and, if necessary, strengthened and leveled. You may be interested to know how much it costs to dig a trench for the foundation and how to do it correctly manually and using an excavator. The areas under the future soles or cellar floor are compacted, filled with gravel, and covered with rolled waterproofing.
- The main waterproofing layer of the foundation is being installed (skipped when insulating the PPU structure). Read about how to waterproof a foundation with your own hands here.
- Insulation boards are attached to clean and dry surfaces.
- External parts are faced, soil is backfilled and the blind area is insulated (if necessary).
Regarding a note. The requirement for adhesive fixation for subterranean areas and mechanical or adhesive fixation for above-ground areas are significant technical nuances.
The soil-filled layers need to be as tight and sturdy as they can be. Slab types of insulation are installed in two or more layers to meet this requirement.
Energy efficiency and structural integrity of a private home are greatly enhanced by externally applied insulation to the foundation. This article discusses different insulation materials, installation techniques, and related costs as it examines when and how to carry out this process. Homeowners can increase comfort, lower heating and cooling costs, and improve insulation in their homes by making educated decisions based on these factors. This thesis statement provides a clear and concise overview of the article’s scope, laying the groundwork for a thorough investigation of the subject.
Differences in technologies for different types of bases
When deciding on the properties of insulation and how to install or fasten it, the kind and depth of the structures must be considered. Slabs made for extreme loads and able to withstand pressure of up to 25–30 t/m² are used to lay the heavily loaded layers, which are found below and at the level of soil freezing. In addition,

- Monolithic bases, poured using the “Swedish slab” technology, they are insulated at the laying stage, after preparing the site and geotextile flooring and roll waterproofing (which geotextile to use?). The same applies to ready-made concrete products laid using special equipment. Internal insulation of an already laid and in use slab is possible, but is considered less effective.
- Strip foundations poured into warm permanent formwork or covered with insulation from the outside after the concrete has hardened and waterproofing has been installed. Read more about how to properly make a strip foundation with your own hands here, and from this article you will learn how to make formwork. There are different schemes for their insulation, including laying a layer under the sole of the tape (protection against heaving) or a blind area around the perimeter of the house (shifting the freezing zone of the soil), insulating the internal space and floors along the ground (reducing the main heat losses). In houses with deep basements, the entire outer side of the tape and the very base of the cellar floor are subject to insulation.
- Columnar bases are protected from soil heaving by laying an insulating layer under the soles of the supports (which is important – exceeding the cut-off area by at least 2 times on all sides) and insulating the pillars themselves (including at the pouring stage). Reducing heat loss from columnar and pile-grillage foundations is achieved by insulating the inlet and floors. Read more about the nuances of constructing a pile-grillage foundation for a house made of aerated concrete here.
Useful video
Watch the video to learn whether insulating a house’s foundation is necessary, how to do it correctly, and what the simplest and least expensive insulation option is.
Adding external insulation to your home’s foundation can protect against moisture-related problems and increase energy efficiency significantly. You can guarantee your property will benefit for a long time by selecting the appropriate materials and installation techniques.
It is important to evaluate local soil conditions and climate when thinking about external foundation insulation. This makes it easier to choose insulation materials that offer sufficient moisture and heat resistance. Extruded polystyrene (XPS) and rigid mineral wool are two materials that are frequently used because of their strength and resilience to water damage.
There are several crucial steps involved in installing insulation for external foundations. First, the foundation’s exterior is prepped by cleaning and, if required, fixing any damage that already exists. After that, the insulation boards are firmly installed against the foundation walls to make sure there are no spaces or overlaps that could reduce the insulation’s effectiveness. Sealing penetrations and joints is given special attention in order to keep the thermal barrier continuous.
The price of external foundation insulation varies based on a number of variables, including the size of the foundation, the type of material chosen, and local labor costs. The initial investment can typically range from moderate to high, but over time, the cost is frequently justified by the energy savings and increased value of the property. To ensure competitive pricing and high-quality workmanship, it is advisable to get multiple quotes from qualified contractors.
In conclusion, there are a number of advantages to insulating your home’s foundation from the outside, including improved energy economy, reduced moisture buildup, and strengthened structural integrity. You can wisely invest in the comfort and longevity of your home by choosing appropriate materials, adhering to installation procedures, and taking long-term cost-effectiveness into account.


