
Pitch of the roof is one of the most important factors to be carefully considered when designing the sheathing of a pitched roof. An effective roof’s ability to shed water and snow, look good, and even work with certain types of roofing materials are all influenced by its pitch, or slope.
A roof’s pitch is commonly expressed as the vertical rise divided by the horizontal span. On a roof with a 4:12 pitch, for example, there are 4 vertical rises for every 12 horizontal ones. Pitch selection is important because different situations call for different uses. For example, steep pitches (8:12 or higher) work well for rapidly releasing snow and rain, while lower pitches (3:12 or 4:12) are more frequently found in residential settings due to their ease of construction and visual appeal.
Requirements for roof pitch also affect the roof’s structural layout. Stronger framing is needed on steeper pitches to support the heavier snowfall and more complicated loads brought on by the steep angle. Lower pitch roofs, on the other hand, are more likely to pool and have slower water runoff, so extra waterproofing techniques or special materials may be needed to stop water infiltration.
It is essential to match the thickness and type of sheathing to the particular pitch of the roof when designing sheathing for a pitched roof. In order to provide sufficient support and prevent warping or sagging under the weight of roofing materials and potential snow loads, steeper pitched roofs frequently require thicker sheathing.
| Feature | Pitch Requirement |
| Roof Pitch | The angle or slope of the roof, typically mea12). |
| Material Compatibility | The type of roofing material suitable for different pitch ranges, ensuring proper water shedding and durability. |
| Water Drainage | Higher pitches facilitate faster water runoff, reducing the risk of leaks and water damage. |
| Aesthetic Considerations | Steeper pitches may be preferred for certain architectural styles or to enhance curb appeal. |
| Structural Support | Steep pitches require stronger framing to bear the weight of the roof and snow loads. |
What it is?
The word "lathing" describes continuous decking or stiff slats with a comparatively small cross-section that are installed atop the rafters with the intention of:
- Uniform distribution of load on the rafter system from the roofing pie and snow cover.
- Forming a slope, preparing the base for reliable and correct fixation of roofing materials.
- Supports soft roofing types or heavy weight materials.
It’s important to remember that this design is not the same as a counter-lattice, which is made up of thin slats and used to repair waterproofing and provide a ventilation gap in insulated pies or under sheet metal-based roofing materials. The lathing, which is packed perpendicular to the rafters and reinforces the main structure, comes in all types and pitches.
The design specifications are rather straightforward: it needs to be robust, consistent, and dependable. Changes in the elements’ pitch or level are not permitted. The same holds true for loose fasteners, drooping surfaces, lumps, or exposed nails. The materials’ service life needs to be at least as long as the rafter system’s and the cake’s overall durability.
Execution: how much should one perform, step
The qualities of the roofing materials have a direct bearing on the design and pitch:
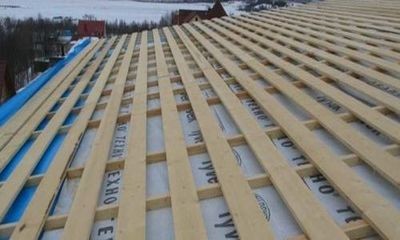
- Under soft roll roofing, bitumen and small-piece tiles, exclusively solid floorings made of plywood or wood boards (the best option) or boards are installed. In particularly difficult cases (for single-pitched roofs – with large weight loads), such lathing can even be double (the bottom row is packed in space, the top row is packed tightly). Sheet materials in such bases are fixed with a gap of 2 to 10 mm, compensating for possible displacement or warping due to temperature or humidity expansion. The flooring is made as smooth and durable as possible; a properly laid continuous sheathing should support the weight of an adult.
- Under most types of sheet materials (metal tiles, thin corrugated sheets, rebates), a standard lattice lathing is laid with a pitch between slats within 25-45 cm.
- Under large-format rigid sheets (asbestos-cement slate, high-rigidity corrugated sheets), a thin sheathing is installed in increments of 50 to 75 cm.
When selecting a lattice structure’s precise pitch The manufacturers’ recommendations, the slope’s angle of inclination, and the spacing between the rafters (universal tables) are all taken into consideration. These last are particularly important to remember when installing any profiled sheets. However, the load-bearing capacity and kind of roof serve as the primary guidelines (see table).
| Material | Corner slope slope, ° | Optimal step range rack, cm | Recommendations and rules |
| Slate | From 30 | 50-75, no more | Each sheet is supported by at least 3 beams, the exact pitch depends on the size of the sheet. In some cases, it is necessary to pack slats with a difference in height of 2-4 mm |
| Euroslate (ondulin) | 5-10 | Solid | Increasing overlap of sheets with decreasing slope angle |
| 10-15 | 25-45 | ||
| >15 | 60 | ||
| Corrugated sheet | Solid | Direct relationship between the weight of the sheet and the cross-section of the slats | |
| >15 | 20-50 with hardness C10, C20, C21 |
It is important to keep in mind that the bottom line of the sheathing fastening calculation must align with the edge and fixation points of the roofing materials.
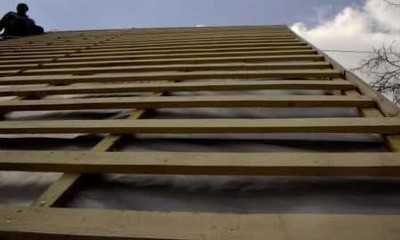
The latter is particularly crucial when installing metal roof tiles. Instead of using regular metal tiles, a thicker or double strip is placed on the lower edge, and the spacing between each strip should match the manufacturer’s specifications to the nearest millimeter.
For the whole length of the overhang, solid decking is present beyond the walls (i.e., at least 5 cm, more is better).
Material requirements
The guidelines for selecting lumber are governed by GOST 8486-86, SNiP II-26-76, and the specifications of roofing suppliers. A minimum of 50 x 50 mm for discharged sheathing beams and 25 x 150 mm for boards is acceptable. Wider boards tend to warp, so there’s no use in using them. The rafters’ pitch is taken into consideration when choosing materials for continuous decking (see table):
| Interrafter distance, cm | Minimum material thickness, mm | ||
| Edged or tongue and groove board | OSB, fiberboard, chipboard | Moisture-resistant plywood (FSF and similar brands) | |
| 60 | 20 | 12 | |
| 90 | 23 | 18 | |
| 120 | thirty | 21 | |
| 150 | 37 | 27 | |
Every piece of lumber used needs to be dry and impregnated with fire retardants and antiseptics. The sheathing sags or warps when the humidity rises above the transport level. It is made clear that wood must be pre-impregnated with fungicides; otherwise, the materials are processed and thoroughly dried on the construction site.
Average requirements apply to wood grade. If the grade II lumber is well-dried and free of big knots or bark, it can be used to lay the sheathing. However, materials that are blatantly inferior—such as bark-covered slabs, wood that has been bent or blackened by insects—cannot be utilized.
Metal profiles can be used in place of wood materials if the roof slope is longer than six meters. When installed properly, such sheathing has no deviations in level, allowing the base to remain perfectly level for an extended period of time. It can withstand the weight of roofing materials, up to and including natural tiles.
But such sheathing is rarely installed beneath pitched roofs because of its heavy weight, the difficulty of attaching external coverings to the metal, and its high cost.
Understanding the necessary pitch for a pitched roof is essential for long-term structural stability and sheathing design. Pitch, also known as slope angle, influences the roof’s visual appeal and establishes the kind of materials and building techniques required. This article examines how varying pitch angles affect design decisions about the efficacy of insulation, drainage, and roofing material selection. Homeowners and builders can make well-informed decisions to guarantee that their pitched roofs are not only long-lasting but also practical and aesthetically pleasing by investigating these factors.
How to do it?
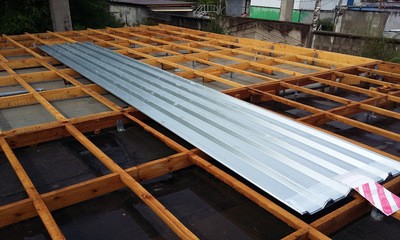
After the rafter system is installed, work starts with leveling it and resolving any issues. Installation typically starts from where roofing materials will eventually be fastened, or from the edge of the overhang, upwards.
The precise steps vary depending on how many layers there are in the cake. For example, in residential buildings with insulated pitched roofs, installing hydro- and windproofing films on top of the rafters with a 2-centimeter ventilation gap and filling the counter-lattice comes before installing the sheathing.
In continuous lathing systems, the waterproofing layer is applied on top of the sheets after the sheets are laid.
Lumber is fastened with ordinary nails (1 PC in the beam center, 2 PCs for boards with a 2 cm indentation from the edge). All sharp edges and protruding parts should be driven inside, and board or sheet joints should be on the rafters. The level and pitch of the sheathing are continuously checked while the slats are being filled. To finish the job, a cornice strip that shields the building from precipitation is inserted into the outer lath of the sheathing.
Common installation errors and construction recommendations
The primary risk stems from improper sheathing type and pitch selection. Because of this, installing profiled materials incorrectly results from deviating from the interval advised by the manufacturers (there is simply no board under the required fastening point). Overthinning the boards increases the risk of roofing materials sagging, which is particularly evident in regions that receive a lot of snowfall.
The belief that all issues can be resolved by lowering the step of the sheathing or installing a solid covering is likewise incorrect; in this case, the estimate rises significantly and the roof is poorly ventilated.
Apart from mistakes in design, transgressions related to installation technology consist of:
- Saving on lumber and its processing, for example – buying boards with bark, refusing fire retardants and fungicides or using boards and beams with a smaller cross-section.
- Excessively tight fit of sheet materials when stuffing solid sheathing. Without 2-3 mm compensating gaps, such coatings begin to swell at the joints. The same applies to the installation of sheets with significant differences in height, leading to cracks and leaks.
- Installation of sheathing without a protrusion.
- Stuffing materials with different thicknesses.
- Ignoring the need to check the level or installing the pie and covering without preliminary leveling of the sheathing.
- Laying a continuous sheathing or fastening rolled waterproofing with timber over the insulation without a 2 cm ventilation gap.
- Attaching sheet roofing materials to the base without a batten.
It is advisable to prepare a spot for the temporary placement of the materials at the top and sketch up an approximate layout of the materials (particularly when laying continuous sheet sheathing) to make the work easier. Work is done in warm, dry weather regardless of the kind of lathing.
Of course! For your article on "Features of the design of sheathing of a pitched roof, pitch requirements," here is a succinct conclusion:
It is essential to comprehend the pitch requirements for a pitched roof in order to guarantee its longevity and functionality. The pitch, or angle, of the roof has a direct bearing on a number of important variables, such as the kind of roofing materials that can be employed successfully and the building’s overall visual appeal.
In comparison to roofs with lower pitches, steeper pitches—such as those exceeding 45 degrees—usually call for different materials and construction methods. This is because steep pitches are better at shedding snow and water, which over time lowers the chance of leaks and structural problems.
In contrast, modern architecture frequently features lower-pitched roofs, which call for stronger materials to withstand less effective water shedding and possibly even more waterproofing. Comprehending these variations facilitates the selection of appropriate materials and construction methods by homeowners and builders, guaranteeing optimal roof performance in their particular climate and surroundings.
In summary, the design of sheathing for a pitched roof necessitates striking a balance between aesthetic preferences and functional factors like weather resistance and upkeep. Homeowners can make sure their roofs not only have a nice appearance but also successfully endure the weather over time by following pitch requirements and choosing the right materials.
This conclusion wraps up the key points of the article in a straightforward manner, providing readers with a clear understanding of why pitch requirements matter in roof design.


