
To calculate a hip roof is a necessary skill for anyone working on building or remodeling projects. Knowing the equations and processes at play guarantees that the roof is both structurally solid and aesthetically beautiful. Understanding these computations is essential whether you’re a professional builder or a homeowner considering an addition.
First of all, a hip roof is distinguished by the way that it slopes on all four sides, coming together to form a ridge at the top. In order to precisely determine its area, you will need to divide the roof into manageable portions. The length and width of each section are important factors in figuring out how much material is needed.
Important formulas are those that compute the area of each triangle segment that the slopes form and take into consideration any extra elements such as skylights or dormers. Here, accuracy is crucial because errors may result in underestimating the materials or jeopardizing the structural integrity of the roof.
Furthermore, knowing how to compute the pitch angle, or slope, of each side guarantees efficient water drainage and discourages pooling, both of which are essential for averting leaks and prolonging the life of the roof. You can approach the task of calculating a hip roof with confidence and make sure your project moves forward smoothly by following these steps.
- Process Features
- Preparing for work
- Formulas and drawings
- How to calculate slope taking into account all loads?
- Proportions of roofing elements
- Rafter system
- Lathing dimensions
- Roof covering
- Services that help you calculate dimensions and building materials
- Useful video
- Video on the topic
- Hip Roof truss system./Hip Roof Rafter System. Subtleties that not everyone knows about!
- Multi-angle hip .Part 1 – calculation of rafters
- Mauerlat knot in the Hip Roof
- Calculation of the hip roof rafter system
Process Features
The starting information is:
- Dimensions and plan of the house, namely, the parameters of the external and internal load-bearing structures holding the hip roof frame.
- Climatic conditions: snow and wind loads, amount of precipitation, average air temperature.
- Type and weight of all layers of roofing pie (specified and, if necessary, adjusted during the calculation).
- Other operating conditions (the need to use internal space, complicate the configuration or install additional. pass-through elements, design requirements).

The computation is complicated because the hip and trapezoidal slopes have different characteristics (slope, area, and shape), and there are four more ridges in addition to the ridge.
Both the calculation of reinforcing structures and the selection of the main frame elements’ cross-section present challenges.
Deviations downward are not permitted. The estimate and weight of the roof increase with large deviations.
Even in the most basic design, the frame is always strengthened with struts; in residential buildings, a hip roof frequently needs to be reinforced with at least two vertical support posts.
Check out our article to learn how a hip roof is built.
We’ll dissect the crucial procedures and techniques for precisely estimating a hip roof in this post. The formulas and procedures involved are important to understand whether you’re planning a new build or renovating an existing structure. We’ll walk you through identifying the various parts of the roof, figuring out the hip rafters’ length, figuring out the pitch of the roof, and making sure that materials like shingles or roofing tiles have exact measurements. These easy-to-understand instructions will provide you the tools you need to calculate a hip roof for your building or remodeling project with confidence.
Preparing for work
The first step in the process is to create a basic yet thorough drawing that will enable you to measure the area of all roof surfaces (both total and individual slopes), as well as the length and cross-section of the main components.
The roof drawing gets more intricate as the parameters are defined, and intermediate rafters, extra components, and roofing pie are calculated.
The developer should ultimately receive an accurate roof plan that details the cross-section, dimensions, points, and methods of fastening each element—ideally accompanied by a 3-D model.
Formulas and drawings
When performing a sequential calculation:
- The optimal slope of the slopes is determined, the angle of inclination of the rafters is calculated.
- The height and placement points of the ridge, the length of the diagonal and central rafters and the purlin itself are calculated.
- The length of the eaves overhang is selected and the approximate area of the slopes and the entire roof is calculated. This indicator is subsequently used to determine the load per 1 m2 .
- The weight of the roofing pie and the load on the rafters are specified.
- The cross-section of the main load-bearing elements of the frame (including the beams and vertical posts), the pitch and cross-section of ordinary and shortened rafters are selected and checked.
- Strengthening elements are calculated – struts, trusses or crossbars.
- An accurate calculation of the lathing, counter lathing and pie is carried out.
- The required amount of materials and fasteners is determined.
For a precise computation It is worthwhile to use roofing calculators that use trigonometric formulas to determine the indicated values:

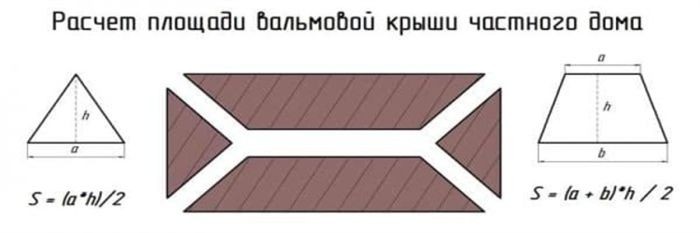


How to calculate slope taking into account all loads?
Hip roof slopes can range from 5 to 60 degrees, although projects with modest or moderate slopes are uncommon; the hip roof must be at least 15 degrees when sheet materials are used. The anticipated loads are considered when selecting a slope:
- Roofing cake weight.
- Wind loads.
- Snow weight.
When it comes to a hip roof, the length of the diagonal slopes—that is, the distance from the upper corner of their connection to the wall plate—and the height of the roof—that is, the distance from the ceiling or lower level to the ridge—determine the slope of the slopes.
Aid! The specifications set forth by producers of roofing materials also influence the slope. For most types, the ideal slope ranges from 20 to 45 °.
Proportions of roofing elements
The following components of such structures are calculated:
- Obtaining an accurate design of the truss structure frame, including overhangs, sheathing and counter-lattice.
- Calculation of roofing cake layers (roll materials taking into account 10-15 cm overlap and overhang behind the ridges of the slopes, insulation and the roofing materials themselves).
- Calculation of materials for lining the overhangs.
- Drawing up a diagram of the placement of additional elements – walk-through structures, windows, hatches, snow guards and gutters.
Rafter system
This step is regarded as the most challenging since any mistakes made in the frame’s design could cause it to warp when it is installed or used. When done correctly, the task starts with defining the house box’s dimensions. Next, in order:

- A simple approximate plan of the frame is drawn up, subsequently – refined.
- The amount of materials for laying the Mauerlat and sleeper is calculated, the exact location and method of their attachment are noted.
- The number and height of vertical support posts, the extreme points of their placement and the length of the ridge run are determined. At this stage, it is recommended to check the compliance of the section of the power plate and support posts with weight loads using tables, or lay it with a margin (from 150 mm 2).
- The exact length of the oblique diagonal legs and their cross-section are calculated. Due to length restrictions, the need and splicing points of lumber are also determined at this stage. Due to significant (1.5-2 times higher than ordinary central) loads, it is recommended to make these elements double or even triple. The length margin for installation is at least 5%; the method of connection and fastening in the unit is selected in advance depending on the type of rafters and the number of ridge girders.
- Calculate the pitch and cross-section of ordinary rafters and other elements of the frame of the slopes (namely, the rafters and half-legs).
- The need for reinforcing elements (struts, tightening, truss trusses) is determined.
- The most detailed frame design is drawn up.
Fasteners are chosen at this stage, along with techniques for organizing the eaves overhang and connecting all nodes and elements.
Hip roof eaves overhangs can be formed with fillies because of the length of the rafters, but this is made clear ahead of time.
The design of the hip roof rafter system is covered in more detail here, and building a rafter frame is explained in detail in this article.
Lathing dimensions
Depending on the chosen roof covering, the algorithm’s precise order will vary, but generally speaking:
- The type of sheathing is selected – solid for soft coverings or for low slope slopes or thin in other cases.
- Taking into account the expected weight loads, the thickness of sheets, boards or planks is selected (from 12 mm in the first case and from 20 and 50 mm).
- The main lathing pitch recommended by the manufacturer and the distance to the first plank are specified. The latter is relevant when planning to cover roofs with metal or some types of composite tiles.
- Using a calculator or manually, create a diagram of the layout of materials. Ideally, the planks are brought directly to the ridge or with a slight indentation of the top plank, with a uniform spacing of the sheathing on the remaining sections of the slopes.
- The required amount of lumber and fasteners is calculated, the resulting value increases by 5-10%.
Apart from the guidelines provided by the manufacturer, consideration should be given to how the discharged sheathing pitch varies depending on the rafters’ pitch (refer to the table below). Materials are calculated using a similar scheme when laying solid types, accounting for the required 10–12 mm wide boards or compensation gap between sheets.

Roof covering
The typical algorithm consists of:
- Clarification of the area of the slope to be covered with materials and the indentation for fastening gutters.
- This value is divided by the usable area of each sheet, indicated by the manufacturer and depending on the roof slope and tightness requirements.
- The resulting number of sheets increases upwards.
Because of the intricate shape of the slopes, you should account for at least a 30% waste of sheet materials when selecting a roofing covering for a hip roof.
Particular care must be taken with metal roof tiles that have a complex or small profile, are laid in unique patterns, and have lots of fastening points. Manufacturers advise multiplying the total area of the slopes by a correction factor (1.1 and higher) and verifying the results using a precise sheet layout when computing such materials for hip structures.
For such roofs, small-piece tiles and soft rolled varieties with a straightforward pattern are typically thought to be more profitable and appropriate.
Services that help you calculate dimensions and building materials
To select the best plan, compare your calculations with indicative drawings or use online roofing calculators, which offer the following features:
- stroy-calc.ru is a popular service that allows you to get all the geometric parameters of a hip roof. With its help, you can calculate materials and check the compliance of the frame, sheathing and coating with the expected loads.
- calcstroy.ru is a calculator that provides accurate indicators of material consumption and drawings in two-dimensional projection.
- kalk.pro – a service for performing complex calculations and obtaining drawings and 3-D designs of a hipped roof.
It is crucial to realize that the majority of these services are only able to provide data in the event that you have precise initial data and are not intended for the design of intricate roofs from the ground up.
For instance, they check that the lumber cross-section complies with the loads and compute the slopes at a known ridge height, but they do not determine them). However, they work wonders if you need to figure out which drawing is best and estimate the cost.
If you are confident in your abilities, you can use KZ-Cottage, 3D Max, AutoCAD, or Archikad to design the roof and every other part of the house. It is better for novices and those without an architectural degree to enroll in the ArCon program.
Applications like Google SketchUp, FloorPlan 3D, VisiCon, and Home Plan Pro can also be used as alternatives to complicated programs.
Useful video
See this helpful video to learn how to use an online calculator to calculate the cost of a hip roof:
| To correctly calculate a hip roof, follow these steps: | 1. Measure the length and width of the building"s footprint. |
| 2. Determine the pitch or slope of the roof. | 3. Calculate the run and rise for each roof slope. |
| 4. Use the Pythagorean theorem to find the length of the hip rafters. | 5. Add the lengths of all hip rafters to find the total length. |
| 6. Calculate the area of each triangular section of the roof. | 7. Sum the areas to find the total roof area. |
| 8. Consider overhangs and additional features in your calculations. | 9. Double-check your measurements and calculations for accuracy. |
Several crucial steps must be taken when calculating a hip roof to guarantee precision and effectiveness in your building project. To determine the footprint of your building, first measure its length and width. This serves as the foundation for estimating the area covered by the roof.
Next, choose the roof’s pitch angle, which will determine its slope and drainage capacity. Pitch angles that are commonly used range from 4/12 to 6/12. Pitch angles that are steeper require more materials to effectively shed water.
Utilizing the Pythagorean theorem, determine the hip rafters’ length using these measurements. In order to precisely cut the rafters, you need to know the diagonal measurement from the eave to the peak, which can be found using this theorem.
Once you know the length of the hip rafters, use the relevant formulas to find the total amount of hip rafters your roof requires. By taking this step, you can make sure that you accurately plan your construction and buy the right amount of materials.
Don’t forget to take into consideration extra elements like ridge boards and overhangs, which are crucial to the hip roof’s structural soundness and visual appeal. Verify your calculations one more time to prevent expensive errors and guarantee a seamless building process from beginning to end.


