
Your home’s security and appearance can both be improved by installing a metal entry door. Even though it could seem overwhelming, you can complete this project on your own if you have the necessary supplies and are ready. With step-by-step instructions for every installation task, this guide will lead you through the necessary procedures for installing a metal entrance door.
To start, planning is essential. Start by taking precise measurements of your door frame’s dimensions. Attach safety gear such as goggles and gloves, and have ready a drill, screwdriver, level, and measuring tape. Make sure there is enough room to move around during installation by clearing the work area.
Next, if you’re replacing an existing door, carefully remove the old one. Before moving forward, inspect the door frame for any damage or necessary adjustments. A level, stable surface is essential for installing the new door. Before proceeding, take the time to make any necessary adjustments to the frame, such as shaving or reinforcing.
Start attaching the metal door frame now. Make sure the frame is level and flush with the door opening when you place it there. If necessary, make adjustments with shims to keep the frame stable and aligned correctly. Depending on how your home is built, after you are happy with the arrangement, fasten the frame by screwing it into the nearby wall studs or masonry.
- Materials and tools
- Preparing the doorway
- Removing the old door
- Preparing the opening
- Measuring and ordering a door
- Step-by-step installation instructions
- Fastening the box with anchor bolts
- Installation of a door frame by welding
- Fastening the box with grips
- Installation of accessories
- Final stage
- Finishing
- Conclusion
- Video on the topic
- How to put the front door to aerated concrete | Installation of a heavy metal door with a thermal extension.
- How to make the installation of the front doors TM portal
- Installing the entrance metal door with your own hands / How to install a door in a frame house
- Installing the front door with your own hands
- Entrance metal door installation | Master class | detailed instructions
- How to install the front door correctly? / Step -by -step installation of the front door
- Installing the front metal door with your own hands – how to install a door
- How to install an entrance metal door with your own hands!
Materials and tools
It’s advised on a lot of websites to measure the doorway before placing an order with the manufacturer to replace or install a door frame. This is a valid point of view, but it only applies to recently constructed buildings. Nothing prevents you from obtaining the precise opening measurements in every direction.
Not everything about replacing doors is easy; a 2 cm measurement error can cause major issues. If you have to widen the opening, you can get away with very little blood. If the reverse is true, there will be financial expenses as well as a significant amount of work to be done. As a result, it is preferable to alter the workflow and structure the entire procedure along the following chain:
- purchase materials and tools;
- remove the old door;
- clean the opening from plaster and quarters (available in all Khrushchev buildings);
- take measurements;
- order a door;
- install the front door;
- complete finishing work.
Supplies for the task at hand:
- anchors (anchor bolt) with a diameter of at least 10 mm and a length of at least 15 cm – 6 pcs. (four on one side, two on the other). Before purchasing, it is better to call the company where you will order the door (or store) and find out whether anchor bolts are included in the kit;
- steel reinforcement 10-12 cm long and with a cross-section of at least 10 mm, if the door will be welded to the eyes – 8-12 pieces.;
- silicone grease for bearings and eccentric;
- mounting foam;
- Wooden or plastic spacer wedges (you can make it yourself, but better to buy) to fix the door frame in the desired plane – 8 pcs.;
- garbage bags;
- Polyethylene film to protect furniture from dust.
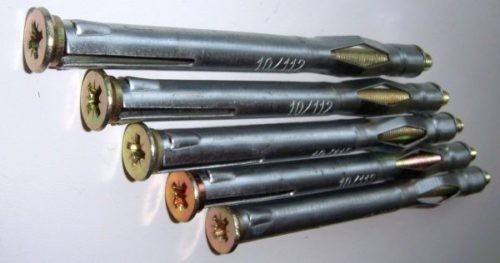
In the event that the doorway needs to be lowered, you will also need to purchase a ready-made cement-sand mixture and brick when it removes significant gaps (greater than 10 cm).
The tools required vary depending on how the box is mounted to the wall. This is a general list that ought to be the main focus of each particular circumstance.
Therefore, the following will be needed if you want to install the apartment’s metal entrance door yourself:
- Perforator (can replace the shock electric drill) – is necessary;
- a screwdriver with a set of bit or a cross -shaped and slotted screwdriver;
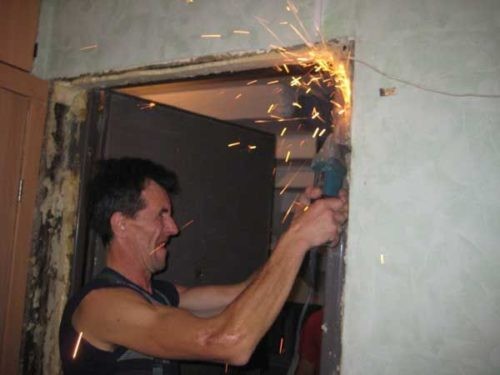
- grinder with cutting and diamond wheel – needed mainly when widening an opening or eliminating a quarter in houses of old construction;
- semiautomatic welding machine — necessary when attaching lugs to reinforcement by welding or installing a door frame on "grips";
- pry bar or crowbar;
- hammer;
- chisel;
- 3 m tape measure;
- spirit level or laser level;
- furniture wrench No. 4;
- socket head of a wrench for tightening the anchor bolt;
- homemade plumb line;
- water sprayer;
- construction pencil or marker.
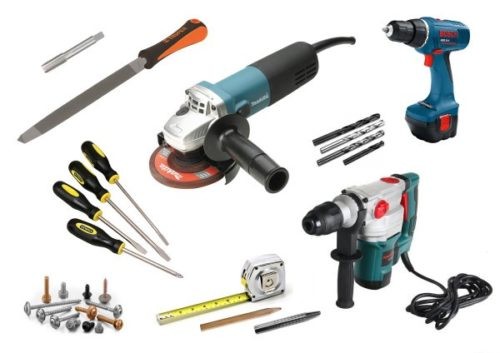
If the power tools listed above are missing from your home kit, you can either rent them or ask friends or acquaintances for them. Buying them is not practical; hiring professionals to install the doors will be less expensive.
Preparing the doorway
Experts advise ordering a new door first, taking out the old one, and getting the opening ready. They stress that if you perform these steps back-to-front, the apartment won’t have an entry door for one to two nights. Experience has shown that even skilled measurers can err when estimating the size of an opening when there are old doors present.
You will have to go several days without doors for the night due to inaccurate measurements. Therefore, one must decide between potential problems in the event that a mistake is made and the door frame’s proper dimensions for the opening.
Removing the old door
Eliminating the leaf is the first step in disassembling any door. If the door is on detachable hinges, a pry bar will suffice to lift it. Using a screwdriver, remove the non-separable hinges from the box by unscrewing the screws. Starting at the bottom is the best option.
Using a crowbar, the wooden box is cut out of the center of the side posts. Use a grinder to cut off the anchor bolts or eyes on a metal box in order to remove it. Once the box is unfastened, it is carefully knocked out or squeezed out. Excessive force can be harmful and cause damage to the walls.
Preparing the opening
The first step in physically installing an apartment entrance door is to remove the old one. Additionally:
- platbands, old polyurethane foam, insulation, pieces of plaster remaining on the slopes, spacer wedges are removed, and all protruding metal elements are cut off. The threshold is disassembled;
- using a plumb line to check the vertical wall inside the opening. If there is a blockage inside the door of more than 1 cm, it must be removed with a hammer drill and a chisel – difficulties will arise when installing the door frame;
- available in older houses, a quarter in the doorway is removed. This can be done with a grinder with a diamond blade, which is very noisy and dusty, or with a hammer drill, drill holes around the entire perimeter in small increments, and then knock out the remaining concrete with a hammer and chisel. Marking the cutting line in pencil will help simplify the work;
- the height and width of the opening are measured, after which an order is placed for the manufacture of doors;
- the ends of the walls in the opening are carefully inspected. If necessary, protruding parts of the wall material are knocked down manually (hammer and chisel) or cut off with a grinder. Loose bricks and crumbling pieces of concrete are removed. Voids and cracks are treated with a deep penetration primer and then sealed with cement mortar (1 share of Portland cement, 3 parts of sand). In this case, small potholes can be ignored, and large ones can be filled with pieces of brick;
- the next stage for those who live in old houses: inspection and repair of the floor under the door frame. There is a wooden beam mounted there, which becomes rotten over time. It needs to be removed. After this, there are two options: install a new block or seal this place with bricks and fill it with a cement-sand mixture;
- if the wall is made of lightweight concrete (gas silicate blocks, expanded clay concrete, etc.).d.) or thickness less than 15 cm, the walls of the opening are scalded with a metal frame. This operation is often necessary even if the house is made of panels;
- the opening ready for installation should be 4-5 cm wider than the manufactured door (20-25 mm on each side). Such gaps ensure high-quality installation and insulation, increase the strength and reliability of the structure.
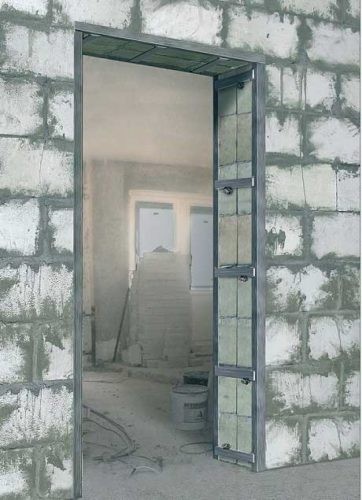
Important note: the beam above the door must rest at least 5 cm on each wall when the doorway is expanded.
Measuring and ordering a door
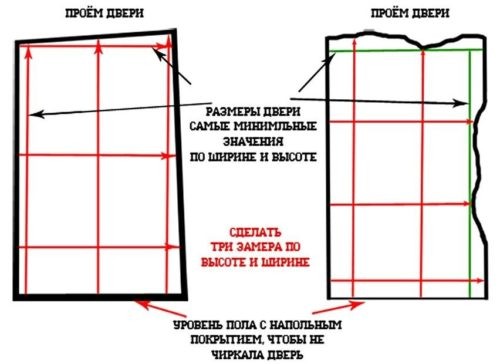
The precision of the measurements will determine the pace and caliber of the front door installation. They need to be measured twice for height; the width is taken at the top, middle, and bottom. The door frame’s measurements are determined by taking the smallest values for the vertical and horizontal dimensions, then deducting 40–50 mm to account for technological gaps.
You must choose the loops’ location—that is, which direction the doors will open—before you visit the store. The standard option is to the corridor wall. It is simpler to bring in furniture if the corridor is through and runs in the opposite direction from the entrance.
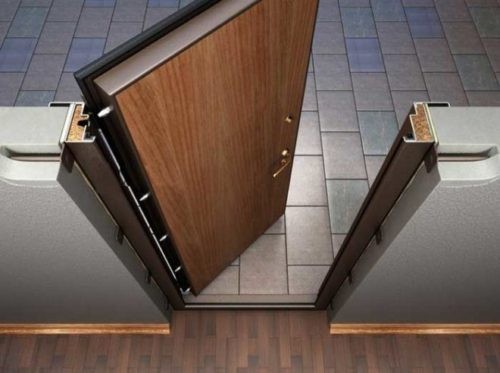
Old houses tend to have unusual openings. As a result, you must decide whether to order doors in accordance with the current sizes or to enlarge the opening. The second option, which spares the customer the labor-intensive, noisy, and dirty process of adjusting the opening to the size of the door block, is generally preferable, according to experience, even though it loses a little money. This is especially true since almost all companies finish orders the same day.
When placing an order, keep in mind that insulation needs to be placed inside the door frame as well as the door leaf.
Step-by-step installation instructions
A variety of techniques are employed to install entrance doors, depending on the type of wall, its condition, and the thickness of the aperture:
- anchor bolts through technological holes in the box;
- welding lugs with pieces of reinforcement or iron rod driven into the wall;
- using metal grips.
Let’s make two notes right away:
- During welding, changes occur in the structure of the metal, as a result of which it loses strength. When trying to break in, this has an effect – a door with lugs is easier to tear out of the wall (for apartments this is not important). Therefore, given the choice, you should always choose to install the door on anchor bolts – they are easier to attach to the wall;
- the technical regulations for installing doors provide for a minimum number of points for fixing the frame to the wall – 10 (3 vertically and 2 horizontally). Research has shown that the use of modern materials for fittings and lugs makes it possible to get by with 6 points (4 on the hinge side and 2 in the lock area). The security of the apartment does not suffer from these changes.
Fastening the box with anchor bolts
It is now common practice to mount the box using anchor bolts. The likelihood of buying such doors therefore approaches 100%.
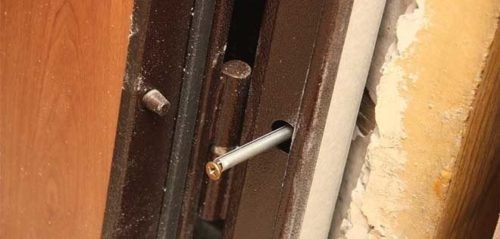
Let’s examine how to correctly install a metal entrance door on an anchor yourself, step-by-step.
Step 1: Locks and handles (which are typically already embedded in the door leaf during production) are fastened to the door leaf. Check that the handles and hinges move smoothly after the door has opened and closed multiple times. It is now essential to verify that the locks are functioning properly.
The door probably needs to be replaced if the crossbars are hard to fit into the frame’s holes because the geometry was harmed during assembly. Yes, replacing a door block under warranty prior to installation is simpler than doing so after. One more thing to keep in mind is that a lot of door manufacturers will void their warranty if the door is installed independently. As for us, the guarantee is still in place.
Step 2: Whether the hinges are secret (hidden) or external, the canvas is taken off of them. On two thin (1-2 cm) pads, the box is inserted into the opening. The vertical position along the front and ends of the door is measured with a level and plumb line.
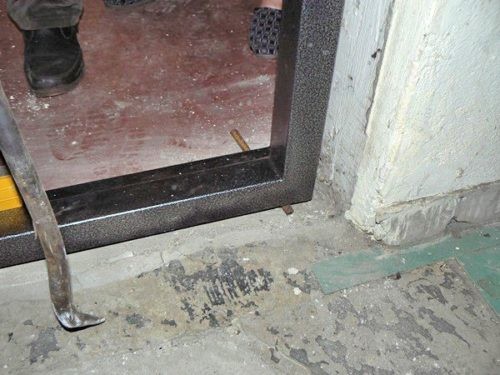
Step 3: Wedges are used to fix the final position. The exposed frame’s geometry is examined once more; even a small mm error compromises the door’s performance parameters.
Step 4: Hang and open the door leaf to 45 degrees. It will stay in this position if everything is carried out as directed. will either open or close on its own; you must keep adjusting the verticals.
Important note: installation instructions for hidden (internal) hinge manufacturers specify that the door must be tilted several degrees in the direction of the corridor. Should it be absent, the warranty is null and void. Every model has a unique set of numbers. You must therefore carefully read the instructions before setting the vertical. As a last resort, visit the manufacturer’s official website to locate these suggestions.
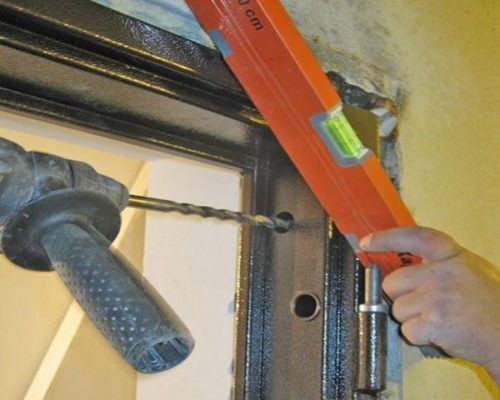
Step 5: The door is once more taken off of its hinges. The insulation within the box is taken out where the technological hole is so that it can encircle the drill. Following that, holes with the same diameter as the anchor are drilled up to 15 cm long.
Please take note that you can drill holes in the frame for the eyelets yourself if you have them and want to mount the door using anchor bolts. A metal drill bit that is four to five millimeters larger in diameter than the anchor’s cross-section is required for this.
Step 6: Drive the anchor bolts into the holes from the hinge side using a hammer and a metal insert until they click, signifying that the anchor is seated inside the box on the plate.
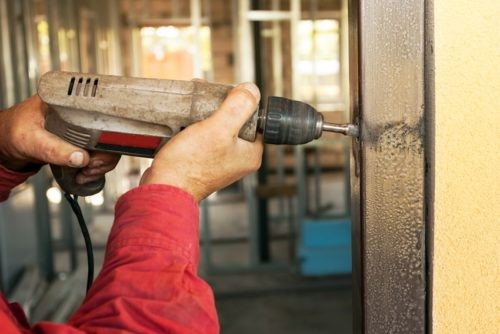
The wrench’s socket head is used to tighten the bolt. Following each fixation point, the door’s vertical is examined. The box moves away from the wall or is clamped to it when the bolt is loosened, if needed. The installation of anchors on the lock side completes the fixation procedure.
Step 7: The hinge bearings are lubricated with silicone grease. The hinges hold the door leaf in place. The door’s smooth operation is examined, as are the locks and handles.
Step 8: If the insulation hasn’t been installed beforehand by the manufacturers, it is glued. It is verified that the rebate is pressed firmly into the box. An eccentric that is positioned where the handle tongue enters the door frame can be used to adjust it if needed.
The work mentioned above is all not difficult. The most important thing is to keep an eye on the box’s geometry at all times.
Installation of a door frame by welding
Many producers make door blocks with eyelets built into the frame. You shouldn’t give it much thought as to how to weld the front door into place correctly in this situation.
First, as was already mentioned, you can mount the box on the anchors and disregard the eyes.
Second, except for points 5 and 6, the step-by-step algorithm for completing the work is nearly the same as the one above.
- the wall is drilled through holes in the steel plates to a depth of 12-15 cm;
- pre-prepared pins or fittings are driven into the resulting holes;
- Using a semi-automatic welding machine, the lugs are welded to the pins.
As you can see, not much has changed.
Fastening the box with grips
When anchor bolts or pins drilled into the wall come loose while the door is being operated, this technique is employed (the wall material is fragile or they are less than 15 cm thick). In these situations, the opening’s perimeter is enclosed by a metal sheathing of the wall.
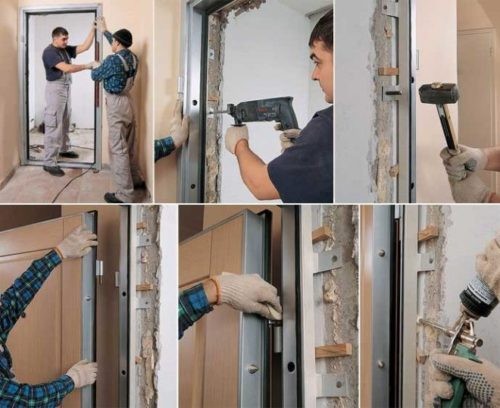
Welded to the door block frame from the apartment side are plates that are 4-5 cm wide and extend to the grille plates. There have to be a minimum of ten of these lugs overall.
After the door is vertically oriented and wedge-secured, it is welded to the sheathing. The procedure for installation is covered in great detail above.
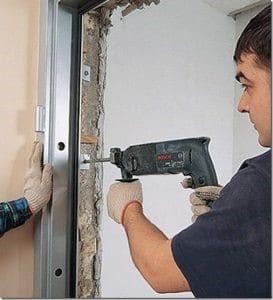
The door casing on the exterior will prevent the door from falling out or pressing into the apartment when fastened using this technique. Pulling out toward the corridor will not be possible due to welding.
Installation of accessories
Manufacturers of doors from fittings don’t just install handles; the locking mechanism is already installed, so damage during transit is a possibility. Before putting in the frame, they must be put together. You then need to check the exposed frame’s geometry, the door leaf’s movement, and the locks’ functionality.
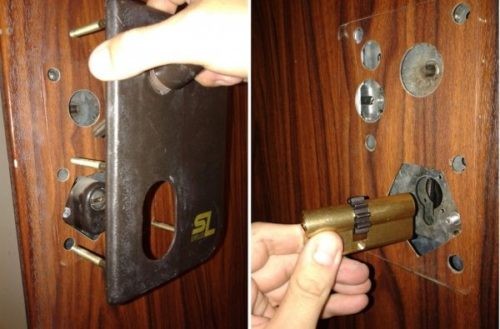
Both a plate and a rosette can have handles installed on them. The first ones are in style right now.
Installing a door handle with a rosette requires the following steps to be completed:
- unscrew the decorative strip (rosette) from both handles;
- insert a square into the door;
- put the handles themselves on the square from the outside and inside;
- screw the handles to the door leaf with special self-tapping screws (with sawn off heads);
- insert a threaded stud from the outside for fastening the handles together – prevents the handles from being removed from the corridor side;
- screw on the rosettes.
Adding a metal entrance door to your home can be a satisfying DIY project that improves both security and aesthetics. This tutorial will take you step-by-step through the entire process, from selecting the appropriate door and tools to finishing the installation and framing preparation. You’ll get the confidence to take on this project and produce results that look professional without hiring an expert with our clear instructions and helpful advice.
Final stage
The technological work of installing the door is completed at this stage, along with the finishing of the slopes and the economy class door leaf.
You must foam the space between the wall and the door block after putting the frame in place. Foam serves multiple purposes simultaneously:
- is an additional fastening of the door frame;
- serves as insulation;
- protects the apartment from corridor noise.
To stop foam from seeping in, the apartment side box is sealed with masking tape before the gap is filled, and the wall is dampened with water to eliminate dust. There are two stages to the foaming process. Using a technological gap, a thin layer of foam is first applied from the inside to the outside casing.
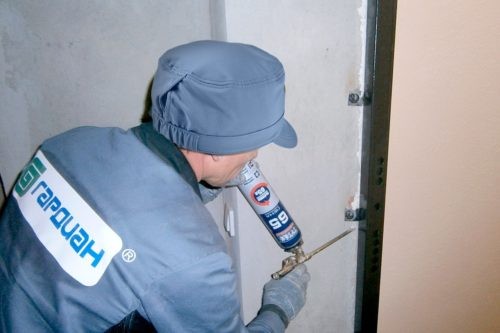
When foam expands in the corridor between the wall and the metal casing, this procedure will prevent it from doing so. Once the expansion process has finished after 15 minutes, you can use foam to fill the remaining space. The excess is cut off with a knife once it has dried. Take the masking tape out of the container.
Putty or cement mortar can be used in place of foam to seal the space between the block and the wall. However, the financial cost and implementation difficulty are higher. The door leaf’s protective film is removed, and ornamental plugs with anchors are affixed to the holes to complete the installation.
Finishing
The slopes and the nearby wall remain exposed at the installed door (platbands are required). Furthermore, the interior of the door leaf for economy class doors needs to be finished further, either with powder painting or veneer or plastic paneling.
Installing slopes can be done with putty, plastic, or gypsum plasterboard (as detailed in the article "How to make slopes on plasterboard windows?"). However, adding more trim is the most widely used method of trimming. The accessory and door can be supplied together by the manufacturer.
Note: Refer to the following material for further information on how to install the additional strip.
Conclusion
Metal entry doors are easy to install by yourself. This calls for the right equipment and supplies, a capable helper, and—above all—desire. Although the technological process is not very complex, it must be done in the following order:
- the old door is removed;
- the opening is cleared of remnants of plaster, insulation, metal fasteners, etc.d.;
- checking the verticality of the walls inside the opening. If necessary, part of the wall is removed;
- measurements are taken;
- the door is ordered or purchased ready-made;
- the ends of the walls in the opening are inspected and, if necessary, restored;
- the threshold under the removed door block is inspected;
- handles are installed on the delivered door, after which it is checked to ensure that the geometry of the frame and the leaf match;
- the canvas is removed from the hinges, and the box is installed in the opening and aligned vertically in all planes, after which it is fixed with wedges;
- the door leaf is placed on the hinges to check the verticality of the installed frame;
- the canvas is removed, and the door is attached to the wall with anchor bolts or using lugs;
- The technological clearance is laid with mounting foam, after which the door is installed on the loops;
- final technological work is carried out.
Installing a metal entrance door yourself can be a satisfying project that improves your home’s appearance and security. You’ve gained control over a crucial component of your home’s operation by following these steps. Recall that preparation is essential. Before you begin, make sure you have all the equipment and supplies you’ll need. To prevent problems with fitting later on, measure accurately.
Give safety top priority when installing. Seek assistance if necessary, as metal doors can be weighty. To guarantee a tight fit and seamless operation, double-check measurements and alignments at every stage. To ensure the best possible security and functionality, take your time adjusting hinges and locks.
After installation, give the door a thorough test. To make sure it functions properly, open and close it several times. To improve insulation, look for any cracks or gaps around the frame and seal them. Lastly, celebrate your achievement—you’ve installed a metal entrance door that improves the security and aesthetics of your house.


