
Although installing a toilet may seem like a difficult undertaking, it can be a doable and satisfying do-it-yourself project with the right supplies and some advice. When remodeling your bathroom or replacing an outdated toilet, understanding how to install a toilet can save you money and effort. We’ll walk you through the procedure in this guide to give you the assurance you need to complete the task correctly.
It’s crucial to first assemble all required equipment and supplies. A new toilet, bolts, a wrench, a screwdriver, a rubber gasket or wax ring, and plumber’s tape are required. Preparing everything ahead of time will facilitate a more seamless and effective installation process.
Next, get the space where the toilet is going to be installed ready. Verify that the floor is both level and clean. It is necessary to remove the old toilet before replacing it. Disconnect the water line, turn off the water supply, and flush the toilet to empty the tank. To remove the toilet from the floor, unscrew the bolts located at its base. There could still be some water in the tank or bowl, so be ready for a little mess.
The new toilet needs to be installed right now. Ensure that the rubber gasket or wax ring is centered before placing it on the flange. As you gently lower the toilet onto the flange, make sure the bolts line up with the holes in the toilet’s base. Firmly press down to form a seal. Tighten the bolts to secure the toilet, but take care not to overtighten and break the porcelain.
Attach the water supply line to the tank after the toilet is firmly in place. After turning on the water, look for any leaks. Try flushing the toilet once to make sure everything is watertight. As necessary, adjust the fill valve and float to guarantee correct operation. For a final touch and added stability, run a bead of caulk around the toilet’s base.
By following these steps, installing a toilet can be a simple process. You can successfully finish this project and enjoy your new bathroom fixture by being patient and paying close attention to detail. Never forget that preparation and patience are the keys to any DIY project.
- Installation installation steps
- Choosing an installation location
- Preparatory work
- Required materials and tools
- Marking the wall for the installation
- Niche for installation
- Installation nuances
- Block installation
- Frame installation
- Installation instructions
- Connecting the installation to the water supply
- Frame installation
- At what height to install
- Frame fastening technology
- Connection to the sewer
- Functionality check
- Installation covering
- Plumbing connection
- Video on the topic
- The simplest installation of the installation of the toilet and the hidden button. I show all the stages!
- Installation installation | Full process
- Hypsum cardboard installation cladding (Omsk)
- Installation of a suspended toilet of installation in different ways.
- Installation for toilet. How to install it with your own hands
- Installation and installation of installation of the toilet with your own hands. The installation of installation with drywall.
- The main errors in installing installation. Installation from A to Z.
- CORRECT selection and installation of installation for the toilet. I show ALL stages of installation installation.
Installation installation steps
One thing unites the characters of the "Russian world": they set themselves up for hardships before valiantly overcoming them. What connection does this have to installing a toilet? the most straightforward. Typically, after a plumbing product is purchased, the location of installation is determined. Also, the incorrect design was bought, as is frequently the case. As a result, here is the steps involved in installing a wall-hung toilet:
- the location of the installation is determined;
- a model is selected to suit the formed conditions;
- the wall and floor are marked for the purchased structure;
- the tank is hung;
- installation of the installation body is in progress;
- The drain pipe is connected to the sewer riser, and the tank to the water supply;
- performance is checked;
- the installation is covered with a false wall or protective box;
- work is being carried out to finish the false panel with tiles or decorative plaster;
- a panel with drain buttons is installed;
- the toilet is hung with simultaneous connection to the cistern and sewer system.
Please be aware that professional plumbers occasionally reverse the order in which the tank is installed and the frame is fastened. This is unimportant and has no bearing on the caliber of the work.
Toilet installation can be a difficult task, but anyone can do it with the right tools and a step-by-step guide. This post will guide you through each step of the procedure, from setting up your bathroom to making sure the toilet is securely installed and connected. Without the need for specialized skills, these instructions will help you achieve a professional result whether you’re installing a new bathroom or replacing an old fixture.
Choosing an installation location
Selecting the wall-hung toilet’s installation site is the first step in the installation assembly process. Please be aware that when installing new plumbing to replace a floor-standing toilet, this task is not required. After all, when creating the toilet project, experts considered every ergonomic requirement, including the width of the aisles, the space between the toilet and the side walls, the accessibility to communications, etc.
When building a new structure or renovating an existing combined unit in Khrushchev, the following SP and SNiP requirements need to be considered:
- The toilet should be located as close as possible to the sewer riser. If the dimensions of the installation do not allow this, then it is necessary to provide a slope of 2-3 cm per 1 p.m;
- the upper edge of the bowl without a toilet seat with a lid should have a standard height of 40 cm from the floor level;
- the minimum permissible distance from the front of the toilet to the side walls, doors or other plumbing equipment is 50 cm, with an optimal distance of 75 cm;
- along the center line the parameters are slightly different: to the side walls and other plumbing fixtures – 38 cm with an optimal length of 45 cm;
- The toilet paper holder is placed at a distance of 20-30 cm from the front edge of the bowl and at a height of 60-70 cm from the floor.
The given parameters are intended for the typical individual, or about 90% of the nation’s population.
From the prerequisites listed above, it makes sense to:
- The installation should be installed in a place where it interferes least.
- The approach to the bowl of the toilet should be convenient, nothing should interfere with it.
- The proximity of communications reduces the costs of lengthening engineering tracks, which, when increasing, will take part of the space of the toilet or bathroom.
In addition, the dimensions of plumbing equipment and the type of wall—capital, half-brick, or plasterboard septum—must be considered when selecting an installation.
It is simpler to identify the precise model of a suspended toilet once the installation location has been established. It might be:
- Block structure. The tank is attached to a pre -prepared niche in the capital wall (in this case, the toilet occupies a minimum space) or on its surface (in the subsequent, the tank is closed with a screen), and the toilet bowl is installed on the floor;
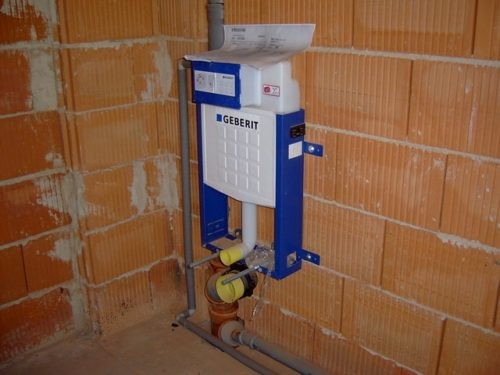
For comparison, block systems measure 45–110 cm in height, 44–53 cm in width, and 12–20 cm in depth.
- frame system, where the frame is attached to the wall and floor. In the case of lightweight partitions, frame structures with 4 legs are purchased. A toilet in a frame system is always installed on frame studs;
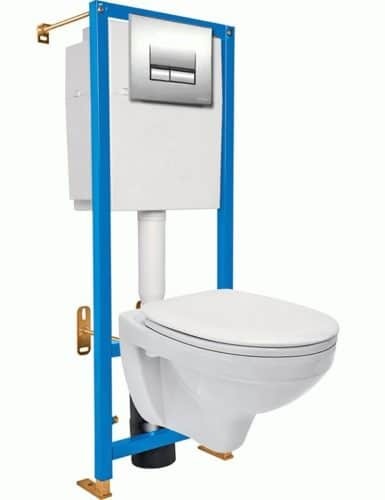
For reference, the standard dimensions for frame installation are as follows: depth – 15–30 cm; width – 50 cm; height – 1.02-1.4 m. On the other hand, the WISA model (118×38 cm) has a high frame but is narrow, and the SANIT installation (82 cm by 53 cm) is low but wide, making them both suitable for small rooms.

- corner installation – a type of frame system for installing a wall-mounted toilet in a corner of a room. In this version, a special fastening system to adjacent walls has been developed for the frame.
Preparatory work
A niche is cut out in the main wall for the block installation, markings are made for installation, and supplies and tools are purchased during the preparatory work. Not all operations are completed by the last one. The tank is often mounted on the exterior of the wall. But purchasing a frame structure makes more sense in this situation.
Required materials and tools
DIY Installing a toilet requires the purchase of an installation kit, additional materials, and a set of tools. The final position is not challenging. As a result, you can find some or all of the tools at home, with friends, or next door. Rent from specialized companies as a last resort.
Included in the installation kit ought to be:
- frame structure;
- plastic tank;
- inlet valve;
- fitting;
- fastening elements for the frame and toilet;
- drain control panel with a button (experts call the entire panel a button or key);
- flush elbow;
- drain pipe;
- pipe plugs – installed during installation to prevent debris from getting inside;
- noise-insulating (shock-absorbing) gasket under the toilet;
- wall hung toilet bowl;
- toilet seat;
- toilet lid.
You will also require the following additional materials:
- pipe for connecting the tank to the water supply;
- silicone-based sealant for insulating the connections between flush pipes, the toilet bowl and the sewer riser;
- flax fiber or fum tape for thread insulation on fittings.
Tools needed:
- a hammer drill with carbide or diamond drills for concrete or brick;
- a hammer;
- a set of wrenches;

- an adjustable (gas) wrench;
- a level;

- a plumb line;
- a screwdriver or screwdrivers;
- a construction knife;
- a tape measure;
- a construction square;
- a marker or a simple pencil (for builders);
- a grinder with a cutting wheel or a hacksaw for metal.
Marking the wall for the installation
Though it is extremely difficult in practice, it is theoretically possible to install the installation correctly without preliminary marking.
In order to install the toilet, you must therefore arm yourself with a tape measure, pencil, plumb line, long, even rail, or better yet, a rule. Draw the dimensions of the toilet installation onto the wall, creating a vertical line that will act as an axis for the suspended toilet’s design and the frame attachment point. Here, there are multiple installation options, which means there are multiple ways to figure out the center line:
- In a separate bathroom only a toilet is installed. In this case, a vertical line is drawn strictly in the center of the wall near which the installation will stand.
- It is planned to install a bidet next to the toilet. Then two axes, one for the toilet frame, the second for the bidet, should divide the wall into three equal parts. This is the best option, but not the only one. With a long wall, the proportions may be disrupted while maintaining a minimum distance between the toilet and bidet bowls of 50 cm.
- In a combined bathroom, the vertical is drawn in the center of the selected location. But one rule must be followed: the installation frame must be at least 13.5 mm from the adjacent wall. Then the center line will be located from the side wall at a distance of ½ of the installation width +13.5 mm.
The location of the drain panel is established following the application of the vertical line. One meter should separate it from the floor’s finishing material, such as tiles, laminate, parquet, or linoleum. As a result, you must consider the surface on which the structure’s legs are mounted: a screed or the floor’s base. If the floor is ceramic, you should consider the thickness of the screed, tile adhesive, and tiles in the first scenario; in the second, just the adhesive and tiles are needed.
Subsequent procedures are performed in the following order:
- the top of the structure is located;
- a horizontal line is drawn through the top point of the frame, after which marks are made on it for the installation width of the installation;
- through the marked points, strictly vertical lines are lowered down the wall, after which they continue along the floor perpendicular to the wall and parallel to each other at a distance of up to 25 cm from the wall surface;
- The lines on the floor determine where the legs will be installed. The calculation is carried out as follows: 1.5 cm is added to the depth of the structure for the gap between the tank and the wall and 3.5 cm if the sewer pipe is laid along the wall. The figures given apply to smooth walls. If the plane of the wall is blocked or there is a curvature, corrections are made;
- the points on the floor are connected;
- checking the perpendicularity of the drawn line in relation to the adjacent wall. If there is no 90 o, the position of the legs is adjusted. In this case, the legs of the frame will have different distances to the wall. Here you need to maintain the actual depth of the structure at the leg closest to the wall by adding 1.5 cm.
Niche for installation
A groove is positioned beneath the pipes in a block structure, and a niche is cut out of the wall (writing a groove is also permitted). The purpose of buying this kind of installation is defeated if you don’t do this; instead, you’ll need to install a protective box or a false wall. In this case, installing a monoblock toilet or purchasing a frame system is simpler and more affordable while still producing the same design and spatial solution.
For those who are new to the construction industry, a groove is a shallow opening in the wall that can accommodate cables, wiring, pipes, and other forms of communication.
We will go over how to build a niche and lay a groove in detail below, but first, let’s discuss why doing this work on load-bearing walls is PROHIBITED.
Only after receiving approval from the management company and creating a plan for extra wall reinforcement can a niche be removed. Not only does the project consume all of the savings from buying a block structure, but it also puts a large dent in the owner’s pocket.
Everything is much worse with a fine for pipes if a niche can still be legalized. It is strictly forbidden to make grooves in concrete walls and to lay a horizontal groove in brick walls, as stated in Decree of the Government of the Russian Federation No. 508 (clauses 10.3 and 10.11). For aerated concrete, the same specifications hold true. The explanation is straightforward: the walls can no longer support the weight.
Until the building is demolished, a wall featuring a niche and a fine can usually remain in place. Another unpleasant thing to note is that the owners will be subject to a fine (which may be withstandable) and will have to get the modification approved if unapproved influence is found on the load-bearing walls. However, there has been a negative trend recently: engineering design bureaus charge between 500 and 800.0 thousand rubles for project modifications that are made retroactively. Refusing to grant permission for finished modifications could lead to a court-mandated eviction. There has already been documentation of this kind of Russian conflict resolution. and on multiple occasions.
Here is the work sequence for those who choose to install the installation in a niche:
- a center line for the tank is drawn on the wall, and then the location of the panel with buttons is marked;
- taking the panel point as a reference, draw a rectangle 100 cm high and 60 cm wide;
- On top of the rectangle, a place is marked for the load-bearing beam of the niche arch (it will always be there in the project);
- using a grinder with a special circle, a slot is made along the drawn lines to a depth of 15-20 cm;
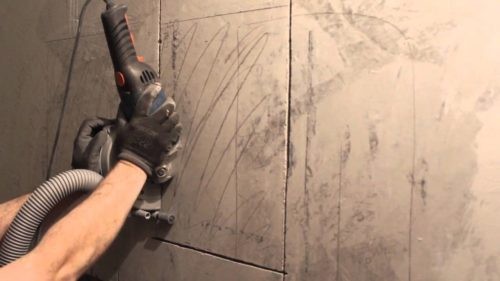
- Mark the location of the water supply with a pencil;
- Using a grinder or a grinder, lines are cut for a channel for laying a metal-plastic (polypropylene) pipe connecting the installation tank to the water supply system. The size of the fine depends on the outer diameter of the pipe used;
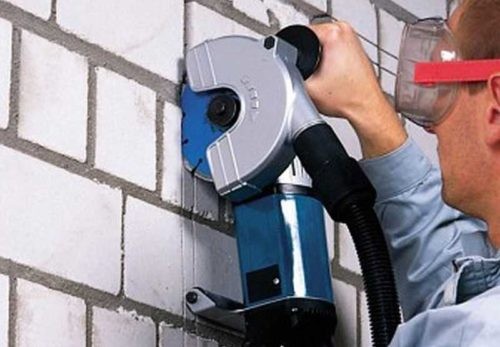
- using a hammer drill with a spatula, a niche is knocked out in the wall – a depth of 15-20 cm and a fine;

- a metal channel beam is installed on the cement mortar.
Once you’ve finished the aforementioned tasks, you can start the installation.
Installation nuances
Every company has its trade secrets. When installing the installation, there are a few subtleties.
Block installation
When wall-hung toilets started to appear in block designs, mounting them to the wall became a significant issue. However, since it takes up space and barely blends in with the toilet’s design, the plumbing manufacturers’ suggested method of installing pins on which the bowl is hung is unlikely to win over the owners.
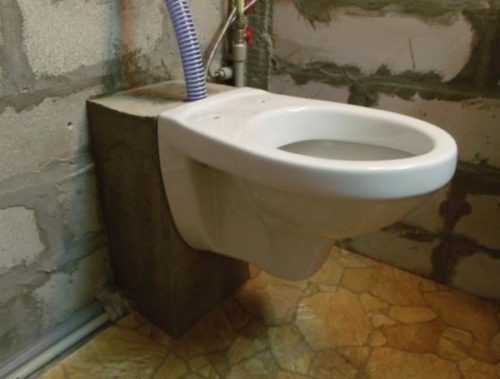
Describe the procedure in brief. Assembling the formwork is underway. On the rear, studs with a washer and nut are put in place. Concrete is poured over everything, and it is subsequently tiled.

Experts in plumbing have adapted different techniques. About the secrets below.
1. A long drill is used to drill through and through a punber in the capital wall. Another small trick is that the drill is used frequently—literally, every 20 to 30 seconds. Oil is used to cool it. Hide the piercing on the side opposite the puck and nut (bolt head).
If the wall is from the outside, a bolt is placed; if it is from the inside of an apartment, a long hairpin is placed. Take note that it is lined and putty-locked. This is the best approach for private residences. It is improbable that neighbors in a high-rise building will consent to wall decoration. As a result, the following approach must be implemented.

2. If the concrete wall is monolithic, anchors are driven into it; if there are cavities, special dowels are used. Here’s the second secret. You must first open the spacers before putting in the hairpin toilet. Since there isn’t a head, you can’t simply check the hairpin. Plumbers use a mushroom nut, that is, not through, for these purposes.


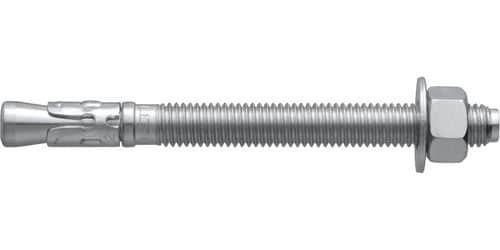
They recommend doing the same for those who perform the work themselves. Such a part cannot be found for sale. There’s only one way out, then: find a turner and ask him for an unusual nut. But having expertise in one field does not automatically translate into having expertise in another.
Additionally, our grandfathers knew how to tighten and loosen studs by using two nuts: first, you screw them onto the stud, and then you use two keys to lock them in place. The top nut is used to screw the stud into, and the bottom nut is used to unscrew it.
Frame installation
Experts recommend the following when installing a frame installation:
- use a more modern panel with two buttons, which will save water;
- place the drain panel either between two tiles or in the center of one of them;

- set the upper edge of the toilet bowl to a height of 40-44 cm;
- the thickness of the protective screen or false wall should not be more than 7 cm;
- carry out thorough quality control of work at each stage of installation.
Installation instructions
There are conflicting instructions in the toilet installation instructions regarding which task should be done first: secure the frame before connecting the tank to the water supply network, or begin installation from the frame instead. In actuality, the tank is usually where they begin.
Connecting the installation to the water supply
There is a specific order to the technology used to connect the tank to the plumbing system:
- the cold water riser is closed;
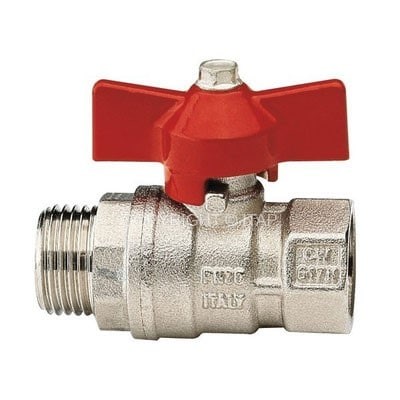
- We find in one of the packages an adapter for the tank wall, also known as a faucet. For different manufacturers, the shape of the tap and the method of closing may be different;
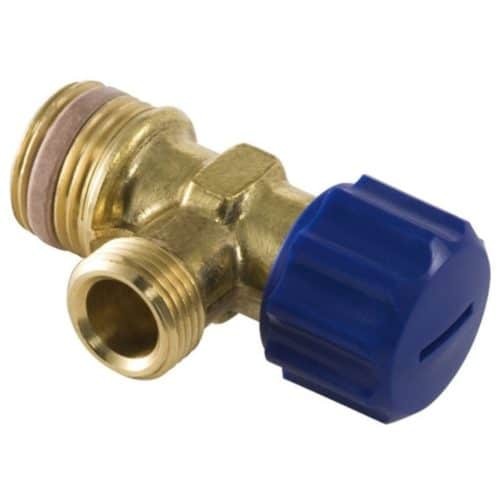
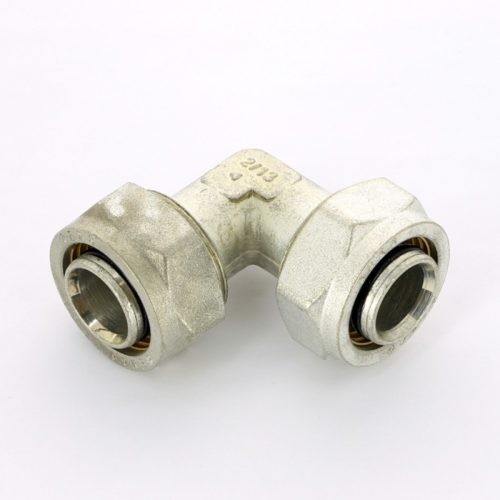
- since you can’t put a water pipe directly onto the tap, we find an additional fitting (there is a model for each type of pipe);
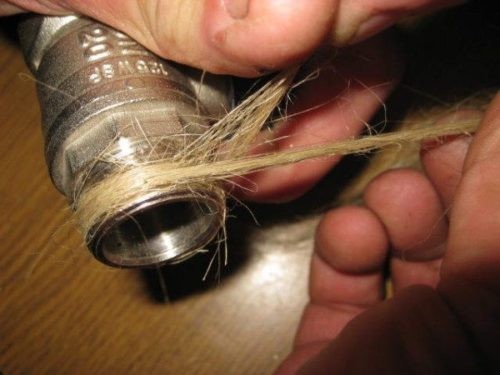
- to better seal the connection, we wrap flax fiber or fum tape around the tap;
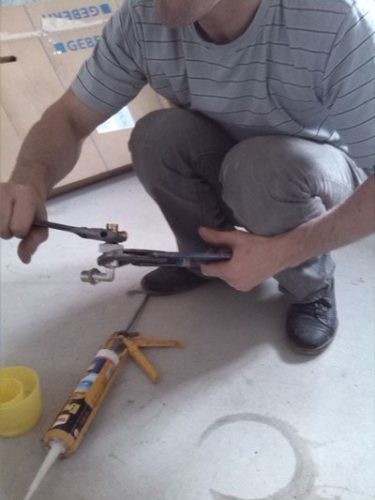
- twist the fitting with the tap;
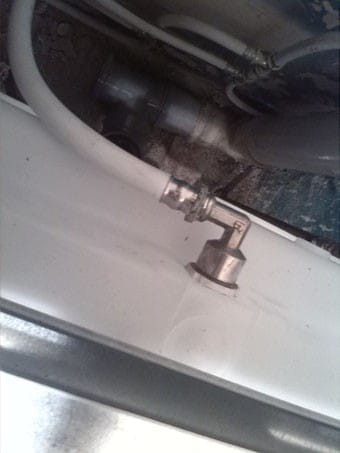
- we attach a metal-plastic (in our case) or polypropylene pipe to the fitting;

Important: Avoid using hoses that are flexible.
- install the tap in the wall of the tank;
- turn off the tap inside the tank;
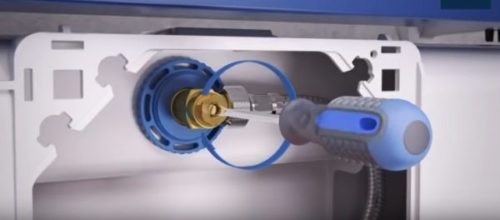
- connect the metal-plastic pipe to the water supply;
- we find a flexible hose inside the tank or among the parts of the kit, remove the protective covers from it and screw it to the tap;
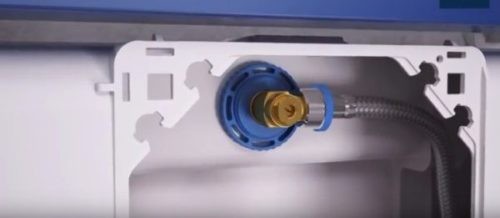
- take the hose out. Take a bucket and place it under the hose. Alternately open the tap on the riser, and then in the tank;
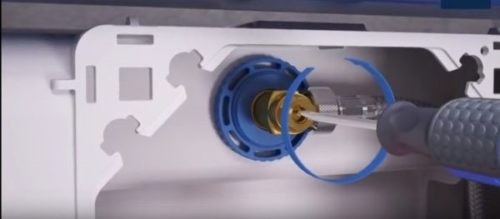
- We conduct a test drain of water to check for leaks;

- close both taps, connect the second end of the hose to the drainage unit;
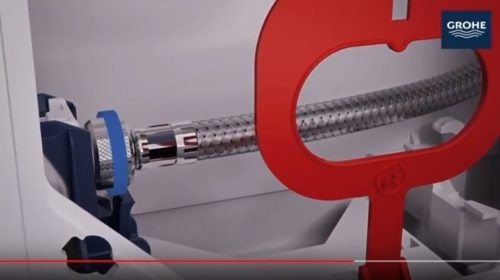
- put a plug.

Frame installation
Since the frame’s legs allow for vertical movement, you must first adjust its height before attaching it to the wall.
At what height to install
Since there is no standard for installing a floor-standing toilet, regulatory documents (GOST, SP, SNiP) in Russia and the CIS do not regulate the height at which a toilet can be installed from the floor. It cannot be raised or lowered, and GOST 30493 specifies the bowl’s size.
Simultaneously, years of experience using floor-mounted toilets have demonstrated that 40 cm is the most practical and common height (43 cm is the standard in Europe). The practice-developed standard is appropriate for individuals of varying physical abilities, statures, and physiques. The person remains in their comfort zone even if they raise the bowl’s edge by 4 cm. Discomfort begins to set in at 46 cm (45 cm is the borderline value between the two zones); 90% of toilet users’ feet do not touch the floor at this height.
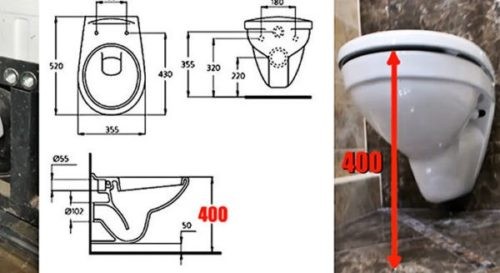
Installing a wall-hung toilet is not always possible to keep the parameters within the given range because the apartment owner’s wish frequently encounters real-world situations:
- The height of the accepting hole of the sewer pipe turned out to be overstated due to the miscalculation of builders-they simply reinsured or incorrectly calculated the thickness of the floor of the flooring;
- out of necessity, the toilet was removed from the sewer riser, as a result of which it had to be raised 3 cm for each meter of connecting pipe.
- they laid a heated floor without a screed, as a result of which the floor level dropped, but the sewer pipe remained in the same position.
In the event that hanging the toilet within 40–44 cm is not feasible, a podium is set up. A toilet visitor will find it easier and more convenient to climb onto a small elevation rather than to sit on a seat that does not provide support for his feet.
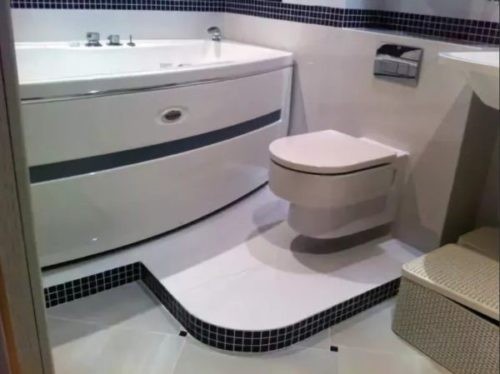
Rebuilding the riser is a far more costly option to this solution (the cost of replacement usually scares the owners). It’s much easier to do everything when the bowl is raised to 40 cm. Manufacturers have offered two methods to accomplish this:
- drilled 4 vertical holes in the installation frame for toilet studs;
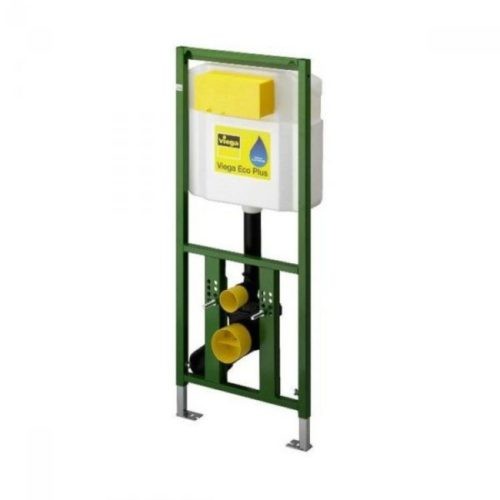
- installed retractable legs in the frame, which have a height reserve of up to 20 cm (most models have 17-18 cm).
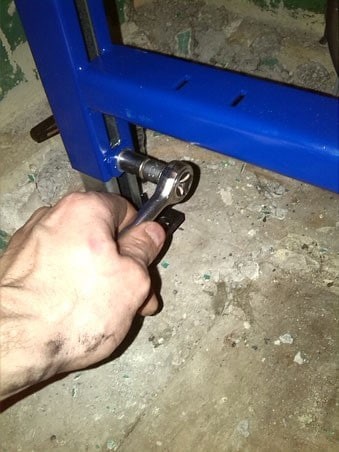
Consequently, you have two options for adjusting the wall-hung toilet’s height: either place pins in the appropriate hole or raise or lower the legs (a 13mm wrench or, better yet, a socket head with a "ratchet") will work well for this.
There is a mark of one meter on the installation frame to make it easier to adjust the toilet’s height with the feet. In the event that it is fixed, the bowl’s top will be 42 cm above the ground. As a result, the designated mark needs to be changed if the toilet needs to be raised or lowered. It can be decreased by a few centimeters.
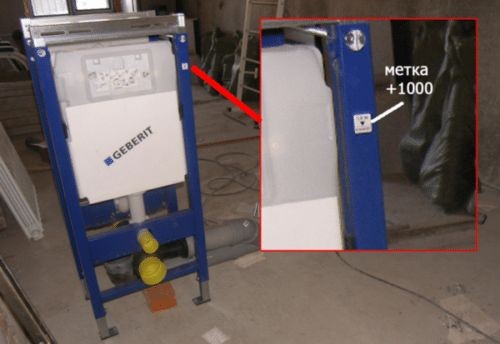
The thickness of the waterproofing, cement screed, tile adhesive, and tiles (5-8 cm) must all be considered if the installation frame is placed on the floor (ceiling).
Frame fastening technology
At the locations marked during the marking procedure, the height-adjusted frame is positioned with its feet on the ground. Additional actions don’t lead to problems:
- on the floor, mark the places of attachment of the feet with a marker or pencil;

- install the upper stops;

- make marks of the attachment points on the wall;
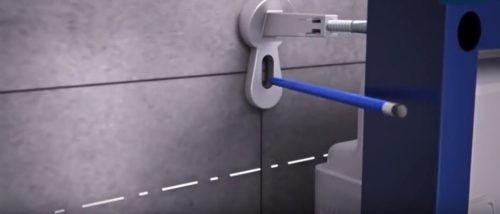
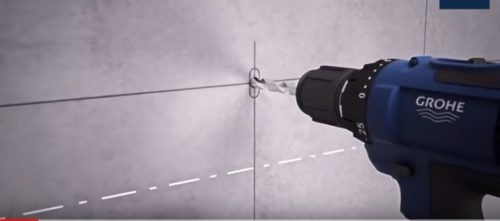
- move the frame to the side and drill holes in the wall and floor;
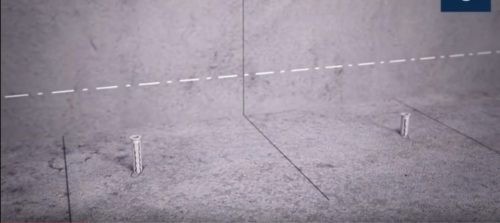
- hammer the dowels into the drilled holes;
- fasten the frame at all points, but do not fix it rigidly;
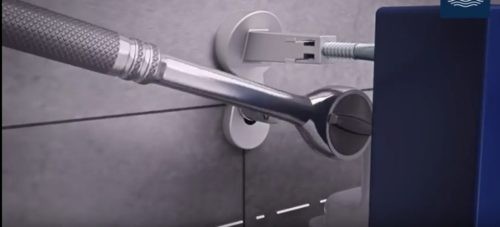
- check the vertical and horizontal installation. If necessary, make adjustments – for this purpose, play is left in the fasteners. First, check the vertical;
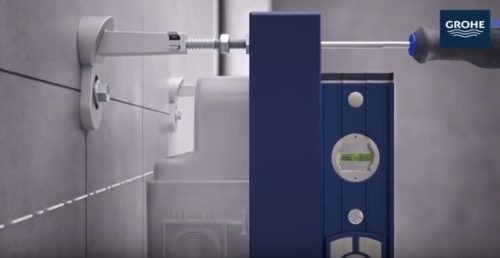
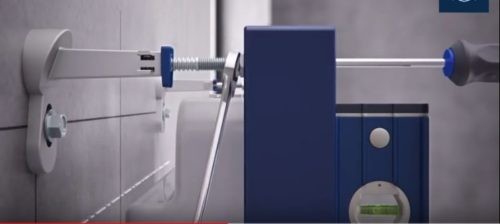
- then the horizontal, correcting deviations with the legs;

- all fastening points are clamped and fixed with a lock nut.
Connection to the sewer
The installation is connected to the sewer at the end of the process. In order to accomplish this, the kit comes with two elbows: one that connects to the riser at the back of the installation at a right angle of 90 degrees, and another that is angled at 120 degrees when the branch travels along the wall.
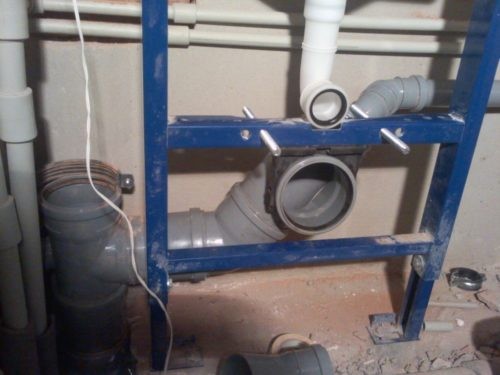
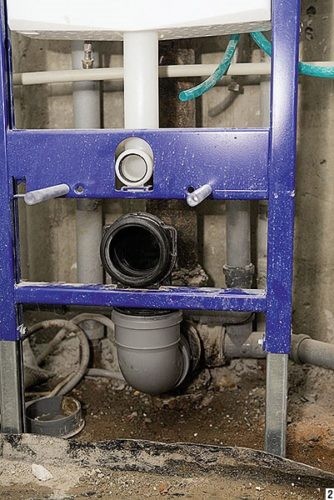
The connection process is executed based on the subsequent algorithm:
- the hemisphere of the fastening clamp is attached to the frame. The fastening can be both upper and lower – during work, you need to focus on the drilled holes;

- the elbow is inserted into the hemisphere and fixed with a latch;
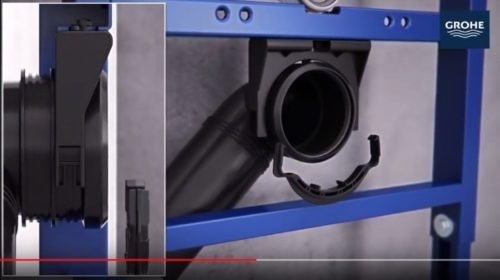
- measure the distance from the elbow to the riser hole and cut off the adapter pipe with an angle grinder (an angle grinder is not a technology, but the most convenient tool);

- we remove the chamfer from it, remove the burrs with a file;

- lubricate all connections with silicone and assemble.
The toilet studs are screwed into the frame after the sewer system is connected. They need to be perpendicular to the wall and parallel to one another in order to avoid distortion in this situation. The picture below shows the mounting technique in clear view.
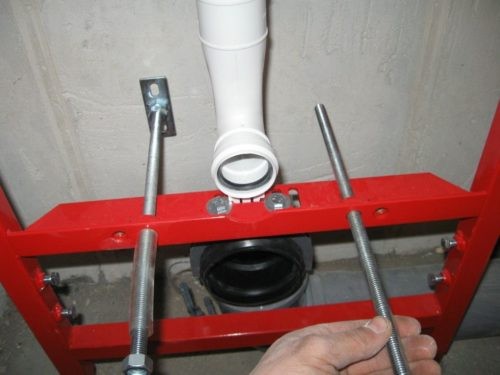
Functionality check
The system is tested after the tank is connected to the water supply and the drain pipe to the sewer riser. After all, plasterboard covering the installation is the next step, and it will obstruct access to numerous structural components. For this:
- open the tap inside the tank;

- remove the plugs from the pipes (red in the photo, yellow or blue from other manufacturers);
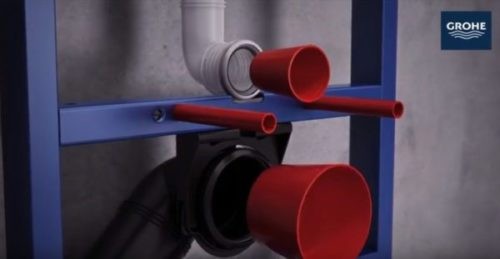
- pipes with cuffs are attached to the toilet;

- the toilet bowl is put on the pins and pushed towards the installation. The goal is for the dressed pipes to fit into the joint with similar pipes mounted on the frame. It will not be possible to push it all the way, since the fittings on the toilet have a decent amount of length (later they will have to be shortened);
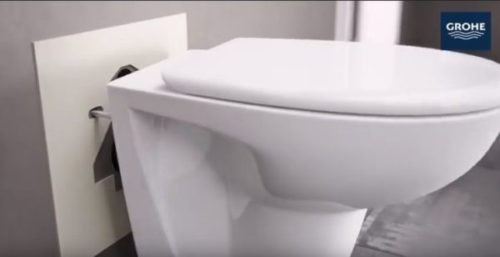
- manually activate the flush valve rod.
Be aware that many artisans sandwich wooden blocks between the installation and the bowl, fastening the toilet with nuts to create a rigid structure.
After removing any detected flaws and returning the wall-hung toilet to its initial configuration—closing the tap, emptying the tank of water, removing the bowl from the studs, and replacing the plugs—the test of the toilet’s functionality is concluded.
Installation covering
The plumbing work is followed by general construction work after the installation is finished. Every component of the system, along with engineering communications, is enclosed in a box, false wall, or protective screen. A floor-to-ceiling partition made of gypsum plasterboard is the preferred option. A guide metal profile is attached in order to install it on the walls and screed.
The CD profile (ceiling) stiffening ribs are fastened to it with metal self-tapping screws. A lathing is created in this manner to secure the sheet material. The installation is covered with plasterboard after the toilet pipes and studs are drilled holes in the drywall and a window is cut out for a button panel.
For those who are self-taught, we suggest reading the article "How to sheathe an installation in a toilet," which goes into great detail on how to put in the sheathing and correctly fasten gypsum boards to it.
Plumbing connection
The final two plumbing stages, which include installing the toilet bowl and the flush button, begin with tiling the walls and floors. A wall-hung toilet bowl is far simpler to install than a monoblock or "compact" toilet bowl. The following order is followed for all work:
- Among the elements of the toilet, we can find pipes and cuffs for them, nuts with washers for studs;

- Cuffs are attached to the pipe sockets;


- plastic fittings are placed on the faience pipes of the toilet;
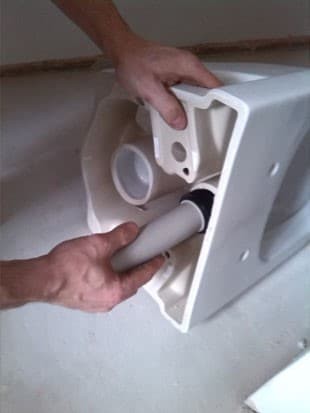
- with a marker or pencil, mark the location of the plane of the back wall of the toilet on the pipes (for convenience, you can attach a long ruler or strip to the sides of the bowl);

- fittings are removed from the toilet and placed on the frame. The plane of the false wall (with tiles) is marked;
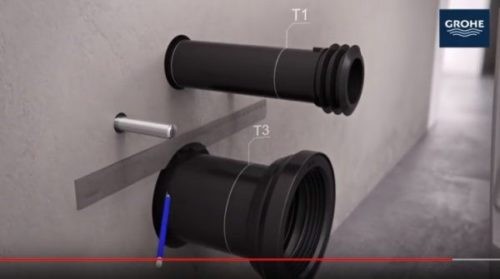
- the pipes are removed, the length between the drawn lines is determined. In our case, X is for the drain fitting and Y is for the flush fitting. The pipes from the edge with a smaller diameter must be shortened to the length X and Y. In this case, IMPORTANT, you need to cut 3 mm more – the fitting will lengthen due to the shock-absorbing gasket;
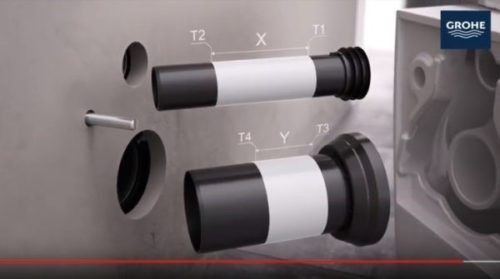
- the pipes are cut with a grinder, as in the case of connecting the installation elbow to the riser;
- the cut fittings are chamfered;
- burrs are removed with a file;
- all connections are lubricated with silicone sealant;
- a shock-absorbing pad is installed;
- PVC protective tubes are put on studs;
- fittings are inserted into the installation nozzles;
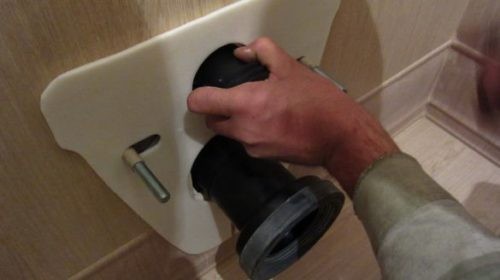
- The earthenware pipes of the toilet and the cuffs of fitting are lubricated with silicone;
- The toilet bowl is put on the stilettos and moves to the false wall, after which it is clamped by nuts through polymer gaskets;
- The cover with a chair is installed.

The toilet can be used once the sealant has fully polymerized, which should take 12 hours.
| Step | Description |
| 1 | Turn off the water supply |
| 2 | Remove the old toilet |
| 3 | Prepare the new toilet for installation |
| 4 | Install the new toilet mounting bracket |
| 5 | Secure the toilet to the floor |
| 6 | Connect the water supply |
| 7 | Check for leaks |
| 8 | Install the toilet seat |
Toilet installation may seem like a difficult undertaking, but most homeowners can complete it with the correct equipment and a little perseverance. A simple, step-by-step procedure will help you make sure your new toilet is installed securely and is working as it should.
To begin, thoroughly read the manufacturer’s instructions for the particular toilet model you own. These instructions are essential because they offer specific, unit-specific steps. Next, prepare by gathering all required equipment and supplies before starting. You’ll avoid needless frustration and save time by making this preparation.
Make sure to shut off the water supply and empty the last of the water from the old toilet before starting. Remove the old unit carefully, being cautious not to harm the nearby plumbing or structure. To guarantee a good seal for the new installation, thoroughly clean the area after removing the old toilet.
Make sure all connections are tight and secure by carefully following the instructions when installing the new toilet. The mounting bolts and wax ring should be closely inspected because they are essential parts that stop leaks. Reconnect the water supply and check for leaks after securing the toilet to the floor. Your newly installed toilet ought to be operational if all the seals are tight.
Lastly, pause to admire the work you’ve done. Although installing a toilet can seem daunting, most do-it-yourself enthusiasts can successfully complete the project with the correct approach. Once your new toilet is installed, you can take pleasure in the enhanced functionality of your bathroom as well as the satisfaction of a job well done.


