
Installing an acrylic bathtub can be a satisfying project that improves your bathroom’s appearance and usefulness. Acrylic tubs are a popular option for do-it-yourselfers because they are lighter and simpler to handle than traditional porcelain or cast iron tubs. A level, an adjustable wrench, silicone caulk, plumber’s putty, and of course the acrylic bathtub itself should be assembled before you start.
Set up the installation area first. Make sure the floor is clean and level and clear of any debris. In order to avoid any instability or unevenness after the bathtub is installed, this step is essential. Next, take exact measurements of the alcove or area that the tub will occupy. Standard sizes are usually available for acrylic tubs, so be sure to measure precisely for a good fit.
After the space is ready, set the acrylic bathtub in its proper location. Depending on the model, their size and shape may require assistance. Make sure the tub fits tightly against the walls and lines up with the plumbing fixtures. Verify the tub’s exact horizontal position with a level, then make any required adjustments to the feet or shims to ensure stability.
Now that the tub is properly positioned, it’s time to fasten it. Around the tub’s drain opening on the underside, apply plumber’s putty. When the drain assembly is attached, this helps to create a watertight seal. Using an adjustable wrench, firmly tighten the drain fitting after inserting it. Take care not to overtighten since this might harm the acrylic.
Focus on caulking the bathtub’s edges after fastening the drain. To create a waterproof barrier along the joint where the tub meets the floor and walls, use silicone caulk. For an impeccable finish, use your finger or a moist cloth to smooth the caulk. Before using the bathtub, let the caulk cure in accordance with the manufacturer’s instructions.
Check for leaks and movement in the bathtub after the caulk has dried. Pour some water into the bathtub and look for any evidence of water seepage near the drain and the edges. Well done if everything is safe and dry! Now that your acrylic bathtub is installed, you can start reaping its benefits for many years to come.
- Materials and tools
- Preparatory work
- Instructions for installing an acrylic bathtub with legs
- Marking
- Assembly
- Instructions for fastening to the frame
- Frame assembly
- Installation of legs
- Frame installation
- Regulation of the height of the legs and fastening of distant sides to the wall
- Installation instructions for bricks
- Nuances of installation
- Pedestal Installation Guidelines
- Video on the topic
- The best acrylic bathtub installation! Now you don"t need to buy a frame..
- Assembly and installation of an acrylic bathtub. All stages + Useful tips
- How to install an acrylic bathtub with your own hands? Reliable installation
- Acrylic bathtub, assembly and installation
Materials and tools
There are multiple steps in the process of installing an acrylic font, and each one calls for specific supplies and equipment. This is an exhaustive list of them. Tool and material requirements won’t apply if no work is done.
In order to complete a thorough bathroom makeover, you will need:
- acrylic bath;
- bath screen;
- siphon;
- corrugated tube for connection to the riser;
- brick, silicate or foam blocks;
- dry mortar or cement M400;
- painting (reinforcement) fiberglass mesh;
- waterproofing mastic;
- ceiling profile (CD) or aluminum corner;
- ceramic floor tiles;
- wall tiles;
- tile adhesive;
- silicone sealant;
- polyurethane foam for processing the bowl body – reduces noise pollution when drawing water.
Included in the toolkit ought to be:
- hammer drill – used to remove old tiles and drill holes for fasteners;
- grinder – needed if difficulties arise in the process of disassembling an old bathtub;
- hammer;
- trowel;
- chisel – needed to dismantle old tiles;
- knife or trowel for removing sealant;
- building level – needed when laying tiles and aligning the bowl horizontally;
- notched spatula;
- a screwdriver or screwdriver for mounting the frame and assembling the siphon;
- wrench for clamping coupling nuts;
- roulette;
- marker (construction pencil);
- construction square.
Regardless of experience level, this comprehensive guide to installing an acrylic bathtub offers easy-to-follow step-by-step instructions that anyone can follow when starting a home renovation project or doing it for the first time. This post covers all the information you need to ensure a professional installation, from setting up the area and making sure the plumbing connections are made correctly to fitting and sealing the bathtub securely. Our helpful tips and clear, practical advice make it simple to upgrade your bathroom with a long-lasting, stylish acrylic bathtub.
Preparatory work
The preparatory steps involved in installing an acrylic bathtub are completed in the following order:
- all unnecessary objects and things are removed from the premises – if they do not interfere, then there is a risk of severe contamination;
- the water supply is shut off by emergency taps (if necessary, they can be temporarily turned on);
- the screen is removed from the bathtub (you can see how to do this in the article “How to install a screen on an acrylic bathtub?");
- the siphon is disconnected;
- use a hammer and chisel to knock down a corner of strips of ceramic tiles along the sides of the bowl;
- use a knife (trowel) to remove the sealant;
- old bowl is dismantled. To do this you need to do the following:
- unscrew the screws at the corners of the font if a frame structure for installing the bowl is used;
- swing and then remove from the pedestal;
- knock down the tiles and then the plaster from the wall in the area of the built-in side of the bathtub.
- the font is removed from the premises;
- the siphon is disconnected from the sewer riser;
- the sewer hole is closed with a stopper or a rag so that an unpleasant odor does not spread throughout the apartment;
- the area under the old bathtub is cleared of debris;
- if a corner version of the bowl is purchased, the angle in the wall is leveled to 90 o . The technology is outlined here. If this requirement is ignored, the fastening strips will quickly damage the acrylic;
- waterproofing work is being carried out (instructions are given in the material “How and how to waterproof a bathroom floor?");
- the floor is leveled with cement-sand mortar or ceramic floor tiles – differences in height should not exceed 1 cm;
- the joints of walls and floor tiles are sealed with sealant;
- The sides of the bowl are protected from damage during transfer from room to room with masking tape.
Instructions for installing an acrylic bathtub with legs
A new bowl can be installed in several ways. One of them is installing an acrylic bathtub on legs. At first glance, the work is the simplest in terms of complexity. But there is a catch: an error in the points of fixation of the bar to the bottom of the bathtub of just 5-10 mm can lead to the fact that, under the weight of a person taking water procedures, the bottom will sag, slowly but surely turning out the screws from the drilled holes. The result is not difficult to predict: the service life of plumbing fixtures will be sharply reduced. Therefore, the closest attention should be paid to the first stage of installation of the font: marking.
Marking
The following order is followed when marking fastening points:
- the floor is covered with packaging cardboard – prevents scratches on the sides of the bowl;
- the font turns upside down;
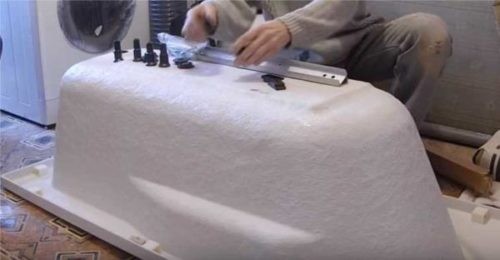
- using a tape measure, the longitudinal axis of the product is determined (applied along the bottom with a marker or pencil);
- in accordance with the manufacturer"s recommendations, there are lines for attaching plates under the legs in the area of the drain and head. They usually pass at a distance of 3-5 cm from the edge of the landing area (each manufacturer has its own requirements). The mark is made again with a marker;
- the middle of the mounting strips is determined – marked with a marker or drill;
- the plates are laid one by one on the transverse lines so that the middle of the plank lies exactly on the crosshairs of the lines;
- Through the mounting holes of the strip, mark the attachment points with a pencil or a sharp object at the bottom of the bathtub.

Note: to facilitate fast assembly, manufacturers have incorporated unique mounting platforms into the most recent models of acrylic bathtubs. All DIYers need to do is screw the legs.
Assembly
Then, everything is easy. The following is the work algorithm:
- 4 holes are drilled to a depth of 8-10 mm for self-tapping screws that will fasten the legs. To make it easier to control the drilling depth, many experts stick colored electrical tape onto the drill. The diameter of the drill should be 1-2 mm less than the diameter of the fastener (the latter is indicated in the instructions);
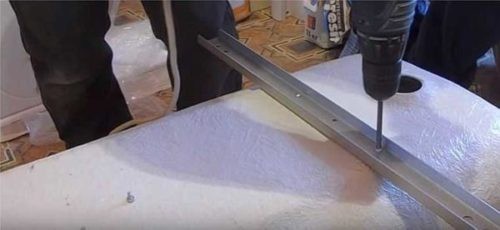
- the holes on the planks are aligned with the drilled seats;
- hardware is screwed in;
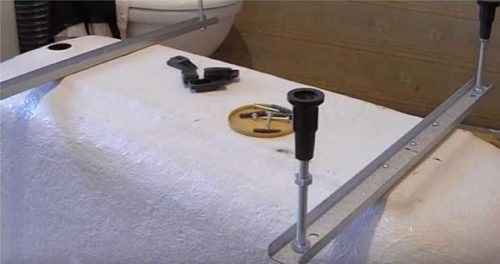
- legs are assembled. The process goes in the following sequence:
- two nuts are screwed onto the stud: adjusting and fastening;
- the leg is installed in the mounting hole and fixed on the reverse side with a third nut (washers must be placed under the mounting nuts);
- the fastening nuts are tightened with the maximum possible force – no one will touch them again;
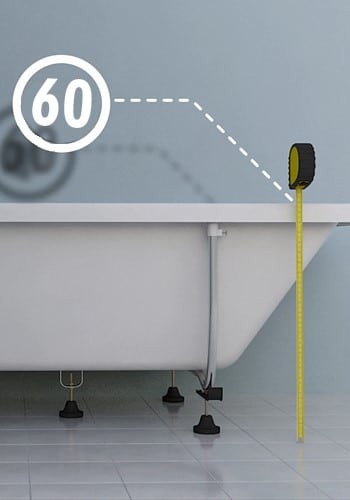
- use a wrench and an adjusting nut to set the height of the racks (preliminarily, so that there is less work with a wrench after installing the bowl on the legs) so that the side of the bath is 60 cm above the floor level;
- the bottom and sides of the bathtub are covered with polyurethane foam or Izolon for better heat and sound insulation;
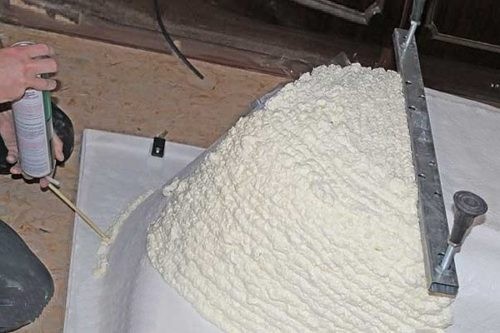
- the bathtub is turned over and placed on legs;
- Using a level and a wrench, the top of the bathtub is aligned in a horizontal plane. To do this, the far leg is taken as the basis. After this, the second farthest pin is adjusted until the side board reaches a horizontal position. Then the horizon of the transverse sides is drawn out with the front studs. The process of setting the horizontal position is completed by checking the diagonals;
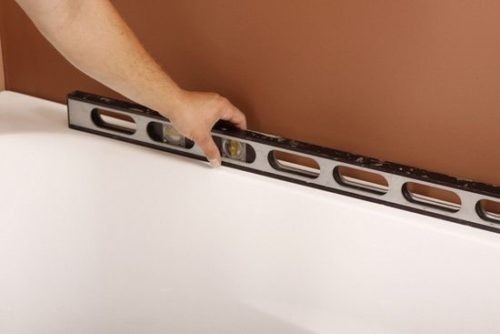
- the line of contact with the bowl is marked on the walls with a marker;
- the bathtub is moved away from the wall;
- the mounting plate is taken and pressed against the wall 3-4 mm below the drawn line;
- marks are made for the dowels through the mounting holes on the wall;
Take note: there are eight plates in the kit: two for the transverse walls and four for the side walls.
- holes for the dowels are drilled with an electric drill (hammer drill) (one or two, depending on the size of the bathtub);
- the dowels are driven into the wall with a hammer;
- the plates are fastened with self-tapping screws;
- the bathtub is put in place. To do this, it is first raised above the plates, pressed tightly against the walls and lowered so that the sides go behind the mounting plates.
When the siphon is assembled and connected to the sewer riser, the installation is finished.
Instructions for fastening to the frame
It will take a lot longer to install the bathtub on the frame. However, the extra labor costs are worthwhile because the metal support keeps the bottom of the bowl and the walls of the font from bending under the weight of an average-sized person. When the font is placed on legs, the near side is unsupported.
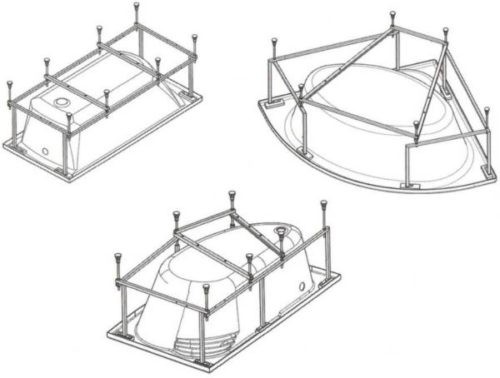
The rectangular-profiled frame is constructed from stainless steel. able to be welded or demounted. The prefabricated model comes with:
- frame made of metal profile;
- racks;
- legs with plastic bearings;
- fixing plates – mounted on the wall to fix the stable position of the bowl;
- hairpins;
- bolts for assembling the frame;
- washers for bolts and nuts;
- nuts;
- self-tapping screws for attaching the frame and racks to the bathroom;
- self-tapping dowels for fixing plates on the wall;
- fixing plates made of plastic or metal.
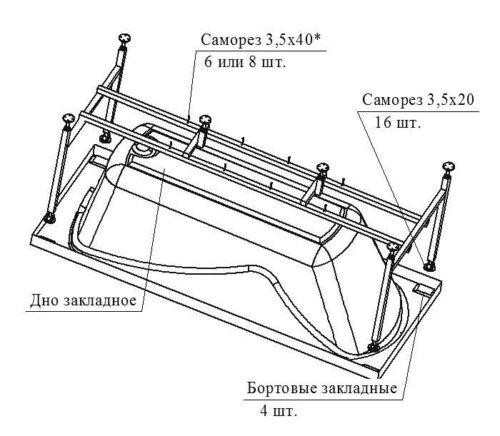
There are various steps involved in installing an acrylic bathtub on a frame: assembling the frame, attaching the legs, installing the bathtub’s frame structure, and adjusting the height and plane.
Frame assembly
Let’s examine how to put together an acrylic bathtub frame in more detail:
- The factory packaging of the frame is opened. All elements are laid out according to their intended purpose;
- a bolt with a washer is inserted into the frame bar in the outer hole;
- a nut and washer are screwed onto the bolt. It cannot be clamped – it must rotate together with the bolt while it is screwed into the rack (maximum clamping is done after installing the legs). The operation is repeated with all racks. If in the frame model the mounting pin simultaneously performs the function of legs, then the sequence of operations is slightly different:
- the stud is screwed into the stand, and the nut is placed on it;
- a washer is placed on top of the pin, and the frame profile is lowered onto it;
- tighten the nut and washer;
- the thrust bearing is screwed on.
While the legs are being adjusted in height, the frame and legs are finally fixed.
Installation of legs
The mounting stud can be used to install the legs directly, or they can be inserted into a different hole in the frame profile. Both choices were covered in the previous section.
Additionally, some models have feet located beneath the bathtub’s base. Their installation technique might be different from mounting in the corners. Essentially, though, the plan is as follows: a short pin (a nut can be welded) is screwed into the frame profile’s threaded holes, and then a lock nut secures it. The pin is screwed with a plastic support.
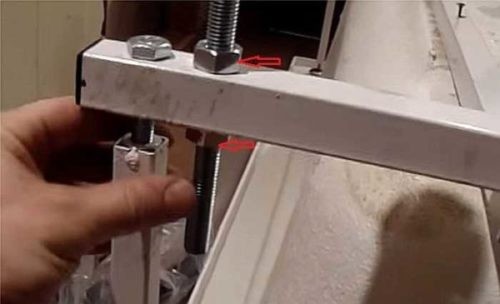
Frame installation
The frame installation instructions are straightforward:
- the acrylic bathtub turns upside down;
- On it, using a tape measure and a ruler, two perpendicular lines are drawn running in the middle of the bowl: one longitudinal, the other transverse. Experienced installers lower this element of the technological process and expose the frame by eye. The main thing here is that the racks do not extend beyond the dimensions of the plumbing fixtures;
- A plastic sleeve is placed on the racks;
- the frame is laid on the bottom of the bath strictly in the center;
- in the holes for fastening the frame and racks, acrylic marks are made;

- Exactly in the center of the marked places, holes with a depth of 6-8 mm are drilled, in diameter there are fewer screws per 1-2 mm;
- The racks and the frame are fastened to the bottom and sides of the font;
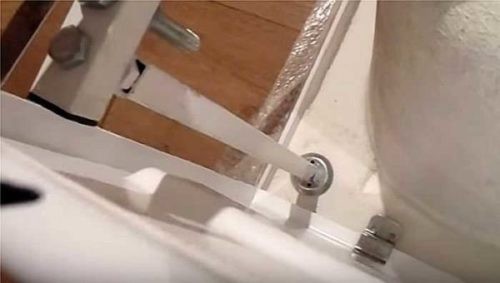
- The fasteners of the frame are regulated by the fasteners – it should fit tightly to the bottom of the bath without distortions;
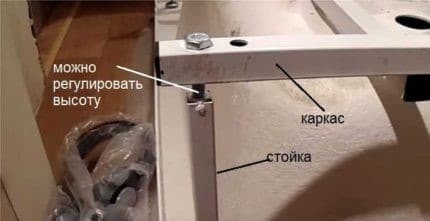
- nuts fixing the frame are clamped.
The bath must then be installed, and the leg heights must be adjusted.
Regulation of the height of the legs and fastening of distant sides to the wall
The process for adjusting the bowl is the same as for installing a bath on the legs.
If the bath is attached in addition to the wall, it will become more rigid. Hooks or special plates are used for this. The prior section includes information on fastening technology.
Installation instructions for bricks
Placing an acrylic bathtub on brick or gas silicate block pillars is a more efficient way to install it. More detailed than the previous ones, step-by-step instructions on how to install an acrylic bathtub on bricks. Additionally, there is a noticeable increase in the labor intensity of the work done. Eventually, though, the challenges pay off as the bowl gains stability, strength, and durability without sacrificing its light weight.
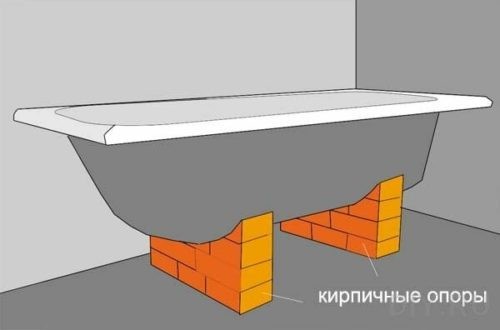
Step 1: The bathtub is positioned in its intended usage area. The floor has markings for where brick or block columns will be installed. Standard dimensions require two supports; longer dimensions require three (one in the center of the font). Although many experts believe that positioning the supports as close as possible to the bend that forms the transition of the bottom to the walls is the best option, it is best to make marks opposite the bottom-reinforcing plates.
Step 2: A one-to-three ratio of cement to sand is prepared. Since you won’t need much, you can mix it with a trowel in a bucket instead of utilizing mixing attachments on an electric or hammer drill. There are only 8–12 bricks that need to be placed on the mortar, after all.
Step 3: Columns are placed one brick wide, two bricks long with a 10-15 cm indentation from the wall, or two bricks long without an indentation. The masonry’s height of approximately 170 mm allows for a 60 cm side height above the floor. Many artisans place three rows of bricks without considering this point. The rear support rises by 20 mm if the font design does not include a slope for draining water, which is hard to find these days. Either a thicker layer of solution or a plastic or metal lining can accomplish this.
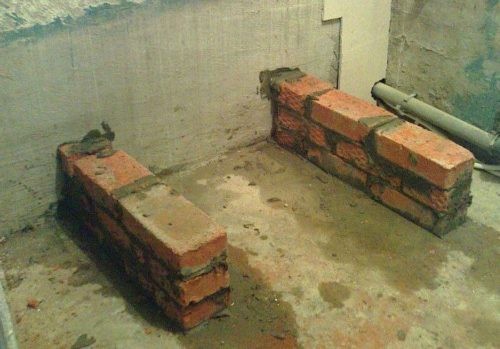
Important: the following calculation is used to determine the column’s height: 10 mm (the layer of mortar beneath the bottom bricks) + 65 mm (the thickness of the bricks) + 10 mm (the mortar in between the bricks) + 65 mm (the second brick) + 20 mm (the plaster covering the brickwork layer).
Step 4: Plastering is applied after the bricks are wrapped in painter’s mesh. The fiberglass’s top is plastered and bent onto the support. Here, you can apply a lot of mortar to achieve a 20 mm layer thickness.
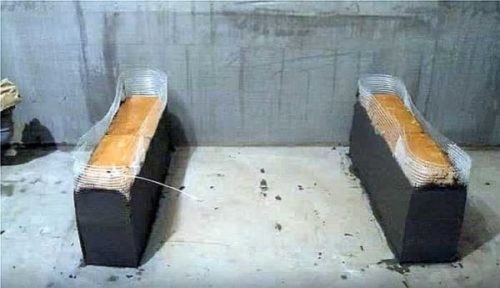
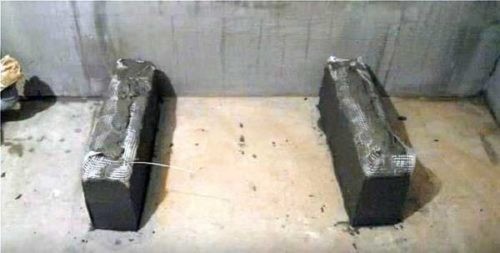
Step 5: The bowl is put on the supports after being lubricated from below with silicone sealant to prevent the mortar from sticking. The horizontal plane is then examined across its length, width, and diagonal. If necessary, adjustments are made with ease thanks to the mortar; all you have to do is apply slight pressure to the corner that protrudes. After the process is finished, the bathtub is taken out of the brickwork.
Step 6: Allow the mortar to solidify. According to some experts, 12 to 14 hours is sufficient. However, it is best to be cautious and finish the work in two days.
Step 7: The bowl is positioned against the walls on the masonry. The sides’ upper or lower edges are marked. The lower one, when using an aluminum corner or metal profile, if the bathtub will also be fastened to plates or hooks.
Step 7: Take the bathtub out of the supports. The corners or plates are fastened to the wall.
Step 8: The bowl is positioned on supports so that its sides rest on the corner, where sealant has already been applied, or go behind the plates (hooks).
Observation: occasionally, a small amount of foam is applied to the supports in order to better fix the bathtub. This solution has a future, but not before the bowl is properly secured to the posts and pressed firmly enough to squeeze out almost all of the foam before the glue polymerizes. You can accomplish this by carefully walking along the bathtub’s bottom. The second approach involves connecting the installed bathtub to the sewage system. A car jack is used to raise it after it has been filled with water. The bathtub is lowered after foam is blown into the space between the posts and the bottom.
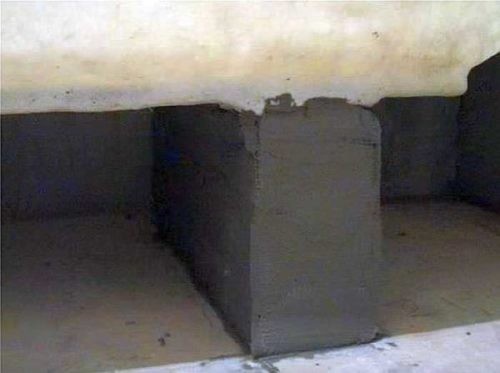
Step9: The siphon is put together. There is a sewer connection to the bathtub.
Step 10: The water is turned on. The siphon elements’ connections are examined for quality. When leaks show up, repairs are made.
Step 11: The intersection of the sides and the wall is displayed.
Step 12: The screen has been set up.
Nuances of installation
It is occasionally necessary to provide a more thorough explanation of private matters during the bath installation process. Installing small details and dedicating the section.
When installing a corner bath, are there any features to consider? When installing corner bowls, home masters look first to see if there are any special requirements. Rectangular fonts are installed using the same technology as other plumbing installations. There are two subtleties: the bath is installed solely on the frame, and the wall’s angle must be precisely 90 degrees.
How to further fasten the bathtub to the wall. When supporting the side, the acrylic bathtub’s light weight is insufficient to prevent it from toppling over. In order to make the system more stable and prevent it from stumbling under side loads, more fastening of the bowl to the wall is necessary. In reality, a number of techniques are employed to fasten the bathtub’s walls to the room’s walls, including:
- plates or hooks. Bathtub, frame or legs are not included – must be purchased separately. Fastened with self-tapping dowels on the walls at an equal distance from each other. The bowl falls on top of them, acquiring a rigid fixation;
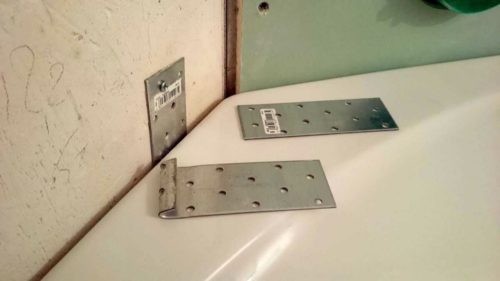
- support plates from an aluminum corner or metal profile used for fastening gypsum boards – take a ceiling one (CD). The metal is attached to the wall with self-tapping screws, and the bowl is lowered onto the sides onto the guides. Experts consider this type of fastening to be the most effective;
- groove. The wall is being chipped. The side of the bathtub is pushed into the resulting groove, after which the groove is sealed with mortar. Plus one: the bowl does not deform even under the weight of an obese person. There are several disadvantages: the work is labor-intensive, the aesthetic perception of the font is reduced, difficulties arise when dismantling plumbing fixtures.
The following is the work algorithm:
- the height-adjusted bowl is pressed tightly with all sides to the walls;
- A mark is made along the upper edge of the bathtub on the wall – a line is drawn with a marker or pencil;
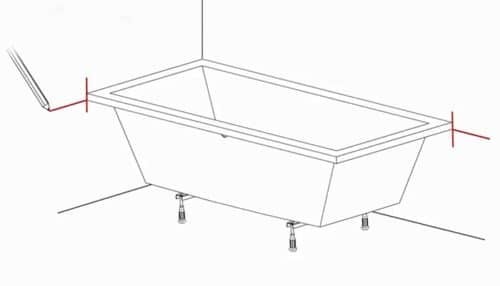
- the body moves away from the walls;
- use a tape measure to find the places where the plates are attached. In this case, they need to be fixed 3-4 mm below the line – when water is added, the bath will sag. If you miss this moment, the plates will begin to squeeze the acrylic out of the side until they come out;
- drilling locations for dowels are marked through the mounting holes in the plates;
- holes for dowels are drilled;
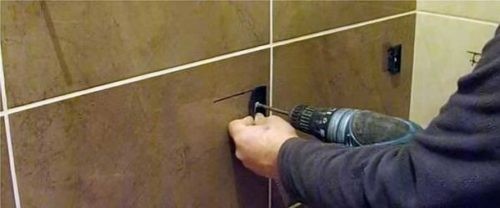
- dowels are driven into the holes;
- the plates are fastened with self-tapping screws;
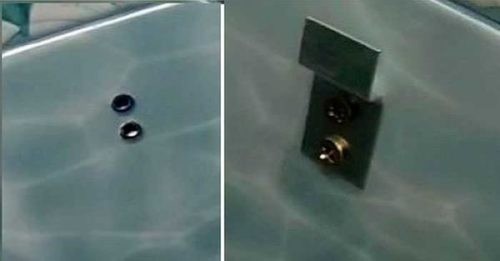
- the bowl is hung on the plates.
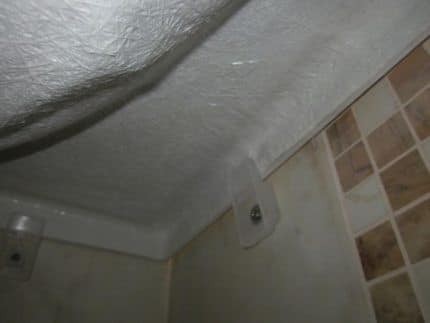
The dirty work is done when the bathtub is fixed to the wall and the protective film is removed from the bathtub’s surface. This is accomplished by carefully prying up the film in one of the corners using a knife or fingernail and removing it from the bowl.
Pedestal Installation Guidelines
Installing a sturdy brick base beneath the bowl’s bottom is another efficient bathtub installation method. This kind of installation is known as "pedestal installation" by builders. The same procedure and order are followed for all tasks as when installing on brick columns. One thing is different: two metal plates, each about one centimeter thick, support the bathtub. By doing this, foam will be forced between the brick base and the bottom, securely fastening the font to the pedestal.
The plates won’t fit if the bathtub has legs. The height of the support can be changed to create the necessary space beneath the foam.
To upgrade a bathroom, installing an acrylic bathtub can be a simple but satisfying project for any homeowner. Acrylic bathtubs are a popular choice for many renovations because of their affordability, robustness, and range of styles.
Get the bathtub itself, silicone sealant or plumber’s putty, an adjustable wrench, a level, and maybe a hacksaw to cut pipes if necessary before you start. A successful installation requires preparation.
Begin by thoroughly cleaning the space where the new bathtub will be installed and removing any outdated fixtures. Verify the stability of the floor and that it can sustain the weight of the tub with people and water in it. Verify the levelness of the floor with a level.
After that, set the acrylic bathtub in its proper location and adjust as necessary to ensure proper alignment. To make sure the tub is completely horizontal and stable, use the level once more. After the bathtub is in the proper place, seal it with silicone sealant or plumber’s putty around the overflow and drain openings.
As directed by the manufacturer, connect the bathtub’s drain to the plumbing system already in place. This usually entails firmly fastening the overflow pipe and drain shoe. To tighten connections, use an adjustable wrench; however, take care not to overtighten as this could harm the acrylic surface.
As directed by the manufacturer, give the sealant enough time to cure after connecting the plumbing. After it has dried, test the bathtub by adding water and looking for leaks near the overflow and drain areas. Reapply sealant as needed until the connections are watertight if there are any leaks.
Put the finishing touches on the installation, like installing a bathtub surround or running a bead of silicone along the edges where the tub meets the walls, to finish the job. These measures contribute to a safe and durable installation in addition to improving the bathtub’s appearance.
Installing an acrylic bathtub may be a fulfilling project that makes your bathroom a more useful and pleasurable place with careful planning and attention to detail.


