
Tiling is one of the most satisfying renovation projects you can take on for your bathroom. It not only gives the area a more modern appearance, but it also improves cleanliness and durability. Acquiring a long-lasting and polished finish depends on your ability to lay tiles correctly, regardless of whether you’re renovating an outdated bathroom or starting from scratch.
Thorough preparation is essential before beginning the tiling process. Make sure all of your surfaces are dry, clean, and clear of any debris before you start. To provide a smooth foundation for the tiles, fix any fractures or uneven spots in the substrate. It’s also crucial to measure and plan the layout correctly. This stage reduces the need for cutting and guarantees symmetrical tile alignment, particularly around fixtures like sinks and bathtubs.
Selecting the appropriate tiles is yet another important step in the procedure. To avoid mishaps, choose tiles for bathroom floors that have a non-slip surface. Because of their durability and wide range of designs, porcelain and ceramic tiles are popular options. On the other hand, wall tiles come in a variety of textures for increased traction in damp areas and glossy finishes for simple cleaning.
When it comes to tile installation, begin by evenly applying the adhesive with a trowel that has a notch. To avoid the adhesive drying out before you can place the tiles, work in small sections. Using spacers to maintain uniform gaps between tiles for grouting afterwards, firmly press each tile into place. Prior to continuing, let the adhesive cure in accordance with the manufacturer’s instructions after the tiles are laid.
Learn exactly how to install tiles in your bathroom for a long-lasting and gorgeous finish with our in-depth guide. We cover all of the necessary tips and techniques to guarantee a high-quality finish, from surface preparation and tile selection to adhesive and grouting. Whether you’re starting from scratch or taking on a renovation project, knowing these techniques will help you create a bathroom that’s both aesthetically pleasing and functional.
- Methods for laying tiles
- Preparatory work
- Materials and tools
- Calculation of the required amount of materials
- Tile calculation
- Glue calculation
- Grout calculation
- How to choose the right glue
- How to choose adhesive for bathroom tiles if you have to buy it?
- Step-by-step installation instructions
- Where to start
- Marking
- Wall covering
- Installation of ceramic floor
- Finishing works
- Possible problems and ways to solve them
- The tiles lie in steps
- The tiles look crooked in a row
- The tile falls inside
- The sealed seams have failed
- Different tile sizes
- The nuances of laying tiles in the bathroom
- Video on the topic
- How to lay tiles on a bathroom floor?
- Laying tiles on the bathroom floor Repair in detail We build for ourselves
- How to start laying the first row of tiles from the bathtub
- How to lay bathroom tiles in one day. Rules for laying tiles.
- Laying tiles in the bathroom with your own hands. Useful tips (PART 1)
- All stages of laying tiles. No advice on how to apply glue, just to the point.
Methods for laying tiles
The bathroom’s flooring and wall cladding are made of tiles. This kind of finishing material doesn’t conduct electricity, burns easily, doesn’t absorb moisture, and is easy to clean. produced by thousands of businesses, offering a vast array of colors and patterns in addition to a variety of sizes. As a result, you can obtain a large number of unique design solutions.
The interior design of the bathroom can also be influenced by different ceramic laying techniques, which visually alter the space. There are various methods for laying tiles on the walls as well as the floor.
Tiles can now be laid in the following methods:
- basic — ceramics are laid in even rows. This is the simplest and most popular method, while the most economical – you need less material and the least laborious, t.To. few trims (always laid at an angle of 90° relative to the wall);

- "at random" (brickwork) – imitates classic brickwork. Here, each next row is shifted by ½ the length of the tile. For example, if the first row began to be laid with a whole tile, then all odd rows should start with a whole tile, but the second and all even rows should start with half a tile;

- diagonally – the tiles are laid in a diamond pattern in relation to the wall (on the floor) or the floor (on the wall). The method is complex and requires a lot of trimming. If you plan to use several colors, it is advisable to first draw up a laying scheme, as it is easy to get confused;

- herringbone – a combination of two methods: “staggering” and diagonal. An even more complex method;

- chess – used for two tile colors. The basic styling method is based on, where colors alternate both horizontally and vertically;

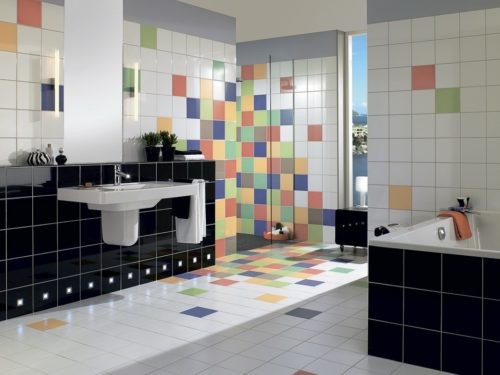


- with shift – applies only to floors. The method involves the use of tiles of different sizes, where the difference in size can reach 4, 6, 8, 10, 12, 16 and 24 times.

You can see in the photo how to lay small and large tiles in this pattern.
Not every option that has been thought of for installing tiles in the bathroom is doable by a novice. If the installation is complicated, it is best to leave it to the pros.
Preparatory work
There is a lot of prep work involved in laying tiles on the wall and the floor of the bathroom. Whether it’s a Khrushchev or a wooden house, a wide range of technological operations are carried out:
- the bathroom is freed from old plumbing (in a new building without finishing this type of work is not possible);
- The walls are aligned (a detailed story about the technology of wall alignment can be found in the materials “How to level the walls in the bathroom” and “How and how to plaster the bathroom”);
Note: It is important to emphasize that the gypsum board beneath the tile is only fastened to the sheathing. The weight of the ceramics will cause moisture-resistant plasterboard and gypsum board sheets adhered to the wall to collapse and fall off.
- the subfloor is being prepared. Such technological operations as pouring a new screed and waterproofing work are carried out. A step-by-step algorithm of work is described in the articles “Preparing the floor for pouring screed” and “Waterproofing the floor in the bathroom”;
- the surface of the walls and floors are treated with a primer.
The final procedure is required. It aids in improving the ceramics’ adherence to the walls and floor’s base. White foam, an indication that the primed surface is saturated with moisture, must appear after the primer has been rubbed into the base.
Applying the first layer in the evening will ensure that the walls are completely dry by morning (the instructions on the primer package will tell you how long it takes to dry).
It is preferable to lay the tile on a slightly moist surface rather than waiting for the second coat of primer to completely dry.
Materials and tools
You will need to buy the following supplies and equipment (you can rent or ask friends for the latter) in order to lay tiles in the bathroom:
- ceramic or porcelain tiles;
- tile adhesive;
- deep penetration primer;
- grout (fugu) for seams;
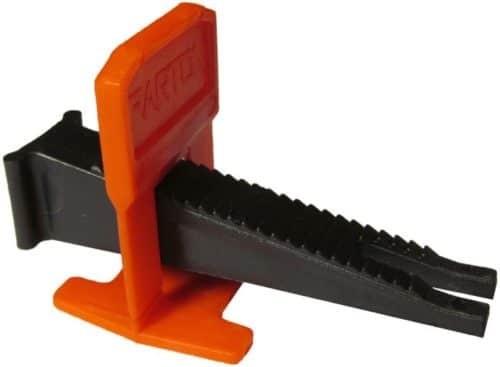
- plastic crosses for adjusting the gaps between tiles or a polymer tile leveling system (Russian-made SVP, Western-made Rubi Tile Level);
- silicone sealant;
- metal ceiling profile CD (PP) for the first row of tiles on the wall;
- self-tapping dowel for attaching the profile to the wall;
- stepladder (needed when finishing walls);
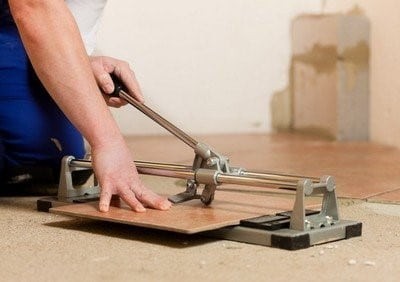
- electric or mechanical (manual) tile cutter. In extreme cases, you can use a glass cutter. But this is long and laborious;
- a screwdriver or hammer drill with a mixer for stirring tile adhesive (also required for drilling holes in the wall for dowels);
- container for adhesive mass;
- primer cuvette;
- a roller with an extension handle and a paint brush for applying primer;
- building level;
- trowel for applying glue;
- metal spatula with teeth;

- narrow spatula with a straight blade;
- soft (rubber) spatula for grouting joints;
- mallet;
- rags;
- soft sponge;
- roulette.
Calculation of the required amount of materials
To lay tiles by hand in a bathroom, you must precisely calculate how much tile, grout, and glue you’ll need.
Tile calculation
There are a few small variations in the process used to determine how many tiles are needed for floors and walls. Thus, we will examine the process of deciding how many tiles to use for floors and walls using a conditional example.
Walls. We’ll perform the computations for a simple design featuring a single-tone material surface. The following order is followed when performing calculations step-by-step:
- Using a regular tape measure, measure the perimeter of the walls. The results are recorded in a notepad or on a piece of paper;

- the height of the room is determined. In both cases, measurement results are rounded to the nearest centimeter;
- multiplying the perimeter by the height to determine the total area of the walls;
Consider two 1.7-meter-long and two 3.1-meter-long walls. 9.6 m is the final perimeter (1.7 x 2 + 3.1 x 2). 2.8 meters in the ceiling. Consequently, the walls’ total area will be 26.88 m2 (9.6 m x 2.8 m);
- the area of the doors and windows, if any, is determined;
- the dimensions of the bathtub are taken to determine how much wall area it will cover;
- From the total area of the walls, doors, windows and the area where the bathtub adjoins the wall are subtracted.
A doorway, for instance, is 1.8 m2 in size (2.0 m in height and 0.9 m in width). Not a window. 0.7 m wide, 1.7 m long, and 0.6 m high are the dimensions of the sanitary ware, and the bathtub junction area is 1.44 m2. adjacent to one side and end of the wall. The wall behind the bathroom doesn’t need to be tiled. Such regions have an area of 1.02 m2 on the side (0.6 m x 1.7 m) and 0.42 m2 at the end (0.7 m x 0.6 m);
- by subtracting from the total area of the wall the space where tiles will not be laid, the size of the surface for laying tiles is found (26.88 m2 – 1.8 m2 – 0.42 m2 – 1.02 m2 = 23.64 m2 ).
However, this is a net pure figure. However, during the work, the tiles may get damaged and will need to be trimmed. Consequently, the figure 23.64 m2 needs to be increased by 10-15% for the diagonal method (practice suggests that this should be sufficient) and by 10% for the basic layout (for a non-professional, by 15%).
Note that all of the figures are final and rounded.
The area of the necessary material is divided by the area of the tiles in the package to determine the number of tile packages, which is easy to determine because tiles are typically not sold individually in large retail outlets.
Important: You can buy a little bit more ceramics than you need without worrying about breaking the family budget because the majority of Russian building material retailers accept returns of unused ceramic tiles. When buying the material, this point needs to be made clear.
For information: Different batches of ceramic tiles may have different tones, just like wallpaper. As a result, you must maintain control over the batch or tone number, which is disclosed on the packaging by the manufacturers. You should also be aware of the caliber of Gres tiles, which is listed on the packaging.
Ground. Here, the area of the room and the number of rows can be used to calculate the amount of material needed. The first scenario involves a step-by-step computational process.
Step 1: The entire floor area is calculated.
Step II: Determine the area of the floor beneath the bathroom, which does not have tile.
Step III: The net (net) quantity of flooring material is determined.
Stage IV. For straight laying, the result increases by 10%, and for diagonal laying, it increases by 15% to 20%.
When calculating the number of tiles in rows, the length and width of the room are measured. After this, the length of the floor is divided by the length of the floor element, as a result of which the amount of ceramics in the row is determined (rounded up). Then the width of the bathroom is divided by the width of the tiles – we get the number of rows (rounded up again). By multiplying the number of tiles in a row by the number of rows we get the total amount of material required. With this calculation method, the final figures are more accurate. Therefore, it is enough to buy 1-2 floor tiles (not packages) in reserve.

Glue calculation
Every tile adhesive manufacturer lists the amount of material used per square meter on the packaging. However, since there are never perfectly smooth walls in real life, these computations are only theoretical in nature.
Hence, we obtain a basic figure that must be modified for the uneven surface of the walls and floor by dividing the area of the walls and floor by the material consumption. For instance, the basic adhesive requirement rises by 20% when leveling a wall with tile adhesive by 5 mm.
Grout calculation
Depending on the height, width, and length of the tile-to-tile seam, fugue (grout) is purchased. The consumption is indicated by the packaging. As a result, figuring out how many grout packages there are is easy. If there is not enough fugue or if it persists, you shouldn’t be upset.
Ultimately, you have no control over how the glue will fill the seam. If it almost reaches the surface, there won’t be much consumption. If there is void in between the tiles, you will need to purchase more grout.
How to choose the right glue
Adhesive for bathroom tiles can be purchased or made yourself. Everything is dependent upon the kind of base, the quantity of labor, and the finisher’s ability.
Therefore, it is less expensive to level large height differences on the wall’s surface at home using glue. Portland cement, river sand (quarry sand needs to be sifted to get rid of small pebbles), PVA glue (dishwashing detergent, liquid soap, or washing powder work well in place of PVA glue), and water are required.
The adhesion to the ingredient proportions in the composition is the sole determinant of the glue’s quality. For every 10 kg of Portland cement grade 300, 400–5, 500–6, and 5–10% of diluted PVA glue (one part water, two parts glue), four parts sand are added.
For information, specific additives are added to the solution to enhance the homemade glue’s resistance to chemicals, heat, moisture, and frost as well as its plasticity and adhesion. Liquid glass, resin additive DEG1, superplasticizer D5, MasterTherm, superplasticizer C3, etc.
Each additive’s usage instructions provide information on how to use it.
Pre-made varieties of tile adhesive include:
- dry mixtures – the composition contains all the necessary components. All that remains is to stir according to the instructions;

- mastic – ready-to-use paste;

- adhesive solution (another name is “liquid nails”) – used only for repairing (replacing) tiles.
How to choose adhesive for bathroom tiles if you have to buy it?
Here, the base that the ceramics will be glued to dictates the type of glue to use. Therefore, the best adhesives for gypsum and cement plaster are universal cement and two-component epoxy adhesives. A dispersion adhesive that has good adhesion but doesn’t go deep into the base is what you need for a plasterboard wall.
Litokol, Knauf, Vetonit Ultra fix, Ceresit, and Unis Plus are the best brands to purchase.
Step-by-step installation instructions
There are various sections in the instructions on how to install tiles on the walls and the floor of the bathroom:
- where to start laying ceramics;
- how to make markings;
- how to lay tiles on a wall in a bathroom;
- how to lay tiles on the floor;
- how to sand seams.
Where to start
Professional builders do not consider the sequence of work to be essential. Some tile the floor first, then the walls, and lastly install the bathtub.Others begin with the walls, and still others begin with the bathtub.
Starting with wall tile installation is the best course of action for individuals handling the full cycle of work themselves, as tiles, tools, and mortar can fall during the process. The author has repeatedly noticed, even among experts, that if the glue can be removed, the instruments and tiles leave chips. A second issue is resolved by placing the wall tiles in such a way that the bottom row rests on the floor tiles, creating a so-called "lock" that prevents water from seeping through the joint.

In this regard, there are plenty of suggestions for organizing a clean bathroom on the Internet. Of these, we think only one merits discussion; expert builders suggest tiling the walls first, followed by the installation of a bathtub and floor tiling.
Beginners will thus be able to avoid multiple issues at once:
- if you first install a bathtub, then the first row of tiles along the wall should go along the side of the sanitary ware, which, by the way, is good. But a huge problem for non-professionals is laying the two bottom rows, namely, fixing the tiles in the penultimate row on the wall;
- recently it has become fashionable to put the bathtub not on the tiles, but on the screed, which is easy to do with the given technology;
- there is no risk of installing a bathtub with a counter-slope (installed strictly horizontally), since you can always add mortar under the legs.
Another point of entry for the shower cabin installation process:
- all communications are installed;
- an inclined rough screed is poured;
- the walls are tiled;
- the floor in the cabin is finished – it must have a slope towards the drain hole;
- tiles are laid on the rest of the floor in the room.
Marking
Marking the wall or floor is one of the requirements for correctly laid tiles with a pattern or design. The tiles are laid on the floor of a different room in order to prevent errors and apply the proper pattern to the wall. On the back of each tile is a pencil number. The diagram that is produced is affixed to the wall.
Additionally, the metal profile for the wall’s first row of cladding needs to be marked. Pencil (marker), tape measure, level, and preferably a laser are used for the work. First, find the room’s lowest corner (the work "How to check the floor level in an apartment yourself" will show you how to do this correctly).
Next, measure the distance from the floor to the seam where the first and second rows meet. This will allow you to draw a horizontal line around the entire perimeter of the room and attach the ceiling profile to the walls precisely and evenly.
Wall covering
One unique feature of wall cladding is that the ceramic tiles start to move to the sides, creating what are known as steps, when the floor curves slightly. You must either wait for the first row to dry completely, which takes a lot of time, or artificially construct a perfectly flat stand for the first row in order to prevent issues with vertical seams.
The latter choice gained a lot of traction among experts. In order to accomplish this, they screw the ceiling profile to the wall using dowel-sarkens, which are used to line the walls of GKL. On it, tiles are laid. The profile is taken off once the lower rows have dried, and the wall is faced once the tile has been laid to the floor.

In actual use, there are various techniques for applying glue when laying ceramics:
- Only on the back of the tile – the method is possible with even walls;
- on the tile and wall – use with significant curvature of the wall, since the thick layer of glue levels the changes in the heights of the wall surface;
- only on the wall – use masters with extensive experience.
Prior to beginning work, the wall and tiles are sprayed with water to prevent them from absorbing the water required for the adhesive mortar. If there is insufficient moisture, the cement mortar’s hydration process may be interrupted (walls are not wetted under epoxy adhesive).
Using a level and a mallet, multiple tiles are adhered to one another and brought into one plane. SVP, or innovative tile leveling systems, will make the process easier. The image below illustrates their basic mode of operation.
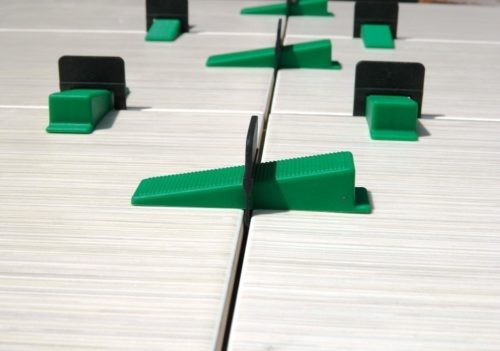

The installation method is easy to use:
- glue is applied to the wall or tile with the smooth side of the spatula;
- using the teeth of a spatula, ridges are created (without them it is impossible to adjust the plane of the tiles – the glue will constantly protrude between the seams);
- apply the facing element to the wall and immediately place plastic crosses or SVP elements;

- using a mallet, level and devices (crosses or SVP) bring the tiles into the same plane with the already laid cladding;
- in the corners of adjacent walls, the tiles should overlap each other and not touch with their edges, which is clearly visible in the figure.
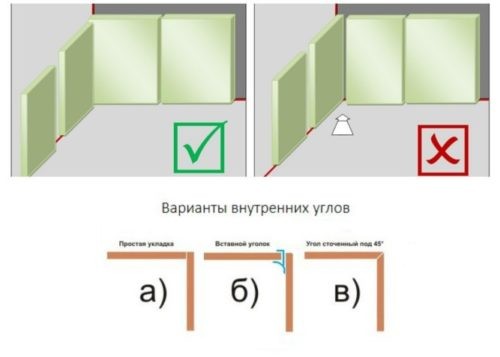
Additionally, using specific crowns or drills for pre-existing wall holes for various pipes and cables, holes are drilled into the tiles. These procedures are completed prior to tile installation.
Installation of ceramic floor
Applying silicone sealant to the floor and wall joints is the first step in installing floor coverings; this provides an extra layer of defense against moisture seeping into the neighboring spaces. Whereas the final tile is placed at the threshold, the first tile is placed in the far left corner. Other than that, the installation method is the same as working on the wall.
A sheathing of wooden slats or a metal profile for the screen is mounted on the floor, outside the bathtub, once the glue has dried. Using self-tapping screws, moisture-resistant plasterboard is fastened to the sheathing. Hatches providing access to communications are located close to the walls and along the edges. They are fastened to the sheathing with suction cups-removable magnets. Gypsum board is adhered to with tile.

A video tutorial explaining how to lay tiles in a bathroom is available.
Finishing works
Among the finishing works are two operations:
- sealing the joint between the bathtub and the wall;
- grouting the seams.
Silicone sealant is used to seal the joints between the tiles and the bathtub’s edge. However, it appears more elegant if the tiles are arranged in thin strips around the entire perimeter at a 45-degree angle. It successfully conceals the seam and keeps water from seeping beneath the bathtub’s wall.
Once the glue has fully dried, which should happen in two days or less, grouting the seams can begin. The grout should have the consistency of fatty, sour cream, enough to hold a spoon in it. The solution will seep from the seams if it is thin. Rubbing the thick one evenly into the seams won’t be possible.

Using a rubber spatula, rub the grout in between the tiles. Following the application of the solution to the seam, the surface is grouted at a 25–30 o angle. Approximately 3 square meters are processed in a single pass; this is contingent upon the tile size and finisher’s skill.
Any remaining paste residue on the tiles is quickly cleaned up with a dry cloth (a wet cloth will leave stains that are difficult to remove). You can use your fingers to fix the seams after three to four hours by rubbing the solution in the areas where the fugue failed or there were gaps. A foam sponge is then used to sand the seams.
Possible problems and ways to solve them
Quality work cannot be guaranteed even with careful study of guidelines, manuals, and tutorials on how to lay tiles in a bathroom. When you lay tiles yourself, you almost never get it right. While some have less, some have more. Instead of dwelling on the issues that have emerged in this case, you should act swiftly to resolve them before the glue sets fully.
The tiles lie in steps
The preparatory work did not entirely eradicate the wall plane issues, which is where the origins of this defect were laid. More specifically, there is a slope or curvature at the junction of the wall and the floor. Consequently, the vertical joints will gradually shift to one side, creating tile steps. To keep the top line perfectly even in these situations, you must first either trim the tiles or place different underlays underneath them.
In the event that the issue is detected after multiple rows of tiles have been laid, you will need to identify the initial row and seal the joints. Matches and wedges are used to repair the lower seam, and plastic crosses of varying thicknesses are used to repair the upper seams.

The tiles look crooked in a row
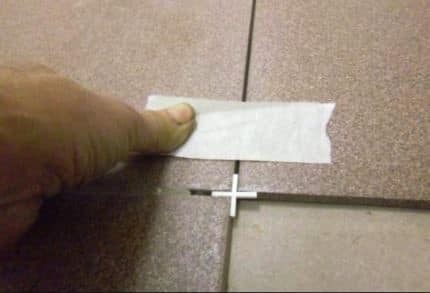
When there isn’t a cross in the seam because it fell out or the master neglected to put it in, this happens. The flaw is easily fixed by leveling the tiles, adding new crosses to the seams, and using masking tape to secure the displaced tiles to the adjacent tiles on all sides.

The tile falls inside
The finisher is solely to blame if tiles are visibly embedded in the adhesive and this is evident because he applied the adhesive mixture improperly—either unevenly or just in dots. In passing, the most frequent error made by inexperienced finishers is to apply glue pointwise in an attempt to save it. In this instance, the tile either caves in or splits, allowing cobwebs to grow on it.
Re-gluing the entire row of tiles eliminates work defects and is a faster and easier process than re-gluing only the sunken tiles. Although this advice appears nonsensical, it is true.
The sealed seams have failed
Such flaws can be caused by excessively liquid grout or poorly cleaned seams. Once the old grout has been removed and the seams cleaned, the defect can be eliminated by repeating the jointing operation.
Different tile sizes
There may be variations in the lengths and widths of ceramic tiles produced by even the top global brands. Though it might not seem like much, the difference is evident on the wall. Because of this, skilled finishers lay one row of tiles from a single package, increasing the possibility that calibration errors won’t be seen.
If a tile is already installed that isn’t the right size, it is either replaced with one that matches the neighboring tiles’ geometry better or the seam size is changed to minimize the visible flaw.
The nuances of laying tiles in the bathroom
Every company has a few little secrets of its own. Moreover, tilers have them:
- the surface of the tile should not have chips, blurred patterns or stains. Tiles with such defects are put aside. Its subsequent use is possible in places closed from view. For example, behind a bathtub, washing machine or sink counter. Tiles with chips are most often used for trimming, getting rid of damaged areas using a tile cutter;
- high-quality tiles should have a flat surface and right angles. You can check these parameters quite simply. It is enough to stack two tiles with their front sides facing each other – the presence or absence of gaps gives an assessment of the quality of the product;
- laying tiles on drywall in the bathroom will be done quickly and efficiently if you allow the 1st row to dry completely. This will prevent the tiles of the upper rows from sliding – steps will not form. In general, this advice from experienced specialists is universal – suitable for walls made of any material;
- you only need to press the tiles into the glue with a rubber hammer (mallet) to avoid damaging the tiles;
- mentally the design of a pattern on the wall is difficult to evaluate. Therefore, it is best to lay the tiles on the floor in the next room and see what happens. It’s too late to change anything on the wall;
- When gluing tiles, you don’t need to press them hard into the adhesive – the mortar will begin to protrude through the seams. If the adhesive does appear, it must be removed immediately;
- if you don’t have the desired grout color, buy a white fugue and then tint it. Here you need to be very careful and count drops of dye per volume of solution in order to subsequently obtain the same color;
- to make the room wider, light tiles are laid on the walls in a horizontal position, higher – in a vertical position;
- For hexagonal tiles, a contrasting color grout is used – it looks very beautiful and interesting.
Although installing tiles in your bathroom may seem difficult at first, with the correct strategy, it becomes a doable task that can completely change the area. Start by making sure the area where the tiles will be installed is ready. Make sure it’s dry, clean, and devoid of any debris or outdated adhesive.
Next, give your layout a thorough plan. Determine the area and your starting point for tile installation (usually the center of the room outward). This prevents unsightly cuts at the edges and helps maintain symmetry. Before applying any adhesive, dry-lay the tiles to check fit and make any necessary adjustments.
When you’re ready to start, use a notched trowel to apply the adhesive, evenly covering a small area of the surface. Using spacers to maintain uniform gaps between tiles for grouting later, firmly press each tile into place. To keep the adhesive from drying out before you can lay the tiles, work in small, manageable sections.
After the adhesive has dried according to the manufacturer’s instructions and the tiles are set, take out the spacers and grout the tiles. Apply the grout diagonally between the tiles, making sure all of the joints are filled, following the directions on the package. Before the grout dries, remove any excess with a damp sponge.
Finally, apply a silicone sealant along the edges where the tiles meet the walls and fixtures after letting the grout set for the recommended amount of time, usually 24 to 48 hours. This keeps your tiled bathroom looking clean and new for many years to come and helps prevent water damage. If you follow these instructions precisely, you’ll have a gorgeously tiled bathroom that enhances the usefulness and aesthetic appeal of your house.


