
Any house must have a strong foundation, and one of the most important steps in this process is making the appropriate formwork. In essence, formwork is a makeshift mold used to hold concrete in place while it hardens. Although creating your own formwork for a house foundation can be a satisfying do-it-yourself project, careful planning and execution are necessary to guarantee a sturdy and long-lasting foundation.
First, determine the kind of foundation required in accordance with your local building codes and house plans. For heavier or more intricate designs, common types are raft foundations and strip foundations for conventional structures. For each type, particular formwork techniques are needed to support the concrete’s weight and shape while it cures.
After deciding on the kind of foundation, collect your supplies. To hold the formwork in place, this usually consists of strong timber boards or panels, fasteners like nails or screws, and braces or supports. Make sure the materials you use are strong enough to support the weight and pressure of the wet concrete.
Next, level and clear the area where the foundation will be poured in order to prepare the site. Using string lines and pegs, precisely measure the foundation’s dimensions based on the dimensions found in your building plans. This arrangement acts as a blueprint for precisely building the formwork.
Building the formwork itself entails putting together the wooden planks or panels to form a robust container for the concrete. First, use nails or screws to fasten the boards or panels to the foundation’s perimeter. In order to maintain formwork stability and stop it from moving during the pouring process, use braces or other external supports.
Make sure the formwork’s joints and corners are securely sealed and reinforced by paying special attention to them. This contributes to a smooth and even foundation by preventing leaks or bulges during the concrete pour. Be especially careful to brace the formwork at regular intervals in areas with uneven ground or for deeper foundations.
Finally, make sure the formwork is precisely square and level before pouring the concrete by double-checking all measurements and alignments. The chance of mistakes that could jeopardize the integrity of the foundation is reduced by this thorough preparation. When you’re satisfied, proceed with pouring the concrete into the formwork, making sure to mix and pour it according to best practices to create a sturdy foundation for your home.
Your house’s foundation will be built to last if you follow these instructions and take the time to build the formwork correctly, giving the rest of your construction project a strong foundation.
| How to prepare the site | Determine the layout and dimensions of the foundation. |
| Choosing the materials | Select sturdy plywood, lumber, and stakes for formwork. |
| Setting up the formwork | Securely fix the formwork to prevent concrete leakage. |
| Reinforcement placement | Position steel bars or mesh inside the formwork for strength. |
| Pouring concrete | Pour and level concrete evenly into the formwork. |
| Curing | Cover the foundation with plastic sheeting to cure slowly. |
- Device
- Features of different designs
- Calculation
- Selection of materials
- Assembly for strip base
- Removable
- Fixed
- Installation nuances for different bases
- How to set by level?
- When can I remove it after pouring??
- Video on the topic
- FORMWORK WITH YOUR HANDS. HOW TO MAKE IT RELIABLE AND QUALITY
- 6. Formwork. DIY house
- Do-it-yourself foundation – All stages from A to Z. Foundation for a house 10×8
Device
A structure called formwork is used to create the framework for the future foundation. It includes:
- shields that prevent liquid concrete from spreading;
- spacers and clamps to connect structural parts together so that they do not diverge in different directions or fold inward;
- auxiliary scaffolding, making it possible to fix the shields in one position.
Formwork is essentially a form that liquid concrete is placed in to solidify.
Given that the structure is composed of various materials, a corresponding standard exists that indicates the maximum deflection value of the structure: 1/400 of the length for above-ground structures, and 1/250 for underground ones.
This indicator is necessary to ensure that the foundation does not move or the panels themselves do not fracture from the internal weight during the concrete pour.
Features of different designs
There are numerous primary varieties:

- Removable a structure that is dismantled after the concrete has hardened to the desired hardness. Most often used to build country houses. This type of construction is economically beneficial, since after dismantling such formwork can be reused. Typically used for strip foundations, but can be used in columnar or slab foundations.
- Fixed formwork is a pre-made frame, which, after the concrete hardens, becomes part of the foundation.
- For columnar bases, pipes made of asbestos-cement or metal are used.
- And for tape – ready-made forms made of polystyrene foam, reinforced concrete, wood or aerated concrete, and in some cases from DSP and fiberboard.
Based on the primary types, there are subtypes of formwork, such as block, adjustable, and pneumatic.
Formwork is the first step in building a strong foundation, and you can do it yourself with some careful preparation and simple tools. This article walks you through the crucial processes for building formwork, which guarantees the strength and longevity of your foundation. Everything you require to know will be covered in clear, understandable terms, from selecting the appropriate materials to assembling and strengthening the formwork. You can confidently take on this important portion of your home construction project by following these steps.
Calculation
We use the example of wooden boards to calculate the amount of material. The following formula is used to determine the quantity:
A typical 1 m 3 requires 40 to 65 parts, depending on the board’s width. Since all the parts needed to fix the boards and spacers will account for about half of the total cost, it is necessary to add half of that amount to the estimated cost of the boards. If all necessary items are not available, fittings and tools will require additional costs.
For that, you must apply the following formula to determine the minimum thickness needed:
- G – internal load on the formwork produced by concrete. G=q*H, Where q – specific gravity of concrete, which is 2500 kg/m 3, and H – foundation height.
- n – concrete compaction coefficient, which is equal to 1 if vibration shrinkage is not used.
- I – distance in meters between the supports that hold the shields.
- T – resistance of the material from which the shields are made. For wood, this figure is 8*105 kg/m2 .
Given that the concrete in the foundation may vary in densities, compositions, and grades, the average parameter—typically 25 mm—is used to determine the board’s thickness.
Selection of materials
The following supplies are used to make shields:
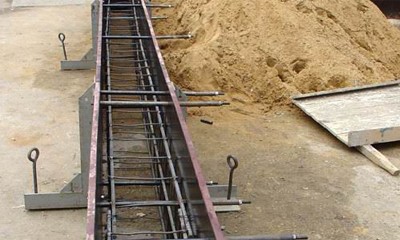
- Metal. It is the most expensive option for assembling a frame. For shields, steel sheets are used, the thickness of which is 1-2 mm. This type of construction is well suited for strip and monolithic foundations, since the reinforcement can be welded to the walls of the formwork. Metal sheets are easy to bend to the desired shape, which helps to create the desired base shape.
- Reinforced concrete is cheaper than metal, but also has a high cost. For such formwork, slabs are used that will help reduce the consumption of the mixture for the foundation, but not lose strength. Since reinforced concrete slabs are heavy, special equipment will have to be used for their installation.
- Expanded polystyrene is a lightweight material for permanent formwork, inside which metal reinforcement can be installed. The advantage of such a design is the ease of its installation and trimming, and the disadvantage is the difficulty of selecting corner elements and roundings.
- Wooden formwork can be made of different types of material: edged board, plywood, fiberboard, OSB or chipboard. A frame made of these materials is most often made for a removable foundation. Wood is the cheapest and most frequently used material in the construction of formwork. The disadvantage of this material is that it needs to be well strengthened.
- Available materials, for example, slate, galvanized sheets, corrugated sheets can also be used for formwork. The disadvantage of this choice is the complexity of assembly and the low strength of the shields.
Regarding a note. Boards are typically used in conjunction with film to construct a strip base because the film fills in the panel’s cracks.
Plywood sheets that are thick work well as a replacement. They are simpler to install and remove and require fewer fasteners.
Assembly for strip base
While expertise and understanding are necessary for proper formwork installation, some basic structures can be put together by hand without the assistance of experts. Let’s examine the installation of both permanent and removable formwork by examining the examples provided below.
Removable

Let’s use a plywood structure as an example to examine how to install a removable frame. To put this design together, you’ll need:
- Select material for shields. To do this, you need to calculate the strength of the plywood sheet that is needed for the foundation in order to understand how thick the formwork should be (most often, sheets from 30 mm are used).
- Cut the sheets into pieces of the required size.
- Connect the pieces of plywood into one panel using wooden blocks and nails.
- Install the assembled structure in a pre-dug ditch filled with sand. The smooth side of the sheet should be facing inward, and the fastening blocks should be facing outward.
- Check the assembled panels for gaps between them. If there are any gaps, they should be eliminated before pouring.
- Install the connected frame made of reinforcement inside the ditch between the sheets.
- From the outside, the panels should be additionally reinforced with pegs. For this, wooden blocks are dug in close to the panels.
- To prevent the structure from collapsing, wooden spacers made of timber or boards are installed inside at the top of the ditch.
- After this, concrete can be poured.
Kindly take note! There are instances where a film is applied from the inside to further cover the plywood. This will aid in further sealing the joints and ensure that the panels stay clean during disassembly, allowing for reuse.
The following video will teach you how to install and secure plywood foundation formwork:
Fixed
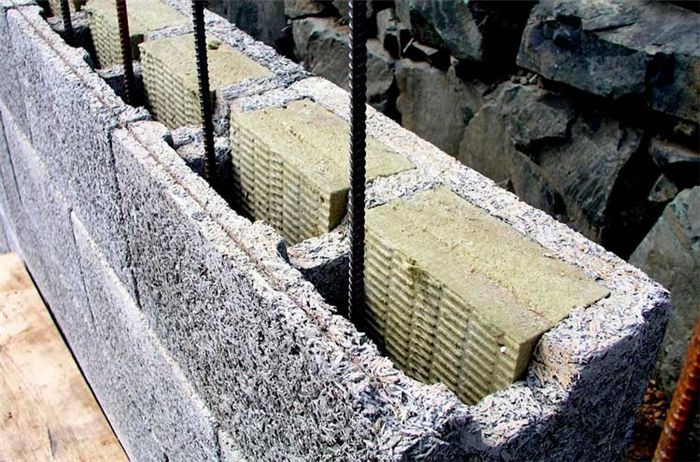
Using blocks composed of wood concrete or aerated concrete as an example, let’s examine how a permanent foundation might be put together. You will need: to assemble
- In the dug ditch, into which you need to pour a cushion of sand and crushed stone, install corner blocks, stringing them onto the reinforcement.
- After laying the first turn, install horizontal overlapping reinforcement inside the blocks. It also needs to be tied together with wire or plastic ties.
- Lay the second row, making an analogue of brickwork (overlapping blocks) with an offset multiple of 250 mm.
- At the stage of laying the second turn, cutouts are made for communications;
- During the installation of subsequent turns, it is necessary to lay a reinforcement cage on each of them.
- 2-4 rows are installed at a time, so that there are no bulges, the last of them is filled with concrete only up to half.
- In some cases, U-shaped nozzles or special pads are used to protect blocks from the mixture, which are removed after pouring.
- To improve shrinkage and also to avoid the formation of air bubbles, low-power vibration devices are used.
- It is recommended to install no more than 3-4 turns per day, so as not to tear the lower rows.
Installing formwork made of different blocks, such as wood concrete, aerated concrete, or polystyrene foam, is appropriate for this technique. In the latter instance, extra reinforcement can be affixed either directly into the polymer walls or into the space between them.
Installation nuances for different bases
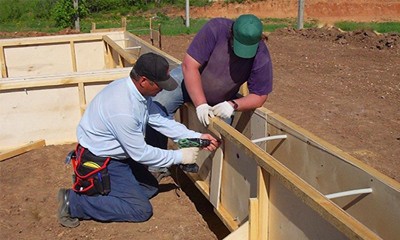
- For tape Most often, removable wooden formwork is made (from plywood sheets or boards). The stages of its assembly are described above.
- When arranging a columnar foundation boards are also used. Most often they are needed to hold pipes or form piles. Unlike a strip foundation, in this type of foundation the boards are installed vertically, forming a prism or cylinder. Each of these pillars is reinforced separately, after which the strapping is done. The lower part of the pile can be poured without formwork.
- For slab the foundation shield is made in one row (the flat part facing inward) along the outer sides of the entire perimeter of the building. When installing such formwork, an additional calculation of the strength of the walls is required, since the pressure on them will be higher. To arrange this shape under the slab, sheets of expanded polystyrene or polystyrene are sometimes used, since with their help you can make a non-separable structure that will provide additional heat and sound insulation.
How to set by level?
The foundation’s surface needs to be level because otherwise, the walls could sag and add to the weight on the foundation, possibly causing damage.
It is advised to build the structure slightly larger than the necessary base height rather than attempting to level the top perfectly. After that, a straight line that will be used as a level must be drawn inside the shields.
To complete everything accurately, you will need:
- determine the required height of the foundation at the lowest marking point;
- apply a level (water or laser) to draw the starting line;
- after that, using another level, draw similar stripes on the remaining pegs, and then connect these lines into one.
The formwork itself may occasionally be leveled to serve as a marker. This is accomplished by installing pillars around the trench’s edge, between which fishing line or rope is stretched. A level can be used to level them. Additionally, even formwork can be created by simply sawing off the top portion as needed.
When can I remove it after pouring??
Once the concrete has dried completely, the formwork needs to be taken down. In ideal circumstances, this process can be completed in two weeks; however, standards advise removing the shields 28–30 days after pouring.

To get rid of the necessary structure:
- remove all studs and nuts that were used during installation;
- remove the struts and supports from the outside, and also pull out the stakes;
- Unscrew the screws that secured the internal spacers;
- pull out the bars and remove the shields.
Choosing the appropriate formwork for your home’s foundation is essential to guaranteeing a sturdy and long-lasting base. Stakes, plywood or boards for the formwork, nails or screws, a hammer or drill, and a level are needed at the start of the process. Make sure the area is level and free of debris before pouring the foundation.
Next, mark the location of the formwork by laying out the dimensions of your foundation on the ground using stakes and strings. As you firmly anchor the stakes, make sure they are level and the appropriate height for the depth of your foundation. Make sure the plywood sheets or sturdy boards are firmly secured to the stakes before building the formwork itself.
Verify the accuracy of all measurements and levels once the formwork is in place. Any mistakes here could compromise the integrity of the entire foundation. To stop concrete from leaking, pay close attention to the joints and corners and make sure they are tightly sealed.
Use a release agent inside the formwork before pouring concrete to keep it from adhering to the concrete after it has been poured. By taking this step, you can ensure that the formwork can be easily removed later on, leaving clean edges. Pour concrete gradually, leveling and compacting it thoroughly to prevent uneven surfaces or air pockets.
As directed by the manufacturer, let the concrete cure properly after pouring. After the formwork has dried, remove it carefully, starting with any internal supports or stakes. To prevent harming the recently cured concrete, take your time. Lastly, before starting any additional construction, check the foundation for flaws and make the required repairs.


