
A polycarbonate pitched roof is a great way to cover a variety of structures, including greenhouses, carports, and patios, in an attractive and long-lasting manner. Sheets made of polycarbonate are robust, lightweight, and offer superior weather resistance. Because it is also simple to work with, this material is well-liked by both professional and do-it-yourself builders.
It’s critical to properly plan and acquire all required materials before beginning any project. Polycarbonate sheets, appropriate framing materials, screws, and sealing tape are required. The procedure will go more smoothly if you have the appropriate equipment on hand, like a saw, drill, and measuring tape. Making the right preparations will guarantee a strong and durable roof.
A number of crucial procedures must be followed during installation, such as cutting and measuring the sheets, fastening them to the frame, and caulking the joints to stop leaks. Care must be taken at every stage to guarantee a precise fit and a stable attachment. By adhering to best practices during installation, you can extend the life of your roof and get a finished product that looks professional.
You can successfully install a polycarbonate pitched roof that looks fantastic and offers dependable protection for many years to come with a little perseverance and the appropriate technique. This kind of roofing is a flexible and useful option for many projects, whether you’re building a greenhouse or covering an outdoor space.
| Step | Description |
| 1. Measure | Measure the area for the roof and cut the polycarbonate sheets to fit. |
| 2. Frame | Build the roof frame using metal or wooden supports. |
| 3. Attach | Secure the polycarbonate sheets to the frame with screws and washers. |
| 4. Seal | Apply sealant to the joints to prevent water leakage. |
| 5. Finish | Check the roof for stability and ensure all parts are securely fastened. |
A polycarbonate pitched roof is easy to install and improves light transmission and durability for a variety of structures, including carports and greenhouses. You can guarantee a strong and long-lasting roof by adhering to the correct instructions, which include choosing the right materials, precisely measuring and cutting panels, and fastening them with the right hardware. Even if you’re a do-it-yourself enthusiast, this article will guide you through every step and provide helpful advice to help you avoid common blunders and achieve a professional finish.
- Advantages and disadvantages
- Main types of material
- Criterias of choice
- Roofing pie structure
- Roof inclination angle, what is the minimum parameter?
- Arrangement of the rafter system and sheathing
- Tools and materials
- Selection of fasteners
- How to build: step by step instructions
- Rules for installing polycarbonate panels
- Typical mistakes and recommendations for beginners
- Video on the topic
- Video on the topic
- THE BEST WAY TO JOIN POLYCARBONATE
- Canopy made of monolithic polycarbonate 4 mm thick
- Installation of polycarbonate connecting profile, H-shaped profile.
- Beam canopy made of monolithic polycarbonate.
- Transparent roof, monolithic polycarbonate.
- #Awnings Polycarbonate canopy – Disappointment! With each winter there is more and more snow, it becomes more and more difficult to clear.
- HUGE awesome polycarbonate canopy
- Kd.i: Transparent terrace roof. Inexpensive and long lasting. h.2 Installation of transparent corrugated sheet.
Advantages and disadvantages
The physical, chemical, and performance properties of this material are distinct. He is admired for the following qualities:

- Non-flammability. The main advantage of polycarbonate materials is their high temperature resistance. Roofing panels do not ignite under the influence of sources of open fire. Sheets can only smolder and melt, but at the same time they do not contribute to the spread of flame in a fire.
- Flexibility and elasticity. Unlike fragile slate and bending profiled sheets, who, after deformation, do not restore their original form, polycarbonate can “damp” under load. This means that after the winter season, when a large volume of snow accumulates on the roof, you do not have to repair the roof. It will independently restore after such loads (provided that the frame and crate are made correctly).
- Variability of colors. Polycarbonate sheets can be made in a wide variety of options: from completely transparent to black, blue, green and others. This allows you to implement various design ideas.
- Ease. To raise the roof panel to a height, you do not need to use special equipment. Standard size sheets can be moved manually with several assistants.
- UV protection. Polycarbonate is capable of retaining high-energy short-wave radiation, which is contained in the spectrum of sunlight. You can safely leave your car under such a canopy, and the paint on the body will not fade.
However, there are a few drawbacks to polycarbonate that should be considered as they may be crucial when selecting a roofing material:
- The material may accumulate static electricity, which provokes electrochemical corrosion of the metal frame elements on which the roofing sheets are fixed. Therefore, iron structures must be carefully treated with anti-corrosion compounds.
- Polycarbonate panels do not always withstand high point loads. Therefore, a person who builds or repairs such a roof must be careful and attentive when walking on the roof.
Fascinating fact: polycarbonate was entirely accidental in its invention. German chemist Alfred Einhorn, who is credited with creating novocaine, began developing an anesthetic in 1898. An insoluble polymer ether that was resistant to high temperatures developed as a transparent solid precipitate at the bottom of a lab flask during one of the experiments.
Main types of material
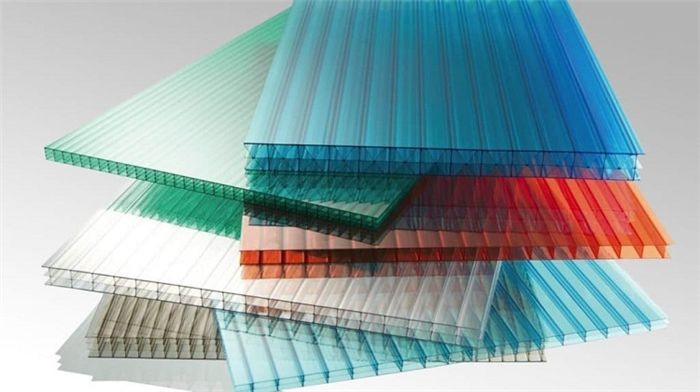
There is essentially no difference in the chemical composition and properties of commercially available polycarbonate materials. Their geometric configuration and the thickness of the sheets are what distinguish them most from one another. There are three primary categories for products:
- Monolithic. This polycarbonate is produced in the form of flat panels with a flat and smooth surface. The thickness of products usually varies from 2 to 12 mm. Externally, the material resembles glass, but at the same time it is much lighter and has a higher margin of safety with the same thickness.

- Profiled. Materials of this type are made in the form of panels with a wave -like profile. Such geometry is used not only for aesthetic purposes. The presence of bends that perform the function of stiffness ribs can significantly increase the strength of the products.

- Cellular. Panels of cellular polycarbonate have a relatively large thickness, since there are special cells in their internal structure. Soths are used to increase the heat and noise insulation characteristics of the material, and are also designed to scatter light rays. Under such a roof, you can comfortably be in hot, clear weather, without experiencing discomfort due to too bright sunlight. Single -chamber cell panels have a thickness of up to 10 mm, two -chamber – up to 16 mm, and four -chamber – up to 25 mm.
Criterias of choice
A variety of factors influence the selection of a specific kind of polycarbonate. If there is a high likelihood of heavy snowfall in the area and large snow accumulations on the roof, profiled or honeycomb panels are a better option. They can handle the weight better. However, it is important to keep in mind that these materials are typically more costly than monolithic polycarbonate slabs.
Conversely, mild to moderate climates are ideal for flat panel installation. They are frequently employed in the layout of small structures, such as parking spots in rural homes’ courtyards.
Cellular products should be preferred if a polycarbonate roof is to be installed over a residential or frequently used room that is directly adjacent to the house (for example, over a veranda or terrace). They will retain heat and absorb street noise more efficiently than monolithic ones.
It is also necessary to take the material’s thickness into account. The panels should be thicker the smaller the roof’s angle and the larger its area. For instance, cheap 6 mm panels are primarily used for small canopies and gazebos that aren’t meant to support large weights. The roof of a private home or cottage is a good fit for sheets that range in thickness from 16 to 32 mm.
Roofing pie structure
The conditions under which a polycarbonate roof will operate in the future are taken into consideration when designing the roofing pie. The structure will only have three parts in the simplest scenario, such as when building a gazebo or covered parking space: the frame, the sheathing, and the roofing material itself.
To improve moisture, vapor, and heat insulation, more materials are used when building a roof for a veranda or terrace. Above the primary lathing, a counter-lattice is also installed if needed.
The waterproofing material should be in the upper layers of the roof, between the polycarbonate panels and the counter-lattice, and the vapor barrier material should be in the lower layers. This is the precise placement that they should be in; otherwise, the waterproofing and vapor will not be able to fulfill their primary purposes.
Occasionally, a coat of paint is added as an additional component. When it’s important to attain the highest level of solar protection, polycarbonate sheets’ exteriors are painted. First and foremost, residents’ personal comfort may necessitate this; on hot summer days, people will feel more at ease under a darkened roof.
Second, by painting polycarbonate white, you can maximize its reflective qualities and avoid the metal frame elements from overheating excessively when exposed to sunlight.
Roof inclination angle, what is the minimum parameter?

One of the most important factors to consider when calculating and drawing up a polycarbonate roof is its angle of inclination.
10% (height difference – 10 cm per meter of roof length), or a 6 degree angle, is the lowest allowable value.
This parameter may only be reduced to 3-6% as an exception, which will only happen if the roof is placed over an open-type building and has a small area, preventing a lot of snow from building up on it.
The particulars of the local climate must be considered when performing calculations. It is preferable to raise the roof’s angle if there is frequent, heavy snowfall in the winter.
It can be raised to 45 or 60 degrees, for instance, when building a country home with a usable attic or pitched roof. The majority of the snow mass will fall on such a slope. There won’t be much of a load on the structure because there will only be a thin layer of adhered snow left on its surface.
Wind loads increase concurrently with an increase in the inclination angle. As a result, you must find the "golden mean" while considering which variable—wind or precipitation—will have a bigger effect on the roof.
In addition, if we are discussing the roof of a house and not a gazebo or covered parking lot, the pitched roof’s construction allows for a height differential between the opposing walls on which it will be installed. As a result, more construction materials will be needed to "build up" the enormous wall the steeper the slope.
Arrangement of the rafter system and sheathing
The frame is made up of the rafter system and the supporting structures. The frame supports the weight of the snow mass that builds up on the roof’s surface and the roofing pie. As such, careful consideration must be given to both its design and installation.
A square or rectangular profile pipe or a traditional beam can be used to arrange the rafter legs. If wood is used, pick a beam big enough—60 by 80 mm, for instance—so that the structure has an adequate safety margin. There should be no more than one meter of pitch between the rafters.
You should select products with a metal thickness of 3–4 mm if a profile pipe is to be used. It is possible to increase the spacing between iron rafters to 1.5–2 meters.

After that, the sheathing is installed on the rafter system.
Its primary purposes are to level the roof surface, distribute loads evenly, and shield the polycarbonate panels from undesired deformation.
In order to keep PC slabs from buckling under the weight of snow, the spacing between sheathing elements should be roughly 40–50 cm, or half the distance between the legs of a wooden rafter.
If the project allows for it, you can use a thinner beam or pipe for lathing and counter-lattice. For the best load-bearing capacity, the wood’s thickness of 50×50 mm is sufficient. One option for 2 mm metal when using a profile pipe is to use it. A flat iron profile should have a minimum thickness of 3–4 mm when utilized.
Tools and materials
It is vital to calculate the quantity of materials needed in advance of beginning the construction of a roofing structure, taking into account the specifics of the project. You’ll require the following building supplies:
- Polycarbonate panels.
- Wooden beam or profile pipe for sheathing and rafter system.
- Rectangular or square pipe for arranging supporting structures.
- Wall building material – if the roof will be installed on the existing walls of a private house (one of them will need to be completed in order to obtain the required height difference).
- Concrete mixture for completing a towering wall or creating a foundation for the metal supports of a pitched roof.
- Hydro- and vapor barrier material – if the roof will be installed over a closed structure.
- A sealant that is chemically neutral in relation to polycarbonate will be needed to seal the joints between the panels and the sheathing.
The following equipment is required:
- Drill and screwdriver – for fastening panels with self-tapping screws.
- Impact wrenches or wrenches – for bolted connections of profile pipes.
- Welding machine – for welded pipe joints.
- Grinder – for cutting profiles.
- Circular saw or hacksaw – for cutting timber.
Selection of fasteners

The type of lathe material—wood or metal—determines the choice of fastening components.
Roofing screws with thermal washers are the most straightforward and practical method for fastening the panels to a wooden sheathing.
In this situation, exact utilisation of these screw types is required because thermal expansion could cause polycarbonate to crack in the absence of thermal washers. Rubber washers will adjust for variations in panel thickness, avoiding fractures.
The use of a metal split profile is the second mounting option. Two parts make up this mounting structure: a base and a cover. Self-tapping screws or bolts are used to securely fasten the base to the supporting base (lathing or counter-lattice). It has a cover put on top of it. Polycarbonate panels are inserted into grooves created in the profile’s side sections. They are also fastened with self-tapping screws to the profile.
How to build: step by step instructions
The process of installing a polycarbonate panel pitched roof is as follows:
- First of all, the foundation is prepared for the metal roof supports (if it is being built over an open structure – for example, a gazebo or a private parking space). Support beams are deepened into the soil to a certain depth, which depends on the specifics of the project: the weight and height of the supports, soil properties, expected load on the roof, etc. In most cases the depth is at least 1 meter. The bottom is covered with crushed stone, after which the supports are installed in a strictly vertical position, secured with supports and filled with concrete.
- Next, horizontal profile pipes are attached to the upper parts of the supports, which ultimately form the roof frame. Electric welding or high-strength bolts can be used for this.
- Rafter legs are mounted on the frame. They can be made either from wood beams or from a profile pipe.
- The battens are installed on the rafter system; they can consist of the same materials as the rafters.
- If the roof needs to be insulated and protected from atmospheric influences, additional vapor, water and heat insulation is installed on top of the battens. There should be an air gap between the vapor and water insulation layers, so a counter-batten is installed in the space between them (according to the same scheme as the main one).
- The main stage is fastening the polycarbonate panels to the battens or counter-battens in one of the two ways discussed above. It should be noted that installation can be carried out in a “dry” or “wet” way. The first involves directly connecting the panels to the battens or profiles. In the second case, it is necessary to coat the joints with a sealant to increase the moisture resistance of the structure.
See our articles on tiled roofing, canopy roofing, attic roofing, and profile pipe roofing for additional information on various types of pitched roofs.
Rules for installing polycarbonate panels
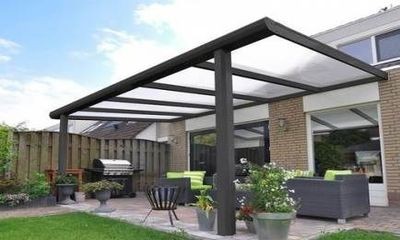
There are a few key considerations to make when installing. First of all, the screws should not be overtightened as this could cause them to "sink" into the polycarbonate panels and distort them.
Polycarbonate expands in volume more intensely than screws do when temperatures suddenly change. As a result, there is too much pressure applied, which causes the attachment points to fracture.
Secondly, in order to prevent moisture buildup in the panels during installation, if a material with a cellular structure is used, the upper and lower ends of the panels must be sealed. This is particularly crucial if the roof is positioned at a slight angle, which hinders the flow of melting water and rainwater down the hill.
Tape is used continuously to seal the upper ends. To ensure ventilation and free condensate drainage, the lower ones are sealed with tape that has holes in it. Special end profiles, composed of polycarbonate, the same material as the panels themselves, can also be used in place of adhesive tape.
It is advised to insert polycarbonate sheets no deeper than 20 mm into split profiles when using them as fastening elements.
Metal profiles that are the right shape must be used in the roof’s corner sections. They have to simultaneously hold the panels in both longitudinal and transverse directions.
Typical mistakes and recommendations for beginners
When building polycarbonate roofs, novice builders frequently commit grave errors that drastically shorten the structure’s service life and increase the cost of necessary early repairs. Let’s examine a few instances:
- Using the wrong tool to cut PC sheets. Polycarbonate is plastic and is much easier to damage than metal or wood. When cutting with a regular grinder or saw, the edges may break and the cuts will turn out uneven. The best option is to use a jigsaw with small and well-sharpened teeth. Tools with large teeth are not suitable for this.
- Premature removal of protective film from polycarbonate panels. Such a film is installed not only for the safe transportation of the material, but also to protect it from damage directly during the installation process. Therefore, it should be removed from the upper sides of the panels only after complete completion of installation operations, when the roof is completely completed.
- Incorrect drilling of polycarbonate. If the panels are not fixed in a stationary state, the holes are uneven and their edges become broken (similar to what happens when cutting incorrectly). The sheet must be firmly pressed to the ground or placed on supports, and only in this position should they be drilled.
- Installing fastening profiles in the wrong position. They should be located in the longitudinal direction (from the top of the roof to its bottom), and not in the transverse direction. In the latter case, they become less stable, and their load-bearing capacity is sharply reduced.
Video on the topic
This video will teach you how to create a polycarbonate canopy:
A cost-effective and practical method of giving different structures long-lasting, weather-resistant roofing is to install a polycarbonate pitched roof. You can make sure that your roof is long-lasting, aesthetically beautiful, and functional by taking the right precautions.
Start with precise measurements and high-quality supplies. For the installation process to go smoothly, this foundation is essential. To ensure that the polycarbonate panels are supported by your frame efficiently, make sure it is sturdy and oriented correctly. In the end, it will be worthwhile to take the time to properly prepare.
Use the proper fasteners and sealing methods when assembling the polycarbonate panels to avoid leaks and preserve structural integrity. Don’t forget to take thermal expansion into account by not overtightening screws. By taking this easy step, you can prolong the life of your roof and avoid future problems.
Last but not least, routine upkeep and sporadic inspections are crucial. Maintain the cleanliness of your polycarbonate roof and look for any indications of deterioration. By taking quick action to fix small problems, you can keep your roof in great shape for many years to come and avoid bigger issues later on.


