
Careful planning and execution are necessary to ensure optimal performance and longevity when installing windows in a house made of aerated concrete. Because of its lightweight and insulating qualities, aerated concrete offers a special setting for window installation.
First and foremost, precise measurement of the window openings is essential. The density and composition of aerated concrete can change, which can impact how windows fit. Accurate measurements guarantee a tight fit that optimizes energy efficiency by preventing gaps.
Next, get the window openings and frames ready. To produce a smooth, clean base for installation, clear the aerated concrete surfaces of any dust or debris. Use a sealant that is appropriate for aerated concrete to properly seal the area around the window frame to stop air leaks.
Use the proper instruments and methods to position the window so as not to harm the aerated concrete. Careful handling keeps the wall’s structural integrity intact by preventing cracks or fractures. Make sure the window frame is plumb and level for optimal operation before firmly fastening it.
Lastly, after installation, look for any crevices or openings between the aerated concrete and the window frame. To improve heat efficiency and reduce air infiltration, these can be packed with insulation. Windows in aerated concrete homes are guaranteed to function well over time with routine upkeep and inspection.
- Features of window openings and their creation
- Meaning of quarters
- Building walls made of aerated concrete and lintels
- Basic norms
- Assembly seam
- How to measure an opening?
- Rules for choosing a window type
- Tools and materials
- Step-by-step instruction
- Installation of double-glazed windows on plates
- Dowel mount
- Differences for wooden
- Finishing nuances
- Possible difficulties and errors
- Prices in the Russian Federation for specialists" services
- Useful video
- Video on the topic
- Installation of windows in a house from aerated concrete
- Installation of windows in a house from aerated concrete
- Installation of windows in a wall of aerated concrete
- Installation of a window in a house made of aerated concrete / Installation according to GOST
Features of window openings and their creation
The terms "Euro-montage" and "installation according to GOST" are frequently found on the Internet, in advertising blocks, and on the websites of businesses that deal with windows. First and foremost, they refer to the current edition’s state standards 30971 and R 52749 in this instance. These documents contain the installation instructions that should be followed.
Meaning of quarters
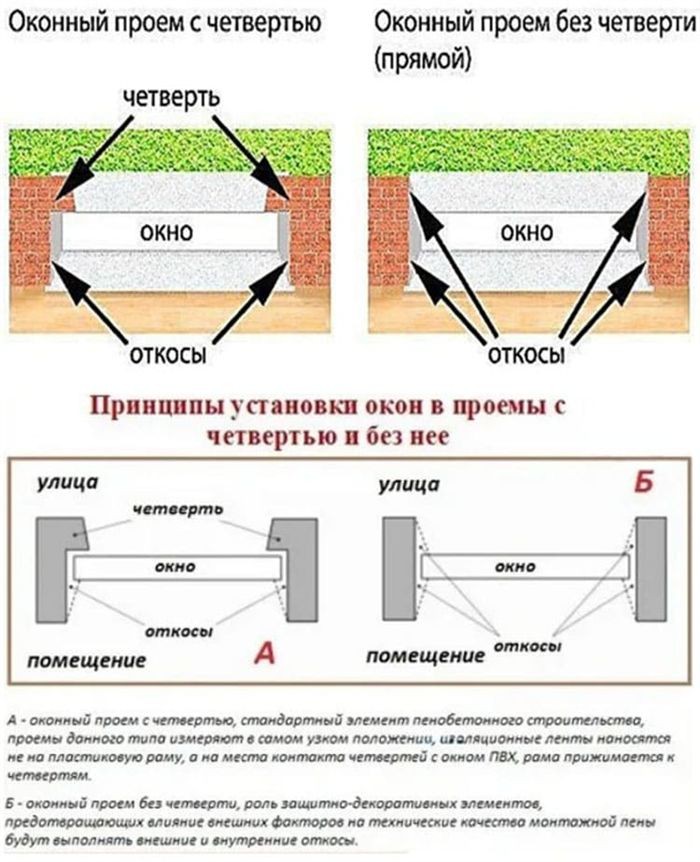
Quarters are highly recommended by almost all experts because they are crucial for window openings in gas-block homes. When describing or discussing installation, there is usually debate about the necessity and meaning of these elements.
One quarter is not necessary; you can omit it. This stance is reflected in the technological roadmaps and design solution descriptions provided by the majority of producers of aerated concrete blocks.
This is how it usually sounds: "with GB single-layer walls, openings for doors/windows, generally without quarters." Slopes are plastered, and the spaces between them and the frame (block) are firmly packed with mounting foam. Roofing steel drains are advised to safeguard the outer wall’s window sill section.
Furthermore, GOSTs permit quarters to be present or absent; the documents state that there is no pressing requirement for them. However, if this component is included, it is unquestionably better because most artisans think that the technique using these protrusions is the best.
The definition of quarters is: windows provide more protection and insulation, are simpler to install, and act as an additional piece of hardware against which the block rests. The opening looks better visually with them in it. If you don’t have a quarter, you’ll need to use expensive, specialized sealants that are difficult to apply (like Steez) instead of vapor-permeable membranes.
Although you can construct pseudo-quarters out of plaster, polystyrene foam, or mineral wool, it is preferable to design a complete element and cut it out of the same GB blocks with homemade tools.
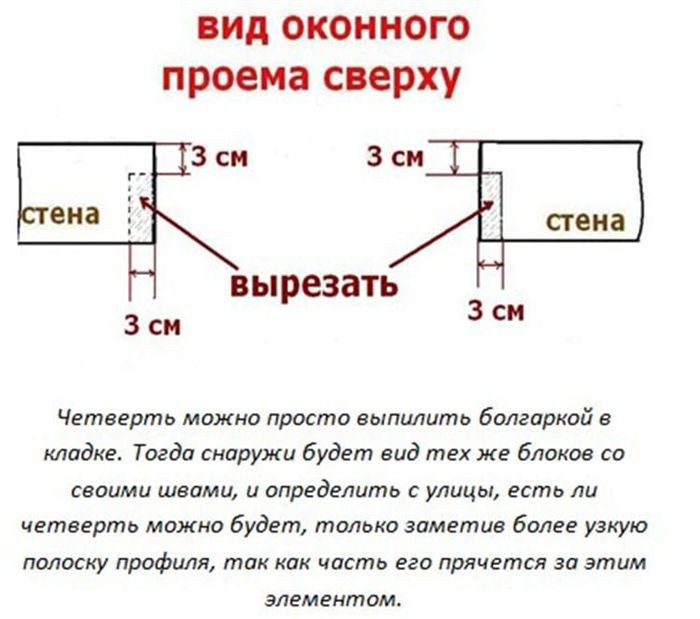
Even a standard hacksaw will work, but it will take a lot of work, and it will make you more anxious. This should be done on aerated concrete, with a circular saw, or with a basic electric saw. The depth of the block determines the quarters’ width and thickness; they are typically 5×5, 4×4, or 5×10.
Citation! It is difficult to attach the GB if the upper jumper is made of a metal corner. In these situations, the quarter is typically made of EPS, glued with regular foam, and fastened into the masonry using wood screws (black screws) that have fungi on them for insulation.
A quarter has been cut out of the 75th block in the picture below. Here, we determined the thickness of this element by measuring a 4 cm gap on the tabletop on the side of the saw blade. We then screwed a rule at this distance to create a sort of guide. The block moves while cutting, resting on the limiter’s edge to produce an exactly even cut.
The quarters are then secured using self-tapping screws (length 100 or 70 mm) and standard glue-foam for GB, starting from the top. Black ones work well with wood, that is, screws. Quarters are not needed because the ebb is installed at the bottom of the window.

You can use a "parquet" (manual, circular disk) for cutting:
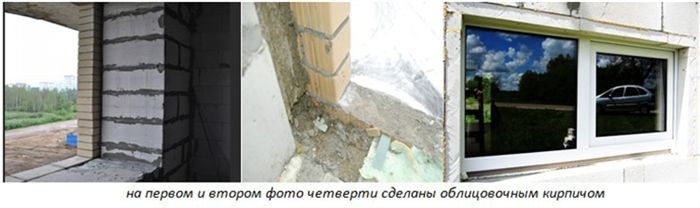
Alternatively, the quarters can be made by gating, which involves cutting them out with a grinder. However, this method requires a lot of labor, and you also need to consider the requirement for enough support for the jumper at the top (which is decreased with this option). A more straightforward scenario is when the house is brick-faced; in this case, the elements mentioned are created during laying.
The window junction is covered with slopes (EPS) if the facade is plastered rather than finished with solid stone material; this could be used in place of quarters. Although false, these parts can still be made from polystyrene foam and plaster during exterior work, making them more complete.
Building walls made of aerated concrete and lintels
Features of the opening’s walls, or sides, in GB structures for windows:
- Lower. Created like regular wall masonry. The blocks are lifted as a single sheet, adhering to the order, to the lower limit of the height of the opening for the double-glazed window. Especially for aerated concrete, it is desirable to strengthen this part, to distribute the load more evenly, for which a reinforced belt is used. The length of the groove is 90 cm greater than the width of the opening on both sides, the depth and width is 2.5 cm. Distance from the ends of the blocks is 5 – 6 cm. In the window sill segment, the reinforcement is placed on the surface, and not in the seam under the window sill blocks, otherwise cracks will appear.
- Sides. The laying continues as usual, the adhesive composition is used as usual, the blocks are shifted with each row by ½, ⅓, ¼ part. It is recommended to leave them intact at the openings, do not cut them. However, this is not always possible; this rule is not particularly significant.
- Top. There is definitely a jumper here. Let"s consider them separately.
Jumper types:
- Solid finished blocks. They rest on the walls 25…30 cm on each side. They are fixed like all blocks – with an adhesive solution, after which the masonry is standard.
- U-blocks, with tray (cavity). Together with corner jumpers, the most popular. For them it is necessary to create wooden or metal temporary supports. These products are laid on them with the solid side down, so that they extend 25…30 cm on each side. Places of connection with the wall, the vertical seam is glued. Insulation is laid in the blocks (inside) on the side facing the street. Leave a little space for reinforcement, make it. Fill everything with concrete, level the mortar along the edges, remove the supports after complete drying, and continue laying the walls.
- Monolithic. The formwork is assembled according to the width of the lintel, the sides are 25…30 cm. Support the structure with beams and pipes. Insulation is laid in the formwork on the street side, with a reinforced frame underneath. Fill the mold according to the height of the row. After drying, remove the supports and remove the formwork.
- Metal corners. Cheap, very simple and popular method, but also quite effective. Here the side walls of the opening serve as supports; ½ of the blocks on each side should fit on them. Seams are taped vertically. They make grooves for the corners, extending onto these supports and further into ⅓ of the opening width. These metal strips are treated with anti-corrosion compounds, wrapped with a plaster mesh, then placed in the described recess and plastered along with the finish.
- No gain. On the side walls of the opening, grooves are punched ⅔ of its width, on each side – 4 pieces. Reinforcement bars are pushed in there, these recesses are filled with cement-sand mixture, concrete. After drying, aerated blocks are placed on the rods in a row, their side segments should extend onto the walls on each side. Seams are taped vertically.
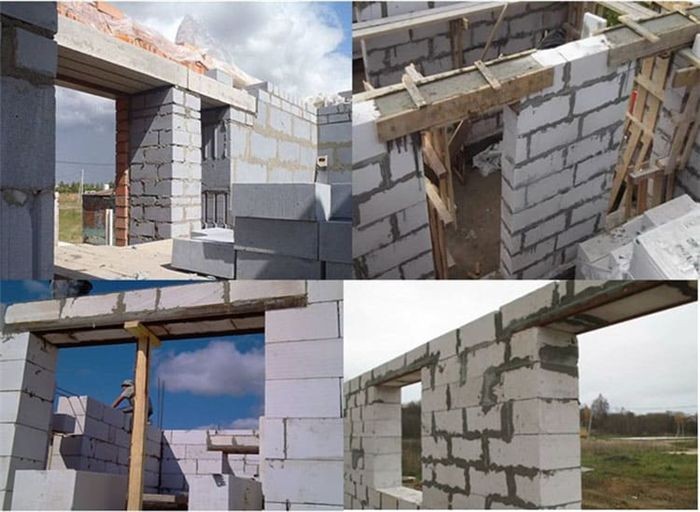
Fascinating! One unique quality of homes built with aerated concrete blocks is the ability to place window, door, and other openings anywhere along a solid wall once the structure is completed. Furthermore, the equipment needed for this is fairly common; for instance, an inexpensive alligator saw designed specifically for aerated concrete or a grinder.
The standard opening parameters for windows in private homes, as per GOST 11214-2003, SNiP 23-05-95 (SP 52.13330.2011), and SP 23.102.2003, are as follows:
- Width 87 cm…2.67 m; height 1.16…2.06 m.
- Should be approximately an eighth (1:8) of the floor area of the room. For bathrooms, utility rooms, non-residential segments – no more than 3%. This ratio may differ; more detailed calculations with formulas are contained in SP 23.102.2003 (R.7).
- The structural part must provide for installation, in addition to the block with glass, window sill, slopes, seals, drains.
Standard double-glazed windows are typically selected, and openings are made underneath them; thankfully, there are sufficient model options. However, there is nothing stopping you from installing windows one at a time; the expense will not go up noticeably. However, in this instance, modifications to the typical project of a house under construction will be required, which will add a little bit of complexity to the proceedings.
GB houses have openings that have certain characteristics because of:. Notable unevenness characterizes the pressure on the opening blocks: the upper stones support the load from the ceiling and the masonry above them, while the lower stones support a portion of the wall’s weight and the pressure from the window structure.
Since GB is made of cellular concrete, which is more brittle than regular mortar or even brick, cracks will develop there if reinforcement is not added—a reinforced belt in the first place, lintels in the second.
The kind of lintel greatly influences the opening’s width:
- up to 2.5;
- specially created for GB, speeds up the process of building a house significantly;
- block strength D500 – D700 with reinforcement;
- do not create cold bridges;
- homogeneous design, which is convenient for finishing;
- buy such products that correspond to the size of the wall blocks, so there will be no gaps during installation;
- for load-bearing walls can be heavy – up to 200 kg; lifting equipment may be required.
- until 3;
- This is a kind of formwork, only from stone forms with a tray.
- any size;
- cheap and very reliable option, but laborious;
- can withstand any load.
- up to 1.2 m or a little more, but only if you equip supports or take a thicker metal and calculate this element individually;
- Popular, since for standard small openings the best strengthening is not required;
width of the strips of at least 50 mm; - a budget option;
- The masonry value over such an element should be up to ⅔ from the width of the opening.
Basic norms
Acts governing windows installations and openings:
- GOSTs: 11214-2003 (main), p 52749, 30674, 30971;
- SNiP 23-02, 23-05-95 (SP 52.13330.2011);
- SP 23.102.2003.
In our instance, the lowering and rising of the soil as a result of freezing and thawing (frost heaving) is the primary cause of the deformation processes that occur during the shrinkage of walls and the foundation of a building, rather than the evaporation of moisture from concrete and blocks.
In order to prevent cracks in aerated concrete on weak and water-saturated soils, reinforced frames are used at the base and the same concrete belts are used for the walls, poured at the level of interfloor ceilings.
In order to stabilize the soil, there is a belief in GB that windows can be installed a year after construction is finished. This is untrue: we do not need to wait for the concrete or masonry mortar to harden, etc., and the processes of soil displacement are continuous but are compensated for by reinforced belts.
Vital. We can fill the positions within two to three months. This is sufficient time for the masonry adhesive and foundation to reach the necessary strength. In this instance, we must rely on the quality of construction—particularly the reinforcement—rather than the full settlement of the building.
The most important factors to consider when installing a window are the mechanical strength, heat-reduction efficiency, and seam tightness in the contact zone (also known as the "window-wall").
The following are the installation depth standards:
| Wall thickness (cm) | Window depth (cm) |
| 20 | 8 |
| thirty | 10 |
| 40 | 12 |
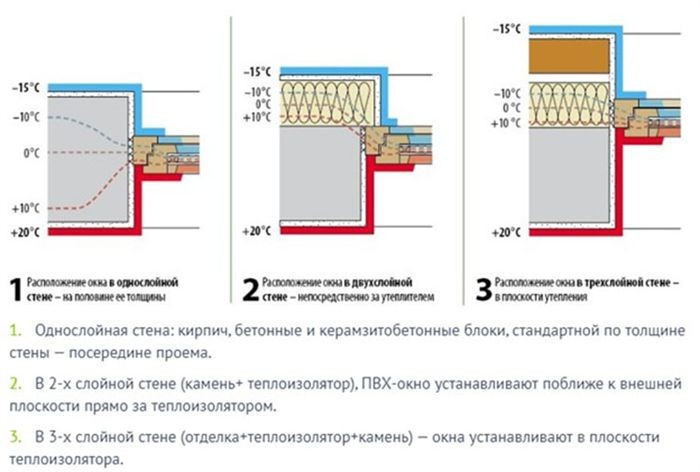
If the outer wall of the opening has a complete lining (made of brick) and insulation, the windows are positioned closer to its edge (as seen from the street), leaving only 3 to 5 cm for the subsequent fixing of slopes, external cladding, and quarters.
Citation! In any case, indentations are made from the outside edge of the opening; this way, when the dew point moves outside the frame, the bindings will be shielded from condensation and freezing. Additionally, recession is preferable for improved vision.
Additional guidelines for installing windows in a home from GB:
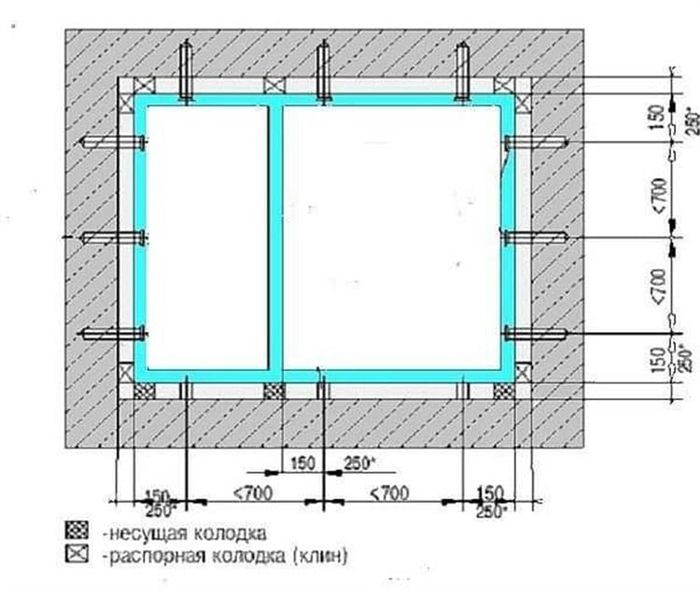
- When installing on plates, you will need at least 5 of them. on a standard block (one at the top and bottom, two at the sides). Such side brackets should be 15 cm away from the corners of the frame.
- During installation, the gap (step) between fasteners should be no more than 70 cm for white profiles and up to 60 cm for colored ones.
- For strong fastening, uniform position, to create a gap under the foam, the window block is placed on support blocks, with spacer elements on the sides.
- External slopes must be insulated, however, this is also highly desirable for internal slopes, where expansion joints are also installed. The gap between the window sill is sealed with a special waterproofing sealant.
- Low tide (also known as a drip sill, often called the same window sill) is a metal plate on the street under the window). They are placed at an angle and when arranging it, it is necessary to take into account the thickness of the pie – insulation + plaster, if such are planned. However, temporary such elements can also be installed if the cladding will be done later. The ebb tides, although in this form, must be installed immediately after installing the window.
- It is recommended to install the maximum number of windows on the southern (sunny) side of the building.
- Windows must be placed level: permissible vertical/horizontal deviations up to 3 mm on one side and 1.5 mm on 1 p. m along the length of the frame. During the installation process, you should often check this parameter with a level.
Crucial! The installation seam needs to be three layers wide, measuring between 150 and 180 cm from the corner. It must be sealed.

In the event that external insulation is absent, the depth of the window block assumes greater significance. Depending on its thickness, it corresponds to a distance of 1/3 from the outer plane of a single-layer wall, or about 8–12 cm from the opening’s edge.
Assembly seam

But first, let’s examine how a mounting seam is created and how a window opening is insulated while it is being filled.
The layers that make up the installation seam beneath the window are as follows:
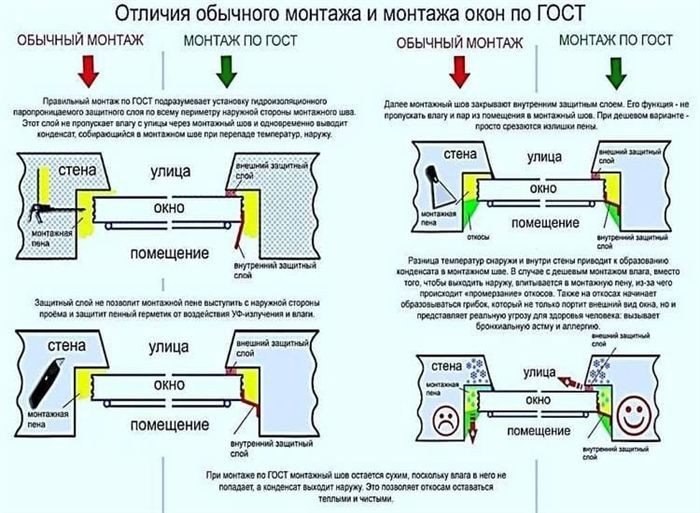
- Central. Basic, this is the main sealing. Inside the joint, between the frame and the wall. As a rule, from polyurethane foam (polyurethane), other insulation. Purpose – main heat, sound, waterproofing. It is this that must be protected first of all, since the foam is destroyed under the sun (ultraviolet radiation), changes color, and crumbles.
- Internal – vapor permeable membrane. Releases moisture accumulated in the room and serves as an obstacle to its entry from the street. Also, sometimes this layer includes coating the walls of the opening waterproofing.
- Outer. In this case, a rather traditional solution: the psul-tape is about quarters and a vapor-resistant for external work of the membrane under the drain (it takes away the moisture further to the street).
Psul-tape serves as both the first line of defense against blowing foam and as an additional insulation of the central layer. It expands three to five times, causing uneven filling. Additionally, the layer that is indicated serves as waterproofing, which is crucial because the materials are prone to absorbing moisture, which deteriorates their ability to retain heat.
Fascinating! A quarter protects and aids in the performance of all of PSU’s functions. Additionally, this protrusion makes it easier to install the entire structure because all that is needed to do is press the window frame, check for vertical and horizontal deviations, avoid nailing temporary boards, etc. D.
Additionally, the foam within the assembly seam needs to be protected. The steam produced by breathing, cooking, and temperature changes is what poses a risk in this situation.
This is the reason for attaching a vapor-permeable membrane (typically foil, but it can also be black, with one layer resembling bitumen). It has a protective film divided on one side, allowing it to be glued to the frame, and subsequently, the slope, with the second part. These materials can be used both indoors and outdoors.
How to measure an opening?
GOST 30971 states that evaluating the walls is the first step in installing a window. The walls need to be cleared of debris (particularly from glue residue and building chemicals), leveled with putty, and measured.
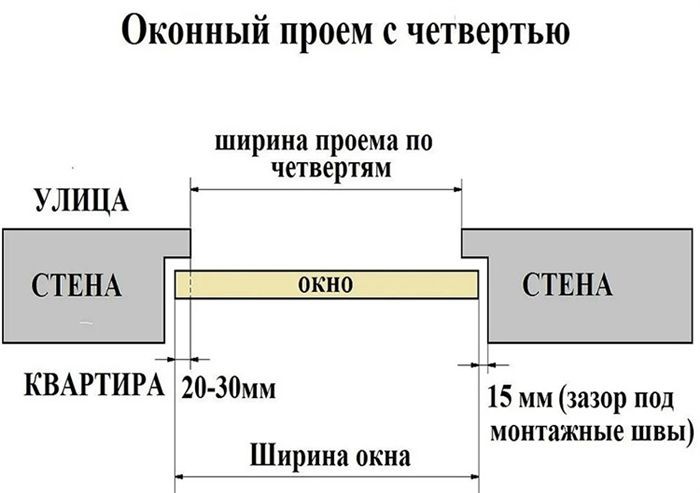
The following diagrams provide a comprehensive explanation of how window unit dimensions are calculated during the ordering process. Since it is on both sides, the height is equal to the opening minus twice the installation gap’s width; this is why it is called "spray foam" in the figure.
If there are quarters, we add 15 mm (the interval of the indicated protrusion elements, beyond which she"s hiding) or we consider that the window extends beyond them, meaning that this segment is not included in the computation. Alternatively, we take only the visible portion of the frame that has already extended beyond them.
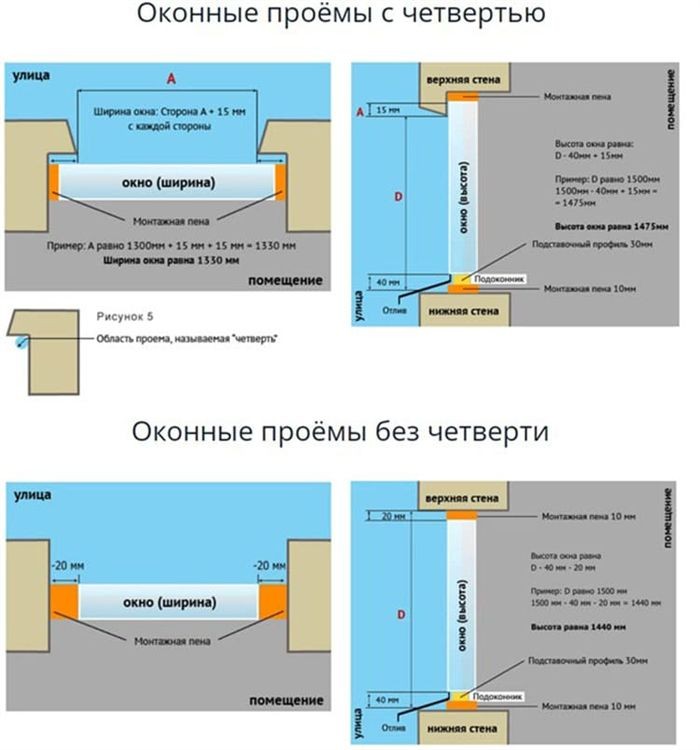
We begin at the outer limit of the intended layer’s thickness of the installation gap created by the opening. The height is calculated similarly, with the exception that the foam, stand profile, and ebb typically occupy 40 mm at the bottom and the last one on top, from which we deduct.
Note: We adjust the numbers for each unique case due to variations in the height/thickness of the mounting gaps and stand profile.
For longevity and efficiency, window installation must be done correctly in a home made of aerated concrete. This article walks you through the crucial procedures to guarantee a correct installation that preserves the structural integrity and thermal insulation of your house. Every step in the process of achieving the best possible performance and longevity for your windows in an aerated concrete structure is explained in detail, from readying the window openings and selecting the right sealants to firmly fastening the frames and guaranteeing sealing.
Rules for choosing a window type
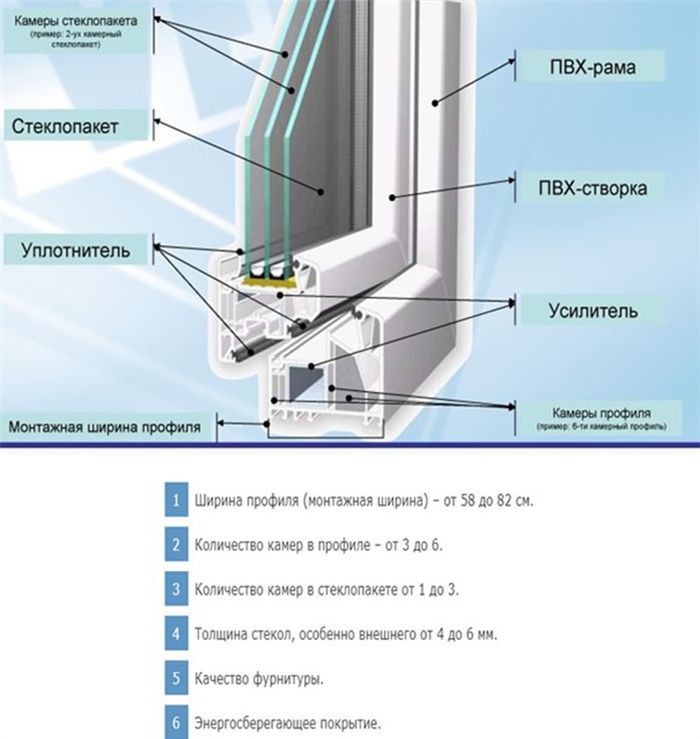
Brick has a higher heat capacity than aerated concrete, so when selecting double-glazed windows, you should look for models with improved heat conservation. Things to be mindful of:
We consider the fact that both the glazing and the profile contain cameras, which have an equal impact on heat conservation.
Aerated concrete homes in moderate climates only need windows with cameras—at least three in the profile and one in the glazing. However, a product with the first two (3 glasses) is a certain average reliable standard for GB; this is also a certain minimum for such cold regions as Siberia.
Tools and materials
You will need the following in order to install a window in a finished opening of a GB house:
- Perforator, drill, screwdriver.
- Hand saw, wood saw, but it is difficult to work with them, so it is better to use a compact circular saw, a special electric one for aerated concrete (alligator). You can also use a machine with a circular saw.
- A plane for aerated concrete blocks.
- A large rule.
- Graters for GB. At least two with different grain sizes: A63 and a nail for significant steps. Some of them can be replaced with coarse-grained sandpaper.
- A large building level.
- Black wood screws (length 100 or 70 mm).
- Dowels, plates, self-tapping screws and dowels for them (we will consider them in more detail in the process of describing the installation).
- A brush, a spray gun for applying primer, other mixtures.
- Mounting foam with a gun, cement waterproofing coating, external and internal vapor-permeable tape.
- Plastic spacer and support wedges.
- Putty knife.
Step-by-step instruction
In GB structures, window blocks can be installed in two different ways:
- on the plates;
- on dowels (self-tapping screws with dowels or screws), sometimes this method is called unpacking.
As always, the first step involves leveling and preparing the surfaces. They are found in the following ways. We apply a long rule to the surface: it will not fit tightly in areas of unevenness; you will need to press it and move it, and risks will still exist. We use a grater to remove these marks. We handle every wall in this manner.
Vital. Protrusions between the blocks—especially on the outside—should not exist.
Grators remove glue and construction mixture deposits simultaneously. Blocks merely clear out the seams and grooves because they typically have no irregularities. We’ll receive even quarters; there might be a tiny bit of clearance, maybe 1-2 mm.
Installation of double-glazed windows on plates

There are two different ways to mount plates: either to standard wood screws (which have wide threads) or, and this is the more dependable option, to self-tapping screws with dowels for aerated concrete.
The process’s general idea is the same; only these specifics are different. Now let’s talk about the second kind.
This technique is applied to medium-sized, tiny windows. Anchor stainless steel plates, such as those measuring 40x160x2 mm, are used for the fastening process. They are fastened with dowels and self-tapping screws (6×60 mm) in aerated concrete.
Installing the plates results in maximum increments of 70 cm (60 cm for colored profiles). The distances are 15 cm for imposts and 20 cm for the frame’s inner corner. Plastic wedges are used to align the window in the opening and create a gap for the foam.
First, attach a foil (or possibly bitumen) tape—a vapor-permeable barrier—to one side of the frame for internal insulation. It has two distinct protective strips, one of which is fixed to the frame and the other to the opening when the block is being installed; this allows the segments to be fixed independently for every installation step.
If the standard sizes of the plates have protrusions that fit into the window profile’s groove, they can be pushed into place and inserted; if not, they can be fixed simply with anchors. Usually, the brackets are drilled against the outside of the frame and fastened to two self-tapping screws.
Counseling! Simple plates and those with a unique butterfly for the profile groove are available; if you choose to buy the latter, make sure it fits the exact profile that is currently in place. Additionally, there are universal sizes that screw in without requiring a block cutout.
The plates can also be made by you. Because some artisans think that pre-made brackets like these are weak, they just use thicker steel sheets, cut them into the appropriate shapes, and use metal drills to drill holes in them.
After that, the outside of the frame is adhered to with PSUL tape, which eventually fills in the empty space and seals the seam between the window block’s outer section and the quarter. Install the frame in its final location after checking both the vertical and horizontal alignment with a level. The locations for the ebb tide installations are divided into quarters.
Next, we use only black wood screws to secure the plates to the opening’s walls so that the frame does not stray from its predetermined position. Next, we use a drill bit (ten) to drill a hole in the wall for specific anchors that will be inserted into the aerated concrete. After adding a small amount of GB foam glue, we inserted unique dowels (hexagon sockets) with 6×70 self-tapping screws.
The seam is then foamed from the outside in the following order: the cutout beneath the ebb, the areas around the pads, and the pads themselves. This material is used to make a certain kind of seam. The most important feature is the absence of air bubbles. Next, install the ebb by gluing the outer vapor-permeable tape underneath it.
Following completion of the exterior work, all interior seams are foamed, the remaining vapor-permeable tape segment is adhered to the opening with its sticky side facing downward, and the plates are sealed using the remaining tape segments.
Dowel mount
The anchor fixing method is more involved because it requires disassembling the frame, or unpacking, in order to remove the glazing or sashes (chambers), prior to installation. Concrete self-tapping screws (7.5×152) are used, inserted into plastic dowels, as these fasteners do not adhere well in GB on their own. Wedges are also used, as usual, to level the block.
Vital. You’ll need a lot of polyurethane foam, and since it will serve as the primary insulator for the seam, it is best to invest in higher-quality, more costly foam.
A vapor-permeable tape, which can be coated with bitumen-like material or metallized (foil), is indispensable. used to keep moisture away from foam joints. Such resources are available for both internal and external use.
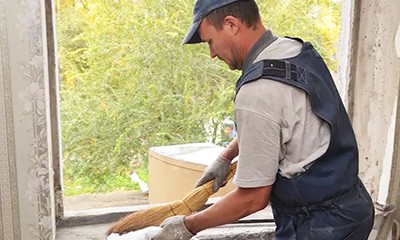
Cleaning the opening is the first step.
Eliminate all impurities from the surface, particularly any glue accumulation for aerated concrete, as moisture causes it to retain moisture and deteriorate the waterproofing.
All protection measures will be rendered ineffective if it is contaminated; freezing and condensation will result, the GB unit will become saturated with water, and it can easily be removed.
The aperture needs to be primed twice, ideally, with a compound designed for deep penetration after cleaning. This is necessary to ensure that the foam adheres better (adhesion will increase) and to improve its insulating qualities.
In our example, the opening is primed, and then the walls are perfectly protected by a layer of cement waterproofing.
The construction of quarters is the following phase. We have already discussed it. Additionally, we sawed the GB bars here and used glue and self-tapping screws to attach them. Remember to place PSUL tape between the frame and this element.
We foam over any holes in the opening’s walls and leave them empty if there are any (for us, these are the "handles" on the blocks). It retains moisture, conducts heat well, and forms a cold bridge, so you can’t fill it with glue. Its sagging is visible in the photo; we need to get rid of them (with a grater). We seal and cover other holes as well.
It was not possible to secure the upper quarter due to the jumper’s corner, but it can still be made of EPS. The opening in the second picture has been fully primed (we used a spray bottle), holes and chips have been filled with foam, and some of the walls have already had a brush application of cement waterproofing.
Counseling! It is best to install mosquito nets before installing the window if that is your plan.
For concrete, we use self-tapping screws, which are not fully inserted into the frame.
According to GOST, holes are drilled in the following manner (fasteners must be spaced equally and close to the imposts above and below):
- 15 cm from the edges (internal corners) and from the central post (impost).
- If there is more than 70 cm between the screws, then another one is screwed in in this gap, preferably as equidistantly as possible.
Since the profile has a spacer frame made of this material, the holes are made with a drill bit designed specifically for metal so that the self-tapping screws (7.5 mm) attach to it rather than the plastic. After positioning and securing the window in the opening, we mark the screw holes and insert the screws.
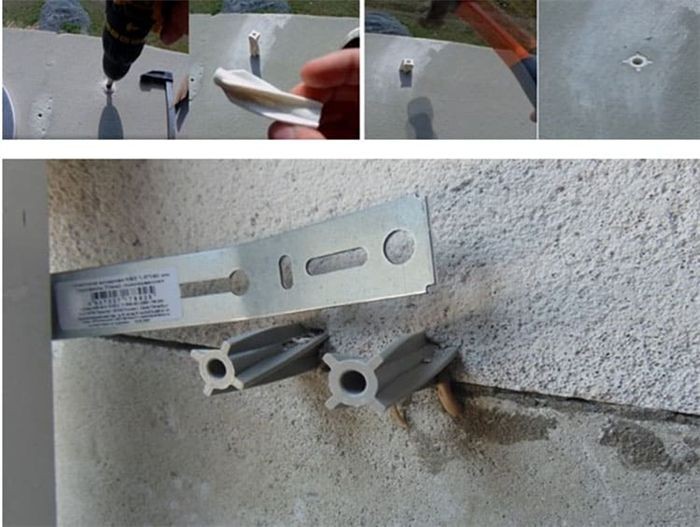
Concrete self-tapping screws are not very strong; door blows and wind gusts can undo them. In our case, the fasteners were unscrewed after the frame was taken out once more. We used ten drills to drill out their holes, then we hammered in special plastic (nylon) dowels for aerated concrete—which have spiral wings that protrude.
Next, we glue foil vapor-permeable tape and PSUL at the ends along the perimeter (letter P, that is, except for the bottom) of the frame along the profile segment next to the quarter. adding a window.
Strangeness! When the block is placed into the opening, the vapor-permeable film is adhered to the end of the frame so that it extends parallel to the slope.
The tape is first attached to the frame in one piece, after which a double-glazed window is inserted, fastened, and the joint foamed. Next, the protective film is taken off the second segment of the tape, which is then pressed and smoothed before being firmly fixed to the wall. Reliable protection is created by plastering and puttying the vapor barrier along slopes.
We use a screwdriver to tighten the screws. We insulate the mounting seam from the street prior to putting in the sash and glass. A unique external membrane tape is glued.
The interior (foil-coated in our case) such material acts as a barrier to keep moisture out of the room while also allowing the steam buildup in the room to pass through. The external takes it even farther outside; in our case, it has a coating akin to bitumen.
On top of the tape, we installed a drip cap that doubles as a drain. Even if exterior finishing and insulation are not yet planned, it must be installed because a stainless steel plate will shield the seam and insulation from precipitation and UV rays.
One half of the external tape is adhered to the window sill and the other to the frame using adhesive. There are four screws used to secure the drip cap.
If the window is blind, the block with chambers is dismantled, meaning they unpack, but if there is a sash, in the installation method we outline, it is removed along with the glazing. We now hang or install these components.
Counseling! It’s crucial to keep in mind that the sticker or marking on the glass should face inside the space, particularly if it has a coating, to ensure that the product containing it is properly positioned inside the space.
The block is then foamed all the way around, any excess foam is cut off, the vapor barrier’s protective film is removed, and the block is glued to the slopes.
Differences for wooden
Installing wooden or plastic windows in a home built of aerated blocks doesn’t really change anything. Either self-tapping screws or plates can be used with the same techniques. You can use a larger variety of screws and anchors only for wooden blocks.
Wooden structures have the advantage of slightly less weight, which makes the work easier. Use concrete screws in addition to expansion and frame anchors. To install these fasteners, the frame only needs to be drilled.
It is important to remember that wooden blocks are sometimes installed in casings, or unique boxes. In this instance, the procedure becomes considerably more intricate.
Finishing nuances
The following procedures are used to protect the exterior of the quarters: The reinforcing façade mesh is covered with putty or plaster that is vapor-permeable and based on cement. Since it will be utilized to decorate the walls, it is leveled with a spatula and sanded in preparation for painting. After that, another layer of comparable finishing will be applied.

The quarter had a groove cut into it at low tide:
The best course of action is to install an expansion joint around the perimeter of the joint, where the window block is next to the opening and the gap is sealed with a special sealant-coating where the window sill is located. In addition to the foam, a special gasket is pushed into the joint.

However, the question is really about how slopes should be finished. If the slopes are made of plaster, it is best to finish them in multiple layers. Insulation is also a must.
After installation, the plastic glass unit is adjusted (the mode, pressure, and sash distortions are adjusted); wedging might be required if the profile’s geometry is broken.
Strangeness! In the event that the structure lacks sashes, it might be essential to unpack and take out the glass from the profile before proceeding with the installation. This is very easy to do: just snap off the glazing beads and remove the chambers using a blunt, thin-bladed object (a spatula).

Assembly in reverse order: snap these retaining strips, then insert the glass block.
Possible difficulties and errors
Errors and challenging situations when installing windows in an aerated concrete home:
- Cutting quarters with a hand saw is more difficult, you will need to carefully align them with graters.
- Incorrect thermal and waterproofing (including slopes), incorrect removal of the window in the opening from its outer edge will lead to the creation of cold bridges, the formation of condensation.
- Incorrect settling of the block in the opening: if the gaps are too narrow, it will be impossible to perform high-quality sealing. But too large a gap creates excessive load on the fasteners, they will deform, loosen. If you do not use special supporting wedges, this will lead to the destruction of the assembly seam, violation of the geometry of the block, the resulting cracks will be blown through.
- The drainage hole of the frame should not be covered.
- A common mistake is poor-quality foaming, insufficient volume of this substance, especially from below. To the point that if large air chambers and poor density are detected, then you need to select the old layer or part of it and seal the joint again, slowly and carefully.
- If the external cladding is made of hollow materials, for example, not solid brick and its holes stick up under the window opening, then these cavities must be filled with cement-sand mortar.
- Not hiding the ends of EPS, if it is used for pseudo-quarters, insulation (between the cladding and the wall). This material must be hidden behind blocks or its ends covered for fire safety purposes, and also so it will not deteriorate.
- If there is no ebb (drip) installed outside under the window, then water and ultraviolet radiation will get onto the mounting foam of the seam, which will neutralize its qualities and thermal insulation, the fasteners will corrode. This strip must be fixed not only in the gaps cut out on the blocks, but also with self-tapping screws, otherwise the wind will tear it out. The flashing should be installed at least on an external vapor-permeable membrane, and it would be ideal to also lay a sound-absorbing gasket on it.
- An insufficient number of fasteners, if the windows are in windy areas and if the block is heavy, will lead to their loosening, deformation, and the window may be squeezed out. Therefore, you can add several additional screws, plates. But not too much, as this will deteriorate the heat capacity of the profile and it may be damaged. The installation diagram of fasteners with their maximum pitch must be observed.
- The vapor barrier (external, internal) is not installed or is glued poorly – it needs to be pressed well, smoothed out so that there are no unevenness or wrinkles. Before this, the wall is cleaned of dust, glue, and degreased. If this material is missing, the foam will deteriorate very soon: under the influence of ultraviolet radiation and moisture, it will change its color to reddish and crumble.
- When measuring, it is necessary to take into account the layers of insulation.
- You can not mount on a dirty surface (especially the influx of glue), irregularities (small up to 1 – 2 mm are allowed), potholes, chips.
- The surface of the wall walls is not primed. In this case, the foam will stick poorly, there will be low adhesion, it will be mobile, which will lead to the formation of cracks and.
Prices in the Russian Federation for specialists" services
Windows installation in an aerated concrete (block) home will typically cost 1900 rubles per square meter. Because installing a color profile calls for more fasteners, the cost is typically higher (by about a quarter). Casting installation costs between 300 and 350 rubles per piece. Up to several thousand rubles in savings are typically offered when ordering windows and installation together.
Useful video
Installing a window in a concrete home powered by gas:
| How to properly prepare windows for installation in an aerated concrete house? | Ensure the window frames are properly sealed and insulated to prevent air and moisture infiltration. |
| How to measure and fit windows into aerated concrete walls? | Accurately measure the window openings and use appropriate fixings to securely anchor the frames into the aerated concrete. |
Aerated concrete homes require meticulous planning and execution when installing windows in order to guarantee longevity and optimal performance. Measure the window openings precisely first, then select windows that fit snugly. Sealing correctly is essential to preventing moisture and air infiltration, which over time can cause structural problems and energy loss.
Make sure the window openings are dust- and debris-free and give them a thorough cleaning before installing. Use an appropriate primer to improve the sealant’s adhesion. Shims should be used to properly level and square the windows when they are in place. This is an essential step to prevent any operational issues later on, like having trouble opening or closing the windows.
After the windows are in the proper location, use the appropriate screws or anchors made for aerated concrete to firmly fasten them to the building. To preserve the structural integrity of the windows and the building, follow the manufacturer’s instructions for installation techniques and suggested fasteners.
To create a tight seal against drafts and moisture, use a high-quality sealant around the window frame’s perimeter after installation. The added barrier improves indoor comfort and energy efficiency. Before putting the finishing touches on the installed windows, make sure everything is securely in place and operating as it should.


