
One clever way to improve the comfort and energy efficiency of your home is to insulate your roof with expanded clay. Expanded clay is a common material choice for both builders and homeowners due to its exceptional insulating qualities and lightweight nature. This article will walk you through the expanded clay roof insulation process and give you the information and instructions you need to complete the job successfully.
It’s critical to comprehend the importance of insulation before beginning the insulation process. Your house will stay warmer in the winter and colder in the summer with a well-insulated roof. This lowers energy use and utility bills in addition to increasing comfort. Because it is strong and lightweight, expanded clay provides superior thermal insulation without significantly increasing the weight of your roof structure.
A few crucial steps must be taken in order to get ready for the insulation work. Before insulating your roof, evaluate its present state and make sure any necessary repairs or maintenance have been finished. To avoid more problems, it is essential to remove any debris from the roof and make sure that drainage is adequate. Additionally, measure your roof’s dimensions and slope to determine how much expanded clay you’ll need.
Expanded clay insulation is applied evenly over the roof surface during the insulation process. Expanded clay granules are perfect for do-it-yourself projects because they are lightweight and manageable. For a uniform layer of insulation, begin at one end of the roof and work your way towards the other. For best results, you may decide to add more layers or mix expanded clay with other insulation materials, depending on your climate and insulation requirements.
- Characteristics, pros and cons of expanded clay
- Advantages and disadvantages
- Characteristics
- Which expanded clay to choose for roof insulation
- What layer will be required
- Materials and tools
- Calculation of the amount of expanded clay
- Preparatory work
- Technology of roof insulation with expanded clay
- Insulation of a pitched roof
- Insulation of a flat roof
- Video on the topic
- The best insulation. Insulating the ceiling of a house with sawdust.
- We insulate the bathhouse ceiling with expanded clay.
- Roof insulation.
- Insulation of a bathhouse ceiling with expanded clay. 🆕VKontakte – link below 🔽
Characteristics, pros and cons of expanded clay
Small, mostly spherical, porous pellets of baked clay are known as expanded clay. obtained by quickly heating moistened clay shale or fusible clay. The raw material "boils" during the water evaporation process, creating a large number of pores that give expanded clay its ability to withstand heat.
Advantages and disadvantages
Clay can be fired to produce a material that has benefits and drawbacks. Among the benefits that need to be mentioned are:
- low price per 1 m3 of material. However, some explanations are needed here: in small packaging, the insulation is quite expensive. Only in big-bags can expanded clay be bought at an affordable price;
- long service life, comparable with the operational life of the building as a whole;
- resistance to sudden temperature changes – in domestic conditions it is impossible to create conditions under which destructive processes begin inside the granules;
- not related to flammable materials;
- high frost resistance – withstands from 150 to 300 freeze/thaw cycles;
- low specific gravity;
- versatility – can be used as backfill and filler for lightweight concrete;
- environmental safety;
- simple insulation technology;
- resistance to fungus, mold and mice with rats.
Among the drawbacks are:
- very high level of water absorption, reaching 25% for whole granules, 40% for damaged ones;
- thermal insulation properties are manifested only when the thermal insulation layer is openly backfilled with a thickness of 200 mm and above;
- a large amount of fine dust penetrating into all cracks during backfilling.
See the work "Expanded clay as insulation" for more thorough details on expanded clay, including in-depth discussion of its benefits and drawbacks.
Characteristics
The high range of values for expanded clay insulation can be attributed to the high quality of the clays. He:
- thermal conductivity – 0.1-0.18 W/(m×°K). 0.23 W/(m×°K) is also found;
- density – 300-800 kg/m 3 . In St. Petersburg, for locally produced expanded clay, this figure is 1,200 kg/m3;
- compressive strength – 1.0-4.0 mPa.
Which expanded clay to choose for roof insulation
Expanded clay comes in various varieties:
- sand consisting of ceramic particles of arbitrary shape up to 5 mm in size. It has high thermal conductivity (0.15-0.18 W/(m×°K), and therefore it is a stretch to classify it as an insulating material. It is used mainly in the production of lightweight concrete and as an underlying layer for insulating horizontal surfaces;
- gravel, the granules of which have a rounded appearance and a significant variation in size, from 5 to 40 mm, due to which manufacturers began to sort gravel into fractions: small, medium and large, passing the pellets through sieves with different cell sizes.
In addition to being added as additives to cement-sand screeds and lightweight concrete, ceramic granules are used as insulation. Low densities and large particle sizes provide the best insulating qualities. The general rule is that a material’s weight indicates how many air pores it contains, and the more pores, the lower the material’s thermal conductivity.
- crushed stone has granules with sharp edges and corners. Obtained by crushing sintered large pieces of clay. In construction, granules ranging in size from 5 to 10 mm are used.
The best expanded clay for roof insulation can be easily chosen based on the aforementioned features.
- For a pitched roof there is no need to pour a covering layer. Therefore, you can get by with gravel and not buy sand. Large fraction granules have a low heat transfer rate, but cannot be compacted tightly, and therefore such a layer easily transmits heat. As a result, we find that to insulate a pitched roof, you should buy expanded clay of fine and medium fractions in approximately equal proportions.
- For a flat roof you need an underlying layer of sand 3-5 cm thick. Therefore, about 10% of the total backfill volume is purchased. A large faction is not suitable for the reasons stated above. Gravel of small and medium fractions remains in approximately equal proportions.
What layer will be required
The kind and thickness of roof insulation are predetermined in the project (SNiP requirements), in accordance with all industry regulations. In the event that this has not been completed or if there is no design, specific thermal formulas can be used to calculate the necessary layer of thermal insulation.
This is a challenging task because numerous derivatives must have their values determined. For instance, not even seasoned builders are aware of where to look to find the climate zone coefficient value. As a result, knowledgeable Internet users discover a number of websites that include online calculators, such as this one, to assist in performing the necessary calculation.
However, you can go in a different direction and benefit from the experience that has been gained.
- The thickness of the expanded clay layer for roof insulation depends on its type.
- Expanded clay as insulation begins to work only when the layer thickness is more than 20 cm.
- A pitched roof cannot withstand significant structural loads, since it must have a safety margin for snow.
- To insulate concrete structures with expanded clay, the minimum backfill thickness for central Russia is 30 cm.
- The minimum thermal insulation layer of ceramic granules for wooden structures is 40 cm or more.
We will summarize the most important point from everything that has been said: for a pitched roof, the expanded clay layer can only be between 20 and 30 cm thick; it cannot withstand a snowy winter. Therefore, if you don’t live in a warm climate, it’s worth thinking about whether or not to insulate your home using this method. Alternatively, add more insulation to the ceiling from the attic side or from below. You can also use a different kind of insulation to add extra insulation to the roof.
This kind of insulation technology is perfect for flat roofs because it makes it easy to pour a layer of expanded clay that is between 30 and 40 cm thick. You should also take financial considerations into account.
Materials and tools
Both pitched and flat roofs—which require thermal insulation—can be found on private residences and high-rise structures. Therefore, to insulate a roof using expanded clay, different supplies and equipment are needed. This is a comprehensive list of everything you’ll need, along with an indication of its location:
- expanded clay sand – necessary for insulating a flat roof;
- expanded clay granules measuring 0.5-20 mm in approximately the same proportions of grade M250-M350;
- Portland cement for cement laitance, grade M300;
- edged boards 20-25 mm thick of any width or OSB (plywood) sheets;
- softwood timber 25-35 cm wide, 50-75 mm thick;
- vapor barrier film type C or simple polyethylene film;
- windproof membrane type A (AM);
Note: The article "Installing a vapor barrier with your own hands" goes into great detail about the different kinds of films, their uses, and installation techniques.
- a board of any size for manual compaction of the backfill;
- slats for installing counter-lattice;
- screws for wood;
- metal corners for attaching the timber to the flooring;
- reinforcing mesh for pouring screed on a flat roof;
- scotch;
- board or rule for leveling expanded clay;
- a screwdriver with a cross bit for self-tapping screws and a mixing attachment for preparing cement laitance;
- construction knife;
- roulette;
- solution container;
- buckets for supplying expanded clay to a pitched roof.
Calculation of the amount of expanded clay
The following formula can be used to determine the volume of expanded clay for insulation: V = S x h x 1.2, where:
- V is the volume of expanded clay;
- S – insulation area;
- h—thickness of the heat-insulating layer;
- 1.2 – correction factor for shrinkage for a flat roof. For pitched – 1.1.
Customers sometimes indicate the volume in liters, making it difficult for them to calculate the necessary number of bags. Everything is easy in this instance. 3 1000 l in 1 m. As a result, the amount found by applying the formula during computations needs to be multiplied by 1000 and divided by the bag’s liter capacity.
Preparatory work
There is essentially no prep work involved in installing roof insulation. It all boils down to cleaning your flat roof of dust and debris.
Waterproofing a flat roof and installing flooring on a pitched roof are tasks performed by many experts. The StroyGuru website’s editors claim that these works are still related to the primary technology, which is unimportant. Getting everything right is the most important thing.
Comprehending the advantages and procedures of expanding clay insulation is essential for successful roof insulation. This article emphasizes expanded clay’s superior thermal qualities and lightweight nature as it walks homeowners through the fundamentals of using it as insulation. The steps from preparation to application are covered in detail, and readers will receive helpful advice on how to maintain adequate ventilation and moisture control as well as useful knowledge to improve the comfort and energy efficiency of their homes. Learning this insulation technique can make a big difference in providing a well-insulated and ecologically friendly roof solution, regardless of whether you’re building from scratch or renovating.
Technology of roof insulation with expanded clay
There are two sections to the instructions on using expanded clay for roof insulation: one for pitched roof insulation and the other for flat roof thermal insulation.
Insulation of a pitched roof
The following technology is used to insulate a single- or double-slope roof:
- On top of the rafters there is a decking made of 20 mm thick edged boards or OSB sheets. The fastening is carried out closely, without gaps;
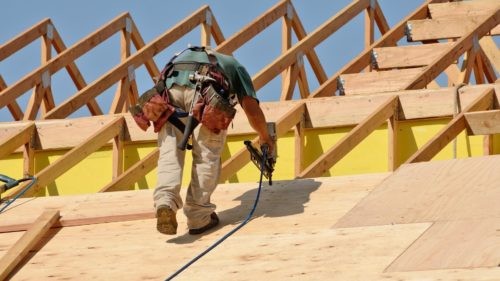

Important: Because there is a very high chance that the boards will eventually start to come off under the weight of the insulation, it is not recommended to install flooring underneath the rafter system under expanded clay. Ecowool has a flooring installed underneath it.
- a vapor barrier film is laid vertically over the flooring (10-15 cm). Can be made from simple polyethylene;
- vapor barrier is attached with a stapler. You shouldn’t be too zealous: the main fixation will be carried out with a beam;
- joining seams are taped;
- timber is attached to the flooring horizontally, using metal corners. Step between corners – 50 cm, between bars – 40-60 cm. If the width of the beam is greater than the planned thickness of the backfill, the pitch can be increased by 10-15 cm. This requirement is explained by the fact that in practice it is impossible to ensure that the surface of the backfill is parallel to the flooring. There will always be a slight angle. As a result, near the top beam the thickness of the expanded clay layer will be slightly less than at the base;
Be aware that nearly every pitched roof insulation recommendation includes a sentence addressing the placement of cells in between horizontal beams. The editorial staff of the site believes that building cells is a waste of money based on their personal experiences, and none of the specialists provide a comprehensive explanation.
- Expanded clay is poured between the bars, after which it is compacted manually using a board. After compaction, filling and leveling are carried out using a lath or rule. The bars serve as beacons;
- the expanded clay surface is covered with a windproof membrane (type A or AM). There is no need to tighten it under any circumstances, since at low temperatures it decreases in size and can burst in several places. A good example is electrical wires, the breakage of which is a common occurrence in severe frosts. The technology for laying vapor barrier membranes can be viewed here;
- the counter-lattice is filled with a 40×40 or 50×40 block over the laid membrane. It has two functions: to create a ventilation gap and become the basis for attaching the finishing roof;
Important: Expanded clay’s poor ability to absorb noise makes metal tiles difficult to combine with; when it rains, the house erupts in a cacophonous roar that is hard to get used to. For ceramic granules, soft roofing works well, and for metal tiles, basalt wool works well.
- the roof is being covered.
Insulation of a flat roof
Apartment building flat roofs seamlessly gave way to private construction when a cottage, summer house, and garage were being built. Since most builders are unfamiliar with their insulation, mistakes are frequently made.
This is an example of a work plan:
- the base of the flat roof is primed, twice;
- bitumen mastic is applied over the dried primer. The purpose of this operation is to create conditions for the adhesion of roll waterproofing to the concrete floor;
- a waterproofing layer of rolled materials (roofing felt, TechnoNIKOL and others) is laid with the obligatory approach to the walls along the entire perimeter to the height of the backfill. Vapor barrier films and mastics are not used for waterproofing – there is a high probability of damage by moving expanded clay granules;
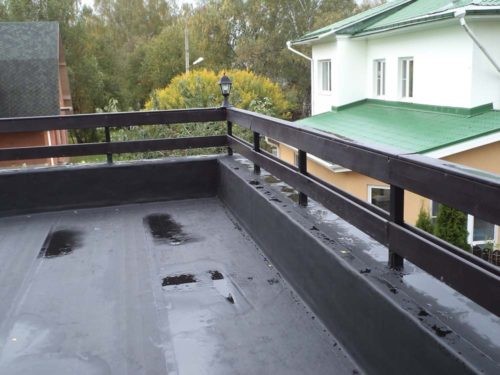
- a layer of ceramic sand 3-5 cm thick is poured;
- the sand is compacted with a board with a handle;
- Expanded clay 8-12 cm thick is backfilled and compacted again. In this way, layer by layer, with constant compaction, they reach the required insulation thickness.
As the technological process advances, there are multiple ways to finish the task.
1. Walking on the flat roof is not planned. In this instance, the expanded clay is covered with a type A or AM vapor barrier membrane. Tape is used to seal the seams. Over the membrane, two layers of roofing felt or any other rolled waterproofing material are applied, each perpendicular to the other. Bitumen mastic is applied carefully to connecting seams. It is imperative that the waterproofing materials and film are applied to the wall above the drain hole. Covering the entire wall, including the top, is the best course of action.
Take note: you need a vapor barrier film. Remember that roofing felt is vapor permeable and that expanded clay perfectly absorbs moisture from the air. Thus, in dense fog, expanded clay becomes wet.

2. There are plans to create a recreational space on the flat roof. Here, the expanded clay layer can be covered with sheets of flat slate (you can use OSB or a slate/OSB combination) or filled with a cement-sand screed.
A damper tape is fastened to the wall and a metal reinforcing mesh is placed over the expanded clay prior to the screed being poured. Layer of scum: 3–5 cm. The work "Technology of wet floor screed with expanded clay" shows how to carry out this technological step correctly. Below is a diagram of it.
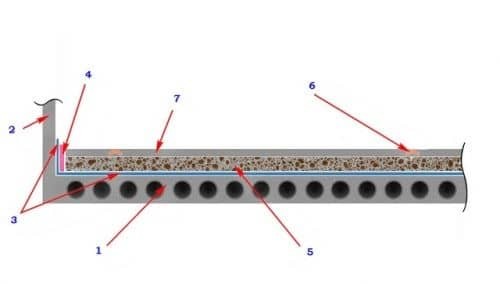
- 1 – flat roof base.
- 2 – wall.
- 3 – waterproofing layer.
- 4 – damper tape.
- 5 – thermal insulation layer.
- 6 – lines of beacons.
- 7 – screed made of mortar based on sand and cement.
After 28 to 30 days, the screed has strengthened and is primed in two layers before being filled with a waterproof layer made of bitumen and polymer. finishing to the owner’s preference. Paving slabs, a grassy layer of rich soil, porcelain tiles, etc. could be examples of this.
The second, easier method of finishing the thermal insulation task entails a few straightforward steps:
- the expanded clay is poured with cement laitance on top;
- sheets of OSB or flat slate are applied in two layers (plywood is also possible, but it is expensive, but the effect is the same);
- the entire structure is covered with a liquid waterproofing layer of bitumen with polymer additives;
- The roof is being finished.

It is essential to have adequate insulation on your roof in order to keep your house cozy and energy-efficient. Expanded clay, a lightweight aggregate with superior thermal insulation qualities, is one efficient technique. Expanded clay, when installed appropriately, reduces heat loss in the winter and maintains a cool interior during the summer.
It’s crucial to evaluate your roof’s condition and make sure any necessary repairs or upgrades are finished before starting the insulation process. This entails fixing leaks, changing out damaged roofing components, and making sure there is enough ventilation to avoid moisture buildup, which can reduce the effectiveness of insulation.
Expanded clay insulation should be applied to the roof surface in an even layer, filling in any gaps and covering the entire surface. This contributes to the formation of a smooth barrier that lowers thermal bridging and raises overall energy efficiency. To achieve optimal performance, proper installation also entails layering the insulation according to recommended thicknesses.
Maintaining the longevity and efficacy of your expanded clay roof insulation requires routine maintenance. Periodically check for any indications of deterioration or damage, particularly following inclement weather. Dealing with problems as soon as they arise guarantees that your insulation keeps working effectively, saving you money on energy bills over time and improving comfort in your house.


