
Plaster slopes for plastic windows are simple to make and improve your windows’ functionality and appearance after installation. Plaster slopes, sometimes referred to as surrounds or sills for windows, offer a smooth transition from the interior wall to the window frame. Not only do they enhance appearance, but they also aid in moisture control and long-term window integrity preservation.
Sandpaper, masking tape, a trowel, water, plaster mix, and a mixing bucket are needed before you start. Using drop cloths or newspapers to shield your work area from spills and splatters is also a good idea.
Prepare the area surrounding the window frame first. To guarantee a smooth plaster application, make sure all dust and debris are completely cleaned. Protect the surrounding walls and window frame from unintentional plaster splashes by using masking tape.
Next, combine the plaster as directed by the manufacturer. Plaster mix is usually mixed with water in a bucket until a creamy, smooth consistency is reached. Try not to mix up too much plaster at once, as this will cause it to dry out before you can use it.
Apply the plaster mixture evenly along the window frame’s edges with a trowel, progressively inclining the slope. Using a trowel, smooth out the plaster to create a soft slope that keeps water away from the window and makes the wall blend in seamlessly.
After applying the plaster, let it dry for the amount of time suggested by the manufacturer. Depending on the kind of plaster used and the surrounding circumstances, this could change.
Sand the surface gently to eliminate any imperfections and achieve a smooth finish once the plaster has fully dried. Use a fresh cloth to remove any dust.
The plaster slopes can then be painted or finished to match your interior decor. Select a paint or finish that goes well with your walls and improves the way your windows and room look as a whole.
With a little effort, you can give your plastic windows plaster slopes that look professional, improving the aesthetics and functionality of your house.
- Is it possible to do?
- Requirements
- The angle of dawn
- What types of plaster are suitable?
- What tools and consumables will be needed?
- How to prepare the mixture?
- DIY installation features
- Possible difficulties and errors
- Pros and cons of using outside and inside
- Average prices in the Russian Federation for plastering
Is it possible to do?
Slopes are ornamental elements that encircle the window and cover the top and sides of the inner segment of the opening, which are sections of walls. GOST 30971 advises against using anything other than plaster and plasterboard, although insulated polymer panels are an alternative.
Plaster is one of the materials that can be used to finish PVC window slopes. However, discussions about whether this material is superior to all others have already come to be accepted as standard.
Plastering is typically compared to all other options before being chosen, particularly sandwich panels and plastic linings, which seem like a great option in this instance but aren’t always the best option.
Plastering slopes is a distinct type of work from complex finishing manipulations due to minute but significant details, labor-intensiveness, painstakingness, and the requirement for exceptional precision in calculations.
These elements’ designs are different from those of walls and ceilings because they require more intricate and costly procedures. As a result, they are always listed separately in price lists.
Requirements
Slopes have to adhere to these requirements:
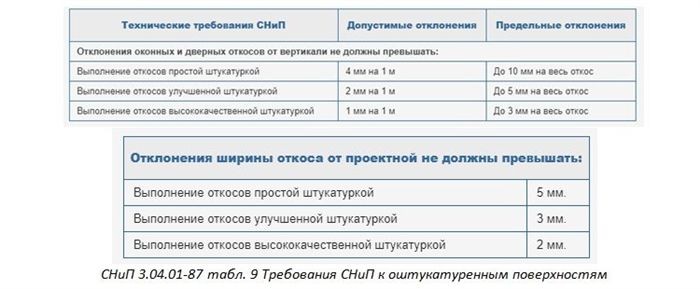
- Before plastering, the alignment of the walls from the outside and inside must be done with particular quality, otherwise the waviness of the finish will be noticeable, even minimal unevenness will appear through it, and this is more typical for the material in question. There should be no deviations in width/verticality that exceed the standards established in SNiP (see. tables below).
- You need to make a bevel from the frame to the surface of the walls – it creates the so-called dawn of the window slopes. The angle of all such geometric shapes inside a building or at least a room must be the same.
- The surface of the base for painting coatings should be as smooth as possible, without roughness, the height/depth of which exceeds 1 mm. Such shortcomings should not be more than two by 4 square meters. m square.
The angle of dawn
Since there are no standards for turning off slopes and dawning corners in SNiPs and GOSTs—only the most permissible deviations—this matter needs to be thoroughly discussed with the master or resolved on your own before work. It is possible to make the corners different, like 90 or 45 degrees.
The window slope can be turned at a straight or a detailed angle, but if the opening is meant to let light in or we need to increase this feature, the latter option is preferable.
A more suitable direct option would be in the case where the window serves as an interior element or is situated between two rooms. In addition to increasing light penetration, a detailed coal will allow the sash to open wider, reducing the chance of them bumping into the wall.
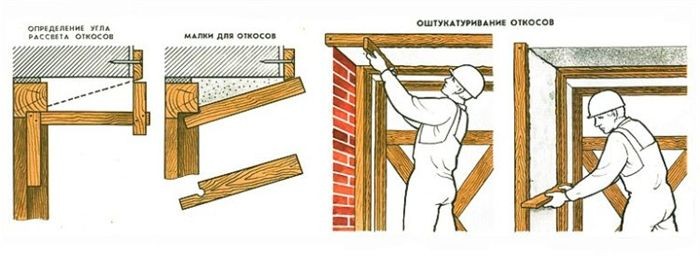
Guidelines for dawn’s angles:
- usually make a turn of 90 ° or more;
- the amount of slope deployment is proportional to the thickness of the wall – the wider it is, the greater the value, the norm is 1:10, for example, with an edge (edge) width of 60 cm, they retreat 6 cm from the perpendicular to the bottom line of the frame;
- For the edge on top, for technical reasons, it is allowed to make the opening angle smaller than on the sides.
What types of plaster are suitable?
For window slopes next to plastic windows, all varieties of plaster are appropriate. Although interior surfaces can also be made from facade mixtures, this is typically reserved for wet rooms. Particularly for the designated locations, these materials have slightly worse technical and aesthetic qualities (they shrink, are heavy, and take a long time to harden).
| Plaster | Options | Peculiarities |
| On plaster | Classic traditional choice for dry heated locations, for internal slopes. Layer up to 10 cm. Any subsequent finishing is acceptable. | The fastest setting time. There is a certain level of plasticity. Very unstable to moisture and corrosion. |
| With cement base | Works inside and outside (facades). Layer 0.5 – 4 cm. Often used for subsequent decorative finishes, cladding. | High or complete resistance to moisture. It is inconvenient to work because the composition is crumbly and heavy. Aesthetics are slightly lower than those of gypsum compositions. |
| With lime | For dry indoor areas. When adding cement, it can be used for exterior work, for facades. Thickness in a wide range – depends on binding ingredients, additives. | The most universal mixture, but there are more features and disadvantages. More susceptible to damage from moisture. High elasticity. Lightweight. |
| Warming | Interior and exterior works. Maximum thickness 5 cm. The composition is used for rough finishing. | Porous. Prevents heat loss. Fireproof, completely non-flammable. |
| Polymer composition | Indoor and outdoor spaces, i.e. for dry and wet environments. The thickness of the layer is limited by the size of the solid fillers, standard – up to 5 mm. Can be used under painting or as a full pigmented finish. | Of all the types under consideration, the most durable, resistant to temperature differences, jumps in humidity level. Best able to withstand mechanical stress. Fully maintainable, easy restoration for any damage. Superior Aesthetics. |
Traditionally, exterior work is done with cement mixtures and interior work with gypsum mixtures. The best, albeit priciest, solutions are made of polymers; they are employed when ornamentation, aesthetics, or exceptionally fine design are needed.
Cement compositions can be used for interior work in a room with high humidity and moisture content, but they are also frequently used in such areas due to their affordability.
The majority of the gypsum mixture’s technical benefits become drawbacks when applied to non-gypsum conditions. With the exception of a few small details, cement compositions are more generally used than this.
Let’s examine why cement mixtures perform better when used for exterior (street) finishing than interior work. In cases of aggression, higher loads, and humidity:

- Completely resistant to moisture, does not absorb it, properties remain stable. The same applies to temperature changes.
- The most durable, has high adhesion to rough surfaces typical of facades. But it does not adhere well to wood, paint, ceramics, and there is a need for an abrasive primer, notches, and reinforcing mesh.
- Indispensable for aggressive conditions with heavy loads such as outdoor environments.
- Almost complete versatility when considering application conditions. But it shrinks, the aesthetic properties are lower, it slowly gains strength (up to 4 weeks.). Due to its large weight, it is difficult to work with: unevenness and sagging occur, lags on horizontal planes, on the upper edge of the slope (a retaining mesh is required).
- A porous, granular surface is created – there is a need for enhanced grinding, grouting, in the finish layer of material smoothing these shortcomings. But the listed disadvantages are not inherent in decorative varieties of cement compositions.
- It has an increased tendency to cracking due to shrinkage, and also, since the ductility is lower than that of compositions for internal locations.
- Easy to make yourself from sand and cement. It dries more slowly, which is more convenient when working – there is more time to apply the mixed solution.
For interior work, cement mixtures are occasionally utilized, particularly in highly humid spaces. For this reason, adding plasticizers and lime to the mixture enhances its qualities, which is crucial for slopes because it increases plasticity and lowers the chance of shrinkage and cracking. Putty and three layers also lessen the likelihood of cracking.
Frost resistance is an important consideration when selecting cement compositions; the more freezing/thawing cycles, the better.
Why gypsum compositions are not appropriate for outdoor (street) surfaces and are best suited for interior work and dry, heated rooms
- when wet, it swells, becomes deformed, falls off, and absorbs moisture;
- there is no versatility – gypsum is definitely not suitable for the facade;
- the strength is low, there is no shrinkage, but the ductility is better (the tendency to cracks is reduced), which is especially important in our case;
- difficult to modify and improve with additives – experience is required to determine the ingredients and proportions; making the mixture yourself is more difficult;
- sets quickly. It is necessary to prepare in small portions; adding water to the dried substance will not solve the problem, since the properties of the composition will not be restored;
- quickly gains strength, even with the thickest layer the period will not exceed 1 week.;
- application is easier, it is easier to create a perfectly flat surface, also due to the low weight, since sagging does not appear, it requires less experience for finishing work;
- The shades are cleaner, for example, if you choose white, then it will not appear under wallpaper, paint – you can make any color with tints, and it will be better;
- smoothness, which is noticeable not only to the touch, but also visually (the impression of a more solid, clean surface is created); it is possible to bring the finishing layer to the level of putty, but only experienced craftsmen can do this;
- it’s easier to make three-dimensional patterns and decorative reliefs;
- low weight, which simplifies work and improves evenness and uniformity of the layer;
- there is no need for reinforcement if the thickness is up to 5 cm;
- vapor permeability, the walls breathe – this is another factor confirming that the disadvantage in the form of condensation is not so typical;
- due to the smaller grain size there is some sound and heat insulation;
- work is completed faster, as the solution sets and dries more intensively.
What tools and consumables will be needed?
The following supplies and equipment are needed:
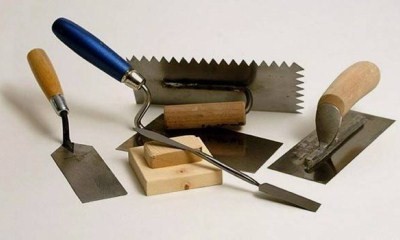
- To apply plaster:
- spatula, trowel, trowel (trowel);
- falcon, corner leveler;
- rule;
- grater, half at the finish smoothing.
- Tools required to prepare and strengthen the surface:
- polyurethane foam will be required if the window cracks were poorly sealed;
- materials for expansion and other seams, joints: sealant (silicone), special sealants, in extreme cases, tow, felt;
- reinforcing mesh for leveling if the surface is slightly curved, and for holding the mixture if necessary;
- beacons;
- corners: T-shaped for fixing beacons; perforated corner-forming, the option with reinforcing mesh will be the best; if cladding is planned, then you will need a corner for tiles, decorative.
- For marking and calculations:
- a regular level (bubble), but a laser level is better – for installing beacons and checking the evenness of surfaces;
- square with a movable bar for marking the slope and angle of dawn;
- pencil, tape measure;
- for the angle of dawn, wooden guides may be needed (shown in the diagrams above in section. "The angle of dawn").
- Goat, stepladder, you can use a table;
- Thick rubber gloves for hands;
- Knife for cutting foam;
- Containers for mixing the solution;
- Mixer (separate, drill/screwdriver attachment) or a tool for manual mixing (stick, iron rod);
- Polyethylene to protect the floor and surfaces;
- Mounting tape.
Resources:

- moisture-resistant antiseptic, antifungal primer – if the wall (base) is porous, weak, then use substances with increased penetrating and strengthening ability;
- putty;
- plaster;
- paint, if the finish will be made with it.
To get ready and combine the solution:
- mixer, electric drill with an attachment or, in extreme cases, the latter, a similar tool (stick, rod);
- measuring container for water;
- a bucket to pour powder into and a steelyard to weigh it in
- a basin, a bucket for mixing.
Lighthouses ought to be constructed from plastic or stainless steel that doesn’t darken.
How to prepare the mixture?
Differences in wall heights and beacon heights are taken into consideration when calculating the dry composition amount. Given that only a small amount of material reaches the slopes, you can estimate the dry composition per square meter using a 10 mm layer.
About 9 kg of the gypsum mixture will be needed, but it must be taken with a reserve (10%), or between 10 and 11 kg. The manufacturer always marks the bag with the amount consumed. The percentage is marginally higher for mixtures with fine grains than for mixtures with coarse grains. 15 to 18 kg of cement mixture will be needed.
For mixes you make yourself, there are a ton of proportion tables available online. Some examples are:
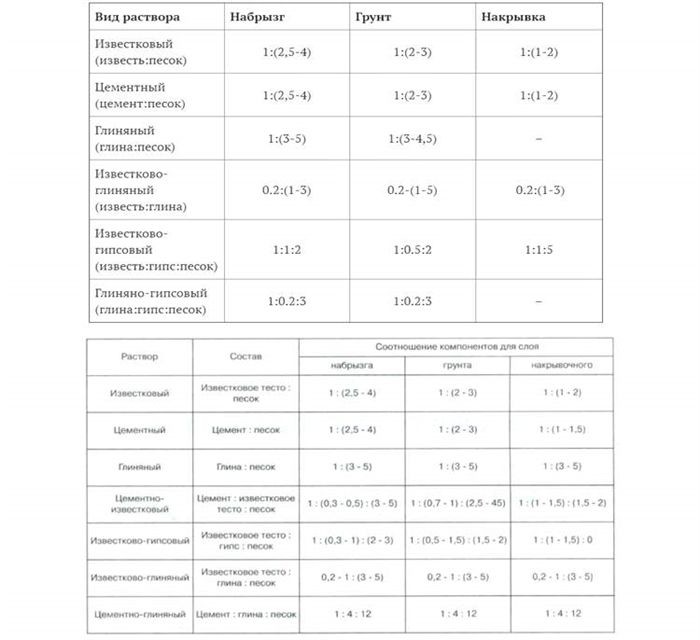
Because plaster sets (hardens after 15 to 20 minutes), mix the plaster with water in small amounts (3 to 4 kg of dry mixture). and you might not have enough time to utilize the full volume. For gypsum, 600–700 ml of water are needed for every kg of composition; for cement, this is much less—150–170 g, or 1 liter for every 5 kg. The mixture should not flow or lag behind the surface; it should neither be too thick nor too thin (skinny).
The density can be adjusted by gradually adding more water rather than adding it all at once. You must stir until homogeneity is achieved and all of the lumps are gone.
DIY installation features
When plastering PVC window slopes, there are some important details to consider in order to budget for and be ready for work:

- It is highly advisable to prime in 2 – 3 layers.
- The price of the master is set for 1 linear meter, since work on slopes is much more complicated, it includes the installation of beacons and sealant (damping gasket), reinforcement, corner formation, leveling, particularly accurate calculations and markings, especially for the angle of dawn.
- Instead of paper mounting tape, you can use low-tack tape, as the former sometimes leaves traces of glue. Before each stage of work, such protection is changed – the tape must be removed immediately after the end of a specific set of actions.
- Heat-insulating or damping gasket is mandatory for gaps (joints) between the opening and the window frame. Use tow, felt. The ideal option if the specified materials are used and there is complete insulation of the slope under the plaster: foam plastic (it will require high-quality waterproofing), polystyrene foam or penoplex (considered the best), mineral wool (usually for external surfaces).
- Highly desirable strengthening of corners:
- internal (husks) – use a reinforcing mesh, which will prevent cracks from forming;
- external (whiskers, goosenecks) – not reinforced, they are easily knocked off, for strengthening use corner profiles – counter-shanks (plastic or metal stainless);
- it is extremely important to install beacons correctly and evenly, the angle of dawn and the absence of an uneven slope of the final finish depend on this.
You will learn how to plaster slopes on windows using your hands in this video:
Possible difficulties and errors
Typical errors and miscalculations (which can also be used to gauge how difficult the task is):
- It has not been checked (with a level, a square) whether the window frame is installed symmetrically or whether it is securely fastened. It is extremely important to correct defects before finishing.
- Sealing cracks with foam as additional insulation. This substance disintegrates, crumbles, crumbles. It is better to use natural fibrous materials treated with an antiseptic before use. The above insulation will simultaneously serve as an additional damper, reducing the risk of cracking.
- Expansion joints with special expansion strips and sealants, for example, from SDM compounds with low vapor permeability, are not installed near the gaps near the frame. An error will result in noticeable cracks appearing in these places.
- A common -out shortage is not thorough, careless measurements at all stages, and especially when determining the angle of dawn, the installation of the beacons. We emphasize this separately, since accuracy is especially important for slopes.
- Not installing profiles for corners – in these places the plaster is vulnerable and over time there is a high risk of it breaking, falling behind, or chipping.
- Incorrect plastering order. First you need to make the internal, then the external slopes.
- Uneven dawn angle on the sides: the asymmetry will be noticeable. From above, you can make this expansion smaller.
- When using cement and heavy compositions, they forget to reinforce the top, which leads to the mixture peeling off under its considerable weight.
Additional visual details regarding slope expansion joints (sealed with acrylic sealant in the final image):
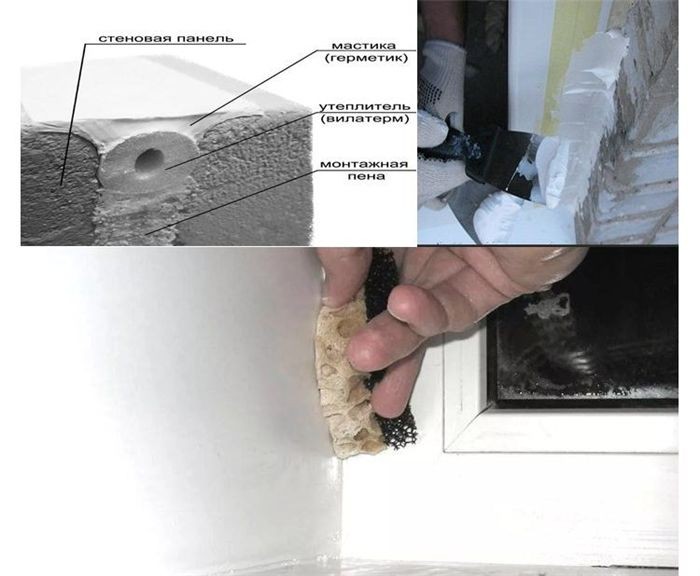
Plastic window slopes It is best to fully insulate before plastering because this will cause the dew point to move farther into the wall and prevent condensation from forming on nearby glass and walls. Additionally, this will lessen the impact of temperature variations, which cause uneven material expansion or compression and, as a result, the development of plaster cracks.
Pros and cons of using outside and inside
Let’s talk about the benefits and drawbacks of plaster so that the user knows what to look for when applying it to slopes close to plastic structures.
| Advantages | Flaws |
| Best material for aesthetics, unlimited shades and design options. Appearance can be modified by application method. | The mixture itself is cheaper, but the services of craftsmen are more expensive (6 – 8 times than installing windows), as a result the price is higher than other materials. |
| Can be restored, which is impossible to do with plastic and difficult with GVL. | Application is difficult and time-consuming. Not even all finishers know how to plaster slopes. There are masters who specialize purely in this type of work. It is easier to fix a finished gypsum fiber board sheet or panel onto a minimally prepared wall than to carefully prepare and level the surface for plaster. |
| Contrary to widespread opinion, does not fade, does not turn yellow. But may fade and accumulate dirt if the finish is not painted. | Duration of work. The mixture is applied in layers. Each next layer – after the previous one has dried. In addition, careful putty will be required – the work will take about 5 days. |
| No seams, no edging, no need to bother with sheet joints. The putty levels the surface into a perfectly flat plane | The insulation will need to be installed separately, and if you use a sandwich panel or gypsum fiber board, this may not be necessary, since it is often already inside this product. |
| If you do it yourself, the costs will be lower, since the materials themselves are cheaper. | Often, ordinary plaster is used, so additional manipulation may be necessary – painting it. |
| Environmental friendliness. Plaster looks more natural, creates a feeling of solidity, harmony, and integrity of the interior. The walls “breathe”, the finishing itself is good thermal insulation. | Characteristic (but solvable) disadvantages that are always mentioned: cracks, condensation. |
We frequently discuss two major drawbacks of plaster: condensation and cracks at the joints close to the frame. Actually, as genuine reviews show, these issues only arise with subpar work. Damper gaskets and expansion joints completely eliminate these drawbacks.
Dispelling rumors and validating beliefs regarding plaster:

- There will be cracks along the frame and window sill. Yes, they can appear, but only with poor quality work. Condensation (windows “cry” and freeze) and the mold it provokes can occur, since this type of slopes is “cold”, that is, it does not contain thermal insulation. These phenomena are also observed if the window is installed poorly – the slopes do not fit flush against the frame, which causes peeling. But, as already noted, these disadvantages can be eliminated completely.
- There is no yellowing or fading in reality, since gypsum or cement with sand by themselves are not prone to this phenomenon by nature. And if you paint (besides, this layer can be updated), and this is usually done, then these shortcomings will be reduced to zero. Unpainted plaster is more likely to fade a little over time.
- Unpainted plaster is more prone to dirt accumulation and is more difficult to clean, but if it is painted, this disadvantage is leveled out.
- It is difficult to glue wallpaper, since there are no corners like, for example, plastic panels – the material in these places will peel off. Completely untrue: there is a special adjacent profile for plastered slopes, which also serves as a beacon.
- A window sash suddenly opened wide by a strong wind will damage the finish, but it will also do the same to plastic or gypsum board, which are also more fragile. The problem is solved with simple special devices that slow down the plowing.
Poor quality work is the main cause of plaster’s drawbacks. However, there are always drawbacks: labor intensity, length, intricacy, and high cost of hiring skilled artisans.
This kind of finish has not been surpassed by new materials and technologies, such as plasterboard, metal-plastic panels, etc., in terms of quality, adaptability, design, and dependability. Professionals hold plaster in high regard, with many stating that it’s the best use for a slope.
This is a succinct thesis statement for your paper: With our simple, step-by-step instructions, you can learn how to make plaster slopes for plastic windows yourself after installation. This tutorial, which is ideal for homeowners who want to improve their window frames, offers helpful advice and straightforward instructions that guarantee you can accomplish professional-looking results without the need for specialized knowledge. Does this fulfill your search criteria?
Average prices in the Russian Federation for plastering
Plaster costs between 250 and 600 rubles per linear meter on the "Profi" specialized search service. It is important to be clear because it is common for businesses to misinterpret what is included in the scope of work.
Making plaster slopes for plastic windows after they are installed is a useful way to improve your home’s appearance and usability. You don’t need a lot of experience or special tools to achieve a professional finish if you follow these simple instructions.
Make sure the area surrounding the window frames is clean and clear of debris before beginning. This stage is essential because it guarantees improved plaster adherence to the frames and walls.
Next, coat the prepared surface with a primer or bonding agent. This strengthens the bond between the plaster and the wall that already exists, encouraging longevity and averting further cracks.
Now, combine the plaster as directed by the manufacturer. Achieving a smooth, workable consistency that is also firm enough to maintain its shape after application is crucial.
To create the slopes around the window frames, carefully apply the plaster using a trowel or putty knife. Begin at the bottom and work your way up to guarantee a tidy finish and even coverage.
After applying, make sure the slopes are consistent and reach the correct angle by using a level or straight edge. This step is essential for both proper drainage of water away from the window frames and aesthetic appeal.
As advised by the manufacturer, let the plaster dry completely. Several hours are usually needed for this, depending on the weather and the thickness of the plaster application.
To eliminate any flaws and produce a smooth transition between the plaster slopes and the surrounding walls, lightly sand the plastered area once it has dried.
Lastly, paint or apply a decorative finish that complements the rest of the room’s design. This gives the plaster surfaces more protection in addition to improving their aesthetic appeal.
These instructions will help you create plaster slopes for plastic windows that look great, add to the overall comfort and efficiency of your house, and are easy to maintain.


